1.2: VSEPR Theory and its Utility
- Page ID
- 172718

\( \newcommand{\vecs}[1]{\overset { \scriptstyle \rightharpoonup} {\mathbf{#1}} } \)
\( \newcommand{\vecd}[1]{\overset{-\!-\!\rightharpoonup}{\vphantom{a}\smash {#1}}} \)
\( \newcommand{\dsum}{\displaystyle\sum\limits} \)
\( \newcommand{\dint}{\displaystyle\int\limits} \)
\( \newcommand{\dlim}{\displaystyle\lim\limits} \)
\( \newcommand{\id}{\mathrm{id}}\) \( \newcommand{\Span}{\mathrm{span}}\)
( \newcommand{\kernel}{\mathrm{null}\,}\) \( \newcommand{\range}{\mathrm{range}\,}\)
\( \newcommand{\RealPart}{\mathrm{Re}}\) \( \newcommand{\ImaginaryPart}{\mathrm{Im}}\)
\( \newcommand{\Argument}{\mathrm{Arg}}\) \( \newcommand{\norm}[1]{\| #1 \|}\)
\( \newcommand{\inner}[2]{\langle #1, #2 \rangle}\)
\( \newcommand{\Span}{\mathrm{span}}\)
\( \newcommand{\id}{\mathrm{id}}\)
\( \newcommand{\Span}{\mathrm{span}}\)
\( \newcommand{\kernel}{\mathrm{null}\,}\)
\( \newcommand{\range}{\mathrm{range}\,}\)
\( \newcommand{\RealPart}{\mathrm{Re}}\)
\( \newcommand{\ImaginaryPart}{\mathrm{Im}}\)
\( \newcommand{\Argument}{\mathrm{Arg}}\)
\( \newcommand{\norm}[1]{\| #1 \|}\)
\( \newcommand{\inner}[2]{\langle #1, #2 \rangle}\)
\( \newcommand{\Span}{\mathrm{span}}\) \( \newcommand{\AA}{\unicode[.8,0]{x212B}}\)
\( \newcommand{\vectorA}[1]{\vec{#1}} % arrow\)
\( \newcommand{\vectorAt}[1]{\vec{\text{#1}}} % arrow\)
\( \newcommand{\vectorB}[1]{\overset { \scriptstyle \rightharpoonup} {\mathbf{#1}} } \)
\( \newcommand{\vectorC}[1]{\textbf{#1}} \)
\( \newcommand{\vectorD}[1]{\overrightarrow{#1}} \)
\( \newcommand{\vectorDt}[1]{\overrightarrow{\text{#1}}} \)
\( \newcommand{\vectE}[1]{\overset{-\!-\!\rightharpoonup}{\vphantom{a}\smash{\mathbf {#1}}}} \)
\( \newcommand{\vecs}[1]{\overset { \scriptstyle \rightharpoonup} {\mathbf{#1}} } \)
\( \newcommand{\vecd}[1]{\overset{-\!-\!\rightharpoonup}{\vphantom{a}\smash {#1}}} \)
\(\newcommand{\avec}{\mathbf a}\) \(\newcommand{\bvec}{\mathbf b}\) \(\newcommand{\cvec}{\mathbf c}\) \(\newcommand{\dvec}{\mathbf d}\) \(\newcommand{\dtil}{\widetilde{\mathbf d}}\) \(\newcommand{\evec}{\mathbf e}\) \(\newcommand{\fvec}{\mathbf f}\) \(\newcommand{\nvec}{\mathbf n}\) \(\newcommand{\pvec}{\mathbf p}\) \(\newcommand{\qvec}{\mathbf q}\) \(\newcommand{\svec}{\mathbf s}\) \(\newcommand{\tvec}{\mathbf t}\) \(\newcommand{\uvec}{\mathbf u}\) \(\newcommand{\vvec}{\mathbf v}\) \(\newcommand{\wvec}{\mathbf w}\) \(\newcommand{\xvec}{\mathbf x}\) \(\newcommand{\yvec}{\mathbf y}\) \(\newcommand{\zvec}{\mathbf z}\) \(\newcommand{\rvec}{\mathbf r}\) \(\newcommand{\mvec}{\mathbf m}\) \(\newcommand{\zerovec}{\mathbf 0}\) \(\newcommand{\onevec}{\mathbf 1}\) \(\newcommand{\real}{\mathbb R}\) \(\newcommand{\twovec}[2]{\left[\begin{array}{r}#1 \\ #2 \end{array}\right]}\) \(\newcommand{\ctwovec}[2]{\left[\begin{array}{c}#1 \\ #2 \end{array}\right]}\) \(\newcommand{\threevec}[3]{\left[\begin{array}{r}#1 \\ #2 \\ #3 \end{array}\right]}\) \(\newcommand{\cthreevec}[3]{\left[\begin{array}{c}#1 \\ #2 \\ #3 \end{array}\right]}\) \(\newcommand{\fourvec}[4]{\left[\begin{array}{r}#1 \\ #2 \\ #3 \\ #4 \end{array}\right]}\) \(\newcommand{\cfourvec}[4]{\left[\begin{array}{c}#1 \\ #2 \\ #3 \\ #4 \end{array}\right]}\) \(\newcommand{\fivevec}[5]{\left[\begin{array}{r}#1 \\ #2 \\ #3 \\ #4 \\ #5 \\ \end{array}\right]}\) \(\newcommand{\cfivevec}[5]{\left[\begin{array}{c}#1 \\ #2 \\ #3 \\ #4 \\ #5 \\ \end{array}\right]}\) \(\newcommand{\mattwo}[4]{\left[\begin{array}{rr}#1 \amp #2 \\ #3 \amp #4 \\ \end{array}\right]}\) \(\newcommand{\laspan}[1]{\text{Span}\{#1\}}\) \(\newcommand{\bcal}{\cal B}\) \(\newcommand{\ccal}{\cal C}\) \(\newcommand{\scal}{\cal S}\) \(\newcommand{\wcal}{\cal W}\) \(\newcommand{\ecal}{\cal E}\) \(\newcommand{\coords}[2]{\left\{#1\right\}_{#2}}\) \(\newcommand{\gray}[1]{\color{gray}{#1}}\) \(\newcommand{\lgray}[1]{\color{lightgray}{#1}}\) \(\newcommand{\rank}{\operatorname{rank}}\) \(\newcommand{\row}{\text{Row}}\) \(\newcommand{\col}{\text{Col}}\) \(\renewcommand{\row}{\text{Row}}\) \(\newcommand{\nul}{\text{Nul}}\) \(\newcommand{\var}{\text{Var}}\) \(\newcommand{\corr}{\text{corr}}\) \(\newcommand{\len}[1]{\left|#1\right|}\) \(\newcommand{\bbar}{\overline{\bvec}}\) \(\newcommand{\bhat}{\widehat{\bvec}}\) \(\newcommand{\bperp}{\bvec^\perp}\) \(\newcommand{\xhat}{\widehat{\xvec}}\) \(\newcommand{\vhat}{\widehat{\vvec}}\) \(\newcommand{\uhat}{\widehat{\uvec}}\) \(\newcommand{\what}{\widehat{\wvec}}\) \(\newcommand{\Sighat}{\widehat{\Sigma}}\) \(\newcommand{\lt}{<}\) \(\newcommand{\gt}{>}\) \(\newcommand{\amp}{&}\) \(\definecolor{fillinmathshade}{gray}{0.9}\)Learning Objectives
In this lecture you will learn the following
- Definition of VSEPR.
- Hybridization concept.
- Prediction of shapes and geometries of molecules.
- Bent’s rule and its application in understanding the structural parameters.
The Valence Shell Electron Pair Repulsion Theory (VSEPR)
VSEPR theory is an improved and extension of Lewis model but predicts the shapes of polyatomic molecules. This model was first suggested by Nevil Sidgwick and Herbet Powell in 1940 and later improved by Ronald Gillespie and Ronald Nyholm.
Prediction of molecular shapes and geometries was made easy by this model through the following simple steps.
- Draw the Lewis structure.
- Count the total number of bonds and lone pairs around the central atom. (Each single bond would involve one pair of electrons).
- Arrange the bonding pairs and lone pairs in one of the standard geometries to minimize the electron-electron repulsion.
- Lone pair electrons stay closer to the nucleus and also they spread out over a larger space than bond pairs and hence large angles between lone pairs.
- The repulsion follows the order LP—LP > LP—BP > BP—BP.
- Multiple bonds should be considered as a single bonding region.
Steric numbers:
Another term called steric number is often used in VSEPR theory.
Steric number (SN) = No. of attached atom + No. of lone pairs. Since the lone pair—lone pair repulsions are maximum, the most stable geometry can be obtained by maximizing the distance between steric numbers on the central atom.
Molecular shapes are eventually determined by two parameters: Bond distance, separation between the nuclei of two bonded atoms in a straight line and the bond angle, the angle between any two bonds containing a common atom.
While mentioning the molecular shapes lone pairs may be ignored, however, while defining the geometry both the lone pairs and bond pairs should be considered.
For example: in water molecule the central oxygen atom is in tetrahedral environment with two lone pairs and two O—H bonds (or two bond pairs). The shape of the water molecule is therefore bent (two lone pairs are ignored).
Similarly, in ammonia, the nitrogen atom is in tetrahedral environment with three bonded pairs (three N—H bonds) and one lone pair. The shape of NH3 molecule is pyramidal.
Predicting the molecular geometries
To begin with, draw the Lewis structure.
Count the number of bonding pairs and lone pairs around the central atom.
Arrange the bonding pairs and the lone pairs in one of the standard geometries thereby minimizing electron—electron repulsion.
Multiple bonds count as a single bonding region.
What is Bent’s rule:
More electronegative substituents ‘prefer’ hybrid orbitals having less s-character, and more electropositive substituents ‘prefer’ orbitals having more s-character.
The bond angles in CH4, CF4 and CH2F2 can be explained using Bent’s rule. While a carbon in CH4 and CF4 uses four identical sp³ hybrids for bonding, in CH2F2 the hybrids used are not identical.
The C-F bonds are formed from sp3 + x hybrids, with slightly more p-character and less s-character than an sp³ hybrid, and the hydrogen are bonded by sp3 - x hybrids, with slightly less p-character and slightly more s-character. Increasing the amount of p-character in the C-F bonds decreases the F-C-F bond angle, because for bonding by pure p-orbitals the bond angle would be decreased to 90°.
Molecular shapes determined by VSEPR theory
|
Molecule |
Steric Number |
Geometry |
Example |
|
MA2 |
2 |
Linear |
BeCl2 |
|
MA3 |
3 |
Trigonal planar |
BF3 |
|
MA4 |
4 |
Tetrahedral |
SiF4 |
|
MA5 |
5 |
Trigonal bipyramidal |
PF5 |
|
MA6 |
6 |
Octahedral |
SF6 |
|
MA7 |
7 |
Pentagonal bipyramidal |
IF7 |
|
Molecule |
SN |
Number of lone pairs |
Geometry |
shape |
Example |
|
MA2 |
2 | 0 |
Linear |
CO2 |
|
|
MA3 |
3 3 |
0 1 |
Trigonal planar |
Trigonal planar |
SO3 |
|
MA4 |
4 | 0 1 2 |
Tetrahedral |
Tetrahedral |
CH4 |
|
MA5 |
5 | 0 1 2 3 |
Trigonal bipyramidal |
Trigonal bipyramidal |
AsF5 |
|
MA6 |
6 | 0 1 2 |
Octahedral |
Octahedral |
SF6 |
Problems:
1. Draw the structure and depict the geometry around Se atoms in [Se3O6F3]3-, which is a symmetric ionic molecule with cyclic structure, using VSEPR model.
Solution
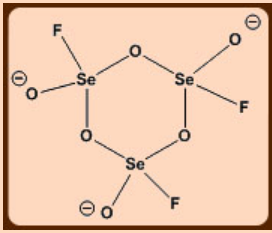
Apply VSEPR theory to the structure.
Se has six valence electrons. One Se—F and three Se—O (one terminal and two bridging) will add four more electrons to the valence shell of Se, so, 10 e = 5 electron pairs out of which four are bonded pairs and one is a lone pair. A TBP environment is expected.
2. Predict and draw the structure of I3+ using VSEPR model.
Solution
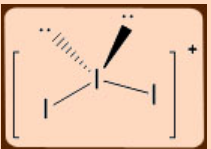
Total number of electron at the central I atom is: 7 + 2 -1 (charge) = 8; 2BP + 2LP, should be tetrahedral and angular shape.
3. Which of H2O and F2O will have the larger X-O-X bond angle?
Solution:
F is more electronegative than H; therefore the space occupied by the O-H bonding pair in the O valence shell will be greater. Hence, H2O will have the larger X-O-X bond angle.
4. Explain why the X-P-X bond angles for the series of POX3 molecules decrease from X = Br (104.1°) to X = Cl (103.3°) to X = F (101.3°)
Solution:
Fluorine is the most electronegative halogen, so it will draw electron density in the P-F bond away from P atom; repulsion of the P-F bonding pairs will be less than the repulsion of P-Cl and P-Br bonding pairs, so the F-P-F bond angle will be the smallest.
5. Show that the following molecules and their corresponding shapes are correct, using VSEPR theory.
| BCl3, | trigonal planar |
| [IF5]2-, | pentagonal planar |
| [NH4]+, | tetrahedral |
| SF6; | octahedral |
| XeF4; | square planar |
| AsF5; | trigonal bipyramidal |
| Xe(O)F4, | square pyramid |
| IF7, | pentagonal bipyramidal |
| [H3O]+ | tetrahedral |
| H2Se | tetrahedral |
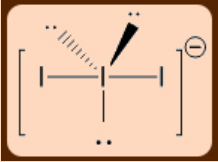
6. Work out the geometry of I3- ion using VSEPR model.
Solution