
4.10: The Nucleus
- Page ID
- 49321

\( \newcommand{\vecs}[1]{\overset { \scriptstyle \rightharpoonup} {\mathbf{#1}} } \)
\( \newcommand{\vecd}[1]{\overset{-\!-\!\rightharpoonup}{\vphantom{a}\smash {#1}}} \)
\( \newcommand{\id}{\mathrm{id}}\) \( \newcommand{\Span}{\mathrm{span}}\)
( \newcommand{\kernel}{\mathrm{null}\,}\) \( \newcommand{\range}{\mathrm{range}\,}\)
\( \newcommand{\RealPart}{\mathrm{Re}}\) \( \newcommand{\ImaginaryPart}{\mathrm{Im}}\)
\( \newcommand{\Argument}{\mathrm{Arg}}\) \( \newcommand{\norm}[1]{\| #1 \|}\)
\( \newcommand{\inner}[2]{\langle #1, #2 \rangle}\)
\( \newcommand{\Span}{\mathrm{span}}\)
\( \newcommand{\id}{\mathrm{id}}\)
\( \newcommand{\Span}{\mathrm{span}}\)
\( \newcommand{\kernel}{\mathrm{null}\,}\)
\( \newcommand{\range}{\mathrm{range}\,}\)
\( \newcommand{\RealPart}{\mathrm{Re}}\)
\( \newcommand{\ImaginaryPart}{\mathrm{Im}}\)
\( \newcommand{\Argument}{\mathrm{Arg}}\)
\( \newcommand{\norm}[1]{\| #1 \|}\)
\( \newcommand{\inner}[2]{\langle #1, #2 \rangle}\)
\( \newcommand{\Span}{\mathrm{span}}\) \( \newcommand{\AA}{\unicode[.8,0]{x212B}}\)
\( \newcommand{\vectorA}[1]{\vec{#1}} % arrow\)
\( \newcommand{\vectorAt}[1]{\vec{\text{#1}}} % arrow\)
\( \newcommand{\vectorB}[1]{\overset { \scriptstyle \rightharpoonup} {\mathbf{#1}} } \)
\( \newcommand{\vectorC}[1]{\textbf{#1}} \)
\( \newcommand{\vectorD}[1]{\overrightarrow{#1}} \)
\( \newcommand{\vectorDt}[1]{\overrightarrow{\text{#1}}} \)
\( \newcommand{\vectE}[1]{\overset{-\!-\!\rightharpoonup}{\vphantom{a}\smash{\mathbf {#1}}}} \)
\( \newcommand{\vecs}[1]{\overset { \scriptstyle \rightharpoonup} {\mathbf{#1}} } \)
\( \newcommand{\vecd}[1]{\overset{-\!-\!\rightharpoonup}{\vphantom{a}\smash {#1}}} \)
\(\newcommand{\avec}{\mathbf a}\) \(\newcommand{\bvec}{\mathbf b}\) \(\newcommand{\cvec}{\mathbf c}\) \(\newcommand{\dvec}{\mathbf d}\) \(\newcommand{\dtil}{\widetilde{\mathbf d}}\) \(\newcommand{\evec}{\mathbf e}\) \(\newcommand{\fvec}{\mathbf f}\) \(\newcommand{\nvec}{\mathbf n}\) \(\newcommand{\pvec}{\mathbf p}\) \(\newcommand{\qvec}{\mathbf q}\) \(\newcommand{\svec}{\mathbf s}\) \(\newcommand{\tvec}{\mathbf t}\) \(\newcommand{\uvec}{\mathbf u}\) \(\newcommand{\vvec}{\mathbf v}\) \(\newcommand{\wvec}{\mathbf w}\) \(\newcommand{\xvec}{\mathbf x}\) \(\newcommand{\yvec}{\mathbf y}\) \(\newcommand{\zvec}{\mathbf z}\) \(\newcommand{\rvec}{\mathbf r}\) \(\newcommand{\mvec}{\mathbf m}\) \(\newcommand{\zerovec}{\mathbf 0}\) \(\newcommand{\onevec}{\mathbf 1}\) \(\newcommand{\real}{\mathbb R}\) \(\newcommand{\twovec}[2]{\left[\begin{array}{r}#1 \\ #2 \end{array}\right]}\) \(\newcommand{\ctwovec}[2]{\left[\begin{array}{c}#1 \\ #2 \end{array}\right]}\) \(\newcommand{\threevec}[3]{\left[\begin{array}{r}#1 \\ #2 \\ #3 \end{array}\right]}\) \(\newcommand{\cthreevec}[3]{\left[\begin{array}{c}#1 \\ #2 \\ #3 \end{array}\right]}\) \(\newcommand{\fourvec}[4]{\left[\begin{array}{r}#1 \\ #2 \\ #3 \\ #4 \end{array}\right]}\) \(\newcommand{\cfourvec}[4]{\left[\begin{array}{c}#1 \\ #2 \\ #3 \\ #4 \end{array}\right]}\) \(\newcommand{\fivevec}[5]{\left[\begin{array}{r}#1 \\ #2 \\ #3 \\ #4 \\ #5 \\ \end{array}\right]}\) \(\newcommand{\cfivevec}[5]{\left[\begin{array}{c}#1 \\ #2 \\ #3 \\ #4 \\ #5 \\ \end{array}\right]}\) \(\newcommand{\mattwo}[4]{\left[\begin{array}{rr}#1 \amp #2 \\ #3 \amp #4 \\ \end{array}\right]}\) \(\newcommand{\laspan}[1]{\text{Span}\{#1\}}\) \(\newcommand{\bcal}{\cal B}\) \(\newcommand{\ccal}{\cal C}\) \(\newcommand{\scal}{\cal S}\) \(\newcommand{\wcal}{\cal W}\) \(\newcommand{\ecal}{\cal E}\) \(\newcommand{\coords}[2]{\left\{#1\right\}_{#2}}\) \(\newcommand{\gray}[1]{\color{gray}{#1}}\) \(\newcommand{\lgray}[1]{\color{lightgray}{#1}}\) \(\newcommand{\rank}{\operatorname{rank}}\) \(\newcommand{\row}{\text{Row}}\) \(\newcommand{\col}{\text{Col}}\) \(\renewcommand{\row}{\text{Row}}\) \(\newcommand{\nul}{\text{Nul}}\) \(\newcommand{\var}{\text{Var}}\) \(\newcommand{\corr}{\text{corr}}\) \(\newcommand{\len}[1]{\left|#1\right|}\) \(\newcommand{\bbar}{\overline{\bvec}}\) \(\newcommand{\bhat}{\widehat{\bvec}}\) \(\newcommand{\bperp}{\bvec^\perp}\) \(\newcommand{\xhat}{\widehat{\xvec}}\) \(\newcommand{\vhat}{\widehat{\vvec}}\) \(\newcommand{\uhat}{\widehat{\uvec}}\) \(\newcommand{\what}{\widehat{\wvec}}\) \(\newcommand{\Sighat}{\widehat{\Sigma}}\) \(\newcommand{\lt}{<}\) \(\newcommand{\gt}{>}\) \(\newcommand{\amp}{&}\) \(\definecolor{fillinmathshade}{gray}{0.9}\)The results of Thomson’s and other experiments implied that electrons were constituents of all matter and hence of all atoms. Since macroscopic samples of the elements are found to be electrically neutral, this meant that each atom probably contained a positively charged portion to balance the negative charge of its electrons. In an attempt to learn more about how positive and negative charges were distributed in atoms, Ernest Rutherford (1871 to 1937) and his coworkers performed numerous experiments in which α particles emitted from a radioactive element such as polonium were allowed to strike thin sheets of metals such as gold or platinum.
It was already known that the α particles carried a positive charge and traveled rapidly through gases in straight lines. Rutherford reasoned that in a solid, where the atoms were packed tightly together, there would be numerous collisions of α particles with electrons or with the unknown positive portions of the atoms. Since the mass of an individual electron was quite small, a great many collisions would be necessary to deflect an α particle from its original path, and Rutherford’s preliminary calculations indicated that most would go right through the metal targets or be deflected very little by the electrons. In 1909, confirmation of this expected result was entrusted to Hans Geiger and a young student, Ernest Marsden, who was working on his first research project.
Video \(\PageIndex{1}\) Rutherford Gold Foil Experiment
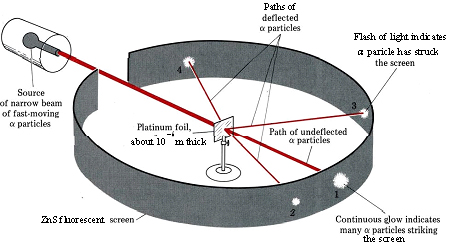
The results of Geiger and Marsden’s work (using apparatus whose design is shown schematically in Figure \(\PageIndex{1}\) were quite striking. Most of the α particles went straight through the sample or were deflected very little. These were observed by means of continuous luminescence of the ZnS screen at position 1 in the diagram. Observations made at greater angles from the initial path of the a particles (positions 2 and 3) revealed fewer and fewer flashes of light, but even at an angle nearly 180° from the initial path (position 4) a few α particles were detected coming backward from the target. This result amazed Rutherford. In his own words, “It was quite the most incredible event that has ever happened to me in my life. It was almost as incredible as if you fired a 15-inch shell at a piece of tissue paper and it came back and hit you. On consideration, I realized that this scattering backwards must be the result of a single collision, and when I made calculations I saw that it was impossible to get anything of that order of magnitude unless you took a system in which the greater part of the mass of an atom was concentrated in a minute nucleus.”1 Rutherford’s interpretation of Geiger and Marsden’s experiment is shown schematically in Fig \(\PageIndex{2}\).
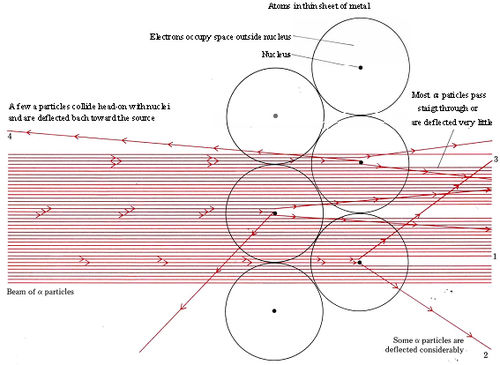
Figure \(\PageIndex{2}\) : Rutherford’s microscopic interpretation of the results of Geiger and Marsden’s experiment.
Quantitative calculations using these experimental results showed that the diameter of the nucleus was about one ten-thousandth that of the atom. The positive charge on the nucleus was found to be + Ze, where Z is the number which indicates the position of an element in the periodic table. (For example, H is the first element and has Z = 1. Helium is the second element and Z = 2. The twentieth element in the valence table constructed earlier is Ca, and the nucleus of each Ca atom therefore has a charge of + 20e = 20 × 1.60 × 10–19 C = 32.0 × 10⁻¹⁹ C.) In order for an atom to remain electrically neutral, it must have a total of Z electrons outside the nucleus. These provide a charge of –Ze to balance the positive nuclear charge. The number Z, which indicates the positive charge on the nucleus and the number of electrons in an atom, is called the atomic number.
The significance of the atomic number was firmly established in 1914 when H. G. Moseley (1888 to 1915) published the results of experiments in which he bombarded a large number of different metallic elements with electrons in a cathode-ray tube. Wilhelm Roentgen (1845 to 1923) had discovered earlier that in such an experiment, rays were given off which could penetrate black paper or other materials opaque to visible light. He called this unusual radiation x-rays, the x indicating unknown. Moseley found that the frequency of the x-rays was unique for each different metal. It depended on the atomic number (but not on the atomic weight) of the metal. (If you are not familiar with electromagnetic radiation or the term frequency, read The Nature of Electromagnetic Radiation where they are discussed more fully.) Using his x-ray frequencies, Moseley was able to establish the correct ordering in the periodic table for elements such as Co and Ni whose atomic weights disagreed with the positions to which Mendeleev had assigned them. His work confirmed the validity of Mendeleev’s assumption that chemical properties were more important than atomic weights.
1 Ernest Rutherford, the Development of the Theory of Atomic Structure, in J. Needham and W. Pagel (eds.) “Background to Modern Science,” The Macmillan Company, New York, 1938.