2.1: Day 1 Procedure - Preparation of Ferrocene
- Page ID
- 211977
In the directions that follow the student should adhere closely to the amounts of materials used in each step. The yields given for each preparation, although not necessarily optimal, correspond to a competent execution of each preparation. Yields substantially lower indicate poor technique, and may necessitate repetition of the step.
It is important to carefully study the experiment before beginning it in order to maximize efficient use of laboratory time. Because of the instability of the cyclopentadiene monomer, it must be used immediately after distillation in the preparation of ferrocene. The total preparation of ferrocene requires about four hours.
References - These provide background information on the techniques and are provided to improve your understanding of the techniques and provide practical hints that may help you avoid mistakes that may prove costly in terms of laboratory time.
- Boiling Point & Distillation; MHS, Chapter 12 pp. 173-205
- Heating & Cooling Methods; MHS, Chapter 6 pp. 73-86
- Reactions Under Inert Atmosphere; MHS, Chapter 7 93-103
- Setting Up Organic Reactions; MHS, Chapter 7 pp. 87-106
- Sublimation; MHS, Chapter 16 pp. 236-239
- Syringes, needles and septa; JWZ Chapter 8 pp. 64-65
- Thin layer and Column Chromatography; MHS, Chapter 18 pp. 255-267
Required Videos: Digital Laboratory techniques Manual
#3. TLC basics
#7. Filtration
#8. Sublimation
#10. Column Chromatography
#11. Balances
#12. Melting Points
Day 1 - Preparation of Ferrocene
***Additional pre-lab assignment. In your lab notebook:
- Determine the limiting reagent for the synthesis of ferrocene. SHOW ALL WORK.
- Calculate the theoretical yield of ferrocene. AGAIN SHOW YOUR WORK. Note: You will need to recalculate the theoretical yield once you have made the ferrocene to account for the quantity of reactant actually used.
"Cracking" of Cyclopentadiene Dimer2

Cyclopentadiene monomer is not stable3 and undergoes spontaneous Diels-Alder addition to produce the dimer and higher polymers. Commercial dicyclopentadiene must be thermally degraded to the monomer, which is used in the preparation of ferrocene.
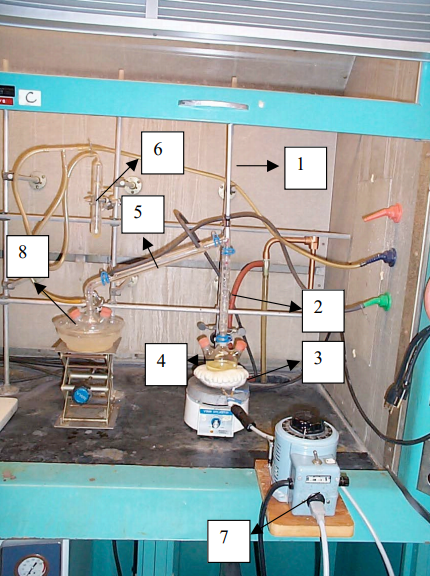
The apparatus shown in figure 1 is preassembled in the hood. 75mL of commercial dicyclopentadiene* have been added to the 250 mL distilling flask. The TA will crack the dimer as follows: first connect the heating mantle to a Variac, and turn on the water flow to the condenser. Check that all joints are well sealed and that the apparatus is stable and tight. Insert a syringe needle into the septum of the receiving flask, flush the system for 1 min with nitrogen. After 1 min remove the vent syringe needle.
Then begin the cracking process by heating the distillation flask until it is hot to the touch (Variac setting 80-90), and then reduce the heating (Variac setting ~ 50) to avoid "flooding" the Vigreux column. During this time the liquid in the flask will begin to froth and the plates in the Vigreux column will become wet with condensate, indicating that the cracking process is taking place. The temperature at the top of the column should rise to 39 °C and condensation of the vapor should begin in the condenser. Collect the cyclopentadiene monomer boiling at 39-41 °C. Maintain a rate of distillation that does not exceed 2-3 drops/sec of monomer passing from the water condenser to the receiver flask. During this time the rate of cracking may decrease. In this event a periodic increase in the Variac setting may be required. The TA will use a syringe to give each student 0.3 mL of cyclopentadiene monomer. The monomer must be used immediately or the cracking and distillation procedure will have to be repeated. Make sure the iron chloride and the potassium hydroxide solutions are ready BEFORE obtaining the monomer.

Fig. 1. Cracking of dicyclopentadiene
- Thermometer
- Vigreux column
- Heating mantle
- 3 Necks round bottom flask
- Condenser
- Nitrogen bubbler
- Variac
- Ice-water
Preparation of Ferrocene4
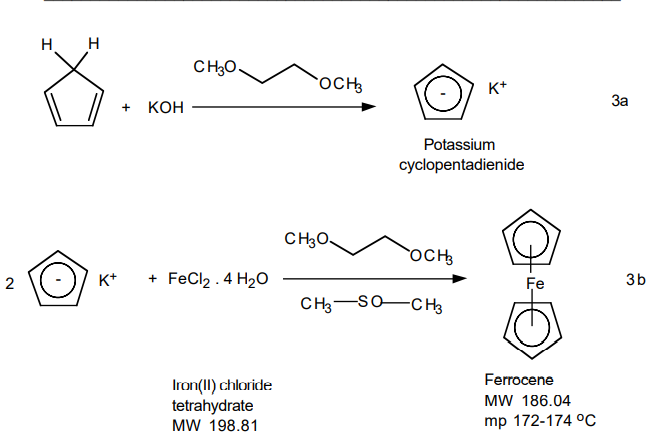
Potassium hydroxide solution: To a 4-mL Assem Vial with septum (provided by TA), quickly add 0.75 g of finely powdered potassium hydroxide*,5 followed by 1.25 mL of dimethoxyethane*. Adjust the nitrogen flow so that one bubble every 2-3 sec. rises through the nujol. With the nitrogen flow adjusted, insert an empty syringe needle through the septum of the flask as an outlet and then insert the nitrogen inlet needle. Pass nitrogen into the flask for about 1 min. to displace the oxygen present and create an inert atmosphere.6
Remove the needles and shake the flask to dislodge the solid from the bottom and to help to dissolve it. Please note the KOH does not completely dissolve in this reaction.
WEAR PROTECTIVE GLOVES WHILE SHAKING THE FLASKS

Iron (II) chloride solution: Add 0.35 g of finely powdered green iron (II) chloride tetrahydrate* and 1.5 mL of dimethyl sulfoxide* to a 4 mL Assem Vial with septum (provided by TA). Cap the flask with the septum provided, insert an empty syringe needle through the septum and then insert the nitrogen inlet needle. Pass nitrogen into the vial for about 1 min to displace the oxygen present. Remove the needles. Shake the vial vigorously to dissolve the iron chloride.
Using the syringe, inject 0.30 mL of freshly prepared cyclopentadiene into the vial containing the potassium hydroxide.7 WARNING: Do not grasp the body of the syringe because the heat of your hand will cause the cyclopentadiene to volatilize. Stir the mixture vigorously. After waiting about 5 min for the anion to form,8 pierce the septum with an empty syringe needle to relieve pressure. Inject the iron (II) chloride solution contained in the Assem vial in six 0.25 mL portions over a 10-min period. Between injections remove both needles from the septum and shake the vial vigorously. After all the iron (II) chloride has been added, rinse the empty flask with 0.25 mL more dimethyl sulfoxide and add this to the vial. Continue to shake the solution for about 15 min to complete the reaction.
Pour the dark slurry of ferrocene into a mixture of 4.5 ml of 6 M HCl* (prepared by each student; NOTE: concentrated HCl is 12 M) and a 30-mL beaker half filled with ice. Stir the resulting mixture thoroughly to dissolve and neutralize the potassium hydroxide. This in an exothermic reaction with heat released. It is important that this mixture remain cold (near 0 °C) during the addition and subsequent stirring. If the temperature starts to rise, slow down the rate of addition and/or add more ice. Some of the Fe (II) will be oxidized to Fe (III) resulting in the formation of the blue (green, brown) ferrocenium salt.
Collect the resulting precipitate on a Hirsch funnel. Wash the ferrocene with four 1.5 ml portions of water, press out excess water, and squeeze the product between sheets of filter paper to aid drying. Dry the crystals on a watch glass in your drawer until the next laboratory. The filtrate is blue because of dissolved ferrocenium ion.
The 4mL Assem vials used in this experiment are disposable. Please place in the special labeled glass vial waste container set up under the hood.
Calibration of Melting Point Apparatus
A Mel-Temp® apparatus with a digital thermometer and a 90-mm melting point capillary is used to determine melting points. Calibrate the apparatus and the thermometer by taking the melting points of four pure compounds that melt over the range of 50-200 °C. Pure melting point standards* are provided in the laboratory. Prepare a graph of reported versus observed melting points for a particular Mel-Temp and digital thermometer. For future reference record the identification number of the Mel-Temp and the digital thermometer. Consult the Chemical Rubber Company HANDBOOK OF CHEMISTRY AND PHYSICS to verify the melting points of the standards used.
***Students will be divided into teams. Each team will calibrate one Mel-Temp with each member of the team determining one point (i.e. melting point standard) on the curve for this instrument. You will use the same Mel-Temp apparatus for entire semester.
To load the melting point capillary, push the open end into some of the crystals (which must be carefully dried beforehand), invert and tap the sealed end gently on the desk top until the crystals slide down. The crystals should not occupy more than 2-3 mm of the tube. If you have difficulty getting the crystals to go to the bottom of the tube, take a 65 mm, long stem funnel and place it upside down on the bench top. Drop the capillary tube down the stem. The impact will not have enough force to break the tube, but it will force the crystals to the bottom.
If you have no previous knowledge of the melting point, it saves time to do a rough determination by setting the Variac to about 60 and scanning the 50-250 ºC range (5 ºC to 10 ºC per minute). When the approximate melting range has been found, a new tube should be prepared and the run repeated using a much slower (<1 ºC per min) rate of temperature increase. Melting point ranges should not exceed four degrees for the former and two for the latter. Always recrystallize a product to constant melting point.
Determine the uncorrected melting point of your sample and compare to the calibration plot. Record in the notebook these results together with any pertinent observations made during heating i.e., evidence of decomposition, color changes, etc. When submitting your notebook pages, include a table showing yields and corrected melting points of the crude and purified products as well as the thermometer calibration curve.
Footnotes:
2 Adapted from: Keneth L. Williamson, “Macroscale and Microscale Organic Experiments”, 2nd Edition; D. C. Heat and Company, Lexington, MA, 1994.
3 At room temperature, cyclopentadiene is 8% dimerized in 4 h and 50% dimerized in 24 h.
4 Adapted from: Keneth L. Williamson, “Macroscale and Microscale Organic Experiments”, 2nd Edition; D. C. Heat and Company, Lexington, MA, 1994.
5 Potassium hydroxide is ground into a fine powder by employing an ordinary food blender.
6 The anion of cyclopentadiene rapidly decomposes in air, and iron (II) chloride although reasonable stable in solid state is readily oxidized to the iron (III) (ferric) state in solution.
7 The mixture of cyclopentadiene monomer and potassium hydroxide slurry should appear pink but may turn either dark green or black. This dark coloration is due to oxidation of small amounts of the cyclopentadiene anion and is not detrimental to this particular procedure. Pure cyclopentadiene solutions are colorless. In other organometallic preparations more scrupulous efforts to eliminate oxygen must be followed.
8 Among simple hydrocarbons, cyclopentadiene is relatively acidic: pKa=15.5

