
Probabilistic Interpretation of Atomic Orbitals (Dry Lab)
- Page ID
- 64893
\( \newcommand{\vecs}[1]{\overset { \scriptstyle \rightharpoonup} {\mathbf{#1}} } \)
\( \newcommand{\vecd}[1]{\overset{-\!-\!\rightharpoonup}{\vphantom{a}\smash {#1}}} \)
\( \newcommand{\dsum}{\displaystyle\sum\limits} \)
\( \newcommand{\dint}{\displaystyle\int\limits} \)
\( \newcommand{\dlim}{\displaystyle\lim\limits} \)
\( \newcommand{\id}{\mathrm{id}}\) \( \newcommand{\Span}{\mathrm{span}}\)
( \newcommand{\kernel}{\mathrm{null}\,}\) \( \newcommand{\range}{\mathrm{range}\,}\)
\( \newcommand{\RealPart}{\mathrm{Re}}\) \( \newcommand{\ImaginaryPart}{\mathrm{Im}}\)
\( \newcommand{\Argument}{\mathrm{Arg}}\) \( \newcommand{\norm}[1]{\| #1 \|}\)
\( \newcommand{\inner}[2]{\langle #1, #2 \rangle}\)
\( \newcommand{\Span}{\mathrm{span}}\)
\( \newcommand{\id}{\mathrm{id}}\)
\( \newcommand{\Span}{\mathrm{span}}\)
\( \newcommand{\kernel}{\mathrm{null}\,}\)
\( \newcommand{\range}{\mathrm{range}\,}\)
\( \newcommand{\RealPart}{\mathrm{Re}}\)
\( \newcommand{\ImaginaryPart}{\mathrm{Im}}\)
\( \newcommand{\Argument}{\mathrm{Arg}}\)
\( \newcommand{\norm}[1]{\| #1 \|}\)
\( \newcommand{\inner}[2]{\langle #1, #2 \rangle}\)
\( \newcommand{\Span}{\mathrm{span}}\) \( \newcommand{\AA}{\unicode[.8,0]{x212B}}\)
\( \newcommand{\vectorA}[1]{\vec{#1}} % arrow\)
\( \newcommand{\vectorAt}[1]{\vec{\text{#1}}} % arrow\)
\( \newcommand{\vectorB}[1]{\overset { \scriptstyle \rightharpoonup} {\mathbf{#1}} } \)
\( \newcommand{\vectorC}[1]{\textbf{#1}} \)
\( \newcommand{\vectorD}[1]{\overrightarrow{#1}} \)
\( \newcommand{\vectorDt}[1]{\overrightarrow{\text{#1}}} \)
\( \newcommand{\vectE}[1]{\overset{-\!-\!\rightharpoonup}{\vphantom{a}\smash{\mathbf {#1}}}} \)
\( \newcommand{\vecs}[1]{\overset { \scriptstyle \rightharpoonup} {\mathbf{#1}} } \)
\(\newcommand{\longvect}{\overrightarrow}\)
\( \newcommand{\vecd}[1]{\overset{-\!-\!\rightharpoonup}{\vphantom{a}\smash {#1}}} \)
\(\newcommand{\avec}{\mathbf a}\) \(\newcommand{\bvec}{\mathbf b}\) \(\newcommand{\cvec}{\mathbf c}\) \(\newcommand{\dvec}{\mathbf d}\) \(\newcommand{\dtil}{\widetilde{\mathbf d}}\) \(\newcommand{\evec}{\mathbf e}\) \(\newcommand{\fvec}{\mathbf f}\) \(\newcommand{\nvec}{\mathbf n}\) \(\newcommand{\pvec}{\mathbf p}\) \(\newcommand{\qvec}{\mathbf q}\) \(\newcommand{\svec}{\mathbf s}\) \(\newcommand{\tvec}{\mathbf t}\) \(\newcommand{\uvec}{\mathbf u}\) \(\newcommand{\vvec}{\mathbf v}\) \(\newcommand{\wvec}{\mathbf w}\) \(\newcommand{\xvec}{\mathbf x}\) \(\newcommand{\yvec}{\mathbf y}\) \(\newcommand{\zvec}{\mathbf z}\) \(\newcommand{\rvec}{\mathbf r}\) \(\newcommand{\mvec}{\mathbf m}\) \(\newcommand{\zerovec}{\mathbf 0}\) \(\newcommand{\onevec}{\mathbf 1}\) \(\newcommand{\real}{\mathbb R}\) \(\newcommand{\twovec}[2]{\left[\begin{array}{r}#1 \\ #2 \end{array}\right]}\) \(\newcommand{\ctwovec}[2]{\left[\begin{array}{c}#1 \\ #2 \end{array}\right]}\) \(\newcommand{\threevec}[3]{\left[\begin{array}{r}#1 \\ #2 \\ #3 \end{array}\right]}\) \(\newcommand{\cthreevec}[3]{\left[\begin{array}{c}#1 \\ #2 \\ #3 \end{array}\right]}\) \(\newcommand{\fourvec}[4]{\left[\begin{array}{r}#1 \\ #2 \\ #3 \\ #4 \end{array}\right]}\) \(\newcommand{\cfourvec}[4]{\left[\begin{array}{c}#1 \\ #2 \\ #3 \\ #4 \end{array}\right]}\) \(\newcommand{\fivevec}[5]{\left[\begin{array}{r}#1 \\ #2 \\ #3 \\ #4 \\ #5 \\ \end{array}\right]}\) \(\newcommand{\cfivevec}[5]{\left[\begin{array}{c}#1 \\ #2 \\ #3 \\ #4 \\ #5 \\ \end{array}\right]}\) \(\newcommand{\mattwo}[4]{\left[\begin{array}{rr}#1 \amp #2 \\ #3 \amp #4 \\ \end{array}\right]}\) \(\newcommand{\laspan}[1]{\text{Span}\{#1\}}\) \(\newcommand{\bcal}{\cal B}\) \(\newcommand{\ccal}{\cal C}\) \(\newcommand{\scal}{\cal S}\) \(\newcommand{\wcal}{\cal W}\) \(\newcommand{\ecal}{\cal E}\) \(\newcommand{\coords}[2]{\left\{#1\right\}_{#2}}\) \(\newcommand{\gray}[1]{\color{gray}{#1}}\) \(\newcommand{\lgray}[1]{\color{lightgray}{#1}}\) \(\newcommand{\rank}{\operatorname{rank}}\) \(\newcommand{\row}{\text{Row}}\) \(\newcommand{\col}{\text{Col}}\) \(\renewcommand{\row}{\text{Row}}\) \(\newcommand{\nul}{\text{Nul}}\) \(\newcommand{\var}{\text{Var}}\) \(\newcommand{\corr}{\text{corr}}\) \(\newcommand{\len}[1]{\left|#1\right|}\) \(\newcommand{\bbar}{\overline{\bvec}}\) \(\newcommand{\bhat}{\widehat{\bvec}}\) \(\newcommand{\bperp}{\bvec^\perp}\) \(\newcommand{\xhat}{\widehat{\xvec}}\) \(\newcommand{\vhat}{\widehat{\vvec}}\) \(\newcommand{\uhat}{\widehat{\uvec}}\) \(\newcommand{\what}{\widehat{\wvec}}\) \(\newcommand{\Sighat}{\widehat{\Sigma}}\) \(\newcommand{\lt}{<}\) \(\newcommand{\gt}{>}\) \(\newcommand{\amp}{&}\) \(\definecolor{fillinmathshade}{gray}{0.9}\)The purpose of this exercise is to increase your familiarity with the wave functions of the hydrogen atom and how they relate to the probability function and electronic distribution. In an earlier "dry lab", you studied electrons as being physical objects having mass, charge, and occupying a specific position in space (The Bohr Model.) The last part of this dry lab introduced the concept of a wave associated with a moving particle. Modern quantum theory does not treat electrons as particles at all, but rather as waves. This is analogous to the different theories on the nature of light that you may already have encountered in physics. Wave behavior has been well studied and is easy to express mathematically by "wave functions". With light, you will recall, a simple sine wave function is used. Electronic wave functions are somewhat more complex but may still be defined mathematically. They are given the symbol ψ (psi). In the computer simulations of this experiment, hydrogen-like orbitals are used, because these are the only functions which can be exactly calculated.
Procedure
When you link above, a new tab will open. This simulation is based on the following hypothetical experiment, and represents one of two interpretations of the quantity (ψ2). This interpretation treats the electron as a localized particle, moving somewhat randomly, but more likely to be found in certain regions of space than others according to the wave function describing it.
The histogram, a particular type of graph showing distributions, which is shown to the right of the diagram of the electron sightings, plots the number of these sightings as a function of distance from the nucleus in small increments.
Using the Simulation
Select orbitals by clicking on their buttons. (Please note that the labels on the buttons are correctly written, for example 2px is written with the "x" shown as a subscript. In your report, you too should write them correctly!) Also note that some of the orbitals show nothing if you try to view them: think about why!
You can start to work on a new orbital whenever you like by making another choice. Initially, by default, a sighting will be recorded each time you click on the "Shutter" button. Clicking in the "Auto" box makes the program run automatically, marking sightings as quickly as the program can generate them. You can stop this any time you like by clicking on the "Shutter" button. Allow the diagrams to develop for several minutes until you are sure of their appearance.
Q1 On distinguishing random "noise" from real effects
Sketch the electron scatter diagram and the histogram for each orbital and hand them in with your report. Also, describe them in words distinguishing between those features which are significant and will be common to repeated runs on the same orbital, and those which are not.
Q2: On probability and the Heisenberg principle
Contrast these results with the Bohr model that you studied in the previous "experiment": what features of Bohr orbits are uncertain, and which are exactly defined. Which features of the orbitals you have been observing are uncertain and which, if you watch long enough, would be exactly reproduced on each run.
In this second part of the experiment, you will be examining the wave functions in more detail to reinforce your understanding of material from the text. The applet below allows you to display slices of constant z-coordinate, which you can set, through a number of different orbitals.
The image which is displayed illustrates the other way of interpreting the wave function, that is, treating the electron as a delocalized "cloud" whose density is related to ψ. The brightness of the colour that you see is related (logarithmically, for practical reasons) to the value of ψ2. The brightest regions correspond to high "electron density". The colour used in the different regions is determined by the sign of ψ: red is positive, blue is negative. The nucleus of the atom is shown as a yellow spot. Remember, PLEASE, that this sign is COMPLETELY unrelated to the sign of the charge on the electron.
Using the Atomic Orbital Simulation
If you are just experimenting, to get a sense of the three-dimensional shape of an orbital, your choice of z-coordinate(s) should be guided by the scale shown below the image. Imagine the three- dimensional orbitals (which have been scaled to appear a reasonable size) centered in a cube which has faces which are the size of the image. (The questions below give more specific values of z to use.)
Once you have displayed the section you want, you can find out ψ, (radial) and (angular) for any point in the section by moving the cursor (mouse pointer) to it and then clicking the left mouse button. The program gives a continuous read-out of the Cartesian and polar coordinates to help you while you are positioning the mouse. You will need a very steady hand to position the cursor on a specific pixel, but there is an alternative. Once you have selected any point with the mouse, a second cursor (a small cross) appears. You can move it independently using the arrow keys: it moves one pixel each time you press a key. To get its position and the related data, press ENTER. (In order to move it quickly, either hold down the appropriate arrow key, or use the mouse again.)
If you scroll the applet off the screen and back again, the panel which shows the mouse position etc may disappear. It will reappear when you select an orbital or a z value. In general, the ψ values shown will not be valid until after you click somewhere on the contour plot.
The relation between the Cartesian and polar coordinate systems is shown in the figure below.
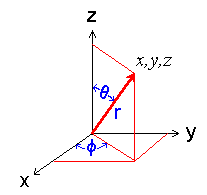
Diagram showing the polar coordinate system
Q3: On the three-dimensional character of the orbitals
Display the section of the 3s orbital at z = 0. Sketch what you see. By using the mouse find and report the radii of the nodes. Now change z by 50 pm intervals up to 500. Where do the nodes go, and why?
Q4: On the shape of nodal surface of the \(3d_{z^2}\) orbital
Display the section of the 3dz2 orbital at z = 0. Sketch and describe what you see. Now change z by 100 pm intervals up to 1000. Find, using the mouse, the approximate theta (q) values for the node. How does this relate to what you know of the three-dimensional shape of the 3dz2 orbital. There is a picture of it in Fig 2-6 (p 43) in Cotton, Wilkinson and Gaus or Fig 11.3 (p 396) in Huheey or Fig. 1.15 (p 16) in Shriver and Atkins.
Q5: On the shape of nodal surface of the 3dz2 orbital
Display the section of the 3dxy orbital at z = 0. Sketch what you see. By trial and error find and report the coordinates of the maximum and minimum values of ψ. (Just do the antinode in the quadrant with x and y both positive. Figure the other three out from the symmetry of the orbital.) How does the value of r at the maximum compare with the value you expect from Fig 2.7 (p 45) in Cotton, Wilkinson and Gaus or Figure 2.1 (p 12) in Huheey. (Shriver and Atkins does not have an appropriate diagram.)
Q6: On the three-dimensional shape of the 3dxz orbital and polar coordinates
Investigate a series of sections through the 3dxz orbital. Change z by 50 pm intervals up to 200 and by 100 thereafter up to 1000. Find, by trial and error with the mouse, the coordinates of the maximum value of ψ on each section. Determine r for the overall maximum from a graph of ψ vs r. Compare it with the value from question 5 - why should it be the same?
Q7: Left over from part 1!
The selection of orbitals available in the simulation which you used in the first part of this experiment did not include the 2pz, 3dxz or 3dyz. Why?
Q8: On the radial probability functions
Select the 2px orbital with z = 0. Sketch what you see. Using the mouse to read off the values from the diagram keeping y = 0 and varying x, plot a graph of 4.p.r2.ψ2 vs r. What is the relation of this graph to the histogram for the same orbital from the first part of the dry lab?
Q9: On the radial and angular parts of the ψ functions
Repeat the procedure in Exercise 8 but read off ψ values along the line x = y (ie at 45o) between the axes. Compare this plot to the one you got from Exercise 8, in particular, where are the maxima and how do the values relate in general to those you found for question 8. Are your results consistent with the functions for the radial and angular parts of ψ as illustrated in the text?
POSTSCRIPT
Remember that you can return to the app in this, and indeed any of the dry labs, any time you like, to help you in your studies.