3.3: How to Make a LibreTexts Remix
- Page ID
- 233931
\( \newcommand{\vecs}[1]{\overset { \scriptstyle \rightharpoonup} {\mathbf{#1}} } \)
\( \newcommand{\vecd}[1]{\overset{-\!-\!\rightharpoonup}{\vphantom{a}\smash {#1}}} \)
\( \newcommand{\id}{\mathrm{id}}\) \( \newcommand{\Span}{\mathrm{span}}\)
( \newcommand{\kernel}{\mathrm{null}\,}\) \( \newcommand{\range}{\mathrm{range}\,}\)
\( \newcommand{\RealPart}{\mathrm{Re}}\) \( \newcommand{\ImaginaryPart}{\mathrm{Im}}\)
\( \newcommand{\Argument}{\mathrm{Arg}}\) \( \newcommand{\norm}[1]{\| #1 \|}\)
\( \newcommand{\inner}[2]{\langle #1, #2 \rangle}\)
\( \newcommand{\Span}{\mathrm{span}}\)
\( \newcommand{\id}{\mathrm{id}}\)
\( \newcommand{\Span}{\mathrm{span}}\)
\( \newcommand{\kernel}{\mathrm{null}\,}\)
\( \newcommand{\range}{\mathrm{range}\,}\)
\( \newcommand{\RealPart}{\mathrm{Re}}\)
\( \newcommand{\ImaginaryPart}{\mathrm{Im}}\)
\( \newcommand{\Argument}{\mathrm{Arg}}\)
\( \newcommand{\norm}[1]{\| #1 \|}\)
\( \newcommand{\inner}[2]{\langle #1, #2 \rangle}\)
\( \newcommand{\Span}{\mathrm{span}}\) \( \newcommand{\AA}{\unicode[.8,0]{x212B}}\)
\( \newcommand{\vectorA}[1]{\vec{#1}} % arrow\)
\( \newcommand{\vectorAt}[1]{\vec{\text{#1}}} % arrow\)
\( \newcommand{\vectorB}[1]{\overset { \scriptstyle \rightharpoonup} {\mathbf{#1}} } \)
\( \newcommand{\vectorC}[1]{\textbf{#1}} \)
\( \newcommand{\vectorD}[1]{\overrightarrow{#1}} \)
\( \newcommand{\vectorDt}[1]{\overrightarrow{\text{#1}}} \)
\( \newcommand{\vectE}[1]{\overset{-\!-\!\rightharpoonup}{\vphantom{a}\smash{\mathbf {#1}}}} \)
\( \newcommand{\vecs}[1]{\overset { \scriptstyle \rightharpoonup} {\mathbf{#1}} } \)
\( \newcommand{\vecd}[1]{\overset{-\!-\!\rightharpoonup}{\vphantom{a}\smash {#1}}} \)
\(\newcommand{\avec}{\mathbf a}\) \(\newcommand{\bvec}{\mathbf b}\) \(\newcommand{\cvec}{\mathbf c}\) \(\newcommand{\dvec}{\mathbf d}\) \(\newcommand{\dtil}{\widetilde{\mathbf d}}\) \(\newcommand{\evec}{\mathbf e}\) \(\newcommand{\fvec}{\mathbf f}\) \(\newcommand{\nvec}{\mathbf n}\) \(\newcommand{\pvec}{\mathbf p}\) \(\newcommand{\qvec}{\mathbf q}\) \(\newcommand{\svec}{\mathbf s}\) \(\newcommand{\tvec}{\mathbf t}\) \(\newcommand{\uvec}{\mathbf u}\) \(\newcommand{\vvec}{\mathbf v}\) \(\newcommand{\wvec}{\mathbf w}\) \(\newcommand{\xvec}{\mathbf x}\) \(\newcommand{\yvec}{\mathbf y}\) \(\newcommand{\zvec}{\mathbf z}\) \(\newcommand{\rvec}{\mathbf r}\) \(\newcommand{\mvec}{\mathbf m}\) \(\newcommand{\zerovec}{\mathbf 0}\) \(\newcommand{\onevec}{\mathbf 1}\) \(\newcommand{\real}{\mathbb R}\) \(\newcommand{\twovec}[2]{\left[\begin{array}{r}#1 \\ #2 \end{array}\right]}\) \(\newcommand{\ctwovec}[2]{\left[\begin{array}{c}#1 \\ #2 \end{array}\right]}\) \(\newcommand{\threevec}[3]{\left[\begin{array}{r}#1 \\ #2 \\ #3 \end{array}\right]}\) \(\newcommand{\cthreevec}[3]{\left[\begin{array}{c}#1 \\ #2 \\ #3 \end{array}\right]}\) \(\newcommand{\fourvec}[4]{\left[\begin{array}{r}#1 \\ #2 \\ #3 \\ #4 \end{array}\right]}\) \(\newcommand{\cfourvec}[4]{\left[\begin{array}{c}#1 \\ #2 \\ #3 \\ #4 \end{array}\right]}\) \(\newcommand{\fivevec}[5]{\left[\begin{array}{r}#1 \\ #2 \\ #3 \\ #4 \\ #5 \\ \end{array}\right]}\) \(\newcommand{\cfivevec}[5]{\left[\begin{array}{c}#1 \\ #2 \\ #3 \\ #4 \\ #5 \\ \end{array}\right]}\) \(\newcommand{\mattwo}[4]{\left[\begin{array}{rr}#1 \amp #2 \\ #3 \amp #4 \\ \end{array}\right]}\) \(\newcommand{\laspan}[1]{\text{Span}\{#1\}}\) \(\newcommand{\bcal}{\cal B}\) \(\newcommand{\ccal}{\cal C}\) \(\newcommand{\scal}{\cal S}\) \(\newcommand{\wcal}{\cal W}\) \(\newcommand{\ecal}{\cal E}\) \(\newcommand{\coords}[2]{\left\{#1\right\}_{#2}}\) \(\newcommand{\gray}[1]{\color{gray}{#1}}\) \(\newcommand{\lgray}[1]{\color{lightgray}{#1}}\) \(\newcommand{\rank}{\operatorname{rank}}\) \(\newcommand{\row}{\text{Row}}\) \(\newcommand{\col}{\text{Col}}\) \(\renewcommand{\row}{\text{Row}}\) \(\newcommand{\nul}{\text{Nul}}\) \(\newcommand{\var}{\text{Var}}\) \(\newcommand{\corr}{\text{corr}}\) \(\newcommand{\len}[1]{\left|#1\right|}\) \(\newcommand{\bbar}{\overline{\bvec}}\) \(\newcommand{\bhat}{\widehat{\bvec}}\) \(\newcommand{\bperp}{\bvec^\perp}\) \(\newcommand{\xhat}{\widehat{\xvec}}\) \(\newcommand{\vhat}{\widehat{\vvec}}\) \(\newcommand{\uhat}{\widehat{\uvec}}\) \(\newcommand{\what}{\widehat{\wvec}}\) \(\newcommand{\Sighat}{\widehat{\Sigma}}\) \(\newcommand{\lt}{<}\) \(\newcommand{\gt}{>}\) \(\newcommand{\amp}{&}\) \(\definecolor{fillinmathshade}{gray}{0.9}\)
This tutorial will walk you through making a customized text using the LibreTexts remixing tool. The Remixer tool can be used for simple tasks like creating a book that consists of select chapters of an existing resource or it can be used to create complex remixes consisting of multiple resources potentially across libraries.
Finding the Remixer
The "Remixer" is activated by pressing the Remixer icon on the primary toolbar, which will start up a new page (if this is the first time it is activated, it may take up to 15 seconds to load).

If the top of your Remixer screen has a grey bar with the term "Demonstration Mode" on the left (Figure \(\PageIndex{1}\)), then you will not be able to publish your text until you login. However, you can still create an online map of your customized text and save it for future editing/publishing.

This video is an introduction to the remixer
Getting Started
When logged into an account with publishing privileges, Remixer will be in "Admin mode" (Figure \(\PageIndex{1}\)) and the Remixer will appear

Figure \(\PageIndex{3}\): Copy and Paste Caption where the red letters are
Creation Steps
Step 1: Enter the name you want for your book (typically your name and the name of the class) in the box labeled "LibreText name" (Step 1 in Figure \(\PageIndex{3}\)). You MUST DO THIS FOR THE REMIXER TO WORK
Step 2 Decide on which copy mode you desire. The two choices you have are Copy-Transclude and Copy-Fork. By default, the Remixer generates "copy-transcluded" pages that mirror the original Master content. To edit the content on the new Remixed page, authors have to either edit the original material (e.g. with errors) or have to "fork" the page to copy the content from the original master page into the new Remixed page. Copy-forked pages copy as traditional copied pages, which, once copied, can be edited independently of the content of the master page. It is recommended to keep the Remixer in Copy-Transclude mode unless you plan to customize the text on all pages. You can convert individual sections/pages to distinct forked copies at a later time in order to customize them.
Step 3: A popup tutorial can be turned on by flipping this switch. Use as needed.
Step 4: The autonumber ensures the constructed Remix follows a consistent number scheme and more importantly, adapts to the changing structure of the remix as new content is added, deleted or reorganized. It is recommended to turn this on (switched to the right). There are options available for the autonumber (blue button below autonumber switch); it is recommended to avoid these until users are more proficient with the remixer tool.
Dragging and Dropping Content
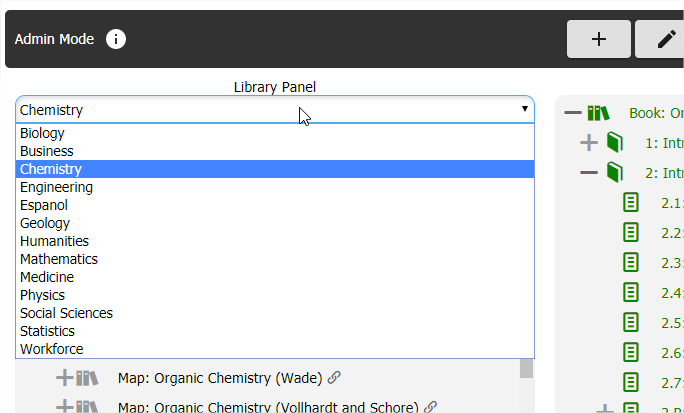
The Remixer has two panels: The library panel and the Remix panel (Figure \(\PageIndex{4}\)). The library panel on the left side contains the existing content on the LibreTexts libraries and the Remixer Panel on the right side is where you will create your new Remix. The basic remixing approach is to drag content with the mouse from the Library Panel to the Remix Panel. To insert a chapter or section from an existing book simply find it in the Library panel and drag it to where you want it in your remix.

Figure \(\PageIndex{4}\): Working panel of the remixer. Left panel is the "Library Panel" that gives users access to the pages on all 13 libraries. The right panel is the "Remix Panel" i.e., the customized text. Content is dragged with the mouse from the Library Panel to the Remix Panel.
In both panels, the  symbol indicates the top (book) level, the
  symbol indicates a chapter, and the
  symbol indicates a section (or subsection).
Users can Select content from any library
At the top of the Library Panel you will find the library selector, you can select material from any of our 13 libraries.