
Safety, Equipment, and Check-In
- Page ID
- 407770
\( \newcommand{\vecs}[1]{\overset { \scriptstyle \rightharpoonup} {\mathbf{#1}} } \)
\( \newcommand{\vecd}[1]{\overset{-\!-\!\rightharpoonup}{\vphantom{a}\smash {#1}}} \)
\( \newcommand{\dsum}{\displaystyle\sum\limits} \)
\( \newcommand{\dint}{\displaystyle\int\limits} \)
\( \newcommand{\dlim}{\displaystyle\lim\limits} \)
\( \newcommand{\id}{\mathrm{id}}\) \( \newcommand{\Span}{\mathrm{span}}\)
( \newcommand{\kernel}{\mathrm{null}\,}\) \( \newcommand{\range}{\mathrm{range}\,}\)
\( \newcommand{\RealPart}{\mathrm{Re}}\) \( \newcommand{\ImaginaryPart}{\mathrm{Im}}\)
\( \newcommand{\Argument}{\mathrm{Arg}}\) \( \newcommand{\norm}[1]{\| #1 \|}\)
\( \newcommand{\inner}[2]{\langle #1, #2 \rangle}\)
\( \newcommand{\Span}{\mathrm{span}}\)
\( \newcommand{\id}{\mathrm{id}}\)
\( \newcommand{\Span}{\mathrm{span}}\)
\( \newcommand{\kernel}{\mathrm{null}\,}\)
\( \newcommand{\range}{\mathrm{range}\,}\)
\( \newcommand{\RealPart}{\mathrm{Re}}\)
\( \newcommand{\ImaginaryPart}{\mathrm{Im}}\)
\( \newcommand{\Argument}{\mathrm{Arg}}\)
\( \newcommand{\norm}[1]{\| #1 \|}\)
\( \newcommand{\inner}[2]{\langle #1, #2 \rangle}\)
\( \newcommand{\Span}{\mathrm{span}}\) \( \newcommand{\AA}{\unicode[.8,0]{x212B}}\)
\( \newcommand{\vectorA}[1]{\vec{#1}} % arrow\)
\( \newcommand{\vectorAt}[1]{\vec{\text{#1}}} % arrow\)
\( \newcommand{\vectorB}[1]{\overset { \scriptstyle \rightharpoonup} {\mathbf{#1}} } \)
\( \newcommand{\vectorC}[1]{\textbf{#1}} \)
\( \newcommand{\vectorD}[1]{\overrightarrow{#1}} \)
\( \newcommand{\vectorDt}[1]{\overrightarrow{\text{#1}}} \)
\( \newcommand{\vectE}[1]{\overset{-\!-\!\rightharpoonup}{\vphantom{a}\smash{\mathbf {#1}}}} \)
\( \newcommand{\vecs}[1]{\overset { \scriptstyle \rightharpoonup} {\mathbf{#1}} } \)
\(\newcommand{\longvect}{\overrightarrow}\)
\( \newcommand{\vecd}[1]{\overset{-\!-\!\rightharpoonup}{\vphantom{a}\smash {#1}}} \)
\(\newcommand{\avec}{\mathbf a}\) \(\newcommand{\bvec}{\mathbf b}\) \(\newcommand{\cvec}{\mathbf c}\) \(\newcommand{\dvec}{\mathbf d}\) \(\newcommand{\dtil}{\widetilde{\mathbf d}}\) \(\newcommand{\evec}{\mathbf e}\) \(\newcommand{\fvec}{\mathbf f}\) \(\newcommand{\nvec}{\mathbf n}\) \(\newcommand{\pvec}{\mathbf p}\) \(\newcommand{\qvec}{\mathbf q}\) \(\newcommand{\svec}{\mathbf s}\) \(\newcommand{\tvec}{\mathbf t}\) \(\newcommand{\uvec}{\mathbf u}\) \(\newcommand{\vvec}{\mathbf v}\) \(\newcommand{\wvec}{\mathbf w}\) \(\newcommand{\xvec}{\mathbf x}\) \(\newcommand{\yvec}{\mathbf y}\) \(\newcommand{\zvec}{\mathbf z}\) \(\newcommand{\rvec}{\mathbf r}\) \(\newcommand{\mvec}{\mathbf m}\) \(\newcommand{\zerovec}{\mathbf 0}\) \(\newcommand{\onevec}{\mathbf 1}\) \(\newcommand{\real}{\mathbb R}\) \(\newcommand{\twovec}[2]{\left[\begin{array}{r}#1 \\ #2 \end{array}\right]}\) \(\newcommand{\ctwovec}[2]{\left[\begin{array}{c}#1 \\ #2 \end{array}\right]}\) \(\newcommand{\threevec}[3]{\left[\begin{array}{r}#1 \\ #2 \\ #3 \end{array}\right]}\) \(\newcommand{\cthreevec}[3]{\left[\begin{array}{c}#1 \\ #2 \\ #3 \end{array}\right]}\) \(\newcommand{\fourvec}[4]{\left[\begin{array}{r}#1 \\ #2 \\ #3 \\ #4 \end{array}\right]}\) \(\newcommand{\cfourvec}[4]{\left[\begin{array}{c}#1 \\ #2 \\ #3 \\ #4 \end{array}\right]}\) \(\newcommand{\fivevec}[5]{\left[\begin{array}{r}#1 \\ #2 \\ #3 \\ #4 \\ #5 \\ \end{array}\right]}\) \(\newcommand{\cfivevec}[5]{\left[\begin{array}{c}#1 \\ #2 \\ #3 \\ #4 \\ #5 \\ \end{array}\right]}\) \(\newcommand{\mattwo}[4]{\left[\begin{array}{rr}#1 \amp #2 \\ #3 \amp #4 \\ \end{array}\right]}\) \(\newcommand{\laspan}[1]{\text{Span}\{#1\}}\) \(\newcommand{\bcal}{\cal B}\) \(\newcommand{\ccal}{\cal C}\) \(\newcommand{\scal}{\cal S}\) \(\newcommand{\wcal}{\cal W}\) \(\newcommand{\ecal}{\cal E}\) \(\newcommand{\coords}[2]{\left\{#1\right\}_{#2}}\) \(\newcommand{\gray}[1]{\color{gray}{#1}}\) \(\newcommand{\lgray}[1]{\color{lightgray}{#1}}\) \(\newcommand{\rank}{\operatorname{rank}}\) \(\newcommand{\row}{\text{Row}}\) \(\newcommand{\col}{\text{Col}}\) \(\renewcommand{\row}{\text{Row}}\) \(\newcommand{\nul}{\text{Nul}}\) \(\newcommand{\var}{\text{Var}}\) \(\newcommand{\corr}{\text{corr}}\) \(\newcommand{\len}[1]{\left|#1\right|}\) \(\newcommand{\bbar}{\overline{\bvec}}\) \(\newcommand{\bhat}{\widehat{\bvec}}\) \(\newcommand{\bperp}{\bvec^\perp}\) \(\newcommand{\xhat}{\widehat{\xvec}}\) \(\newcommand{\vhat}{\widehat{\vvec}}\) \(\newcommand{\uhat}{\widehat{\uvec}}\) \(\newcommand{\what}{\widehat{\wvec}}\) \(\newcommand{\Sighat}{\widehat{\Sigma}}\) \(\newcommand{\lt}{<}\) \(\newcommand{\gt}{>}\) \(\newcommand{\amp}{&}\) \(\definecolor{fillinmathshade}{gray}{0.9}\)
One of the student learning objectives for this course is for each of you to become proficient in working safely in a lab.
During your first lab class period, you will learn how to work in a chemical laboratory safely. You must learn how to work safely in a lab with chemicals not only the learning objectives of this course, but continuing in your studies and professions.
Read each of the following pages carefully, review the information, follow directions to additional activities on Canvas, and then complete the safety contract, check into your lab drawer, and complete any assigned quizzes.
All of these items should be completed before you leave the laboratory at the end of your class meeting.
Lastly, and most importantly: Lab classes are supposed to be collaborative learning environments. When lost or confused, ask for help! You can ask fellow students or your lab instructor. Everyone is in it together!
Learning Objectives
The objectives of this laboratory are:
-
Recognize standard laboratory equipment and verify the inventory of your drawer (sometimes called your "locker").
-
Understand the principles of laboratory safety and agree to follow the rules and procedures designed to keep you and your classmates safe.
Grading & Assessment
Your laboratory week 1 grade will be the combined points for reviewing the information given here and watching the linked videos on Canvas (please note: you must watch them through Canvas using to earn the points), completing the online safety contract, and your Canvas quiz score. The total lab score is out of 30 points.
| Activity | Points |
| Seven introductory videos on Canvas | 7 (i.e. 1 pt for each video) |
| Canvas Safety Quiz | 13 points (you get unlimited attempts, the highest score is what is recorded) |
| Safety Contract Completed | 5 points |
| Worksheet Completed & Turned In | 5 points |
All week 1 lab assignments should be completed before you leave the laboratory at the end of your class meeting.
Begin by reading the following sections on Safety and Equipment, pausing to watch assigned videos on Canvas as directed, and then checking into your lab drawer and locking it securely when finished. Turn in the worksheet for Week 1 before leaving the lab for the day.
Safety
Working safely in a chemistry lab typically involves nothing more than a common-sense approach to safety. As a student working and learning in the chemistry lab this semester, taking personal responsibility for your work habits and work area and recognizing that an accident is most likely preventable are the first steps to a safe chemistry laboratory.
Mandatory Safety Rules To Follow:
-
Safety goggles (department-approved) must be worn in the lab at all times when working with chemicals. Glasses and contact lenses are not acceptable eye protection on their own for the lab. Students who do not follow this rule will be asked to leave the lab immediately.
-
Never eat or drink in the lab. Food may pick up toxic chemicals. Do not have food or drink anywhere on the lab bench top.
-
Never inhale fumes or vapors. Use Fume Hoods For Dangerous or irritating chemicals. If you need to make an observation by smelling, carefully "waft" odors toward your nose with your hand.
-
Never taste any chemicals. Some chemicals are very corrosive and poisonous, even in very small quantities.
-
Never perform an unauthorized experiment and never work in the lab without an instructor in charge. An accident may happen when mixing simple chemicals.
-
Never put anything back into a reagent bottle (i.e. typically a glass bottle where chemicals are stored in). Once a chemical has been dispensed, it has passed the point of no return. Always take as little of a chemical as possible. Use only clean, dry spatulas for removing chemicals from bottles. Properly dispose of excess chemicals.
-
Leave chemicals in their proper place. Do not carry original containers of chemicals to your bench top. Everyone needs access to them for their own work, so leave the reagent bottles in their designated areas in the lab.
-
Avoid touching hot objects. Burns are a common accident in the chemistry lab. Hot glass looks like cold glass; hot metal looks like cold metal. Be mindful when heating anything.
-
Rinse spills off the skin immediately. Rinse off any chemicals spilled on the skin immediately with large amounts of water. You should stop what you are doing to wash your hands in the sink or, if needed, get to a safety shower and remove your contaminated clothing.
-
Clean up broken glassware immediately. Never dispose of glass, broken or otherwise, in the regular trash; Only use the broken glass receptacle, which is clearly marked in the lab, to dispose of any glassware. Obtain replacement glassware from the stockroom, if needed.
-
Properly dispose of waste chemicals. Certain liquids may be poured into the sink and flushed with water while others must be poured into designated waste containers. Your instructor will provide disposal instructions for each lab.
-
Notify your instructor immediately of all accidents - even minor ones! Even minor cuts or burns can be routes of chemical exposure.
-
Locate and learn to operate, at a minimum: the safety showers, fire extinguishers, eye-wash fountains, fire blankets, fire alarms, and exits.
Emergency Procedures
Accidents: In case of an accident in the laboratory, notify your laboratory instructor immediately. All accidents must be reported to the laboratory instructor, even small cuts and minor burns.
Chemical Exposure: The best treatment for chemical exposure in your eyes or on your skin is immediate washing with copious amounts of water. Eyewashes, sinks, and safety showers are provided for this purpose.
Emergency: In case of an emergency call extension 2400 on the lab phone for Campus Safety or (805)730-4200 from a cell phone.
Safety Data Sheets
A major part of participating in chemistry is learning how to use, handle, and dispose of chemicals safely. By law, manufacturers of chemicals provide two important information sources for the safe use of their chemicals – Safety Data Sheets (SDS) contain detailed hazard and disposal information, and National Fire Protection Association (NFPA) chemical hazard labels on each chemical summarize hazard information.
SDS sheets prescribe disposal and handling techniques for the various chemicals. Some chemicals can be washed down the drains, and however many must not. SDS sheets are stored in the Department of Chemistry, but they can also be accessed online here
The NFPA label consists of four colored diamonds with numbers or symbols summarizing the hazard level.
This is what the NFPA label looks like:
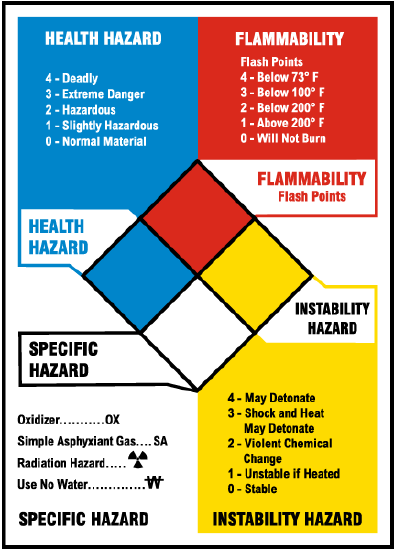
Each week of your CHEM 101 lab class, specific disposal procedures will be discussed during your "pre-lab lecture." There will be questions about the disposal during your quizzes and regardless of quiz questions, it is of utmost importance you know what to do with hazardous waste for your safety, everyone else in the lab, and the environment.
Your instructor will point out important safety equipment in the lab and provide a brief introduction on how to use all safety equipment, as well as the location of the exits.
**Whenever you see this symbol in a black box such as this one, it means there is something on your class Canvas page that you must complete**
You should now go to your Canvas CHEM 101 class page, find the video for Lab Safety, and watch it to obtain credit. Note: you must watch the entire video *ON* Canvas to receive credit. After completing this video, return here and continue your careful review of this information.
In sum,
Always
- wear your safety glasses in the laboratory.
- wear shirts that cover your torso, long pants, and shoes in a laboratory.
- know the hazards associated with the experiment before you begin.
- know where the showers, eyewashes, fire extinguishers, and first aid kits are in the laboratory.
- aim test tube and flask openings away from yourself and others while they are being heated.
- clean up mercury spills with tin foil, sulfur powder, or zinc.
- lubricate glass tubing and use towels to protect your hand when pushing or pulling tubing through stoppers.
- fire polish all glass tubing ends.
- extinguish Bunsen burners that are not being used.
- dispose of wastes into properly labeled waste containers.
- use fume hoods for irritating, poisonous, and corrosive fumes.
- add acid to water or to a base, never the opposite.
Never
- eat, drink, or smoke in the laboratory.
- bring smoking products, gum, food, or beverages (including water) to the bench top where you are working, even if they are closed tightly.
- taste chemicals.
- remove chemicals from the laboratory.
- use mouth suction to fill pipets. Always use a pipet bulb.
- wear highly flammable clothing in the laboratory such as fluffy sweaters.
- put pens/pencils in your mouth.
- wear scarves or ties.
- attempt unauthorized experiments.
- use a flame in a laboratory around solvent fumes.
- put anything back into a reagent bottle.
- work alone in the laboratory.
Equipment
Learning how to properly manipulate instruments for measuring and equipment, like glassware and Bunsen burners, are imperative for your learning and practice in a laboratory environment.
There are a few basic things that a new student to a Chemistry laboratory needs before they can learn and work effectively. One of those things is access to basic laboratory equipment with the associated understanding of what the equipment is designed to do. On the next few pages, you will find an inventory of the basic equipment that each student will have access to and responsibility for over the semester. A visual guide with a brief description is provided for the various pieces of equipment. Make sure that you understand each piece of equipment required for an experiment before you begin working on that experiment and always ask questions if some aspect isn’t clear to you. You can refer back to this section for reference throughout the semester.
Glassware
Laboratory glassware refers to a variety of equipment used in the laboratory, traditionally made of glass but is now made of newer materials (like "borosilicate glass" that can handle rapid changes in temperature much better than glass and is less resistant to breaking).
Glassware can be blown, bent, cut, molded, and formed into many sizes and shapes, which is incredibly helpful for the diversity of needs of chemical reaction vessels chemists have.
A large part of teaching in the chemistry lab is to demonstrate how glassware is used and to alert students to the many safety hazards involved with using glassware and working with chemicals.
You will now watch two videos on Canvas, each explaining aspects of laboratory glassware. The first video details how to take proper measurements with a graduated cylinder, something you will be doing routinely during your lab periods. The second video shows how to work with a highly precise piece of glassware called "pipets." Again you should note: that you must watch the entire video *ON* Canvas to receive credit. After completing this video, return here and continue your careful review of this information.
The Analytical Balance
One of the first pieces of equipment you will work with is the Analytical Balance. This is because weighing a chemical sample is one of the most common measurements in a chemistry laboratory. Almost all of the analytical balances are electronic where the gravitational force of the sample is balanced by a magnetic force generated by an electromagnet. The electrical current needed to maintain the position of the weighing pan is converted to a digital readout. This readout is calibrated against the current needed to balance an internal stainless steel weight. Modern balances can be accurate and reliable but are still susceptible to calibration and operation errors that affect the mass of the sample.
Some of the analytical balances used in the laboratory have a precision of 0.001 grams and a maximum capacity of about 200 grams. As such, do not try to weigh things above 205 grams. The following points will help you obtain reliable weighing results.
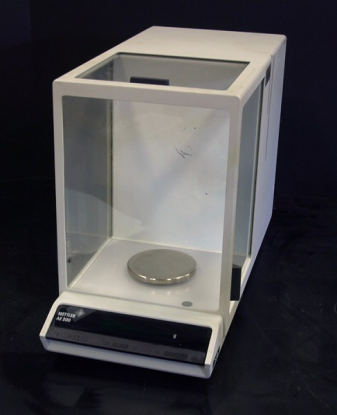
Draft shields: The draft shields must be closed when weighing to avoid air turbulence and temperature changes.
Weighing pan: Place the sample in the middle of the weighing pan.
Maintenance: A dirty balance or unclean weighing vessel are probably the cause of the most common weighing errors. Material, as small as a fingerprint, stuck to the weighing vessel or the balance pan will drastically affect the weight. The balance must be kept clean. If some material is spilled in the balance clean it immediately. In our lab, next to each balance is a small box that has "weighing papers" (disposable papers that you place on the pan before weighing a sample to keep it clean. In the video below, the Professor uses a "weigh boat" instead. They serve the same purpose) and a small paintbrush to help you clean up the balance and the surrounding area.
Use of an Analytical Balance:
- Close all glass doors.
- Press the single control bar to turn the instrument on.
- The instrument will "zero" itself after a few seconds.
- Add your weighing container (if you don't have a beaker, use the weighing paper). If you wish to tare or zero (bring your scale back to zero after adding your weighing container), close the glass doors, and press the control bar briefly. Record weight (ideally, it’s 0.000 g). Add sample and record new weight. The difference between these weights will be the sample weight.
Temperature
A temperature difference between the weighing sample and its surroundings leads to air currents along the side of the weighing vessel that create what's called dynamic buoyancy. The net result is that hot objects appear lighter and cold objects appear heavier. For this reason, you never want to weigh a hot object or a cold object on the balance, and you first need to let the sample equilibrate to room temperature before weighing.
On Canvas, find the fourth video assigned to watch for this lab period. This video is an instructional video about working with Analytical Balances.
The Bunsen Burner
The Bunsen burner is a common laboratory instrument that produces a hot, sootless, non-luminous flame. It is named after a German chemist who in 1854 re-designed previous laboratory flame sources and burners, Dr. Robert Bunsen (see Figure \(\PageIndex{3}\) a.). The Bunsen Burner allows for precise regulation of the mixing of gas and oxygen in its central barrel before combustion, which ignites the flame. By manipulating the Bunsen burner, the flame's size and temperature can be controlled, which is very helpful in the chemistry lab as many reactions must be heated to high temperatures to produce the desired result.
Working with an open flame requires extra caution. Always remember to secure any loose hair, clothing, or accessories before lighting a Bunsen burner and have on hand the proper safety equipment, like a fire extinguisher and a fire blanket. Taking the time to understand how to use a Bunsen burner and what safety equipment to have on hand will allow you to operate this useful laboratory tool with safety and confidence.
Tips for work with Bunsen Burners:
- Turn on the gas just before lighting your ignition source (i.e., match, lighter, sparker);
- Turn off the gas to extinguish the flame at any time, but especially in an emergency;
- Ensure tubing will not catch on fire or get in your way while working.
_(cropped).jpg?revision=1&size=bestfit&width=267&height=273) a.
a.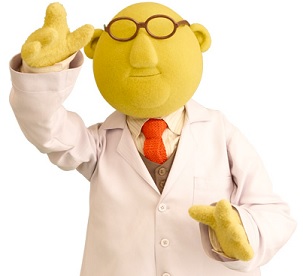 b.
b. 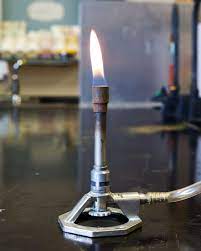
c.
Figures \(\PageIndex{3}\): All things named Bunsen
a. Dr. Robert Wilhelm Eberhard Bunsen (1811-1899), inventor of the Bunsen Burner (Source: Wikipedia)
b. Dr. Bunsen Honeydew (1976-present), a Muppet, who is named after this piece of common lab equipment (in addition to a honeydew melon) and if wasn't careful when working with a Bunsen burner may catch on fire himself, as he is made up of mostly foam rubber covered in fabric (Source: World Encyclopedia of Puppetry Arts)
c. Photograph of a Bunsen burner, showing what is considered to be a "well-adjusted flame" (Source: Google Images)
While common in the laboratory, you may have never had the chance to work with a Bunsen burner or have never had to light one yourself, something you will be doing regularly. This video gives step-by-step instructions on how to do this efficiently and how to adjust the flame properly.
Filtration
You will learn early on in the lecture portion of CHEM 101 that many chemicals we work with are in a mixture with other chemicals. Filtration techniques are sometimes used to isolate chemicals of interest from a mixture.
There are two types of filtration used in Intro Chemistry labs: gravity filtration and vacuum filtration.
Navigate to Canvas to review your final two assigned videos for this first lab period. One video is on gravity filtration, a technique that uses gravity to pull a liquid (called the filtrate) away from a solid through filter paper. The other video is on vacuum filtration, a technique that uses the pull of a vacuum to separate a mixture of solids and liquids.
Safety Contract
To ensure a safe learning experience this semester, you have now learned not only how to properly use the common laboratory equipment you'll work with, but you have also gone through many safety rules. These rules must be followed at all times. Failure to do so will result in you being asked to stop working and leave the lab.
As your commitment to working safely in the laboratory this semester, and also as an acknowledgment that you know the expectations of you working in the lab, you are now required to complete the "Safety Contract." Safety is not negotiable, so it is your responsibility to know and follow the rules.
The safety contract is a Google form that you must fill out. You must be logged into your SBCC pipeline email account to use this form.
The link to the safety contract is on Canvas.
Canvas Quiz
You will now show that you are ready to work in the chemistry lab safely this semester by completing a short quiz on the material.
Navigate to Canvas and find the activity called "Lab Safety Quiz - Week 1." Following the directions given on Canvas, complete this quiz. It is worth 13 points toward the total points for this week's lab assignments. Unlike other Canvas quizzes, you may have multiple attempts, and only your highest score is counted. After an attempt, if you realize one (or more) of your answers were incorrect, simply re-take and re-submit another quiz attempt.
Lab Drawer Check-In General Procedure
Step 1 - Check that all materials listed on the inventory sheet are in your drawer, in the correct quantity (i.e. sometimes you should have more than one of some items), and in good working order (i.e. for glassware this means there are no cracks, chips, or other breaks in integrity). While completing your lab drawer inventory check, please make sure you:
-
Dispose of any glassware that has cracks or is otherwise visibly broken in the broken glassware receptacle (important: never in the regular trash).
-
Ask your instructor about glassware that has small chips in the top ridges. Some glassware with certain chips can be easily fixed with special treatment, while others should be properly disposed of. Your instructor will assess.
-
If any non-glassware equipment seems broken or not in good working order, ask the Instructor so that they can give specific directions.
-
When in doubt or confused, just ask your Instructor! They are here to help!
Step 2 - Complete the inventory sheet completely BEFORE taking it to the stockroom. This means you have already done the following:
-
Wrote your name, K number (get it from your instructor if you don't know it), lab section letter (your lab instructor will tell you what this is and/or write it on the board for your class), and your drawer number (etched on the metal medallion on the upper corner of the drawer) are all filled in at the top
-
Signed the bottom of the sheet indicating you are aware you are responsible for the contents of your lab drawer this semester
-
Copied the combination lock serial number for your drawer (i.e. it is the number after "V66" on the back of the lock) to the designated line on the form
Step 3 - Successfully completing step 2 will mean that you will have your lock combination when you return from the stock room to the lab. With this combination, you must:
1. Take a picture of your combo with your phone
2. Write the combination down in your class notebook or folder or in a similar location
3. Also write the combination for your lock and drawer number on the Week 1 worksheet that you will be turning in before leaving for the day
Step 4 - Properly lock and secure your drawer to ensure all contents are safe until the next time you return to the lab.
Note: If you haven't worked with a combination lock before, or you don't remember how they work, you will want to use this link to watch a helpful YouTube video (or visit with this shortened address: qrco.de/bdGuaj).