
Soap lab
- Page ID
- 387043
\( \newcommand{\vecs}[1]{\overset { \scriptstyle \rightharpoonup} {\mathbf{#1}} } \)
\( \newcommand{\vecd}[1]{\overset{-\!-\!\rightharpoonup}{\vphantom{a}\smash {#1}}} \)
\( \newcommand{\dsum}{\displaystyle\sum\limits} \)
\( \newcommand{\dint}{\displaystyle\int\limits} \)
\( \newcommand{\dlim}{\displaystyle\lim\limits} \)
\( \newcommand{\id}{\mathrm{id}}\) \( \newcommand{\Span}{\mathrm{span}}\)
( \newcommand{\kernel}{\mathrm{null}\,}\) \( \newcommand{\range}{\mathrm{range}\,}\)
\( \newcommand{\RealPart}{\mathrm{Re}}\) \( \newcommand{\ImaginaryPart}{\mathrm{Im}}\)
\( \newcommand{\Argument}{\mathrm{Arg}}\) \( \newcommand{\norm}[1]{\| #1 \|}\)
\( \newcommand{\inner}[2]{\langle #1, #2 \rangle}\)
\( \newcommand{\Span}{\mathrm{span}}\)
\( \newcommand{\id}{\mathrm{id}}\)
\( \newcommand{\Span}{\mathrm{span}}\)
\( \newcommand{\kernel}{\mathrm{null}\,}\)
\( \newcommand{\range}{\mathrm{range}\,}\)
\( \newcommand{\RealPart}{\mathrm{Re}}\)
\( \newcommand{\ImaginaryPart}{\mathrm{Im}}\)
\( \newcommand{\Argument}{\mathrm{Arg}}\)
\( \newcommand{\norm}[1]{\| #1 \|}\)
\( \newcommand{\inner}[2]{\langle #1, #2 \rangle}\)
\( \newcommand{\Span}{\mathrm{span}}\) \( \newcommand{\AA}{\unicode[.8,0]{x212B}}\)
\( \newcommand{\vectorA}[1]{\vec{#1}} % arrow\)
\( \newcommand{\vectorAt}[1]{\vec{\text{#1}}} % arrow\)
\( \newcommand{\vectorB}[1]{\overset { \scriptstyle \rightharpoonup} {\mathbf{#1}} } \)
\( \newcommand{\vectorC}[1]{\textbf{#1}} \)
\( \newcommand{\vectorD}[1]{\overrightarrow{#1}} \)
\( \newcommand{\vectorDt}[1]{\overrightarrow{\text{#1}}} \)
\( \newcommand{\vectE}[1]{\overset{-\!-\!\rightharpoonup}{\vphantom{a}\smash{\mathbf {#1}}}} \)
\( \newcommand{\vecs}[1]{\overset { \scriptstyle \rightharpoonup} {\mathbf{#1}} } \)
\(\newcommand{\longvect}{\overrightarrow}\)
\( \newcommand{\vecd}[1]{\overset{-\!-\!\rightharpoonup}{\vphantom{a}\smash {#1}}} \)
\(\newcommand{\avec}{\mathbf a}\) \(\newcommand{\bvec}{\mathbf b}\) \(\newcommand{\cvec}{\mathbf c}\) \(\newcommand{\dvec}{\mathbf d}\) \(\newcommand{\dtil}{\widetilde{\mathbf d}}\) \(\newcommand{\evec}{\mathbf e}\) \(\newcommand{\fvec}{\mathbf f}\) \(\newcommand{\nvec}{\mathbf n}\) \(\newcommand{\pvec}{\mathbf p}\) \(\newcommand{\qvec}{\mathbf q}\) \(\newcommand{\svec}{\mathbf s}\) \(\newcommand{\tvec}{\mathbf t}\) \(\newcommand{\uvec}{\mathbf u}\) \(\newcommand{\vvec}{\mathbf v}\) \(\newcommand{\wvec}{\mathbf w}\) \(\newcommand{\xvec}{\mathbf x}\) \(\newcommand{\yvec}{\mathbf y}\) \(\newcommand{\zvec}{\mathbf z}\) \(\newcommand{\rvec}{\mathbf r}\) \(\newcommand{\mvec}{\mathbf m}\) \(\newcommand{\zerovec}{\mathbf 0}\) \(\newcommand{\onevec}{\mathbf 1}\) \(\newcommand{\real}{\mathbb R}\) \(\newcommand{\twovec}[2]{\left[\begin{array}{r}#1 \\ #2 \end{array}\right]}\) \(\newcommand{\ctwovec}[2]{\left[\begin{array}{c}#1 \\ #2 \end{array}\right]}\) \(\newcommand{\threevec}[3]{\left[\begin{array}{r}#1 \\ #2 \\ #3 \end{array}\right]}\) \(\newcommand{\cthreevec}[3]{\left[\begin{array}{c}#1 \\ #2 \\ #3 \end{array}\right]}\) \(\newcommand{\fourvec}[4]{\left[\begin{array}{r}#1 \\ #2 \\ #3 \\ #4 \end{array}\right]}\) \(\newcommand{\cfourvec}[4]{\left[\begin{array}{c}#1 \\ #2 \\ #3 \\ #4 \end{array}\right]}\) \(\newcommand{\fivevec}[5]{\left[\begin{array}{r}#1 \\ #2 \\ #3 \\ #4 \\ #5 \\ \end{array}\right]}\) \(\newcommand{\cfivevec}[5]{\left[\begin{array}{c}#1 \\ #2 \\ #3 \\ #4 \\ #5 \\ \end{array}\right]}\) \(\newcommand{\mattwo}[4]{\left[\begin{array}{rr}#1 \amp #2 \\ #3 \amp #4 \\ \end{array}\right]}\) \(\newcommand{\laspan}[1]{\text{Span}\{#1\}}\) \(\newcommand{\bcal}{\cal B}\) \(\newcommand{\ccal}{\cal C}\) \(\newcommand{\scal}{\cal S}\) \(\newcommand{\wcal}{\cal W}\) \(\newcommand{\ecal}{\cal E}\) \(\newcommand{\coords}[2]{\left\{#1\right\}_{#2}}\) \(\newcommand{\gray}[1]{\color{gray}{#1}}\) \(\newcommand{\lgray}[1]{\color{lightgray}{#1}}\) \(\newcommand{\rank}{\operatorname{rank}}\) \(\newcommand{\row}{\text{Row}}\) \(\newcommand{\col}{\text{Col}}\) \(\renewcommand{\row}{\text{Row}}\) \(\newcommand{\nul}{\text{Nul}}\) \(\newcommand{\var}{\text{Var}}\) \(\newcommand{\corr}{\text{corr}}\) \(\newcommand{\len}[1]{\left|#1\right|}\) \(\newcommand{\bbar}{\overline{\bvec}}\) \(\newcommand{\bhat}{\widehat{\bvec}}\) \(\newcommand{\bperp}{\bvec^\perp}\) \(\newcommand{\xhat}{\widehat{\xvec}}\) \(\newcommand{\vhat}{\widehat{\vvec}}\) \(\newcommand{\uhat}{\widehat{\uvec}}\) \(\newcommand{\what}{\widehat{\wvec}}\) \(\newcommand{\Sighat}{\widehat{\Sigma}}\) \(\newcommand{\lt}{<}\) \(\newcommand{\gt}{>}\) \(\newcommand{\amp}{&}\) \(\definecolor{fillinmathshade}{gray}{0.9}\)Making Specialty Soap: Chemistry of Saponification
A Two-Week Guided-Inquiry Experiment
Saponification Background
Chemistry of Saponification
To make soap, a fat or oil containing fatty acid triglyceride molecules is combined with a strong base such as sodium hydroxide (NaOH) or potassium hydroxide (KOH). Under the right reaction conditions, this will form glycerol and a salt of the fatty acid. The chemical equation is
\[\ce{Fatty\ acid\ triglyceride + 3 NaOH -> 3 fatty\ acid\ salt + glycerol}\]
Each fatty acid triglyceride contains three fatty acid groups that yield fatty acids salts (soap) in the presence of NaOH. For example, the fatty acid stearic acid (C17H35CO2H) yields sodium stearate (C17H35CO2Na), shown below.

Figure 1: Sodium stearate is an example of a salt of a fatty acid which is just one example of a compound that can be found in soaps1
We'll be using sodium hydroxide (NaOH) as the base in the soap reaction. Check out this video which describes the interesting history and importance of potash, which contains potassium instead of sodium, used in early soap making and other applications.
Making Soap as a Specialty Product
Making specialty soaps is popular by craft enthusiasts and small businesses. Depending on the ingredients used to create the soap, the final product can have different physical properties including texture, color, and smell that appeal to a consumer. The soap can also have desirable properties such as being gentle for sensitive skin, moisturizing, exfoliating, cleansing, stain removing, etc. When manufacturing and selling soaps, cost also must be taken into consideration. For this experiment, you will choose soap ingredients to create a specialty soap that you will pitch to your classmates and try to convince them to buy your product.
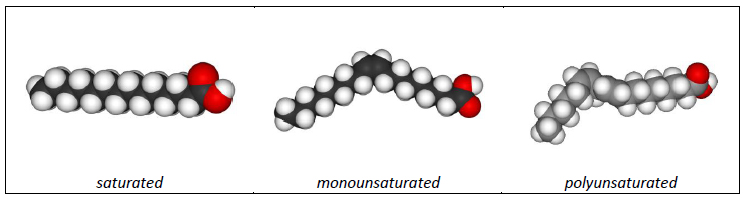
The main decision you’ll need to make when making your soap is what oil/fat to use. The chemical composition and the structure of the fatty acid compounds present in the fat/oil you choose is extremely important to many properties of your soap, including its final hardness. One major difference between fatty acids is if the compound is “saturated” or “unsaturated”. Saturated fatty acids mean that each carbon atom is surrounded by the maximum number of hydrogen atoms. Unsaturated fatty acid molecules have at least one carbon atom that has formed a double bond with an adjacent carbon, so there are less hydrogen atoms surrounding it. See the examples of the chemical structures of saturated and unsaturated fatty acids in Figure 2.
Figure 2: Chemical structures showing examples of saturated, monounsaturated, and polyunsaturated fatty acid molecules. The black spheres are carbon atoms, the white are hydrogen, and the red are oxygen.
Experiment Objectives
For this 2-week guided inquiry experiment, you will work with a lab partner to:
-
Investigate how the chemical structure of different oils/fats affect the properties of soaps.
-
Use this information as well as the costs of all ingredients to determine how to make the “best” specialty soap
-
Test the properties of the soap you create
-
Design a method to describe how well your soap lathers
-
Give a short “sales pitch” presentation to try to convince your peers that you have made the best specialty soap in the lab
Experimental Procedure for Week 1
You’ll work together in pairs for this two-week experiment. Write in your lab notebook and complete the Summary Sheet for Week 1 as you go through the procedure.
Safety Considerations
-
Wear your safety goggles at all times during this experiment.
-
Concentrated sodium hydroxide is caustic and will irritate and burn the eyes and skin. Handle this solution carefully and thoroughly clean up any spills. Here is an example Safety Data Sheet (SDS) for a 20% sodium hydroxide solution.
Part A: Making Your Soap2 3
- With your partner, decide which fat(s) or oil(s) to use to prepare your soap. You are welcome to use your own oil or fat if you brought any, or use one provided in lab, shown in the table below. Be sure to choose oils(s)/fat(s) containing fatty acid triglycerides – so think cooking fats and oils and not motor oil or mineral oil. You may use only one fat/oil or use a mixture of up to two different fats/oils. The total amount of fat/oil needs to be 10mL.
| Fat or Oil | Approximate cost per bar of soap |
|---|---|
| Olive oil | $1.00 |
| Canola oil | $0.30 |
| Coconut oil | $1.40 |
| Vegetable shortening | $0.70 |
The approximate costs of each oil were based on prices found at Walmart using 4 oz (a standard size for a bar of soap). If you are using a different oil or fat, find the price per oz. online, and calculate the total cost for 4 oz.
-
Using a hot plate set at a low temperature, gently heat the fat or oil in a beaker until it reaches a temperature of 35 °C. Using a graduated cylinder, measure a total of 10 mL of warm fat or oil and then pour into a 250 mL beaker.
-
Add 3 mL of 20% sodium hydroxide solution to the beaker. Use a glass stirring rod to combine the oil/fat and sodium hydroxide. Add a few grains of stearic acid, which will help harden your soap.
-
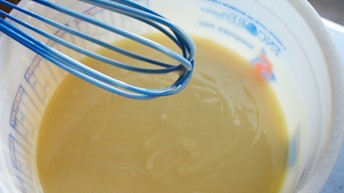
Place a stir bar into your beaker. Then place the beaker on a stir plate, turn on and then gradually increase the speed to avoid splattering. Every so often you'll also want to take the beaker off the stir plate and use the glass stirring rod to stir the mixture by hand, paying extra attention to scrape around the edges of the beaker that might not be stirred effectively with the stir bar. Use the rest of the lab period to stir this as long as possible. Particularly for the oils that are liquid at room temperature (canola oil, olive oil, etc.), stirring a longer time will allow the reaction to complete and the mixture will thicken. Ideally, the mixture will achieve a thicker consistency called “trace” that you can see in the image below. This ensures that you have created an emulsion. If the reaction does not finish and you do not form an emulsion, you risk having unreacted sodium hydroxide left in your soap which will make it unsafe to use. At least one lab partner should stay at the lab bench to monitor your soap while it is stirring, but you both are able to multi-task and complete other tasks at the lab bench.
Figure 3: This image shows “trace,” when the soap mixture is thick you can drip some onto the surface of the mixture and it will not immediately sink back in.4
-
Once your reaction is complete, if desired, add one drop of fragrance to your mixture and mix thoroughly. Essential oils can be expensive, so add $1.00 to the cost of your bar of soap if you add fragrance.
-
Add one drop of coloring if desired. Add $0.20 to the cost of your bar of soap if you use coloring.
-
Use a sharpie to clearly label the bottom of an aluminum weigh boat with you and your partner’s initials, your lab section and lab time, and the current date. Pour your soap mixture into the aluminum weigh boat and let it sit until next week. During the week, your soap will finish reacting and set.
Once you are done with the experiment, be sure to thoroughly clean all of your glassware and equipment you used with warm, soapy water and a brush to remove all fat/oil and soap residues.
Experimental Procedure for Week 2
Part B. Testing Properties of Soap
Write in your lab notebook and fill out the Summary Sheet for Week 2 as you work through the procedure. Wear gloves as you handle your soap in case there is any unreacted sodium hydroxide still present.
1. Test the pH
You’ll want to test the pH of your soap to make sure there is no unreacted sodium hydroxide that would make your soap unsafe to use. An easy way to test for pH is to put a drop of deionized water on your soap and then dip a pH strip in the soap solution that forms. If your soap pH is between 7-10, it is safe to use and touch. If your pH is above 10, there is still too much unreacted sodium hydroxide and it will be unsafe to touch. However, for best safety practices, continue to wear your gloves when handling your soap regardless of the pH you measure.
2. Physical Properties
Observe the color, smell, and hardness of your soap. Be descriptive in your recorded observations.
3. Ability to Lather
Compare the ability of your soap to lather compared to commercial bar soap. Come up with a qualitative or quantitative method to test which soap produces a better lather (i.e. more suds). You can compare the amount of suds from your soap to the suds from the commercial soap OR determine the volume of the suds produced from your soap compared to the volume of suds from the commercial soap. Record your method and observations. Come up with a simple statement to express your results that you can share in your presentation.
4. Ability to Clean5
Test the ability of your soap to clean a stain. You will be provided with index cards, lip stick, and cotton swabs. Place a small amount of lipstick on the index card. Wet the cotton swab and use your soap to create a lather. Try to “clean” the lipstick stain with your soapy swab and observe and record your results. If time allows, try to clean a lipstick stain with just water and/or commercial soap to compare your results.
Part C. Sales Pitch Presentation (Week 2)
After you have conducted all your tests investigating the properties of your soap, prepare a short presentation (3 - 5 minutes) that highlights the desirable qualities and properties of your soap. Split the presentation time between you and your lab partner.
When giving your presentation, you will stand in front of the class with your soap and, if desired, any other visuals you prepared during testing. You may also utilize the white board if there is anything you would like to write or draw to help your pitch. You are welcome to refer to the notes on your worksheet while you are giving your presentation, or you may also prepare a note card or other outline of the important points you want to cover in your presentation. The presentation will be graded according to the provided rubric.
In your presentation, be sure to include the following:
-
Start by discussing your soap recipe and why you chose it. Include relevant background research you did in Week 1 and important observations from your soap making.
-
Describe your soap's properties. Show off your soap and any other visual aids from the experimental testing.
-
Evaluate the procedures from your experimental testing of your soap's properties. What went well and what didn't? Give suggestions for ways to improve if you were given a chance to make and test another batch of soap.
-
Be persuasive in your presentation. What makes your soap stand out from all the others? Consider coming up with a brand name, logo, slogan, etc. for your soap. How did it perform compared to the commercial soap?
-
Flowers, P., Theopold, K., Langley, R., Robinson, W.R. et. al. Section 11.5 Colloids. In Chemistry 2e, 2nd edition; OpenStax, 2019. https://openstax.org/books/chemistry-2e/pages/1-introduction↩︎︎
-
Phansteil IV, O, Dueno, E. and Wang, Q.X. Synthesis of Exotic Soaps in the Chemistry Laboratory. J. Chem. Ed. 1998, 75, 5.↩︎
-
Making Soap Saponification Lab Procedure. https://chem.libretexts.org/@go/page/306794 (accessed Jun 18, 2021).↩︎
-
Best Ways to Control Trace When You Make Cold Process Soap. https://www.modernsoapmaking.com/blog/controlling-trace-in-cold-process-soapmaking (accessed Aug 20, 2021).↩︎
-
Soap and Detergent: Release the Grease. https://www.acs.org/content/dam/acso...the-grease.pdf (accessed Jun 18, 2021).↩︎