
14.15: Paper chromatography
- Page ID
- 424494
\( \newcommand{\vecs}[1]{\overset { \scriptstyle \rightharpoonup} {\mathbf{#1}} } \)
\( \newcommand{\vecd}[1]{\overset{-\!-\!\rightharpoonup}{\vphantom{a}\smash {#1}}} \)
\( \newcommand{\dsum}{\displaystyle\sum\limits} \)
\( \newcommand{\dint}{\displaystyle\int\limits} \)
\( \newcommand{\dlim}{\displaystyle\lim\limits} \)
\( \newcommand{\id}{\mathrm{id}}\) \( \newcommand{\Span}{\mathrm{span}}\)
( \newcommand{\kernel}{\mathrm{null}\,}\) \( \newcommand{\range}{\mathrm{range}\,}\)
\( \newcommand{\RealPart}{\mathrm{Re}}\) \( \newcommand{\ImaginaryPart}{\mathrm{Im}}\)
\( \newcommand{\Argument}{\mathrm{Arg}}\) \( \newcommand{\norm}[1]{\| #1 \|}\)
\( \newcommand{\inner}[2]{\langle #1, #2 \rangle}\)
\( \newcommand{\Span}{\mathrm{span}}\)
\( \newcommand{\id}{\mathrm{id}}\)
\( \newcommand{\Span}{\mathrm{span}}\)
\( \newcommand{\kernel}{\mathrm{null}\,}\)
\( \newcommand{\range}{\mathrm{range}\,}\)
\( \newcommand{\RealPart}{\mathrm{Re}}\)
\( \newcommand{\ImaginaryPart}{\mathrm{Im}}\)
\( \newcommand{\Argument}{\mathrm{Arg}}\)
\( \newcommand{\norm}[1]{\| #1 \|}\)
\( \newcommand{\inner}[2]{\langle #1, #2 \rangle}\)
\( \newcommand{\Span}{\mathrm{span}}\) \( \newcommand{\AA}{\unicode[.8,0]{x212B}}\)
\( \newcommand{\vectorA}[1]{\vec{#1}} % arrow\)
\( \newcommand{\vectorAt}[1]{\vec{\text{#1}}} % arrow\)
\( \newcommand{\vectorB}[1]{\overset { \scriptstyle \rightharpoonup} {\mathbf{#1}} } \)
\( \newcommand{\vectorC}[1]{\textbf{#1}} \)
\( \newcommand{\vectorD}[1]{\overrightarrow{#1}} \)
\( \newcommand{\vectorDt}[1]{\overrightarrow{\text{#1}}} \)
\( \newcommand{\vectE}[1]{\overset{-\!-\!\rightharpoonup}{\vphantom{a}\smash{\mathbf {#1}}}} \)
\( \newcommand{\vecs}[1]{\overset { \scriptstyle \rightharpoonup} {\mathbf{#1}} } \)
\(\newcommand{\longvect}{\overrightarrow}\)
\( \newcommand{\vecd}[1]{\overset{-\!-\!\rightharpoonup}{\vphantom{a}\smash {#1}}} \)
\(\newcommand{\avec}{\mathbf a}\) \(\newcommand{\bvec}{\mathbf b}\) \(\newcommand{\cvec}{\mathbf c}\) \(\newcommand{\dvec}{\mathbf d}\) \(\newcommand{\dtil}{\widetilde{\mathbf d}}\) \(\newcommand{\evec}{\mathbf e}\) \(\newcommand{\fvec}{\mathbf f}\) \(\newcommand{\nvec}{\mathbf n}\) \(\newcommand{\pvec}{\mathbf p}\) \(\newcommand{\qvec}{\mathbf q}\) \(\newcommand{\svec}{\mathbf s}\) \(\newcommand{\tvec}{\mathbf t}\) \(\newcommand{\uvec}{\mathbf u}\) \(\newcommand{\vvec}{\mathbf v}\) \(\newcommand{\wvec}{\mathbf w}\) \(\newcommand{\xvec}{\mathbf x}\) \(\newcommand{\yvec}{\mathbf y}\) \(\newcommand{\zvec}{\mathbf z}\) \(\newcommand{\rvec}{\mathbf r}\) \(\newcommand{\mvec}{\mathbf m}\) \(\newcommand{\zerovec}{\mathbf 0}\) \(\newcommand{\onevec}{\mathbf 1}\) \(\newcommand{\real}{\mathbb R}\) \(\newcommand{\twovec}[2]{\left[\begin{array}{r}#1 \\ #2 \end{array}\right]}\) \(\newcommand{\ctwovec}[2]{\left[\begin{array}{c}#1 \\ #2 \end{array}\right]}\) \(\newcommand{\threevec}[3]{\left[\begin{array}{r}#1 \\ #2 \\ #3 \end{array}\right]}\) \(\newcommand{\cthreevec}[3]{\left[\begin{array}{c}#1 \\ #2 \\ #3 \end{array}\right]}\) \(\newcommand{\fourvec}[4]{\left[\begin{array}{r}#1 \\ #2 \\ #3 \\ #4 \end{array}\right]}\) \(\newcommand{\cfourvec}[4]{\left[\begin{array}{c}#1 \\ #2 \\ #3 \\ #4 \end{array}\right]}\) \(\newcommand{\fivevec}[5]{\left[\begin{array}{r}#1 \\ #2 \\ #3 \\ #4 \\ #5 \\ \end{array}\right]}\) \(\newcommand{\cfivevec}[5]{\left[\begin{array}{c}#1 \\ #2 \\ #3 \\ #4 \\ #5 \\ \end{array}\right]}\) \(\newcommand{\mattwo}[4]{\left[\begin{array}{rr}#1 \amp #2 \\ #3 \amp #4 \\ \end{array}\right]}\) \(\newcommand{\laspan}[1]{\text{Span}\{#1\}}\) \(\newcommand{\bcal}{\cal B}\) \(\newcommand{\ccal}{\cal C}\) \(\newcommand{\scal}{\cal S}\) \(\newcommand{\wcal}{\cal W}\) \(\newcommand{\ecal}{\cal E}\) \(\newcommand{\coords}[2]{\left\{#1\right\}_{#2}}\) \(\newcommand{\gray}[1]{\color{gray}{#1}}\) \(\newcommand{\lgray}[1]{\color{lightgray}{#1}}\) \(\newcommand{\rank}{\operatorname{rank}}\) \(\newcommand{\row}{\text{Row}}\) \(\newcommand{\col}{\text{Col}}\) \(\renewcommand{\row}{\text{Row}}\) \(\newcommand{\nul}{\text{Nul}}\) \(\newcommand{\var}{\text{Var}}\) \(\newcommand{\corr}{\text{corr}}\) \(\newcommand{\len}[1]{\left|#1\right|}\) \(\newcommand{\bbar}{\overline{\bvec}}\) \(\newcommand{\bhat}{\widehat{\bvec}}\) \(\newcommand{\bperp}{\bvec^\perp}\) \(\newcommand{\xhat}{\widehat{\xvec}}\) \(\newcommand{\vhat}{\widehat{\vvec}}\) \(\newcommand{\uhat}{\widehat{\uvec}}\) \(\newcommand{\what}{\widehat{\wvec}}\) \(\newcommand{\Sighat}{\widehat{\Sigma}}\) \(\newcommand{\lt}{<}\) \(\newcommand{\gt}{>}\) \(\newcommand{\amp}{&}\) \(\definecolor{fillinmathshade}{gray}{0.9}\)- To use paper chromatography to identify whether certain food dyes are pure substances or mixtures.
- To obtain a paper chromatogram of various food dyes
- To identify components of food dyes by calculating Rf values
Chromatography is a method of physically separating mixtures into its individual components. It is a common laboratory technique used to identify unknown components in mixtures. The "Chroma" in chromatography refers to colors. While early chromatography (and our experiment today) relied on our eyesight to read a chromatography result, modern instrumentation has other detection methods (absorbance in the ultraviolet or infrared, flame ionisation, mass spectrometry and many other techniques, depending on the type of samples you are separating).
There are several types of chromatography; all types employ a mobile phase or eluent (it can be liquid or gas), which is forced through a stationary phase (a solid or semi-solid). Mixtures are separated because some components will be more attracted to the stationary phase (and stick to it) while some components will be more attracted to the mobile phase (and travel with it).
By eye, we cannot know if each dye color is a mixture or pure substance. Using chromatography, the components in a sample will migrate along the filter paper at different rates such that they become spread out and separated from each other. The mobile phase takes advantage of differing solubility or polarity of the components in order to separate them. This component traveling process is called elution. Chromatography can be used to separate inks, dyes, pigments in plants, or used to determine the chemical composition of many substances.
Figure 1 shows a typical paper chromatogram. There are a few difficulties commonly encountered in the elution process. One problem is that spots tend the spread out as they elute, and can bleed into each other as they proceed up the paper. This can be confusing when interpreting the chromatogram. To avoid this problem, space the spots of sample far apart and make repeated, tiny applications of sample to prevent spreading. Another problem is an uneven solvent front. This can happen if the beaker is nudged – if the mobile phase sloshes inside, the elution trails may travel diagonally, which makes interpretation very difficult.
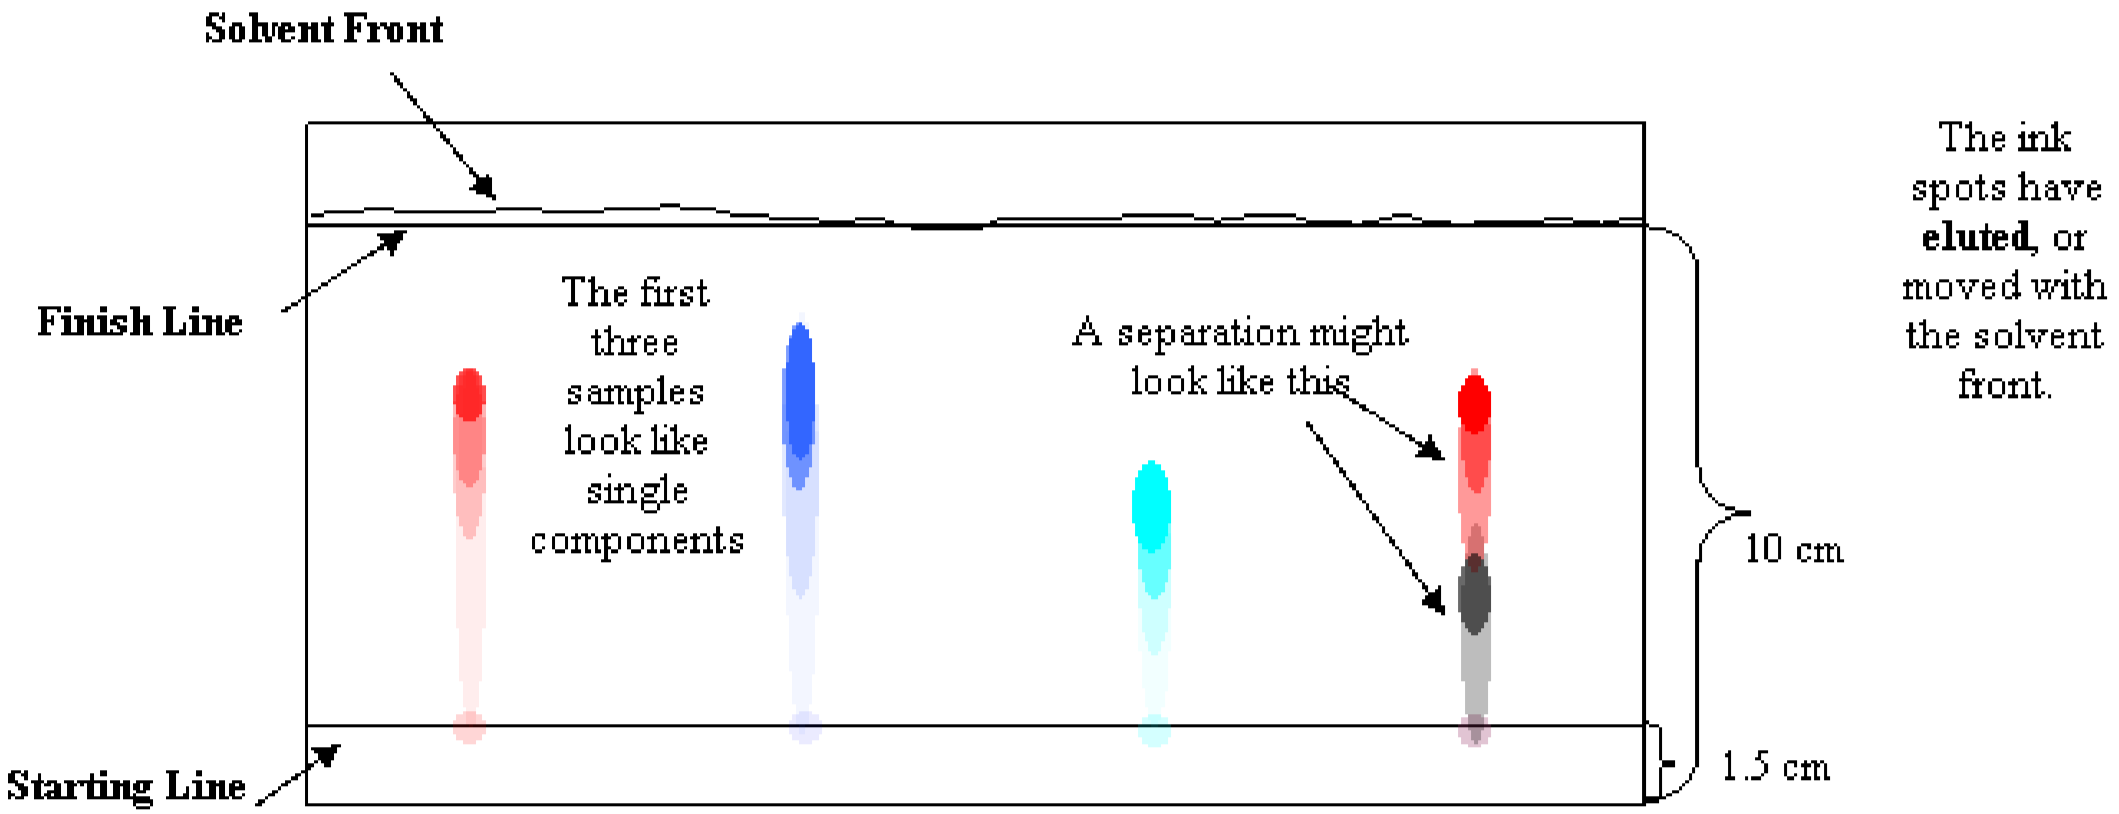
A component with a given solubility travels along with the mobile phase at one rate, regardless of what other components are present in the sample. If the red part of purple dye travels at the same rate as pure red dye, and both stop in the same place, the two should be the same red dye. The two red spots should have the same Retention Factor, Rf. The Rf is the distance, \(D\), traveled by the spot divided by the distance traveled by the eluting solution, or Solvent Front, \(F\).
\[R_f=\frac{D}{F} \label{1}\]
Comparing the Rf values allows the confirmation of a component in multiple samples because unique components have unique Rf values (for the same solvent mixture at the same temperature).
Procedure
Materials and Equipment
Materials: chromatography paper, candy, and eluting solution.
Equipment: 600-mL beaker, pencil, ruler, binder clip and Whatman #1.
Be sure to handle only the dry part or the chromatogram when removing it from the beaker. Wash hands thoroughly if the eluting solution touches your skin. Personal protective equipment (PPE) required: closed-toe shoes
Part A: Preparation of dye solutions
- You will use two pieces of candy, one with a primary color (red, yellow, blue), and one other one (green, orange, brown). You can choose what type of candy. Add two drops of water into a well of the spot plate. Add a piece of candy such that one side of it is suspended in water. After most of the dye is dissolved, turn the candy around to dissolve the dye on the other side. Once most of the dye is dissolved (i.e. you can see the white coating), remove the candy and discard. Do not eat the candy.
- If you want to have a higher concentration of dye in solution, work together with someone who has the same color, and dissolve the dye from another piece of candy in the same solution. There is plenty of volume for multiple runs, so you can share the resulting dye solution.
- Repeat for the different colors assigned to you.
Part B: Preparation of Chromatography Paper
- Wash your hands thoroughly to remove excess oils from your skin. Obtain a ruler and a piece of chromatography paper. Handle the paper only on the edges to avoid leaving fingerprints, as these may hinder the elution process.
- Place the chromatography paper on a sheet of clean notebook paper or paper towel to avoid picking up dirt or contaminants from the bench top. Orient the paper into a “portrait” position and write your name on the top edge of the paper in one corner. Using a pencil and ruler to measure accurately, draw a straight line across the paper, about 1.5 cm above the bottom edge. This is the starting line.
- Lightly draw two small “X” centered on the starting line so that there is plenty of space between the spots and between spots and edge of the paper.
- In the center of each X, apply a small amount of dye with a capillary tube (using the solutions you made in part A, see Figure 2 right).

Figure 2: Using the binder clip (left) and applying the sample (right)
- Attach the top of the paper to a binder clip and insert a pencil through the metal loops (see left panel). Then, lay the pencil across a 600 mL beaker (avoiding the spout) and adjust the paper so it almost touches the bottom.
Part C: Acquisition of Chromatogram
- Remove the paper strip, clip and pencil assembly from the beaker.
- Find your eluting solution. Depending which bench you are working at (near the safety shower, near the fire alarm, or middle bench), you will use a different eluting solution. Pour about 25 mL of eluting solution into the beaker.
Bench Eluting solution near the safety shower 0.1 % aqueous sodium chloride solution middle bench 0.1 % aqueous sodium chloride solution containing 5% ethanol near the fire alarm light 1 % aqueous sodium chloride solution - Place a wick (a larger filter paper) into the beaker so it touches the side, and angle the beaker so that the wick gets wet (without pouring out the solution). Get a cover ready (aluminum foil or saran wrap).
- Gently place the pencil on the rim of the beaker so that the paper is submerged in solution, but the dye spots are not submerged. You should see the solvent move up the paper strip. If necessary, adjust the height. Remember that the spots must be above the liquid level for the experiment to work.
- Start a timer.
- Cover the beaker with aluminum foil or saran wrap. Let the solvent move up least 6 cm (two-thirds of the length of the paper strip). This will take some patience.
- When the solvent front moved far enough, lift the paper out of the solution by lifting the pencil. Let excess eluent drip into the beaker. Mark the position of the solvent front with a pencil (if you forget this step, you can later see the solvent front nicely under UV light). Let the paper air dry, attaching it to a snorkel hood to speed things up. Let it dry completely. Again, this might take some patience.
Part D: Interpretation of Chromatogram

Figure 3: UV illuminator (left) and chromatogram viewed under visible vs. UV light (right)
- Circle around each color spot. For mixtures, circle each separated color as best as you can.
- Use the UV-cardboard illuminator (Figure 3 left panel) to see which spots fluoresce in a different color than the visible color. This will also help detecting colors like blue and yellow that might be difficult to see in visible light (Figure 3 right), and visualizing the solvent front after it dried.
- Use a ruler and draw a plus sign in the center of each spot. Remember, if you separated a mixture, each single color gets a plus sign. Measure the distance from the starting line to each plus sign. Record this distance for each spot on your lab report. These are the \(D\) values, in cm.
- Measure the distance between the starting line and the solvent front reached. Record this distance. This is the \(F\) value, in cm. Unless your solvent ran unevenly, this should be the same for all samples on a single strip.
- Calculate the retention factor (Rf) for each spot and record the values in your lab report.
- Compare the retention factor of samples with multiple spots (dye mixtures) to those with a single spot (pure dyes). What are colors used for the mixtures? Is that what you expected from your experience growing up?
Acknowledgements
Thanks to the Spring 2023 Monday lab section at Westfield State for many suggestions, corrections and the samples pictured here.