
5.2.1: Volume measurements
- Page ID
- 242462
\( \newcommand{\vecs}[1]{\overset { \scriptstyle \rightharpoonup} {\mathbf{#1}} } \)
\( \newcommand{\vecd}[1]{\overset{-\!-\!\rightharpoonup}{\vphantom{a}\smash {#1}}} \)
\( \newcommand{\id}{\mathrm{id}}\) \( \newcommand{\Span}{\mathrm{span}}\)
( \newcommand{\kernel}{\mathrm{null}\,}\) \( \newcommand{\range}{\mathrm{range}\,}\)
\( \newcommand{\RealPart}{\mathrm{Re}}\) \( \newcommand{\ImaginaryPart}{\mathrm{Im}}\)
\( \newcommand{\Argument}{\mathrm{Arg}}\) \( \newcommand{\norm}[1]{\| #1 \|}\)
\( \newcommand{\inner}[2]{\langle #1, #2 \rangle}\)
\( \newcommand{\Span}{\mathrm{span}}\)
\( \newcommand{\id}{\mathrm{id}}\)
\( \newcommand{\Span}{\mathrm{span}}\)
\( \newcommand{\kernel}{\mathrm{null}\,}\)
\( \newcommand{\range}{\mathrm{range}\,}\)
\( \newcommand{\RealPart}{\mathrm{Re}}\)
\( \newcommand{\ImaginaryPart}{\mathrm{Im}}\)
\( \newcommand{\Argument}{\mathrm{Arg}}\)
\( \newcommand{\norm}[1]{\| #1 \|}\)
\( \newcommand{\inner}[2]{\langle #1, #2 \rangle}\)
\( \newcommand{\Span}{\mathrm{span}}\) \( \newcommand{\AA}{\unicode[.8,0]{x212B}}\)
\( \newcommand{\vectorA}[1]{\vec{#1}} % arrow\)
\( \newcommand{\vectorAt}[1]{\vec{\text{#1}}} % arrow\)
\( \newcommand{\vectorB}[1]{\overset { \scriptstyle \rightharpoonup} {\mathbf{#1}} } \)
\( \newcommand{\vectorC}[1]{\textbf{#1}} \)
\( \newcommand{\vectorD}[1]{\overrightarrow{#1}} \)
\( \newcommand{\vectorDt}[1]{\overrightarrow{\text{#1}}} \)
\( \newcommand{\vectE}[1]{\overset{-\!-\!\rightharpoonup}{\vphantom{a}\smash{\mathbf {#1}}}} \)
\( \newcommand{\vecs}[1]{\overset { \scriptstyle \rightharpoonup} {\mathbf{#1}} } \)
\( \newcommand{\vecd}[1]{\overset{-\!-\!\rightharpoonup}{\vphantom{a}\smash {#1}}} \)
\(\newcommand{\avec}{\mathbf a}\) \(\newcommand{\bvec}{\mathbf b}\) \(\newcommand{\cvec}{\mathbf c}\) \(\newcommand{\dvec}{\mathbf d}\) \(\newcommand{\dtil}{\widetilde{\mathbf d}}\) \(\newcommand{\evec}{\mathbf e}\) \(\newcommand{\fvec}{\mathbf f}\) \(\newcommand{\nvec}{\mathbf n}\) \(\newcommand{\pvec}{\mathbf p}\) \(\newcommand{\qvec}{\mathbf q}\) \(\newcommand{\svec}{\mathbf s}\) \(\newcommand{\tvec}{\mathbf t}\) \(\newcommand{\uvec}{\mathbf u}\) \(\newcommand{\vvec}{\mathbf v}\) \(\newcommand{\wvec}{\mathbf w}\) \(\newcommand{\xvec}{\mathbf x}\) \(\newcommand{\yvec}{\mathbf y}\) \(\newcommand{\zvec}{\mathbf z}\) \(\newcommand{\rvec}{\mathbf r}\) \(\newcommand{\mvec}{\mathbf m}\) \(\newcommand{\zerovec}{\mathbf 0}\) \(\newcommand{\onevec}{\mathbf 1}\) \(\newcommand{\real}{\mathbb R}\) \(\newcommand{\twovec}[2]{\left[\begin{array}{r}#1 \\ #2 \end{array}\right]}\) \(\newcommand{\ctwovec}[2]{\left[\begin{array}{c}#1 \\ #2 \end{array}\right]}\) \(\newcommand{\threevec}[3]{\left[\begin{array}{r}#1 \\ #2 \\ #3 \end{array}\right]}\) \(\newcommand{\cthreevec}[3]{\left[\begin{array}{c}#1 \\ #2 \\ #3 \end{array}\right]}\) \(\newcommand{\fourvec}[4]{\left[\begin{array}{r}#1 \\ #2 \\ #3 \\ #4 \end{array}\right]}\) \(\newcommand{\cfourvec}[4]{\left[\begin{array}{c}#1 \\ #2 \\ #3 \\ #4 \end{array}\right]}\) \(\newcommand{\fivevec}[5]{\left[\begin{array}{r}#1 \\ #2 \\ #3 \\ #4 \\ #5 \\ \end{array}\right]}\) \(\newcommand{\cfivevec}[5]{\left[\begin{array}{c}#1 \\ #2 \\ #3 \\ #4 \\ #5 \\ \end{array}\right]}\) \(\newcommand{\mattwo}[4]{\left[\begin{array}{rr}#1 \amp #2 \\ #3 \amp #4 \\ \end{array}\right]}\) \(\newcommand{\laspan}[1]{\text{Span}\{#1\}}\) \(\newcommand{\bcal}{\cal B}\) \(\newcommand{\ccal}{\cal C}\) \(\newcommand{\scal}{\cal S}\) \(\newcommand{\wcal}{\cal W}\) \(\newcommand{\ecal}{\cal E}\) \(\newcommand{\coords}[2]{\left\{#1\right\}_{#2}}\) \(\newcommand{\gray}[1]{\color{gray}{#1}}\) \(\newcommand{\lgray}[1]{\color{lightgray}{#1}}\) \(\newcommand{\rank}{\operatorname{rank}}\) \(\newcommand{\row}{\text{Row}}\) \(\newcommand{\col}{\text{Col}}\) \(\renewcommand{\row}{\text{Row}}\) \(\newcommand{\nul}{\text{Nul}}\) \(\newcommand{\var}{\text{Var}}\) \(\newcommand{\corr}{\text{corr}}\) \(\newcommand{\len}[1]{\left|#1\right|}\) \(\newcommand{\bbar}{\overline{\bvec}}\) \(\newcommand{\bhat}{\widehat{\bvec}}\) \(\newcommand{\bperp}{\bvec^\perp}\) \(\newcommand{\xhat}{\widehat{\xvec}}\) \(\newcommand{\vhat}{\widehat{\vvec}}\) \(\newcommand{\uhat}{\widehat{\uvec}}\) \(\newcommand{\what}{\widehat{\wvec}}\) \(\newcommand{\Sighat}{\widehat{\Sigma}}\) \(\newcommand{\lt}{<}\) \(\newcommand{\gt}{>}\) \(\newcommand{\amp}{&}\) \(\definecolor{fillinmathshade}{gray}{0.9}\)CHEM 0103 Chemistry of the life sciences, Dorm/kitchen Lab
Lab #1: Measuring volumes in the kitchen or in the dorm
Many drugs are given in liquid form, either for oral intake, injection or intake through an intravenous line. It is important that these liquids contain the correct concentration, and that the correct volume is given. If you give too little, there might not be any therapeutic effect. If you give too much, it might be toxic.
Today, we will explore how we can measure volumes in the range of 20 µL to 1 mL. Some of the solutions will be colored, making it easier to see. We will do measurements multiple times, and check how reproducible our measurements are. (To obtain high reproducibility when looking at liquid levels, try to lift your container (tube, pipette) so that it is at eye level and the container in a vertical position). We are practicing this in this first experiment to prepare for the remainder of the semester where you often have to measure and transfer liquids. Luckily, most of our experiments can tolerate a fair amount of volume errors, but they will fail (or the results will be strange) if you are off by a lot.
1. Tape a scale to your transfer pipette
 You have two transfer pipettes in your kit, and you need them throughout the semester. Please take good care of them, and rinse them with water and dispense all the water when you are done.
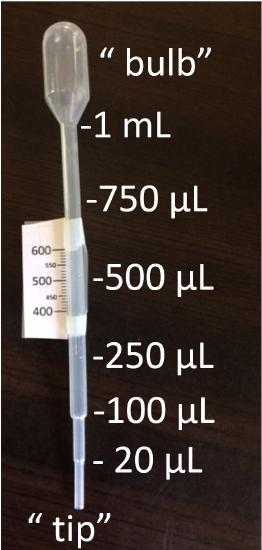
Normally, the transfer pipette is used to dispense set volumes (1 mL, 750 µL, 500 µL, 250 µL, 100 µL, 20 µL). It is not meant to be used for accurate and precise volume measurements, there are better (and more expensive) ways to measure volume. However, in a pandemic, we will improvise a bit (just like the pioneers of science did before there was a metric system and sophisticated instrumentation) and turn one of your transfer pipettes into a device to measure any volume between 400 µL and 600 µL.
You will find a paper scale in your kit. We will tape this scale to the pipette so that the number 500 lines up with the 0.5 mL mark, with the 600 above and the 400 below. Here is a picture of the result, labeled to show the parts of the pipette and the set volumes (see right).
If you wrap the pipette with too much tape, it will be difficult to read off the result. On the other hand, we don't want the scale to fall off mid-experiment. I ended up placing tape on the backside of the paper scale, taping this to the pipette, and using thin strips of tape above and below the scale (where I don't have to read off measurements) for extra stability. We are using a blue solution (food coloring) for this experiment, so even if you apply tape around the entire pipette, you will still see the level of solution clearly.
2. Learning to use the transfer pipette
Always keep the transfer pipette in a vertical position. Squeeze the bulb a bit, insert the tip into the liquid, slowly let the bulb expand to aspirate ("pick up") solution. If you completely release the pressure on the bulb and it picked up less than you wanted to, slowly squeeze the bulb until all the solutions is squeezed out. Then squeeze some more to make a couple of bubbles, and slowly aspirate again. If you get a bit more than you wanted, no problem. Just lift up the pipette so that the tip is just above your solution, and slowly squeeze the bulb and release liquid until you have the desired amount.
To transfer the solution into another container, place the tip slightly above the container, and slowly squeeze the bulb again until almost all of the solution is dispensed. For the last drop, it helps to touch the container and squeeze a small bit of air out of the tip. Even with the utmost care, their might be tiny amounts of solution still on the transfer pipette - that is fine.
Here are instructions in a video (in the video, red food coloring was used; the kit contains blue food coloring solution instead): https://vimeo.com/446896732
Why do I insist on doing everything slowly? You will find that when you pipette too fast, you might get air bubbles into the pipette during aspiration, or liquid will remain (especially at the 100 µL and 20 µL mark where there are nooks and crannies) inside the pipette. To get a dry pipette, pick up 1 mL of solution and very slowly dispense it. For some solutions (soapy ones), there will always be a remaining film of liquid, and you get annoying bubbles unless you work extra slowly.
3. Measuring 0.5 mL (which is 500 µL)
In this experiment, you will measure 0.5 mL in three ways (using a centrifuge tube, using a syringe, and using a transfer pipette). We will use the modified transfer pipette to check our results. Before you start, make yourself a data table (column headers: "Method", "V₁ in µL", "V₂ in µL", "V₃ in µL", "average in µL", "standard deviation in µL").
You will need your modified pipette, an empty 1.5 mL tube, the syringe and the red solution (water with food coloring) in your kit for better visibility.
Fill the empty tube with 500 µL of liquid (details depend on the method, see below). Then, pick up all of the solution with the modified pipette and read off the volume (make sure that there are no bubbles and that the liquid level is flat on the tip of the pipette - no bulge or air). Take a picture if you can. There will always be a tiny drop of liquid left in the tube. Dry the tube before the next experiment by either shaking it out over a sink or dabbing the inside with clean paper towel. Repeat twice (for a total of three measurements, recorded as V₁, V₂ and V₃).
Using the graduation on the tube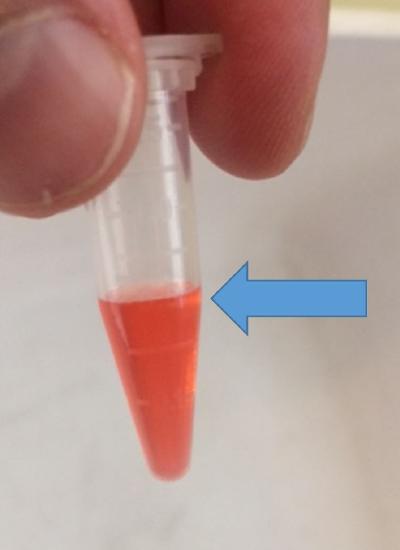
Find the 0.5 mL graduation on the 1.5 mL tube (it is a bit hard to read, and the line is just where the tube starts being tapered, see picture). Pick up some liquid with the (unmodified) transfer pipette, and dispense drop-wise into a clean dry 1.5 mL tube until the liquid surface is at that line. The line is kind of thick, so either use the top, bottom or middle, but try to be consistent for the second and third repetition.
Using the syringe
Place the liquid in a (clean and empty) shallow bowl. Place the tip of the syringe in the liquid and pull the plunger until most of the liquid is in it. Using the mL scale (not the teaspoon scale on the other side), dispense 0.5 mL (corresponding to 2.5 lines) into the 1.5 mL tube. You will see a bubble when you first aspirate the liquid. It is fine to have the bubble in there - it does not cause a problem if it stays in there while you dispense.
Using the transfer pipette
Make sure the (unmodified) pipette is clean and dry. Aspirate 0.5 mL (to the line under the 0.5 mL mark) and dispense into the empty 1.5 mL tube.
Data analysis
For each series of three measurements, calculate the average and the standard deviation and enter it into your table. Compare your results with the other students in the group, and make an evidence-based claim about the accuracy and precision of the three methods of measuring 0.5 mL of liquid.
4. Measuring 20 µL
Sometimes, we will need very small volumes. To measure how much liquid is in the first (very thin) part of the pipette, start with an empty 1.5 mL tube. From your red solution, pick up liquid filling just the thinnest part and dispense into the tube. Repeat this (while counting) until you have about 0.5 mL in the tube. Then, using the modified pipette, measure the total volume in the tube like you did for the first experiment.
Data analysis
Divide the total volume by the count of transfers to estimate the volume in the thinnest part of the pipette. The manufacturer claims it is 20 µL. Check in with the other members of your group to compare.
5. Estimating the size of a drop
Drops can be smaller or larger depending on the liquid that is dripping, and the object it is dripping from. We will estimate the size of liquid drops, and the size of bubbles when blowing air out of the pipette tip when it is submerged in water. To estimate drop size, fill the transfer pipette to 0.5 mL with liquid, and drip into a clean empty 1.5 mL tube. Count how many full drops are possible (there should be some liquid remaining in the pipette). Then, using the modified transfer pipette, measure the volume of the combined drops in the tube. To estimate bubble size, fill the modified transfer pipette to 400 µL without any pressure on the bulb. Submerge the tip of the pipette in liquid, slowly dispense the liquid and then slowly squeeze the bulb to release 10 bubble. Aspirate until you don't squeeze the bulb anymore, and record the volume.
Data analysis
To get the volume of a drop (under the conditions of your experiment), divide the total volume by the number of drops. To estimate the volume of a bubble, divide the difference in volumes by the number of bubbles. Compare with what others measured.
5. Clean up
Rinse the inside of all the materials that came into contact with the red solution with water. Use the technique describe above to dry the pipettes. You can store the red liquid in the tube it came in, or discard it in the sink. Leave the tubes open to air dry.
6. Question for lab report
What is the best way, under the current conditions, to measure 0.5 mL with high precision?
Lab #3: More volume measurements
As a follow-up experiment of Lab #1, design an experiment to answer a question that came up. Examples include repeating an experiment to check reproducibility, trying different volumes, measuring the density of water to be able to check for accuracy (you checked for reproducibility in the original experiment), and testing the influence of temperature or viscosity on the reproducibility/accuracy of volume measurements.
You should make sure that your experimental design addresses the question you are asking, and that you are making good use of your allotted time in the lab (the number of measurements should be comparable to that of lab #1 if you are planning to work with the balance and/or pipettes). If you plan a lab that requires anything in addition to what was available for lab #1, make sure you discuss this with your instructor and obtain permission.
Typically, I set aside one hour of class time to brainstorm, plan and revise experimental plans one week before the lab is done.
Do not start the experiment until you have permission from your instructor.