
1: Calibration of Volumetric Glassware (Experiment)
- Page ID
- 416879
\( \newcommand{\vecs}[1]{\overset { \scriptstyle \rightharpoonup} {\mathbf{#1}} } \)
\( \newcommand{\vecd}[1]{\overset{-\!-\!\rightharpoonup}{\vphantom{a}\smash {#1}}} \)
\( \newcommand{\dsum}{\displaystyle\sum\limits} \)
\( \newcommand{\dint}{\displaystyle\int\limits} \)
\( \newcommand{\dlim}{\displaystyle\lim\limits} \)
\( \newcommand{\id}{\mathrm{id}}\) \( \newcommand{\Span}{\mathrm{span}}\)
( \newcommand{\kernel}{\mathrm{null}\,}\) \( \newcommand{\range}{\mathrm{range}\,}\)
\( \newcommand{\RealPart}{\mathrm{Re}}\) \( \newcommand{\ImaginaryPart}{\mathrm{Im}}\)
\( \newcommand{\Argument}{\mathrm{Arg}}\) \( \newcommand{\norm}[1]{\| #1 \|}\)
\( \newcommand{\inner}[2]{\langle #1, #2 \rangle}\)
\( \newcommand{\Span}{\mathrm{span}}\)
\( \newcommand{\id}{\mathrm{id}}\)
\( \newcommand{\Span}{\mathrm{span}}\)
\( \newcommand{\kernel}{\mathrm{null}\,}\)
\( \newcommand{\range}{\mathrm{range}\,}\)
\( \newcommand{\RealPart}{\mathrm{Re}}\)
\( \newcommand{\ImaginaryPart}{\mathrm{Im}}\)
\( \newcommand{\Argument}{\mathrm{Arg}}\)
\( \newcommand{\norm}[1]{\| #1 \|}\)
\( \newcommand{\inner}[2]{\langle #1, #2 \rangle}\)
\( \newcommand{\Span}{\mathrm{span}}\) \( \newcommand{\AA}{\unicode[.8,0]{x212B}}\)
\( \newcommand{\vectorA}[1]{\vec{#1}} % arrow\)
\( \newcommand{\vectorAt}[1]{\vec{\text{#1}}} % arrow\)
\( \newcommand{\vectorB}[1]{\overset { \scriptstyle \rightharpoonup} {\mathbf{#1}} } \)
\( \newcommand{\vectorC}[1]{\textbf{#1}} \)
\( \newcommand{\vectorD}[1]{\overrightarrow{#1}} \)
\( \newcommand{\vectorDt}[1]{\overrightarrow{\text{#1}}} \)
\( \newcommand{\vectE}[1]{\overset{-\!-\!\rightharpoonup}{\vphantom{a}\smash{\mathbf {#1}}}} \)
\( \newcommand{\vecs}[1]{\overset { \scriptstyle \rightharpoonup} {\mathbf{#1}} } \)
\(\newcommand{\longvect}{\overrightarrow}\)
\( \newcommand{\vecd}[1]{\overset{-\!-\!\rightharpoonup}{\vphantom{a}\smash {#1}}} \)
\(\newcommand{\avec}{\mathbf a}\) \(\newcommand{\bvec}{\mathbf b}\) \(\newcommand{\cvec}{\mathbf c}\) \(\newcommand{\dvec}{\mathbf d}\) \(\newcommand{\dtil}{\widetilde{\mathbf d}}\) \(\newcommand{\evec}{\mathbf e}\) \(\newcommand{\fvec}{\mathbf f}\) \(\newcommand{\nvec}{\mathbf n}\) \(\newcommand{\pvec}{\mathbf p}\) \(\newcommand{\qvec}{\mathbf q}\) \(\newcommand{\svec}{\mathbf s}\) \(\newcommand{\tvec}{\mathbf t}\) \(\newcommand{\uvec}{\mathbf u}\) \(\newcommand{\vvec}{\mathbf v}\) \(\newcommand{\wvec}{\mathbf w}\) \(\newcommand{\xvec}{\mathbf x}\) \(\newcommand{\yvec}{\mathbf y}\) \(\newcommand{\zvec}{\mathbf z}\) \(\newcommand{\rvec}{\mathbf r}\) \(\newcommand{\mvec}{\mathbf m}\) \(\newcommand{\zerovec}{\mathbf 0}\) \(\newcommand{\onevec}{\mathbf 1}\) \(\newcommand{\real}{\mathbb R}\) \(\newcommand{\twovec}[2]{\left[\begin{array}{r}#1 \\ #2 \end{array}\right]}\) \(\newcommand{\ctwovec}[2]{\left[\begin{array}{c}#1 \\ #2 \end{array}\right]}\) \(\newcommand{\threevec}[3]{\left[\begin{array}{r}#1 \\ #2 \\ #3 \end{array}\right]}\) \(\newcommand{\cthreevec}[3]{\left[\begin{array}{c}#1 \\ #2 \\ #3 \end{array}\right]}\) \(\newcommand{\fourvec}[4]{\left[\begin{array}{r}#1 \\ #2 \\ #3 \\ #4 \end{array}\right]}\) \(\newcommand{\cfourvec}[4]{\left[\begin{array}{c}#1 \\ #2 \\ #3 \\ #4 \end{array}\right]}\) \(\newcommand{\fivevec}[5]{\left[\begin{array}{r}#1 \\ #2 \\ #3 \\ #4 \\ #5 \\ \end{array}\right]}\) \(\newcommand{\cfivevec}[5]{\left[\begin{array}{c}#1 \\ #2 \\ #3 \\ #4 \\ #5 \\ \end{array}\right]}\) \(\newcommand{\mattwo}[4]{\left[\begin{array}{rr}#1 \amp #2 \\ #3 \amp #4 \\ \end{array}\right]}\) \(\newcommand{\laspan}[1]{\text{Span}\{#1\}}\) \(\newcommand{\bcal}{\cal B}\) \(\newcommand{\ccal}{\cal C}\) \(\newcommand{\scal}{\cal S}\) \(\newcommand{\wcal}{\cal W}\) \(\newcommand{\ecal}{\cal E}\) \(\newcommand{\coords}[2]{\left\{#1\right\}_{#2}}\) \(\newcommand{\gray}[1]{\color{gray}{#1}}\) \(\newcommand{\lgray}[1]{\color{lightgray}{#1}}\) \(\newcommand{\rank}{\operatorname{rank}}\) \(\newcommand{\row}{\text{Row}}\) \(\newcommand{\col}{\text{Col}}\) \(\renewcommand{\row}{\text{Row}}\) \(\newcommand{\nul}{\text{Nul}}\) \(\newcommand{\var}{\text{Var}}\) \(\newcommand{\corr}{\text{corr}}\) \(\newcommand{\len}[1]{\left|#1\right|}\) \(\newcommand{\bbar}{\overline{\bvec}}\) \(\newcommand{\bhat}{\widehat{\bvec}}\) \(\newcommand{\bperp}{\bvec^\perp}\) \(\newcommand{\xhat}{\widehat{\xvec}}\) \(\newcommand{\vhat}{\widehat{\vvec}}\) \(\newcommand{\uhat}{\widehat{\uvec}}\) \(\newcommand{\what}{\widehat{\wvec}}\) \(\newcommand{\Sighat}{\widehat{\Sigma}}\) \(\newcommand{\lt}{<}\) \(\newcommand{\gt}{>}\) \(\newcommand{\amp}{&}\) \(\definecolor{fillinmathshade}{gray}{0.9}\)Hazard Overview
Chemical Hazards
N/A
Mechanical Hazards
N/A
PPE
- 100% cotton lab coat
- Splash goggles
- Nitrile gloves
Dispensary Provided Items
- 125 mL Erlenmeyer flasks
- Flask stoppers
- 50 mL Burette
- 25 mL Pipettes
- Pipette bulb
- Thermometer
- 300 mL beaker
- Wash bottle
Introduction
You will use a variety of volumetric glassware and other equipment in your laboratory experiments. Whenever possible, you should ensure that the equipment is properly calibrated so that systematic errors do not result from using the equipment to make measurements. In this experiment, you will learn how to calibrate both your pipette and your burette. The process demonstrates the importance of careful technique and the types of corrections that are needed in accurate laboratory measurements. You also will compare your pipette result with that of other students to investigate the scatter associated with nominal 25 mL pipettes. You will interpret this scatter in terms of the theory of random errors.
Calibration is quite simple. The pipette or burette is used to deliver a certain volume of water. The actual volume is determined by measuring the mass of the delivered water and calculating the volume from the known density. There are, however, several factors that must be considered for accurate results. First, the mass of the water must be accurately determined. Although seemingly straightforward, given a good balance, careful technique is required, and corrections must be applied to compensate for buoyancy effects. Second, since the density of water depends on temperature, its temperature must be known to calculate its volume. Thirdly, the glass itself expands with increasing temperature. Hence, the volume delivered by the pipette or burette will change with temperature.
Read and understand the operation of an electronic balance before you begin this experiment.
Operation of Lab Equipment
Analytical Balance
The operation instructions can be found below. Do not attempt to calibrate the balances used in this course. This has already been done for you and is checked regularly by dispensary personnel.
- Check that the balance is level before using it since the calibration depends on the balance being level. Notify your TA if the balance is not level.
- Ensure that the balance and the area around it are clean. Notify your TA if the balance is not clean, and they will instruct you to clean it.
- The doors on either side of the balance and the top all slide backward to give access to the balance. While weighing, these doors should all be closed.
- Before weighing your sample, ensure that the weight displayed is 0.0000 g. The 0 or tare buttons on the bottom of the balance will zero the reading. Be sure to tare your weighing vessel before weighing your sample.
- There will be a small circle on the display if the weight is changing. Once the weight has stabilized, this circle will disappear, and the mass can be recorded.
- Do not bump or spill chemicals on the balance. If an accident occurs, let your TA know immediately.
Experimental Procedure
Careful technique is required to accurately use a pipette or a burette. Your TA will demonstrate the correct technique and explain precautions you should take using them. You should practice using a pipette to deliver exactly 25.00 mL of deionized water several times before you collect the actual calibration data. The largest sources of error in this experiment involve the improper use of the pipette and incorrect reading of the burette.
Draw about 500 mL of deionized water into a clean beaker from the Nalgene container by the sink. Use this equilibrated water to collect all calibration data.
Before beginning lab, your TA will instruct you in the use of the pipette, the burette, and the analytical balances in the lab.
Pipette
Calibrate your 25.00 mL pipette. Confirm that your pipette is clean by filling it above the mark with deionized water and then letting it drain.
Some important tips when using a pipette:
- When you fill it with the bulb, fill well past the mark but not into the bulb. This will give you the most time to make a seal with your finger after removing the bulb.
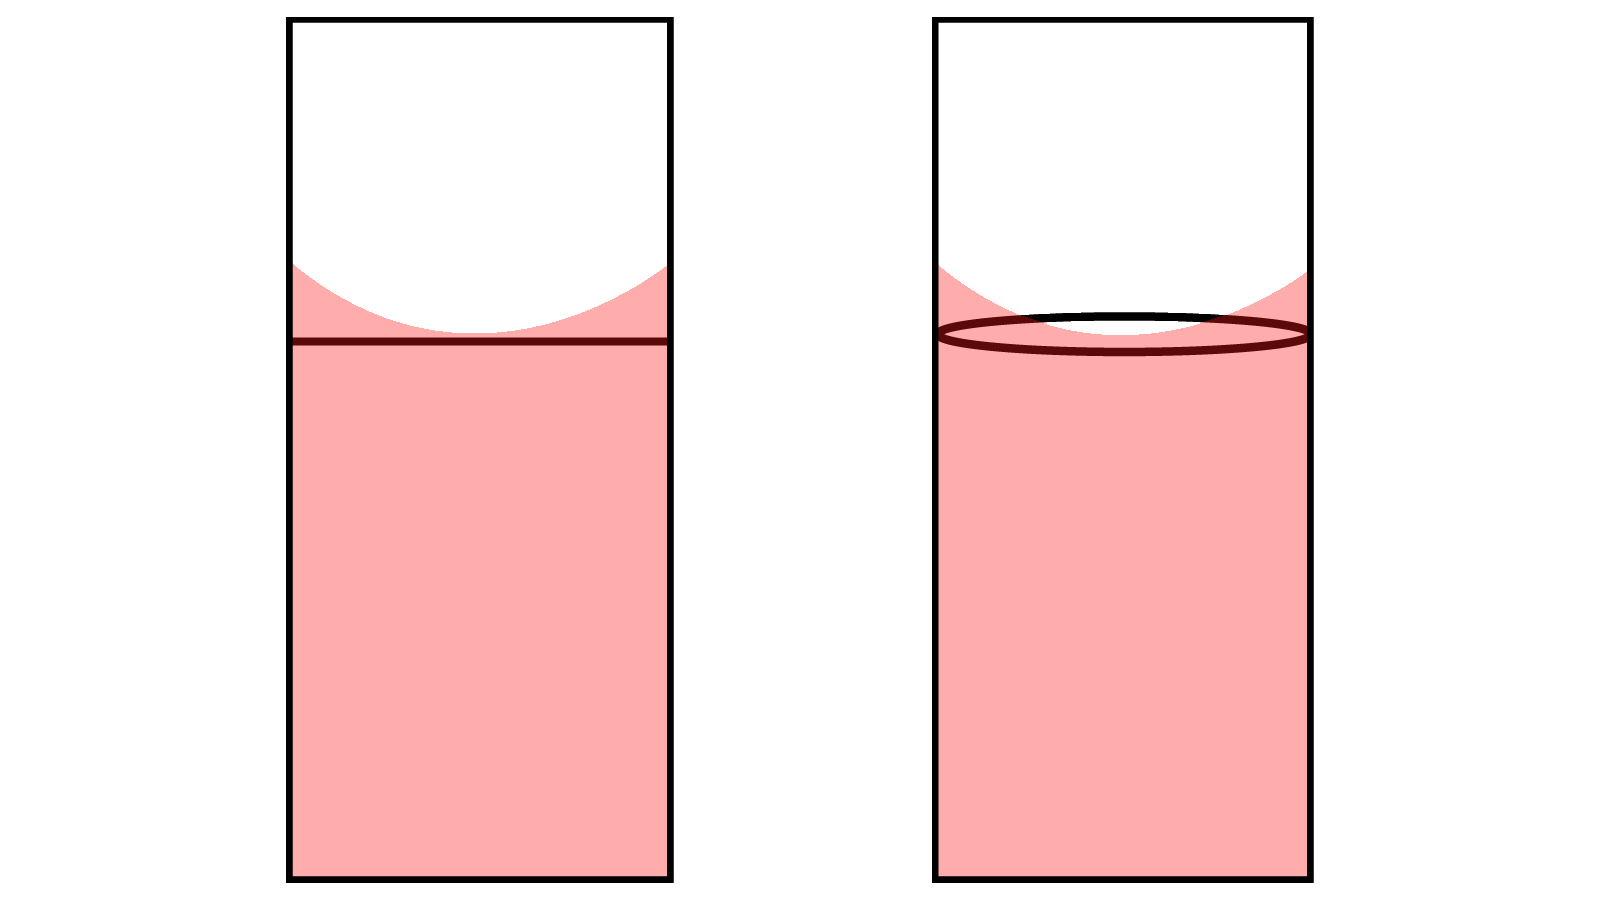
- After filling the pipette with the bulb, quickly remove the bulb and stop the flow of water with your finger (index finger or thumb work best for most people). Use either a twisting or a rocking motion to let a small amount of water drain until the meniscus barely touches the line. See Figure \(\PageIndex{1}\).
- Don't push the bulb onto the pipette too far. It only needs to make a seal, and this doesn't require much overlap. This will facilitate an easier transfer using your finger.
- The heat from your hands is enough to change the temperature of the water through the walls of the pipette. Therefore, minimize contact with the pipette below the water line.
The steps for your pipette calibration are as follows.
- Choose a clean 125 mL Erlenmeyer flask. Fit the flask with a plastic stopper, and weigh this assembly to the nearest 0.1 mg (or 0.0001 g). The scales are sensitive enough to measure the difference in weight due to your fingerprints, so use nitrile gloves when handling the flask. Use the same balance throughout the experiment. Avoid getting the outside of the flask or the stopper wet during the calibration procedure, as evaporation before weighing the water can affect your results.
- Record the temperature of the beaker of DI water that has been sitting at room temperature. You will use this value and the density in Table 1.1 to convert your mass of water to the volume of water.
- Use your clean pipette to deliver exactly 25.00 mL of the equilibrated water into the 125 mL Erlenmeyer flask. Touch the pipette tip to the side of the flask below the neck during delivery. Remember that the pipette is calibrated to deliver so that the last drop remaining in the tip of the pipette after delivery should not be blown out.
- Stopper the flask after delivery to prevent evaporation of the water before its mass is determined. Weigh the stoppered flask containing the 25.00 mL of water to the nearest 0.1 mg.
- Repeat the calibration at least three times. Each lab partner should perform their own calibration.
*note: Four 25.00 mL deliveries can be made into the flask before the total mass exceeds the range of the balance.*
Pipette Calibration Calculation
The density of water as a function of temperature is given in the second column of Table \(\PageIndex{1}\). Use the density for your temperature to calculate the volume of water delivered by your pipette in each determination, the mean volume, the standard deviation, and the 50% and 95% confidence limits for the mean. If one of your determinations appears inconsistent with the others, use the Q test to see if it can be discarded and consider repeating the calibration an additional time. Interpolate between the values in Table \(\PageIndex{1}\) if required.
| Temperature °C | Density g/mL |
|---|---|
| 18.0 | 0.998599 |
| 19.0 | 0.998408 |
| 20.0 | 0.998207 |
| 21.0 | 0.997996 |
| 22.0 | 0.997774 |
| 23.0 | 0.997542 |
| 24.0 | 0.997300 |
| 25.0 | 0.997048 |
| 26.0 | 0.996787 |
Burette
The next procedure involves the calibration of your burette. Confirm that the burette has no clogs by letting it drain. There should be no water drops left on the inside walls.
Some important tips when using a burette:
- The marks on a burette start at 0 at the top and go down to 50 at the bottom. The value is read as the volume delivered by the burette. The volume delivered is found by taking the initial burette volume and subtracting it from the final burette volume.
- While there are marks to the nearest 0.1 mL on the burette, it is possible to interpolate between the marks to the nearest 0.02 mL delivered. Ask your TA for help with this. Burette volumes are recorded to two decimal places.
- Make sure there are no bubbles in the tip of your burette, as this can cause inaccuracies in the volume delivered if they come out during delivery.
- When you record the position of the meniscus, be sure to have your eye parallel to it to avoid parallax errors.
- For your safety, do not climb on the counter or stool when filling up the burette, and do not pour towards your face.
Burette Delivery Calibration
You will repeat the following procedure for 4 volumes of approximately 15, 25, 35, and 45 mL.
- Fill the burette past the zero mark with equilibrated deionized water. Open the stopcock and withdraw sufficient water from the burette to remove any air bubbles from the tip. Adjust the liquid level in the burette at or slightly below the zero mark. Wait about 15 seconds for the water inside the burette to drain down the side walls. Record the level of the meniscus, estimating its position to the nearest 0.02 mL. Touch the tip of the burette to the wall of a beaker to remove any adhering drop of water.
- Empty your weighing flask, wipe the inside neck dry, and reweigh the empty flask with its stopper to the nearest 0.1 mg.
- Recheck the reading of your burette. There should be no noticeable change from your earlier reading (<0.2 mL difference). If a change has occurred, ask your TA for instructions before proceeding.
- Use the burette to deliver the approximate amount of water into your weighed flask (see Table \(\PageIndex{2}\)). Remove any pendent drop from the tip of the burette by touching it to the inside wall of the flask below the neck. Stopper your flask.
- Allow time for water to drain down the walls of the burette, then record the level of the meniscus to the nearest 0.02 mL.
- Weigh the stoppered flask with the delivered water to the nearest 0.1 mg.
- Refill your burette to the zero mark or just below.
- Repeat for each measurement.
| Target Volume | 15 mL | 25 mL | 35 mL | 45 mL |
| Volume reading from the burette (mL) | ||||
| Mass of water delivered by the burette (g) |
Burette Uncalibrated Region Measurement
The final procedure is to determine the volume of the uncalibrated portion of your burette between the 50 mL mark and the stopcock. This is represented by the shaded region in Figure \(\PageIndex{2}\). Table \(\PageIndex{3}\) shows the data you will record and calculate from this procedure.

- First, empty your weighing flask, wipe the inside neck dry, and reweigh the empty flask with its stopper to the nearest 0.1 mg.
- Fill the burette with about 10 mL of water and drain the water into a beaker until the level falls about 1 mL above the 50 mL mark. Remove any pendent drop, wait for drainage, and record the volume above the 50 mL mark to the nearest 0.02 mL.
- Drain the water from the burette into the weighed flask, stopping when the water level is at the top of the stopcock.
- Remove any pendent drop by touching the tip to the side of the flask, stopper the flask, and then weigh the stoppered flask with the delivered water to the nearest 0.1 mg.
- Repeat the procedure three more times.
| Run 1 | Run 2 | Run 3 | Run 4 | |
| 1: Volume of water above the 50 mL mark on the burette (50.00 mL - initial volume in burette) | ||||
| 2: Total Mass of water delivered by the burette (g) | ||||
| 3: Use the density equation, the theoretical density at your recorded temp from Table 1.1, and mass recorded in Row 2 to find the total volume of water delivered (mL) | ||||
| 4: Actual volume of water in the uncalibrated region (Row 1 - Row 3) (mL) | ||||
| 5: Average volume (from Row 4) for all four runs. (mL) | ||||
| 6: Standard deviation in Row 5 (mL) | ||||
| 7: 50% confidence limits in Row 5 (mL) |
Lab Report
See Laboratory Notebook and Reports for details on what is expected of you in a general lab report.
Include the following in your lab report:
- Plot (scatter plot) the calculated burette volume (from recorded mass and theoretical density) vs. the delivered volume (final - initial volume readings from burette).
- Create a histogram of calibrated pipette volumes for the class. You should receive a link to Google Sheets to input your results and get your classmates' results. Wait until you have at least 10 values from your classmates before making this chart. This should look Gaussian, if it doesn't you need to change the bin size.
- Average density of water from your pipette measurements. Compare this with the value of the density of water at the temperature recorded in lab from Table 1.1. Find percent error, and comment on your accuracy. Include sources of error and how to minimize them.
Also, include the answers to the following questions in your lab report.
- The internal diameter of the neck of a 25 mL pipette around the calibration mark is 5.0 mm. Assume that the meniscus can be positioned to ±0.2 mm relative to the calibration mark. If the error in positioning of the meniscus is the only error that occurs in the calibration of a pipette, how closely should duplicate calibrations agree?
- Using the values in the table below, if the temperature has an uncertainty of ±1°C, what is the uncertainty in the burette's delivered volume for the 0-15 mL interval?
-
Initial Burette Reading 0.14 mL Final Burette Reading 15.17 mL Weight of the Flask 50.636 g Weight of the Flask + Water 65.653 Temperature 22.54°C
-
- An alternate way to determine the volume of the unmarked portion of the burette is to measure the diameter and height of the corresponding cylinder and simply calculate the volume of the cylinder. Assume that the diameter of the cylinder is 11.0 ± 0.3 mm and the height is 55.4 ± 0.4 mm. What is the volume of the region and its associated error in mL?