
12.1: Second Circuit
- Page ID
- 471209
\( \newcommand{\vecs}[1]{\overset { \scriptstyle \rightharpoonup} {\mathbf{#1}} } \)
\( \newcommand{\vecd}[1]{\overset{-\!-\!\rightharpoonup}{\vphantom{a}\smash {#1}}} \)
\( \newcommand{\id}{\mathrm{id}}\) \( \newcommand{\Span}{\mathrm{span}}\)
( \newcommand{\kernel}{\mathrm{null}\,}\) \( \newcommand{\range}{\mathrm{range}\,}\)
\( \newcommand{\RealPart}{\mathrm{Re}}\) \( \newcommand{\ImaginaryPart}{\mathrm{Im}}\)
\( \newcommand{\Argument}{\mathrm{Arg}}\) \( \newcommand{\norm}[1]{\| #1 \|}\)
\( \newcommand{\inner}[2]{\langle #1, #2 \rangle}\)
\( \newcommand{\Span}{\mathrm{span}}\)
\( \newcommand{\id}{\mathrm{id}}\)
\( \newcommand{\Span}{\mathrm{span}}\)
\( \newcommand{\kernel}{\mathrm{null}\,}\)
\( \newcommand{\range}{\mathrm{range}\,}\)
\( \newcommand{\RealPart}{\mathrm{Re}}\)
\( \newcommand{\ImaginaryPart}{\mathrm{Im}}\)
\( \newcommand{\Argument}{\mathrm{Arg}}\)
\( \newcommand{\norm}[1]{\| #1 \|}\)
\( \newcommand{\inner}[2]{\langle #1, #2 \rangle}\)
\( \newcommand{\Span}{\mathrm{span}}\) \( \newcommand{\AA}{\unicode[.8,0]{x212B}}\)
\( \newcommand{\vectorA}[1]{\vec{#1}} % arrow\)
\( \newcommand{\vectorAt}[1]{\vec{\text{#1}}} % arrow\)
\( \newcommand{\vectorB}[1]{\overset { \scriptstyle \rightharpoonup} {\mathbf{#1}} } \)
\( \newcommand{\vectorC}[1]{\textbf{#1}} \)
\( \newcommand{\vectorD}[1]{\overrightarrow{#1}} \)
\( \newcommand{\vectorDt}[1]{\overrightarrow{\text{#1}}} \)
\( \newcommand{\vectE}[1]{\overset{-\!-\!\rightharpoonup}{\vphantom{a}\smash{\mathbf {#1}}}} \)
\( \newcommand{\vecs}[1]{\overset { \scriptstyle \rightharpoonup} {\mathbf{#1}} } \)
\( \newcommand{\vecd}[1]{\overset{-\!-\!\rightharpoonup}{\vphantom{a}\smash {#1}}} \)
\(\newcommand{\avec}{\mathbf a}\) \(\newcommand{\bvec}{\mathbf b}\) \(\newcommand{\cvec}{\mathbf c}\) \(\newcommand{\dvec}{\mathbf d}\) \(\newcommand{\dtil}{\widetilde{\mathbf d}}\) \(\newcommand{\evec}{\mathbf e}\) \(\newcommand{\fvec}{\mathbf f}\) \(\newcommand{\nvec}{\mathbf n}\) \(\newcommand{\pvec}{\mathbf p}\) \(\newcommand{\qvec}{\mathbf q}\) \(\newcommand{\svec}{\mathbf s}\) \(\newcommand{\tvec}{\mathbf t}\) \(\newcommand{\uvec}{\mathbf u}\) \(\newcommand{\vvec}{\mathbf v}\) \(\newcommand{\wvec}{\mathbf w}\) \(\newcommand{\xvec}{\mathbf x}\) \(\newcommand{\yvec}{\mathbf y}\) \(\newcommand{\zvec}{\mathbf z}\) \(\newcommand{\rvec}{\mathbf r}\) \(\newcommand{\mvec}{\mathbf m}\) \(\newcommand{\zerovec}{\mathbf 0}\) \(\newcommand{\onevec}{\mathbf 1}\) \(\newcommand{\real}{\mathbb R}\) \(\newcommand{\twovec}[2]{\left[\begin{array}{r}#1 \\ #2 \end{array}\right]}\) \(\newcommand{\ctwovec}[2]{\left[\begin{array}{c}#1 \\ #2 \end{array}\right]}\) \(\newcommand{\threevec}[3]{\left[\begin{array}{r}#1 \\ #2 \\ #3 \end{array}\right]}\) \(\newcommand{\cthreevec}[3]{\left[\begin{array}{c}#1 \\ #2 \\ #3 \end{array}\right]}\) \(\newcommand{\fourvec}[4]{\left[\begin{array}{r}#1 \\ #2 \\ #3 \\ #4 \end{array}\right]}\) \(\newcommand{\cfourvec}[4]{\left[\begin{array}{c}#1 \\ #2 \\ #3 \\ #4 \end{array}\right]}\) \(\newcommand{\fivevec}[5]{\left[\begin{array}{r}#1 \\ #2 \\ #3 \\ #4 \\ #5 \\ \end{array}\right]}\) \(\newcommand{\cfivevec}[5]{\left[\begin{array}{c}#1 \\ #2 \\ #3 \\ #4 \\ #5 \\ \end{array}\right]}\) \(\newcommand{\mattwo}[4]{\left[\begin{array}{rr}#1 \amp #2 \\ #3 \amp #4 \\ \end{array}\right]}\) \(\newcommand{\laspan}[1]{\text{Span}\{#1\}}\) \(\newcommand{\bcal}{\cal B}\) \(\newcommand{\ccal}{\cal C}\) \(\newcommand{\scal}{\cal S}\) \(\newcommand{\wcal}{\cal W}\) \(\newcommand{\ecal}{\cal E}\) \(\newcommand{\coords}[2]{\left\{#1\right\}_{#2}}\) \(\newcommand{\gray}[1]{\color{gray}{#1}}\) \(\newcommand{\lgray}[1]{\color{lightgray}{#1}}\) \(\newcommand{\rank}{\operatorname{rank}}\) \(\newcommand{\row}{\text{Row}}\) \(\newcommand{\col}{\text{Col}}\) \(\renewcommand{\row}{\text{Row}}\) \(\newcommand{\nul}{\text{Nul}}\) \(\newcommand{\var}{\text{Var}}\) \(\newcommand{\corr}{\text{corr}}\) \(\newcommand{\len}[1]{\left|#1\right|}\) \(\newcommand{\bbar}{\overline{\bvec}}\) \(\newcommand{\bhat}{\widehat{\bvec}}\) \(\newcommand{\bperp}{\bvec^\perp}\) \(\newcommand{\xhat}{\widehat{\xvec}}\) \(\newcommand{\vhat}{\widehat{\vvec}}\) \(\newcommand{\uhat}{\widehat{\uvec}}\) \(\newcommand{\what}{\widehat{\wvec}}\) \(\newcommand{\Sighat}{\widehat{\Sigma}}\) \(\newcommand{\lt}{<}\) \(\newcommand{\gt}{>}\) \(\newcommand{\amp}{&}\) \(\definecolor{fillinmathshade}{gray}{0.9}\)
Learning Objectives
Students will be able to:
Content:
- Access the GPIO using buttons on a breadboard
- Build simple circuits
- turn an LED on and off with buttons
Process
- write code that turns on LED lights with buttons
Prior Knowledge
- Python concepts from Python Activities 1-7, and IOT Activities 1-4
Further Reading
Task 1: Building a Circuit with Buttons.
Build the following circuit containing a button and a red LED light. Connect the button to GPIO22, and the red LED to GPIO17. Don’t forget the resistor for the LED or you will burn it out. Note the top image has the Vilros cobbler and the fritzing diagram has the other type. You don’t need to add jumpers between the 3v3 and ground from Broadcom pins 1 and 9 if you are using the Vilros cobbler.
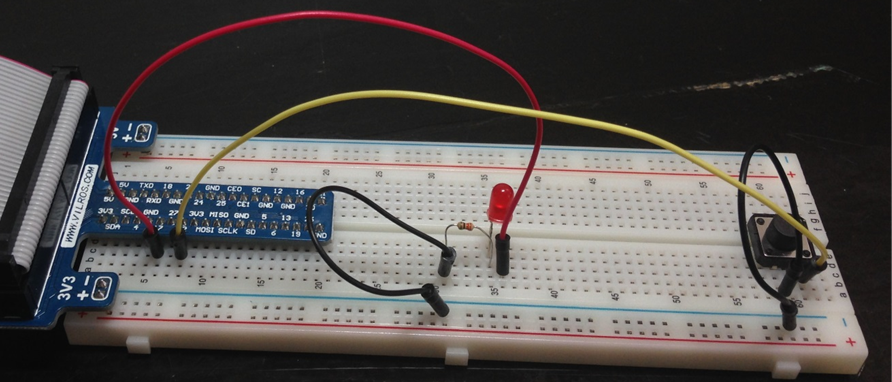 Figure \(\PageIndex{1}\): Image of first circuit with button
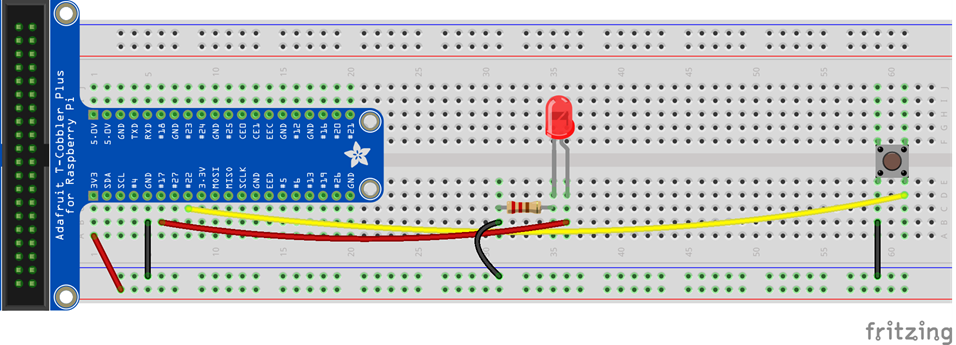 Figure \(\PageIndex{2}\): Fritzing diagram of first circuit with button
Note
GPIO 4 can be used for the button if you have 1-wire disabled in the interface of the RasPi configuration.
Task 1 Python Programs
| Python Program 1 | Python Program 2 |
|---|---|
from gpiozero import Button, LED

red = LED(17)
button = Button(22)

while True:
    if button.is_pressed:
        print("Button is pressed")
        red.on()
    else:
        print("Button is not pressed")
        red.off()
|
from gpiozero import Button, LED
from signal import pause

red = LED(17)
button = Button(22)

def buttonAction1():
    print("Button is pressed")
    red.on()

def buttonAction2():
    print("Button is released")
    red.off()

button.when_pressed = buttonAction1
button.when_released = buttonAction2

pause()
|
Critical Thinking Questions
-
Next to each line of code above, indicate what the statement does.
-
Which of the devices above are GPIO input devices and output devices?
-
Can an input device:
-
trigger another GPIO event?
-
trigger screen output?
-
trigger a function?
-
-
Which three built in functions of the gpiozero.Button class are being used in the programs above?
-
How is the pause() function from signal different from the sleep() function from time?
Task 2: Three Button RGB LED Board
Add two more buttons and an RGB common anode LED to your breadboard. Common anode is the longest pin and needs to be connected to 3v3 with a 220 W resistor. Use GPIO pins 22, 19 and 26 for your buttons. Use GPIO pins 16, 20 and 21 for your RGB LED. Your board may not look exactly like these, but should have the same wiring connectivity regardless of holes on the breadboard. (see images next page
 Figure \(\PageIndex{3}\): Three button board for RGB LED
 Figure \(\PageIndex{4}\): Fritzing diagram of three button board for RGB LED
Task 2 Python Programs
| Python Program 3 |
|---|
from gpiozero import Button,RGBLED
from signal import pause

button_red = Button(26)
button_green = Button(19)
button_blue = Button(22)

led = RGBLED(red = 21, green=20, blue=16, active_high = False)

def buttonAction1():
    print("Red button is pressed")
    led.red = 0.3

def buttonAction2():
    print("Red button is released")
    led.red = 0

def buttonAction3():
    print("Green button is pressed")
    led.green = 0.7

def buttonAction4():
    print("Green Button is released")
    led.green = 0

def buttonAction5():
    print("Blue button is pressed")
    led.blue = 1

def buttonAction6():
    print("Blue button is released")
    led.blue = 0

led.color =(0,0,0)
button_red.when_pressed = buttonAction1
button_red.when_released = buttonAction2
button_green.when_pressed = buttonAction3
button_green.when_released = buttonAction4
button_blue.when_pressed = buttonAction5
button_blue.when_released = buttonAction6
pause()
|
Critical Thinking Questions (cont.)
- What happens when you press and release a single button?
- What happens when you click two or more buttons simultaneously?
Task 3: Making music
Create a folder called "Music" in the assignment folder, go to the class GitHub and download the file "soundfiles.zip". Once you have downloaded it you can open the file manager and drag into the Music folder as shown in figure \(\PageIndex{5}\).
 Figure \(\PageIndex{5}\): Copy and Paste Caption here. (Copyright; author via source)
Alternatively, you can go to the command line and use move command (section 3.5.2.3.2)
 Figure \(\PageIndex{6}\): We first used cd to move to the download folder and ls to check the soundfiles.zip was downloaded. Then we used the mv command to move it tothe Music folder, and specified the full path in the process. (Belford cc 0.0)
to unzip from the command line you should move to the folder the zip file is in and use the following command.
unzip soundfiles.zip
or alternatively you can rightclick on the zip file within the filemanager and choose extract here
 Figure \(\PageIndex{7}\): Copy and Paste Caption here. (Copyright; author via source)
Set up Audio Jacks
Now you need to set up your speakers. There are several options and we will use the audiojack. You can Right Click on the speaker icon in the upper right corner of the Pi desktop and choose Device Profiles and set the AV Jack option to "Analog Stereo Output" if you are using the audio jack.
 Figure \(\PageIndex{8}\): Copy and Paste Caption here. (Copyright; author via source)
If the icon is not present you can go to the command line type
sudo raspi-config
Choose
- option 1 (System Options)
- S2 Audio
- 0 Headphones
Connect an external set of speakers or your headphones to the Raspberry Pi, and you should be good to proceed to the next task. Now open up Thonny and proceed to the following python code. Save it in the Music folder (same folder that we copied the sound files to).
Note: the Raspi gives you many options and in figure \(\PageIndex{9}\) the Rasperry Pi is connect to a JBL Flip 2 speaker through BlueTooth (and not the AV jack).
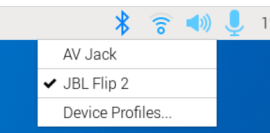 Figure \(\PageIndex{9}\): Copy and Paste Caption here. (Copyright; author via source)
Python code for playing sound files
| Task 3c: Python code for playing sound files |
|---|
import pygame.mixer
from pygame.mixer import Sound
from time import sleep

pygame.mixer.init()

sound_1 = Sound("complete/path-to-sound/file.flac")

while True:
    sound_1.play()
    print("Can you hear the sound?")
    sleep(3)
|
Remember, you can always find the complete path to a file in the file manager by right clicking the file and choosing "Copy Path(s)"
Acknowledgements
Ehren Bucholtz (created original content)