
4: Running Python from Cron
- Page ID
- 434445
\( \newcommand{\vecs}[1]{\overset { \scriptstyle \rightharpoonup} {\mathbf{#1}} } \)
\( \newcommand{\vecd}[1]{\overset{-\!-\!\rightharpoonup}{\vphantom{a}\smash {#1}}} \)
\( \newcommand{\dsum}{\displaystyle\sum\limits} \)
\( \newcommand{\dint}{\displaystyle\int\limits} \)
\( \newcommand{\dlim}{\displaystyle\lim\limits} \)
\( \newcommand{\id}{\mathrm{id}}\) \( \newcommand{\Span}{\mathrm{span}}\)
( \newcommand{\kernel}{\mathrm{null}\,}\) \( \newcommand{\range}{\mathrm{range}\,}\)
\( \newcommand{\RealPart}{\mathrm{Re}}\) \( \newcommand{\ImaginaryPart}{\mathrm{Im}}\)
\( \newcommand{\Argument}{\mathrm{Arg}}\) \( \newcommand{\norm}[1]{\| #1 \|}\)
\( \newcommand{\inner}[2]{\langle #1, #2 \rangle}\)
\( \newcommand{\Span}{\mathrm{span}}\)
\( \newcommand{\id}{\mathrm{id}}\)
\( \newcommand{\Span}{\mathrm{span}}\)
\( \newcommand{\kernel}{\mathrm{null}\,}\)
\( \newcommand{\range}{\mathrm{range}\,}\)
\( \newcommand{\RealPart}{\mathrm{Re}}\)
\( \newcommand{\ImaginaryPart}{\mathrm{Im}}\)
\( \newcommand{\Argument}{\mathrm{Arg}}\)
\( \newcommand{\norm}[1]{\| #1 \|}\)
\( \newcommand{\inner}[2]{\langle #1, #2 \rangle}\)
\( \newcommand{\Span}{\mathrm{span}}\) \( \newcommand{\AA}{\unicode[.8,0]{x212B}}\)
\( \newcommand{\vectorA}[1]{\vec{#1}} % arrow\)
\( \newcommand{\vectorAt}[1]{\vec{\text{#1}}} % arrow\)
\( \newcommand{\vectorB}[1]{\overset { \scriptstyle \rightharpoonup} {\mathbf{#1}} } \)
\( \newcommand{\vectorC}[1]{\textbf{#1}} \)
\( \newcommand{\vectorD}[1]{\overrightarrow{#1}} \)
\( \newcommand{\vectorDt}[1]{\overrightarrow{\text{#1}}} \)
\( \newcommand{\vectE}[1]{\overset{-\!-\!\rightharpoonup}{\vphantom{a}\smash{\mathbf {#1}}}} \)
\( \newcommand{\vecs}[1]{\overset { \scriptstyle \rightharpoonup} {\mathbf{#1}} } \)
\(\newcommand{\longvect}{\overrightarrow}\)
\( \newcommand{\vecd}[1]{\overset{-\!-\!\rightharpoonup}{\vphantom{a}\smash {#1}}} \)
\(\newcommand{\avec}{\mathbf a}\) \(\newcommand{\bvec}{\mathbf b}\) \(\newcommand{\cvec}{\mathbf c}\) \(\newcommand{\dvec}{\mathbf d}\) \(\newcommand{\dtil}{\widetilde{\mathbf d}}\) \(\newcommand{\evec}{\mathbf e}\) \(\newcommand{\fvec}{\mathbf f}\) \(\newcommand{\nvec}{\mathbf n}\) \(\newcommand{\pvec}{\mathbf p}\) \(\newcommand{\qvec}{\mathbf q}\) \(\newcommand{\svec}{\mathbf s}\) \(\newcommand{\tvec}{\mathbf t}\) \(\newcommand{\uvec}{\mathbf u}\) \(\newcommand{\vvec}{\mathbf v}\) \(\newcommand{\wvec}{\mathbf w}\) \(\newcommand{\xvec}{\mathbf x}\) \(\newcommand{\yvec}{\mathbf y}\) \(\newcommand{\zvec}{\mathbf z}\) \(\newcommand{\rvec}{\mathbf r}\) \(\newcommand{\mvec}{\mathbf m}\) \(\newcommand{\zerovec}{\mathbf 0}\) \(\newcommand{\onevec}{\mathbf 1}\) \(\newcommand{\real}{\mathbb R}\) \(\newcommand{\twovec}[2]{\left[\begin{array}{r}#1 \\ #2 \end{array}\right]}\) \(\newcommand{\ctwovec}[2]{\left[\begin{array}{c}#1 \\ #2 \end{array}\right]}\) \(\newcommand{\threevec}[3]{\left[\begin{array}{r}#1 \\ #2 \\ #3 \end{array}\right]}\) \(\newcommand{\cthreevec}[3]{\left[\begin{array}{c}#1 \\ #2 \\ #3 \end{array}\right]}\) \(\newcommand{\fourvec}[4]{\left[\begin{array}{r}#1 \\ #2 \\ #3 \\ #4 \end{array}\right]}\) \(\newcommand{\cfourvec}[4]{\left[\begin{array}{c}#1 \\ #2 \\ #3 \\ #4 \end{array}\right]}\) \(\newcommand{\fivevec}[5]{\left[\begin{array}{r}#1 \\ #2 \\ #3 \\ #4 \\ #5 \\ \end{array}\right]}\) \(\newcommand{\cfivevec}[5]{\left[\begin{array}{c}#1 \\ #2 \\ #3 \\ #4 \\ #5 \\ \end{array}\right]}\) \(\newcommand{\mattwo}[4]{\left[\begin{array}{rr}#1 \amp #2 \\ #3 \amp #4 \\ \end{array}\right]}\) \(\newcommand{\laspan}[1]{\text{Span}\{#1\}}\) \(\newcommand{\bcal}{\cal B}\) \(\newcommand{\ccal}{\cal C}\) \(\newcommand{\scal}{\cal S}\) \(\newcommand{\wcal}{\cal W}\) \(\newcommand{\ecal}{\cal E}\) \(\newcommand{\coords}[2]{\left\{#1\right\}_{#2}}\) \(\newcommand{\gray}[1]{\color{gray}{#1}}\) \(\newcommand{\lgray}[1]{\color{lightgray}{#1}}\) \(\newcommand{\rank}{\operatorname{rank}}\) \(\newcommand{\row}{\text{Row}}\) \(\newcommand{\col}{\text{Col}}\) \(\renewcommand{\row}{\text{Row}}\) \(\newcommand{\nul}{\text{Nul}}\) \(\newcommand{\var}{\text{Var}}\) \(\newcommand{\corr}{\text{corr}}\) \(\newcommand{\len}[1]{\left|#1\right|}\) \(\newcommand{\bbar}{\overline{\bvec}}\) \(\newcommand{\bhat}{\widehat{\bvec}}\) \(\newcommand{\bperp}{\bvec^\perp}\) \(\newcommand{\xhat}{\widehat{\xvec}}\) \(\newcommand{\vhat}{\widehat{\vvec}}\) \(\newcommand{\uhat}{\widehat{\uvec}}\) \(\newcommand{\what}{\widehat{\wvec}}\) \(\newcommand{\Sighat}{\widehat{\Sigma}}\) \(\newcommand{\lt}{<}\) \(\newcommand{\gt}{>}\) \(\newcommand{\amp}{&}\) \(\definecolor{fillinmathshade}{gray}{0.9}\)Running python from the command line
The default intrepeter for the Raspberry Pi is Linux, so to execute Python you must specify you want python to be the interpreter. Open Thonny and create a new python program that you keep in your crontab folder called learning_cron and insert the code:
#learning_cron
import datetime

dateTime = datetime.datetime.now().strftime('%Y-%m-%d %H:%M:%S')
print(dateTime)
This should print out the date and time.
Now, open the command line and type the following, using the path and name of the file you just created (learning_cron.py)
/home/pi/Programs/0_crontab/learning_cron.py
 Figure \(\PageIndex{1}\): (Belford: cc 0.0)
Note you get a permission denied. You can change permissions from the command line or use the Raspberry Pi desktop. To do it from the desktop (figure \(\PageIndex{2}\)
- right click on file
- choose properties
- choose Permisions
- Change Execute from Nobody to everybody
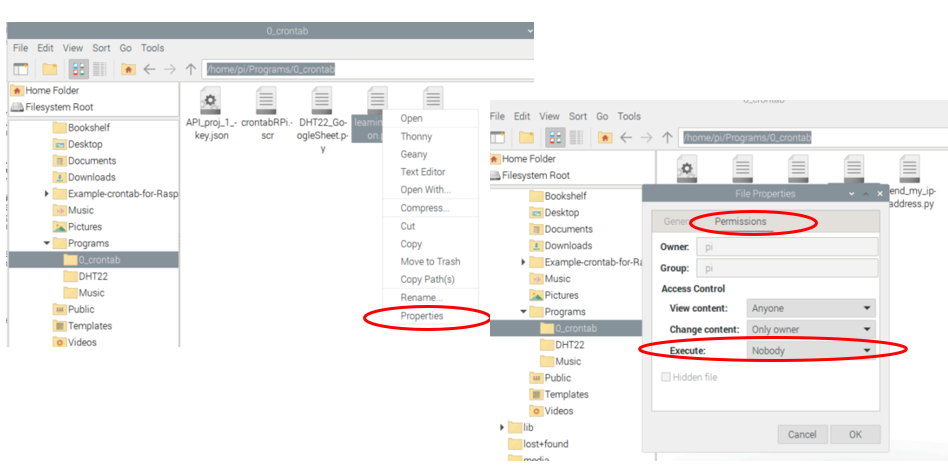 Figure \(\PageIndex{2}\): Copy and Paste Caption here. (Copyright; author via source)
Now use the up arrow and try and run the code again, and you get a whole bunch of new errors
 Figure \(\PageIndex{1}\): Copy and Paste Caption here. (Copyright; author via source)
What is going on is that you are using the default interpreter, which is Linux, and the program makes no sense. So you need to tell the Raspberry Pi which program you want to open it with. This can be done in one of two ways. You can specify the interpreter in the command line, or you can set up a shebang (#!) on the first line of code that provides a path to the interpreter.
1. In the command line
Here you define the interpreter within the command line
python3 /home/pi/Programs/0_crontab/learning_cron.py
 Figure \(\PageIndex{2}\): Copy and Paste Caption here. (cc0.0 Belford)
2. with a shebang (#!)
Here, you define the interpreter within the program, and then you do not need to do so in the command line. But first, you need to define the path of the interperter, which can be done with the which command. So in the command line type:
which python3
 Figure \(\PageIndex{3}\): (cc0.0 Belford)
so the path is /usr/bin/python3
and we will add a shebang to the first line of the program that directs to that interpreter (note: the shebang MUST be the first line of the code)
#!/usr/bin/python3
#learning_cron
import datetime

dateTime = datetime.datetime.now().strftime('%Y-%m-%d %H:%M:%S')
print(dateTime)
now run the code without specifying the interpeter within the command line
pen the command line and type the following, using the path and name of the file you just created (learning_cron.py)
/home/pi/Programs/0_crontab/learning_cron.py
 Figure \(\PageIndex{4}\): (cc0.0 Belford)
Note you get the date and time without specifying the interpreter from the command line and that is why many of the python programs you have been using started with a shebang! The advantage of running python from the command line is you can run multiple programs at once, where you can only run one program at a time with Thonny.
Running Python from Cron
Open up the crontab.RPi.scr file and below the time examples add the following line, which says: run the command every 2 minutes on every hour and every day and every month and every week (* is a wild card meaning all) The command must have the path, and we choose to include the interpreter in the statement. That would not be needed if we were using a shebang.. You can do this with the nano editor from the command line, or open the file with the Raspberry Pi's desktop editor. We need to run a program that has an output that we can see, so we will use the send_my_ip_address.py we created in the "My first cron job" assignment during the second week of class
*/1 * * * * python3 /home/pi/Programs/0_crontab/send_my_ipaddress.py
What the line does is set up a cron job for everyminute on every hour of every day of every week to run the program send_my_ipaddress.py. You should comment it out once you get it working,
 Figure \(\PageIndex{1}\): Copy and Paste Caption here. (Copyright; author via source)
Save the file and then you need to initialize the crontab with the modified scr file. So in the Command line type (note, you need to be in the folder with the scr file, or add its path to the statement
crontab crontabRPi.scr
Now, you need to be careful with how you specify file paths in your python programs. For example, if you want to upload to Google Sheets you will need to know where the json key is. If you place it in the folder with the python program it will work. But then if you run it from cron, it will not work, unless the path is in your code. That is, the program that