
2: Conda Package Management System
- Page ID
- 433859
\( \newcommand{\vecs}[1]{\overset { \scriptstyle \rightharpoonup} {\mathbf{#1}} } \)
\( \newcommand{\vecd}[1]{\overset{-\!-\!\rightharpoonup}{\vphantom{a}\smash {#1}}} \)
\( \newcommand{\dsum}{\displaystyle\sum\limits} \)
\( \newcommand{\dint}{\displaystyle\int\limits} \)
\( \newcommand{\dlim}{\displaystyle\lim\limits} \)
\( \newcommand{\id}{\mathrm{id}}\) \( \newcommand{\Span}{\mathrm{span}}\)
( \newcommand{\kernel}{\mathrm{null}\,}\) \( \newcommand{\range}{\mathrm{range}\,}\)
\( \newcommand{\RealPart}{\mathrm{Re}}\) \( \newcommand{\ImaginaryPart}{\mathrm{Im}}\)
\( \newcommand{\Argument}{\mathrm{Arg}}\) \( \newcommand{\norm}[1]{\| #1 \|}\)
\( \newcommand{\inner}[2]{\langle #1, #2 \rangle}\)
\( \newcommand{\Span}{\mathrm{span}}\)
\( \newcommand{\id}{\mathrm{id}}\)
\( \newcommand{\Span}{\mathrm{span}}\)
\( \newcommand{\kernel}{\mathrm{null}\,}\)
\( \newcommand{\range}{\mathrm{range}\,}\)
\( \newcommand{\RealPart}{\mathrm{Re}}\)
\( \newcommand{\ImaginaryPart}{\mathrm{Im}}\)
\( \newcommand{\Argument}{\mathrm{Arg}}\)
\( \newcommand{\norm}[1]{\| #1 \|}\)
\( \newcommand{\inner}[2]{\langle #1, #2 \rangle}\)
\( \newcommand{\Span}{\mathrm{span}}\) \( \newcommand{\AA}{\unicode[.8,0]{x212B}}\)
\( \newcommand{\vectorA}[1]{\vec{#1}} % arrow\)
\( \newcommand{\vectorAt}[1]{\vec{\text{#1}}} % arrow\)
\( \newcommand{\vectorB}[1]{\overset { \scriptstyle \rightharpoonup} {\mathbf{#1}} } \)
\( \newcommand{\vectorC}[1]{\textbf{#1}} \)
\( \newcommand{\vectorD}[1]{\overrightarrow{#1}} \)
\( \newcommand{\vectorDt}[1]{\overrightarrow{\text{#1}}} \)
\( \newcommand{\vectE}[1]{\overset{-\!-\!\rightharpoonup}{\vphantom{a}\smash{\mathbf {#1}}}} \)
\( \newcommand{\vecs}[1]{\overset { \scriptstyle \rightharpoonup} {\mathbf{#1}} } \)
\(\newcommand{\longvect}{\overrightarrow}\)
\( \newcommand{\vecd}[1]{\overset{-\!-\!\rightharpoonup}{\vphantom{a}\smash {#1}}} \)
\(\newcommand{\avec}{\mathbf a}\) \(\newcommand{\bvec}{\mathbf b}\) \(\newcommand{\cvec}{\mathbf c}\) \(\newcommand{\dvec}{\mathbf d}\) \(\newcommand{\dtil}{\widetilde{\mathbf d}}\) \(\newcommand{\evec}{\mathbf e}\) \(\newcommand{\fvec}{\mathbf f}\) \(\newcommand{\nvec}{\mathbf n}\) \(\newcommand{\pvec}{\mathbf p}\) \(\newcommand{\qvec}{\mathbf q}\) \(\newcommand{\svec}{\mathbf s}\) \(\newcommand{\tvec}{\mathbf t}\) \(\newcommand{\uvec}{\mathbf u}\) \(\newcommand{\vvec}{\mathbf v}\) \(\newcommand{\wvec}{\mathbf w}\) \(\newcommand{\xvec}{\mathbf x}\) \(\newcommand{\yvec}{\mathbf y}\) \(\newcommand{\zvec}{\mathbf z}\) \(\newcommand{\rvec}{\mathbf r}\) \(\newcommand{\mvec}{\mathbf m}\) \(\newcommand{\zerovec}{\mathbf 0}\) \(\newcommand{\onevec}{\mathbf 1}\) \(\newcommand{\real}{\mathbb R}\) \(\newcommand{\twovec}[2]{\left[\begin{array}{r}#1 \\ #2 \end{array}\right]}\) \(\newcommand{\ctwovec}[2]{\left[\begin{array}{c}#1 \\ #2 \end{array}\right]}\) \(\newcommand{\threevec}[3]{\left[\begin{array}{r}#1 \\ #2 \\ #3 \end{array}\right]}\) \(\newcommand{\cthreevec}[3]{\left[\begin{array}{c}#1 \\ #2 \\ #3 \end{array}\right]}\) \(\newcommand{\fourvec}[4]{\left[\begin{array}{r}#1 \\ #2 \\ #3 \\ #4 \end{array}\right]}\) \(\newcommand{\cfourvec}[4]{\left[\begin{array}{c}#1 \\ #2 \\ #3 \\ #4 \end{array}\right]}\) \(\newcommand{\fivevec}[5]{\left[\begin{array}{r}#1 \\ #2 \\ #3 \\ #4 \\ #5 \\ \end{array}\right]}\) \(\newcommand{\cfivevec}[5]{\left[\begin{array}{c}#1 \\ #2 \\ #3 \\ #4 \\ #5 \\ \end{array}\right]}\) \(\newcommand{\mattwo}[4]{\left[\begin{array}{rr}#1 \amp #2 \\ #3 \amp #4 \\ \end{array}\right]}\) \(\newcommand{\laspan}[1]{\text{Span}\{#1\}}\) \(\newcommand{\bcal}{\cal B}\) \(\newcommand{\ccal}{\cal C}\) \(\newcommand{\scal}{\cal S}\) \(\newcommand{\wcal}{\cal W}\) \(\newcommand{\ecal}{\cal E}\) \(\newcommand{\coords}[2]{\left\{#1\right\}_{#2}}\) \(\newcommand{\gray}[1]{\color{gray}{#1}}\) \(\newcommand{\lgray}[1]{\color{lightgray}{#1}}\) \(\newcommand{\rank}{\operatorname{rank}}\) \(\newcommand{\row}{\text{Row}}\) \(\newcommand{\col}{\text{Col}}\) \(\renewcommand{\row}{\text{Row}}\) \(\newcommand{\nul}{\text{Nul}}\) \(\newcommand{\var}{\text{Var}}\) \(\newcommand{\corr}{\text{corr}}\) \(\newcommand{\len}[1]{\left|#1\right|}\) \(\newcommand{\bbar}{\overline{\bvec}}\) \(\newcommand{\bhat}{\widehat{\bvec}}\) \(\newcommand{\bperp}{\bvec^\perp}\) \(\newcommand{\xhat}{\widehat{\xvec}}\) \(\newcommand{\vhat}{\widehat{\vvec}}\) \(\newcommand{\uhat}{\widehat{\uvec}}\) \(\newcommand{\what}{\widehat{\wvec}}\) \(\newcommand{\Sighat}{\widehat{\Sigma}}\) \(\newcommand{\lt}{<}\) \(\newcommand{\gt}{>}\) \(\newcommand{\amp}{&}\) \(\definecolor{fillinmathshade}{gray}{0.9}\)Conda
Conda is a cross platform package management system. It allows you to install, update and manage software packages and dependencies. Conda makes it easy to update Python and ohter packages. There are two ways to run Conda, through the command line, or through the Anaconda-Navigator GUI. There are three advantages to installing Conda and you should install a package management system like Conda if you intend to tackle data science projects..
- Package Management: Conda allows you to install, update and manage packages for multiple programming languages like Python. Some packages you may be interested in are Scikit learn (Machine Learning package), Matplotlib....
- Environment Management: Allows you to create isolated environements with specific packages and dependencies (some package may require different versions of Python).
- Cross-Platform Support:
Distributions
There are two distributions of Conda; Anaconda and Miniconda. Anaconda comes with a large number of preinstalled packages and the Anaconda Navigator, which is a GUI that allows you to manage your packages. Miniconda is a bare bones installation of Conda that only includes a few essential packages. You should install Anaconda if you are interested in Data Science and have lots of free space on your computer. We will provide a tutorial on using Miniconda and only install packages we need.
Minconda
Miniconda installs Conda, Python and a few other useful packages like pip, and zlib. To install additional packages you will need to use the conda install command. In this activity we will install miniconda and show you how to make the Python version in miniconda the default interpreter in Thonny. It will then be easy to update Python by using Conda.
Go to the following URL and choose the Miniconda Installer Links for your operating system and download the executable file.
https://docs.conda.io/en/latest/miniconda.html
The following images are screen shots for installing Miniconda that date to 2022, and may have changed since them.
 Figure \(\PageIndex{8}\):Screen captures of steps involved with installing miniconda. (Copyright; Bob Belford, CC 0.0)
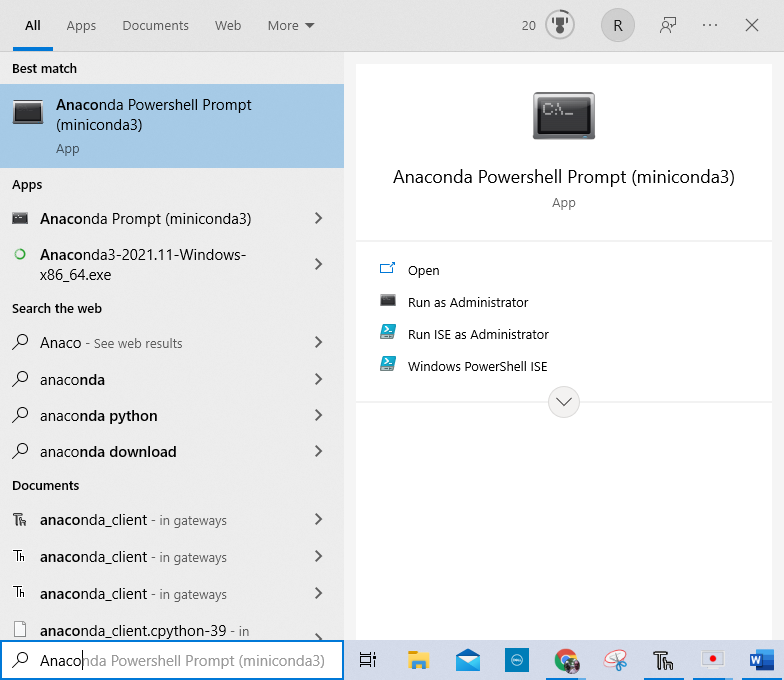
Once you install Miniconda you want to open the Anaconda prompt (miniconda 3) from your Windows start menu, which can be done by typing in the search: Anaconda
If you are using a Windows machine the command prompts are different than Linuxges you want to type the following into the command prompt. You first need to navigate to the correct folder. In the command prompt (which is a terminal shell) type ls to see your folders.
Note <ctrl> C bring back the command prompt if you get stuck
ls
#you may need to use if on windows
dir
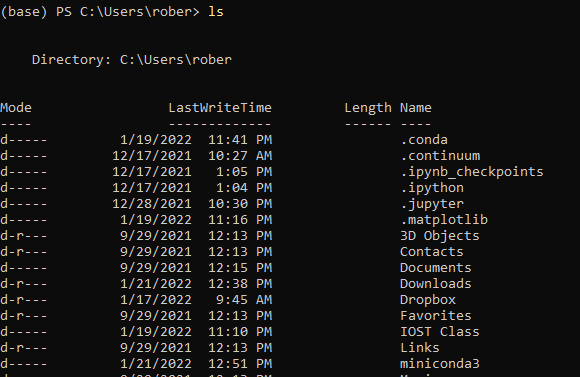 Figure \(\PageIndex{10}\): Viewing directory to locate where conda is installed. (Copyright; author via source)
Now move to that directory (Change Directory)
cd .\miniconda3\
When you list the files you will see where you installed python
You will also want to update python
conda update python
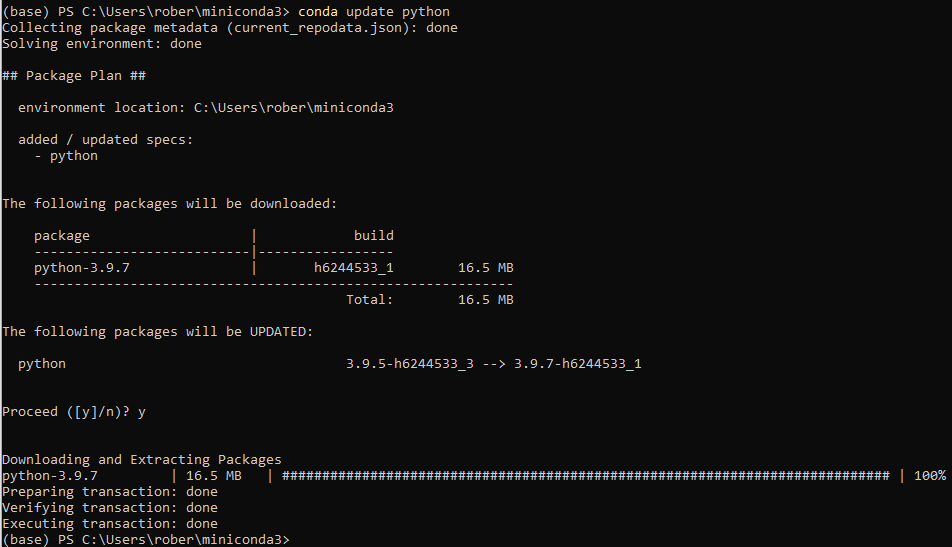 Figure \(\PageIndex{11}\): Screen shot showing how to update python with miniconda. (Copyright; Belford CC 0.0)
Exit the anaconda shell
exit
Changing Default Thonny Python Interpreter
Now we want to link our Thonny to the new install of python. Open Thonny and go to tools/options/interpreter (figure \(\PageIndex{12}\)) and choose the "Alternative Python 3 interpreter or virtual environment". Initially the python executable will direct to where you installed Thonny and you need to direct it to the new path, which you found above. Or you can click the three dots tothe right of the current path and navigate to where the python application file is located and open it.
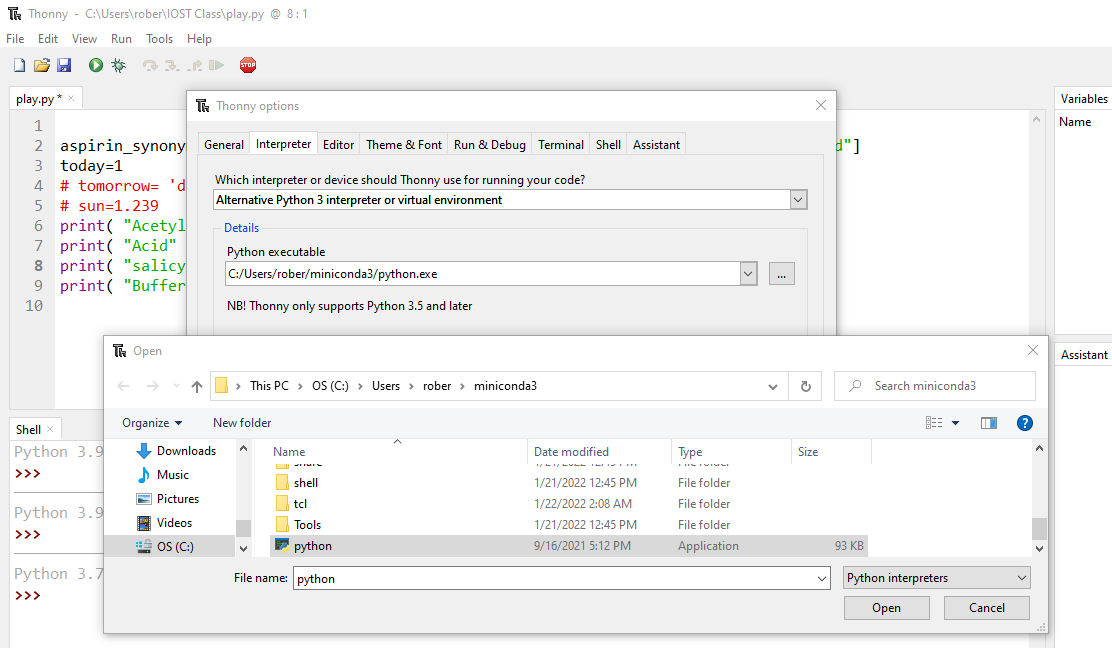
Figure \(\PageIndex{12}\): Copy and Paste Caption here. (Copyright; author via source)
If you now look at the shell in Thonny you can see the new updated Python program you are running
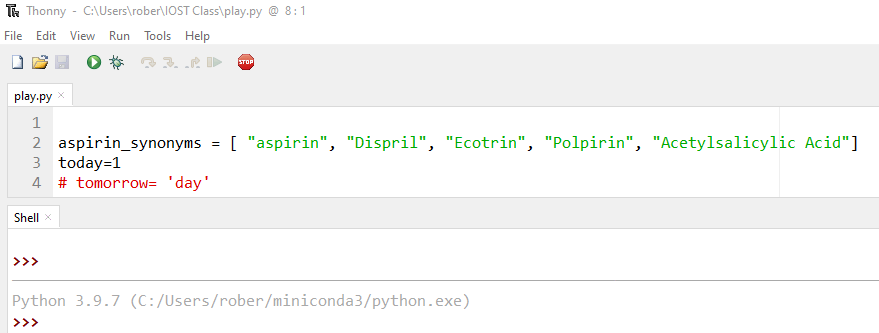 Figure \(\PageIndex{13}\): the version and path of the Python Interpreter Thonny is using. (Copyright; Belford CC 0.0)
Anaconda
Anaconda is a data science platform which allows you to find and install over 7,500 data science and machine learning package and progarams like Python, R, Jupyter, Scikit learn, matplotlib and R, but also includes the conda package manager that helps deal with conflicts across software. There are two installation options, Anaconda and Miniconda. If you are planning to get involved with Data Sciences or have a high quality computer you will probably want to install the full version of Anaconda, but if this class is your only endeavor than you will probably want to install the Miniconda version. Note, the full version comes with the Anaconda Navigator that makes it very easy to launch and maintain packages, where the Miniconda requires you to use to launch programs through the conda prompt. What we are going to do in this class is connect the Thonny IDE to the Python interpreter installed with either Anaconda or Miniconda and use Thonny to launch Python. We are choosing Thonny because it comes installed with the Raspberry Pi. We will also be using MS Visual Studio Code as it integrates with Git and GitHub versioning software
- Anaconda
- https://www.anaconda.com/
- Well suited for scientific programmings. Comes with ipython and Spyder, and the Conda package management system.
- Has 1500 scientific packages and uses 3GB of disk space
- https://www.anaconda.com/
Anaconda Navigator
In your user directory type
conda install anaconda-navigator