
Z Using ADAPT
- Page ID
- 339494

\( \newcommand{\vecs}[1]{\overset { \scriptstyle \rightharpoonup} {\mathbf{#1}} } \)
\( \newcommand{\vecd}[1]{\overset{-\!-\!\rightharpoonup}{\vphantom{a}\smash {#1}}} \)
\( \newcommand{\id}{\mathrm{id}}\) \( \newcommand{\Span}{\mathrm{span}}\)
( \newcommand{\kernel}{\mathrm{null}\,}\) \( \newcommand{\range}{\mathrm{range}\,}\)
\( \newcommand{\RealPart}{\mathrm{Re}}\) \( \newcommand{\ImaginaryPart}{\mathrm{Im}}\)
\( \newcommand{\Argument}{\mathrm{Arg}}\) \( \newcommand{\norm}[1]{\| #1 \|}\)
\( \newcommand{\inner}[2]{\langle #1, #2 \rangle}\)
\( \newcommand{\Span}{\mathrm{span}}\)
\( \newcommand{\id}{\mathrm{id}}\)
\( \newcommand{\Span}{\mathrm{span}}\)
\( \newcommand{\kernel}{\mathrm{null}\,}\)
\( \newcommand{\range}{\mathrm{range}\,}\)
\( \newcommand{\RealPart}{\mathrm{Re}}\)
\( \newcommand{\ImaginaryPart}{\mathrm{Im}}\)
\( \newcommand{\Argument}{\mathrm{Arg}}\)
\( \newcommand{\norm}[1]{\| #1 \|}\)
\( \newcommand{\inner}[2]{\langle #1, #2 \rangle}\)
\( \newcommand{\Span}{\mathrm{span}}\) \( \newcommand{\AA}{\unicode[.8,0]{x212B}}\)
\( \newcommand{\vectorA}[1]{\vec{#1}} % arrow\)
\( \newcommand{\vectorAt}[1]{\vec{\text{#1}}} % arrow\)
\( \newcommand{\vectorB}[1]{\overset { \scriptstyle \rightharpoonup} {\mathbf{#1}} } \)
\( \newcommand{\vectorC}[1]{\textbf{#1}} \)
\( \newcommand{\vectorD}[1]{\overrightarrow{#1}} \)
\( \newcommand{\vectorDt}[1]{\overrightarrow{\text{#1}}} \)
\( \newcommand{\vectE}[1]{\overset{-\!-\!\rightharpoonup}{\vphantom{a}\smash{\mathbf {#1}}}} \)
\( \newcommand{\vecs}[1]{\overset { \scriptstyle \rightharpoonup} {\mathbf{#1}} } \)
\( \newcommand{\vecd}[1]{\overset{-\!-\!\rightharpoonup}{\vphantom{a}\smash {#1}}} \)
\(\newcommand{\avec}{\mathbf a}\) \(\newcommand{\bvec}{\mathbf b}\) \(\newcommand{\cvec}{\mathbf c}\) \(\newcommand{\dvec}{\mathbf d}\) \(\newcommand{\dtil}{\widetilde{\mathbf d}}\) \(\newcommand{\evec}{\mathbf e}\) \(\newcommand{\fvec}{\mathbf f}\) \(\newcommand{\nvec}{\mathbf n}\) \(\newcommand{\pvec}{\mathbf p}\) \(\newcommand{\qvec}{\mathbf q}\) \(\newcommand{\svec}{\mathbf s}\) \(\newcommand{\tvec}{\mathbf t}\) \(\newcommand{\uvec}{\mathbf u}\) \(\newcommand{\vvec}{\mathbf v}\) \(\newcommand{\wvec}{\mathbf w}\) \(\newcommand{\xvec}{\mathbf x}\) \(\newcommand{\yvec}{\mathbf y}\) \(\newcommand{\zvec}{\mathbf z}\) \(\newcommand{\rvec}{\mathbf r}\) \(\newcommand{\mvec}{\mathbf m}\) \(\newcommand{\zerovec}{\mathbf 0}\) \(\newcommand{\onevec}{\mathbf 1}\) \(\newcommand{\real}{\mathbb R}\) \(\newcommand{\twovec}[2]{\left[\begin{array}{r}#1 \\ #2 \end{array}\right]}\) \(\newcommand{\ctwovec}[2]{\left[\begin{array}{c}#1 \\ #2 \end{array}\right]}\) \(\newcommand{\threevec}[3]{\left[\begin{array}{r}#1 \\ #2 \\ #3 \end{array}\right]}\) \(\newcommand{\cthreevec}[3]{\left[\begin{array}{c}#1 \\ #2 \\ #3 \end{array}\right]}\) \(\newcommand{\fourvec}[4]{\left[\begin{array}{r}#1 \\ #2 \\ #3 \\ #4 \end{array}\right]}\) \(\newcommand{\cfourvec}[4]{\left[\begin{array}{c}#1 \\ #2 \\ #3 \\ #4 \end{array}\right]}\) \(\newcommand{\fivevec}[5]{\left[\begin{array}{r}#1 \\ #2 \\ #3 \\ #4 \\ #5 \\ \end{array}\right]}\) \(\newcommand{\cfivevec}[5]{\left[\begin{array}{c}#1 \\ #2 \\ #3 \\ #4 \\ #5 \\ \end{array}\right]}\) \(\newcommand{\mattwo}[4]{\left[\begin{array}{rr}#1 \amp #2 \\ #3 \amp #4 \\ \end{array}\right]}\) \(\newcommand{\laspan}[1]{\text{Span}\{#1\}}\) \(\newcommand{\bcal}{\cal B}\) \(\newcommand{\ccal}{\cal C}\) \(\newcommand{\scal}{\cal S}\) \(\newcommand{\wcal}{\cal W}\) \(\newcommand{\ecal}{\cal E}\) \(\newcommand{\coords}[2]{\left\{#1\right\}_{#2}}\) \(\newcommand{\gray}[1]{\color{gray}{#1}}\) \(\newcommand{\lgray}[1]{\color{lightgray}{#1}}\) \(\newcommand{\rank}{\operatorname{rank}}\) \(\newcommand{\row}{\text{Row}}\) \(\newcommand{\col}{\text{Col}}\) \(\renewcommand{\row}{\text{Row}}\) \(\newcommand{\nul}{\text{Nul}}\) \(\newcommand{\var}{\text{Var}}\) \(\newcommand{\corr}{\text{corr}}\) \(\newcommand{\len}[1]{\left|#1\right|}\) \(\newcommand{\bbar}{\overline{\bvec}}\) \(\newcommand{\bhat}{\widehat{\bvec}}\) \(\newcommand{\bperp}{\bvec^\perp}\) \(\newcommand{\xhat}{\widehat{\xvec}}\) \(\newcommand{\vhat}{\widehat{\vvec}}\) \(\newcommand{\uhat}{\widehat{\uvec}}\) \(\newcommand{\what}{\widehat{\wvec}}\) \(\newcommand{\Sighat}{\widehat{\Sigma}}\) \(\newcommand{\lt}{<}\) \(\newcommand{\gt}{>}\) \(\newcommand{\amp}{&}\) \(\definecolor{fillinmathshade}{gray}{0.9}\)Activity Overview
The goal of this activity is to learn how to upload PDF files of your work to the ADAPT platform of LibreText so it can be graded. You will make this two ways, by taking pictures with your cell phone and converting those to PDF, or by writing in a Google Doc and converting that to a PDF. There will be several steps, and note, if you have a scanner that converts to PDF you can use that instead of the Genius Cell phone app, but the images must be in PDF format. Each answer must be a different page of the PDF, and if they are hand written scans, you must print your name and date and then sign it. There are several steps to todays activity.
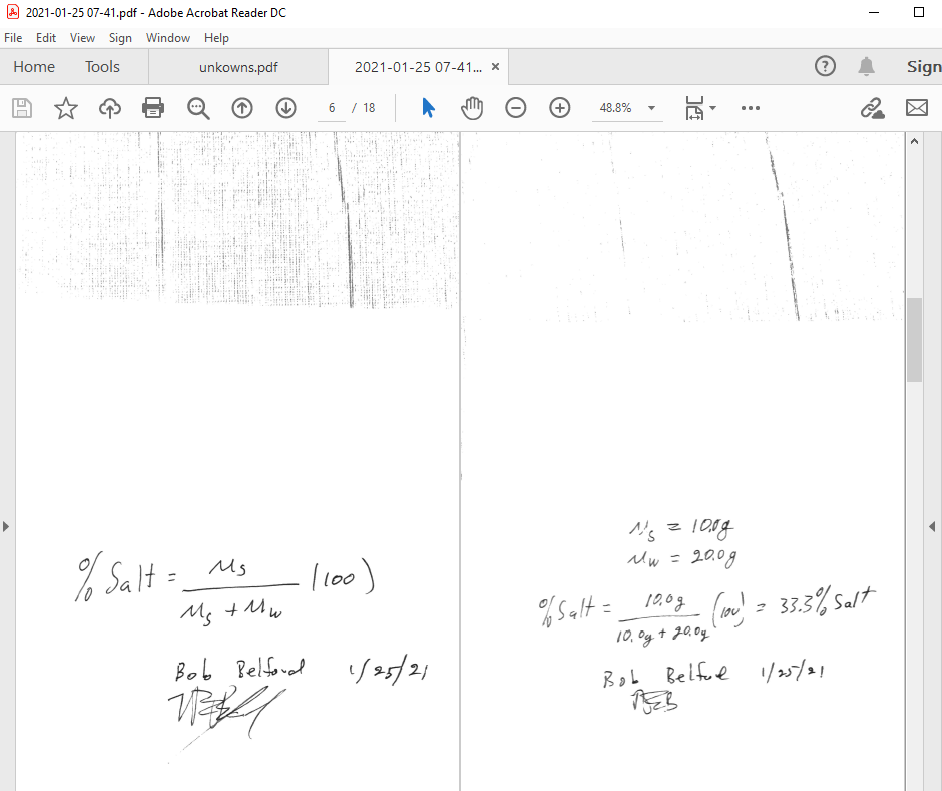
- Write on a sheet of paper the following equation, and under it write today's date, print and sign your signature.
\[\%Salt=\left (\frac{m_S}{m_S+m_W} \right )100\] - Write on a new sheet of paper the following equation, and under it write today's date, print and sign your signature.
\[m_S=10.0g \\ m_W=20.0g \\ \%Salt=\left (\frac{10.0g}{10.0g+20.0g} \right )100=33.0\% \; Salt\] - Write on a new sheet of paper the following:
I understand I need to be able to upload files to ADAPT and my grade will be influenced by the clarity of the files I upload. I will sign and date all scanned files to indicate they are my work.
Under that statement write: today's date, print and sign your name.
- Download and Install Genius Scan App to your cell phone (you may omit this if you have a scanner that will convert your images to a PDF file)
- Take PDF scans of the two equations (steps 1 & 2) and statement in step 3, with each equation being on a separate page (a separate scan). If using Genius scan, feel free to make multiple images of each equation, and when you upload you can choose the best one to submit as your answer.
- Do the Individual Assignment activity in Google classroom where you demonstrate the ability to make subscripts and superscripts in Google Docs.
- Download the Google Doc assignment to your computer as a PDF.
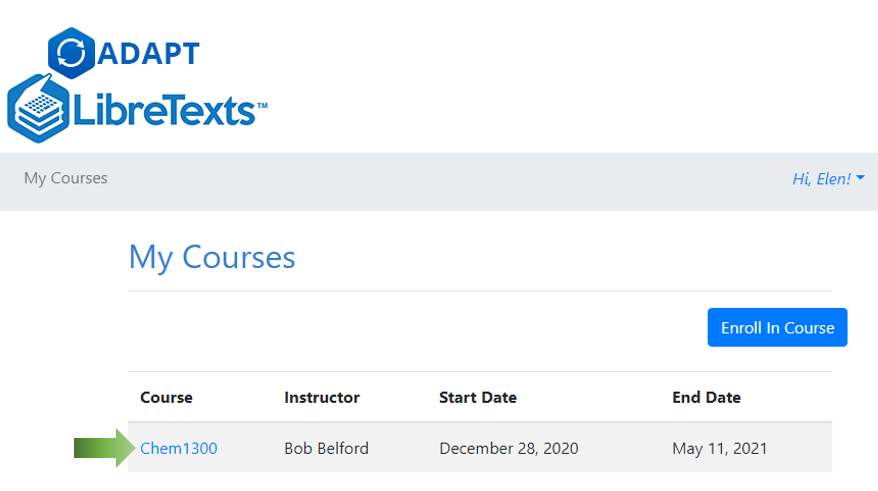
- Go to ADAPT,
- upload the PDF scan of step 5, choose the image of step 1 and assign as the answer to question 1
- Using the PDF of the scan from step 5, choose the image of step 2 and assign as the answer to question 2.
- Using the PDF of the scan from step 5, chose the image of step 3 and assign as the answer to question 4 (note, we are skipping question 3, which will be done in the next step)
- upload a new PDF of the scan of step 6 (your PDF of the Google Doc) and assign as the answer of question 3
Genius Scan
Step 1 Set up email app on your mobile device. There are instructions available for iOS devices and Android devices.
Step 2 Download Genius Scan. You can use links given below if you are viewing this page from your phone, or you can simply search for this app. Free version is enough.
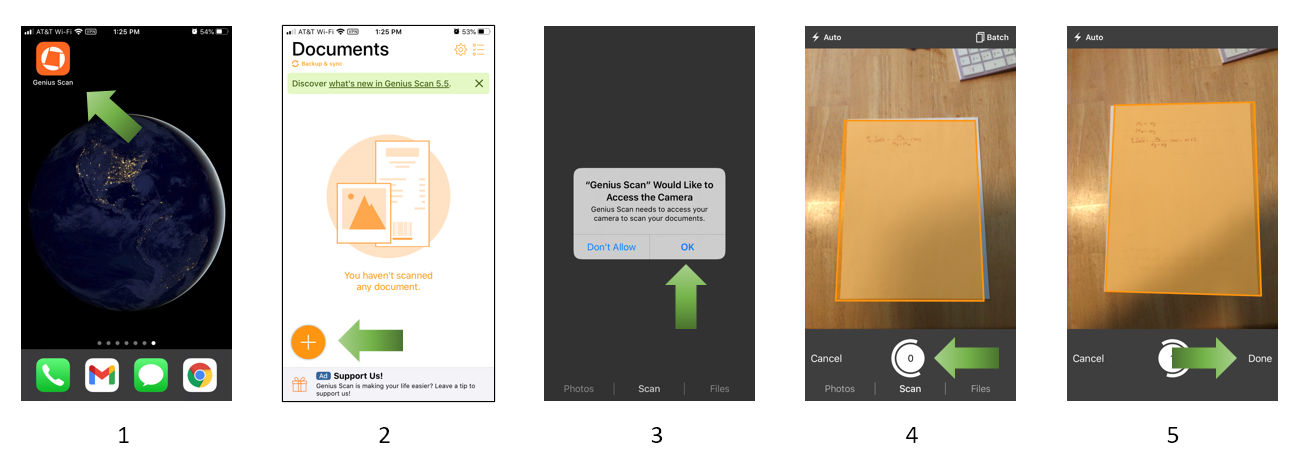
Step 3 Open Genius Scan and add scan your first document.
- Open the app.
- Click on the plus sign in the bottom left corner.
- Allow access to the Camera.
- Position your phone over the sheet of paper you want to scan. The whole page has to be visible in your camera view. Click "Scan" (big round button at the bottom). You can scan as many pages as you need, Genius scan will save them all in one PDF document, and you would be able to slice it in ADAPT.
- Once you've scanned all pages hit "Done".
Please keep all scanned pages as is. DO NOT crop your PDF files as it will result in a loss of part of the page during upload to ADAPT.
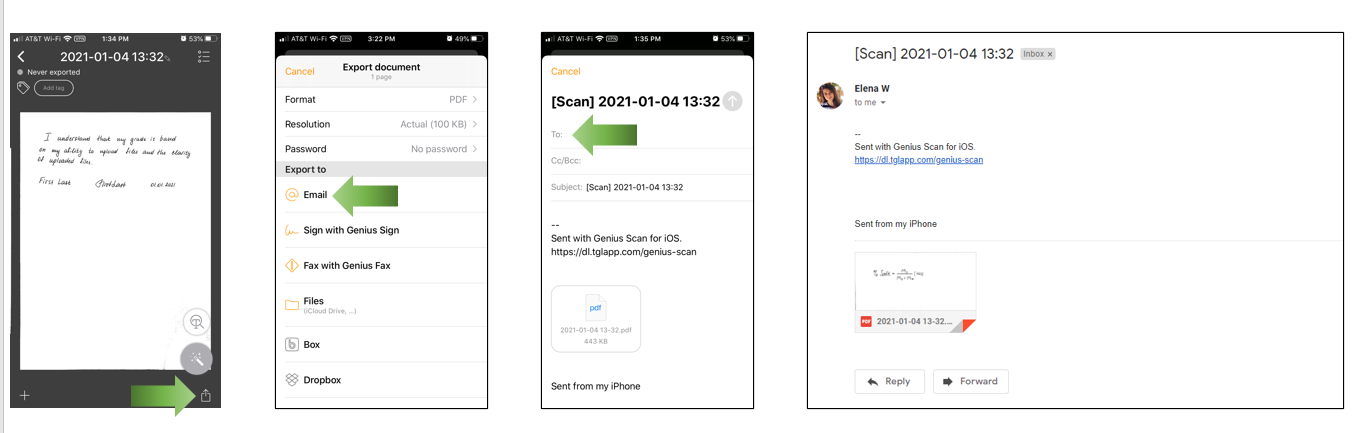
Step 4 Email your PDF file to yourself and access it from your computer to upload to ADAPT. Refer to Figure \(\PageIndex{2}\) for instructions.
Notes on taking Scans
To achieve the best results, before uploading the file, make sure that it is:
- Clear and presentable
- Easy to read and follow
- Centered and the entire solution is visible
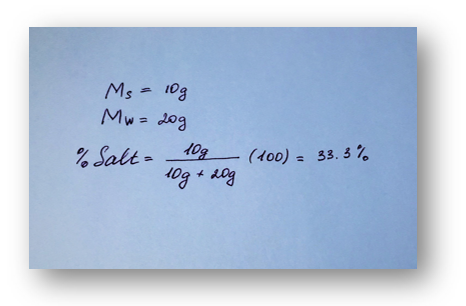
You can see an example of an acceptable submission in Figure \(\PageIndex{3}\)
Below are some examples of unacceptable submissions. You will lose points if the work is not clear.
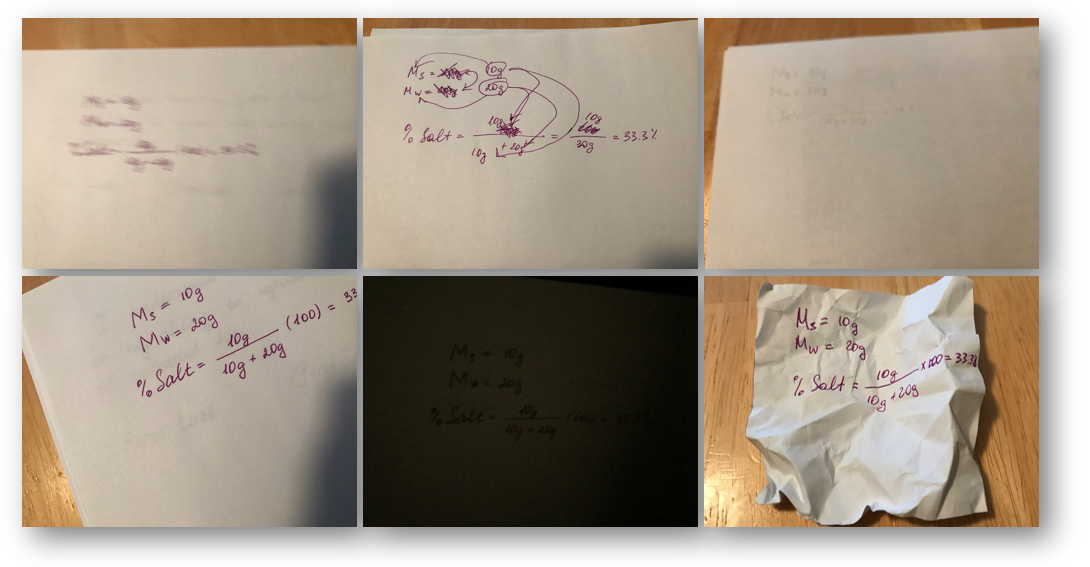
It is advised to take multiple scans of each answer, then when you upload them you can choose the ones you want to assign to each question.
Upload Files to ADAPT
1. Log in to ADAPT
2. Select the course by clicking on its name
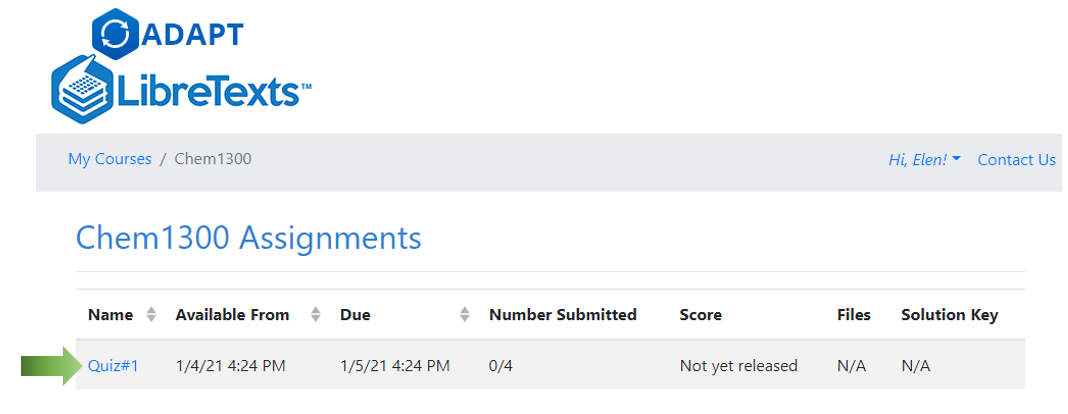
3. Select the Assignment you need to complete
Compiled PDF Submission
You can upload a multipage PDF that contains answers to all questions in the assignment you're working on and then use pages from the uploaded PDF as your submissions for each question. For example, if the assignment has three questions you can upload one PDF where answer to each question is written on a separate page and then set answer to Question 1 to be page 1 from your PDF, answer to Question 2 would be page 3 from your PDF and answer to Question 3 would be page 2 (you can set them in any order). This method saves time since you don't have to upload each page separately.
If you already have an app that can scan multiple pages as one document, and you are comfortable using it you can use it. If not, see section Genius Scan.
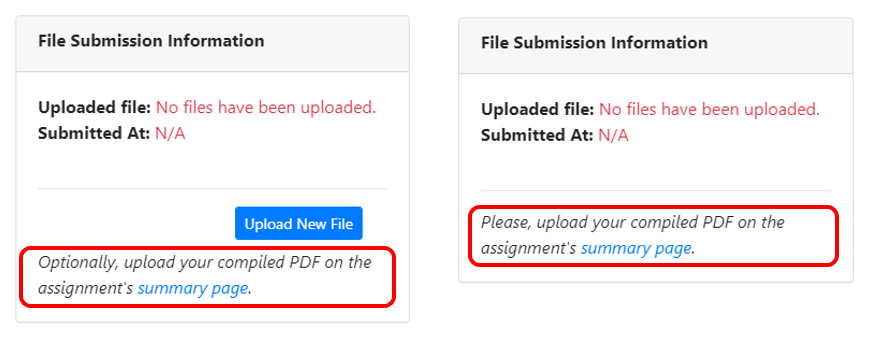
4. Click on "summary page" link under File Submission Information. Depending on the settings that instructor selected, you might see different messages.
Note: If you don't see the "summary page" link, that means that Compiled PDF upload is disabled for this assignment.
5. Click on "Select File" under Upload Compiled PDF Submission and select the PDF file you would like to upload

6. Make sure you selected the right file (check the name) and click "Start Upload".
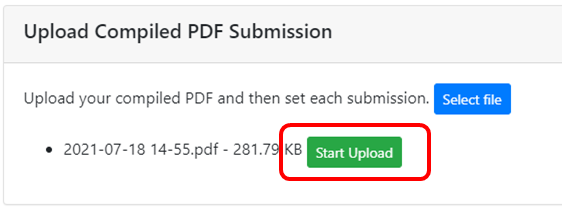
7. Click "Submit". If your file was uploaded successfully, you will see the preview of your file
8. Scroll down to the end of the page where you can see a list of questions.
9. Type the page number that contains the answer to the corresponding question and click "Set Page"
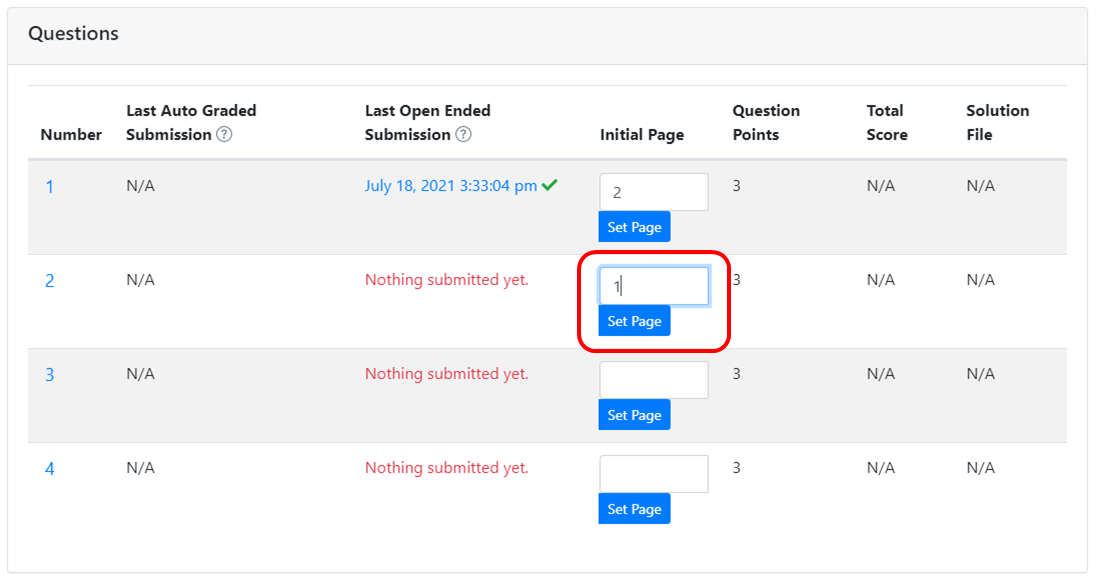
8. All submissions are automatically saved when you click "Set Page"
Non-Compiled PDF Submission
4. Take one picture/scan one page per question. If you have 4 questions in your quiz you need four pictures/scans (cannot be a multipage PDF), each of them clearly showing your answer to one of the questions.
5. Click "Upload New File" under File Submission Information. Depending on the assignments settings, you may or may not see a message below the button. Ignore it for non-compiled PDF uploads.
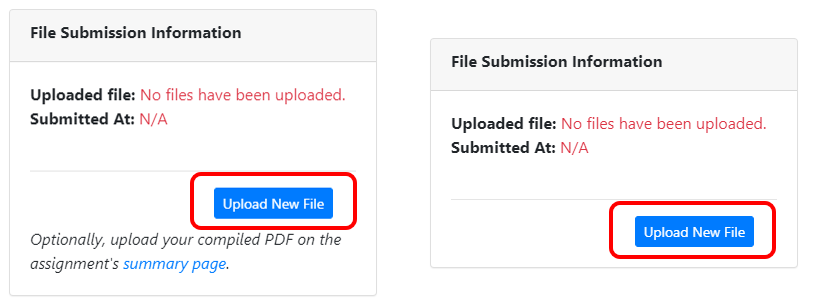
6. In the pop-up window, click "Select File". You can upload .pdf, .txt, .png, .jpeg, .jpg files
7. You will see a confirmation message when your file is done uploading.
8. You can view the file that you submitted by clicking on "View Submission"If you need to replace the file click "Upload New File" and repeat step 6
9. Repeat steps 5 through 8 for each question
Contributors and Attributions
Robert E. Belford (University of Arkansas Little Rock; Department of Chemistry). The breadth, depth and veracity of this work is the responsibility of Robert E. Belford, rebelford@ualr.edu. You should contact him if you have any concerns. This material has both original contributions, and content built upon prior contributions of the LibreTexts Community and other resources, including but not limited to:
- Elena Lisitsyna