
3.2: PASS Thermochemistry- Interpreting thermochemical equations and sketching enthalpy diagrams (3.E.10a)
- Page ID
- 465461
\( \newcommand{\vecs}[1]{\overset { \scriptstyle \rightharpoonup} {\mathbf{#1}} } \)
\( \newcommand{\vecd}[1]{\overset{-\!-\!\rightharpoonup}{\vphantom{a}\smash {#1}}} \)
\( \newcommand{\id}{\mathrm{id}}\) \( \newcommand{\Span}{\mathrm{span}}\)
( \newcommand{\kernel}{\mathrm{null}\,}\) \( \newcommand{\range}{\mathrm{range}\,}\)
\( \newcommand{\RealPart}{\mathrm{Re}}\) \( \newcommand{\ImaginaryPart}{\mathrm{Im}}\)
\( \newcommand{\Argument}{\mathrm{Arg}}\) \( \newcommand{\norm}[1]{\| #1 \|}\)
\( \newcommand{\inner}[2]{\langle #1, #2 \rangle}\)
\( \newcommand{\Span}{\mathrm{span}}\)
\( \newcommand{\id}{\mathrm{id}}\)
\( \newcommand{\Span}{\mathrm{span}}\)
\( \newcommand{\kernel}{\mathrm{null}\,}\)
\( \newcommand{\range}{\mathrm{range}\,}\)
\( \newcommand{\RealPart}{\mathrm{Re}}\)
\( \newcommand{\ImaginaryPart}{\mathrm{Im}}\)
\( \newcommand{\Argument}{\mathrm{Arg}}\)
\( \newcommand{\norm}[1]{\| #1 \|}\)
\( \newcommand{\inner}[2]{\langle #1, #2 \rangle}\)
\( \newcommand{\Span}{\mathrm{span}}\) \( \newcommand{\AA}{\unicode[.8,0]{x212B}}\)
\( \newcommand{\vectorA}[1]{\vec{#1}} % arrow\)
\( \newcommand{\vectorAt}[1]{\vec{\text{#1}}} % arrow\)
\( \newcommand{\vectorB}[1]{\overset { \scriptstyle \rightharpoonup} {\mathbf{#1}} } \)
\( \newcommand{\vectorC}[1]{\textbf{#1}} \)
\( \newcommand{\vectorD}[1]{\overrightarrow{#1}} \)
\( \newcommand{\vectorDt}[1]{\overrightarrow{\text{#1}}} \)
\( \newcommand{\vectE}[1]{\overset{-\!-\!\rightharpoonup}{\vphantom{a}\smash{\mathbf {#1}}}} \)
\( \newcommand{\vecs}[1]{\overset { \scriptstyle \rightharpoonup} {\mathbf{#1}} } \)
\( \newcommand{\vecd}[1]{\overset{-\!-\!\rightharpoonup}{\vphantom{a}\smash {#1}}} \)
\(\newcommand{\avec}{\mathbf a}\) \(\newcommand{\bvec}{\mathbf b}\) \(\newcommand{\cvec}{\mathbf c}\) \(\newcommand{\dvec}{\mathbf d}\) \(\newcommand{\dtil}{\widetilde{\mathbf d}}\) \(\newcommand{\evec}{\mathbf e}\) \(\newcommand{\fvec}{\mathbf f}\) \(\newcommand{\nvec}{\mathbf n}\) \(\newcommand{\pvec}{\mathbf p}\) \(\newcommand{\qvec}{\mathbf q}\) \(\newcommand{\svec}{\mathbf s}\) \(\newcommand{\tvec}{\mathbf t}\) \(\newcommand{\uvec}{\mathbf u}\) \(\newcommand{\vvec}{\mathbf v}\) \(\newcommand{\wvec}{\mathbf w}\) \(\newcommand{\xvec}{\mathbf x}\) \(\newcommand{\yvec}{\mathbf y}\) \(\newcommand{\zvec}{\mathbf z}\) \(\newcommand{\rvec}{\mathbf r}\) \(\newcommand{\mvec}{\mathbf m}\) \(\newcommand{\zerovec}{\mathbf 0}\) \(\newcommand{\onevec}{\mathbf 1}\) \(\newcommand{\real}{\mathbb R}\) \(\newcommand{\twovec}[2]{\left[\begin{array}{r}#1 \\ #2 \end{array}\right]}\) \(\newcommand{\ctwovec}[2]{\left[\begin{array}{c}#1 \\ #2 \end{array}\right]}\) \(\newcommand{\threevec}[3]{\left[\begin{array}{r}#1 \\ #2 \\ #3 \end{array}\right]}\) \(\newcommand{\cthreevec}[3]{\left[\begin{array}{c}#1 \\ #2 \\ #3 \end{array}\right]}\) \(\newcommand{\fourvec}[4]{\left[\begin{array}{r}#1 \\ #2 \\ #3 \\ #4 \end{array}\right]}\) \(\newcommand{\cfourvec}[4]{\left[\begin{array}{c}#1 \\ #2 \\ #3 \\ #4 \end{array}\right]}\) \(\newcommand{\fivevec}[5]{\left[\begin{array}{r}#1 \\ #2 \\ #3 \\ #4 \\ #5 \\ \end{array}\right]}\) \(\newcommand{\cfivevec}[5]{\left[\begin{array}{c}#1 \\ #2 \\ #3 \\ #4 \\ #5 \\ \end{array}\right]}\) \(\newcommand{\mattwo}[4]{\left[\begin{array}{rr}#1 \amp #2 \\ #3 \amp #4 \\ \end{array}\right]}\) \(\newcommand{\laspan}[1]{\text{Span}\{#1\}}\) \(\newcommand{\bcal}{\cal B}\) \(\newcommand{\ccal}{\cal C}\) \(\newcommand{\scal}{\cal S}\) \(\newcommand{\wcal}{\cal W}\) \(\newcommand{\ecal}{\cal E}\) \(\newcommand{\coords}[2]{\left\{#1\right\}_{#2}}\) \(\newcommand{\gray}[1]{\color{gray}{#1}}\) \(\newcommand{\lgray}[1]{\color{lightgray}{#1}}\) \(\newcommand{\rank}{\operatorname{rank}}\) \(\newcommand{\row}{\text{Row}}\) \(\newcommand{\col}{\text{Col}}\) \(\renewcommand{\row}{\text{Row}}\) \(\newcommand{\nul}{\text{Nul}}\) \(\newcommand{\var}{\text{Var}}\) \(\newcommand{\corr}{\text{corr}}\) \(\newcommand{\len}[1]{\left|#1\right|}\) \(\newcommand{\bbar}{\overline{\bvec}}\) \(\newcommand{\bhat}{\widehat{\bvec}}\) \(\newcommand{\bperp}{\bvec^\perp}\) \(\newcommand{\xhat}{\widehat{\xvec}}\) \(\newcommand{\vhat}{\widehat{\vvec}}\) \(\newcommand{\uhat}{\widehat{\uvec}}\) \(\newcommand{\what}{\widehat{\wvec}}\) \(\newcommand{\Sighat}{\widehat{\Sigma}}\) \(\newcommand{\lt}{<}\) \(\newcommand{\gt}{>}\) \(\newcommand{\amp}{&}\) \(\definecolor{fillinmathshade}{gray}{0.9}\)
Question
Given the following thermochemical equation,
C6H6 (l) → 3C2H2 (g) ΔH = 630.0 kJ/mol
Write the complete thermochemical equation for the reverse reaction. Sketch an enthalpy diagram showing the relative positions of all species and include arrows indicating both of the above reactions with appropriate values for ΔH reaction.
- Answer
-
3C2H2 (g) → C6H6 (l)
ΔH = -630.0 kJ/mol

- Strategy Map
-
Step Hint 1. Identify the reactants and products for the forward reaction. 2. Swap them to give the reverse reaction. Recall reversing a reaction changes the sign of ΔH (see LibreText section 3.4)
3. Manipulate the enthalpy value from the forward reaction to give the value for the reverse reaction. The amount of energy will be the same regardless of the reaction’s direction. However, in one direction energy is absorbed and in the other energy is released. 4. Create the enthalpy diagram showing the reaction in both directions.
- Solution
-
3C2H2 (g) → C6H6 (l)
The reactant and product from the forward reaction switch places.
ΔH = -630.0 kJ/mol
The sign of the enthalpy value for the forward reaction is flipped.
The thermochemical equation for the reverse reaction is: 3C2H2 (g) → C6H6 (l) ΔH = -630.0 kJ/mol
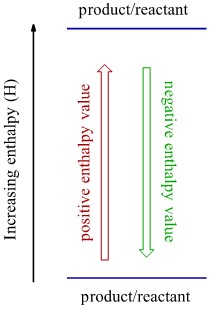
The enthalpy diagram shows the relative positions of all species and includes arrows indicating both of the above reactions with appropriate values for ΔH reaction.
The up arrow represents the forward endothermic reaction, and the down arrow represents the reverse exothermic reaction.
- Guided Solution
-
Download Guided Solution as a pdf
Guided Solution Hint Question
Given the following thermochemical equation,
C6H6 (l) → 3C2H2 (g) ΔH = 630.0 kJ/mol
Write the complete thermochemical equation for the reverse reaction. Sketch an enthalpy diagram showing the relative positions of all species and include arrows indicating both of the above reactions with appropriate values for ΔH reaction.
This is a theory type problem where your knowledge on enthalpy is tested. You must find the reverse reaction given its forward reaction, find its enthalpy and sketch the diagram that represents the reaction in both directions. See LibreText 3.4: Enthalpy of Reaction You are given information about the forward reaction; how can it be manipulated to give the reverse reaction? Recall that if a reaction is reversed, the reactants and products switch sides and the opposite reaction is taking place. What about the enthalpy? The magnitude of energy will be the same regardless of the reactions direction. However, in one direction energy is absorbed and in the other energy is released.
If the enthalpy change for the forward reaction is positive, what do you expect the enthalpy change for the reverse reaction to be? If the enthalpy for the forward reaction is positive you can expect the enthalpy for the reverse reaction to be negative. Recall how to sketch an enthalpy diagram…
- On the lefthand side draw an arrow and label its direction with the corresponding enthalpy change (either increasing or decreasing).
- Draw your reactants and an arrow leading to the products.
If the reaction is endothermic (it has a positive enthalpy) the products will be higher than the reactants and the reaction arrow will point upwards. The opposite is true for an exothermic reaction.
Complete Solution:
Given: C6H6 (l) → 3C2H2 (g) ΔH = 630.0 kJ/mol
Reverse the reaction
3C2H2 (g) → C6H6 (l)
The reactant and product from the forward reaction switch places. In the forward reaction three C2H2 molecules break to form one C6H6 molecule. In the reverse reaction one C6H6 molecule is broken to form three C2H2 molecules.
Change the sign of ΔH
ΔH = 630.0 kJ/mol
The sign of the enthalpy value for the forward reaction is flipped to give the enthalpy value of the reverse reaction. This will always be the case since one way is endothermic while the other is exothermic.
Now use the enthalpy diagram template to position the reactant and product, paying attention to the sign of ΔH is each case to determine relative positions.
The forward and reverse reactions are placed on the enthalpy diagram. The upward arrow represents the forward reaction, and the downward arrow represents the reverse reaction. The forward reaction is endothermic meaning it requires an input of energy. The reverse reaction is an exothermic reaction meaning energy is released from the reaction.
Answer The complete thermochemical equation for the reverse reaction is therefore:
3C2H2 (g) → C6H6 (l) ΔH = -630.0 kJ/mol
Both reactions are represented on the enthalpy diagram:
C6H6 (l) → 3C2H2 (g) ΔH = 630.0 kJ/mol
3C2H2 (g) → C6H6 (l) ΔH = -630.0 kJ/mol
Check your work!
A complete thermochemical equation has reactant, product and value of ΔH.
The reaction given in the question was endothermic, so it is represented by the up arrow on the enthalpy diagram. The reverse reaction is exothermic, so it is represented as the up arrow.
Why does this answer make chemical sense?
For a chemical reaction, the enthalpy of reaction (ΔH) is the difference in enthalpy between products and reactants. Reversing a chemical reaction reverses the sign of the enthalpy. This makes sense because for a reaction to occur in one direction it will be either exothermic or endothermic when the bonds break and form. Therefore, if the same reaction happens but the opposite bonds are breaking and forming the enthalpy will be in the opposite direction. This means that if the forward reaction is endothermic the reverse reaction will be exothermic and vice versa.
Make sure that your ‘down’ arrow represents the exothermic reaction and your ‘up’ arrow represents the endothermic reaction.
(Original question authored by Sharon Brewer shared under a CC BY-NC-SA 4.0 license)