
5.4: Suction Filtration
- Page ID
- 489432

\( \newcommand{\vecs}[1]{\overset { \scriptstyle \rightharpoonup} {\mathbf{#1}} } \)
\( \newcommand{\vecd}[1]{\overset{-\!-\!\rightharpoonup}{\vphantom{a}\smash {#1}}} \)
\( \newcommand{\id}{\mathrm{id}}\) \( \newcommand{\Span}{\mathrm{span}}\)
( \newcommand{\kernel}{\mathrm{null}\,}\) \( \newcommand{\range}{\mathrm{range}\,}\)
\( \newcommand{\RealPart}{\mathrm{Re}}\) \( \newcommand{\ImaginaryPart}{\mathrm{Im}}\)
\( \newcommand{\Argument}{\mathrm{Arg}}\) \( \newcommand{\norm}[1]{\| #1 \|}\)
\( \newcommand{\inner}[2]{\langle #1, #2 \rangle}\)
\( \newcommand{\Span}{\mathrm{span}}\)
\( \newcommand{\id}{\mathrm{id}}\)
\( \newcommand{\Span}{\mathrm{span}}\)
\( \newcommand{\kernel}{\mathrm{null}\,}\)
\( \newcommand{\range}{\mathrm{range}\,}\)
\( \newcommand{\RealPart}{\mathrm{Re}}\)
\( \newcommand{\ImaginaryPart}{\mathrm{Im}}\)
\( \newcommand{\Argument}{\mathrm{Arg}}\)
\( \newcommand{\norm}[1]{\| #1 \|}\)
\( \newcommand{\inner}[2]{\langle #1, #2 \rangle}\)
\( \newcommand{\Span}{\mathrm{span}}\) \( \newcommand{\AA}{\unicode[.8,0]{x212B}}\)
\( \newcommand{\vectorA}[1]{\vec{#1}} % arrow\)
\( \newcommand{\vectorAt}[1]{\vec{\text{#1}}} % arrow\)
\( \newcommand{\vectorB}[1]{\overset { \scriptstyle \rightharpoonup} {\mathbf{#1}} } \)
\( \newcommand{\vectorC}[1]{\textbf{#1}} \)
\( \newcommand{\vectorD}[1]{\overrightarrow{#1}} \)
\( \newcommand{\vectorDt}[1]{\overrightarrow{\text{#1}}} \)
\( \newcommand{\vectE}[1]{\overset{-\!-\!\rightharpoonup}{\vphantom{a}\smash{\mathbf {#1}}}} \)
\( \newcommand{\vecs}[1]{\overset { \scriptstyle \rightharpoonup} {\mathbf{#1}} } \)
\( \newcommand{\vecd}[1]{\overset{-\!-\!\rightharpoonup}{\vphantom{a}\smash {#1}}} \)
\(\newcommand{\avec}{\mathbf a}\) \(\newcommand{\bvec}{\mathbf b}\) \(\newcommand{\cvec}{\mathbf c}\) \(\newcommand{\dvec}{\mathbf d}\) \(\newcommand{\dtil}{\widetilde{\mathbf d}}\) \(\newcommand{\evec}{\mathbf e}\) \(\newcommand{\fvec}{\mathbf f}\) \(\newcommand{\nvec}{\mathbf n}\) \(\newcommand{\pvec}{\mathbf p}\) \(\newcommand{\qvec}{\mathbf q}\) \(\newcommand{\svec}{\mathbf s}\) \(\newcommand{\tvec}{\mathbf t}\) \(\newcommand{\uvec}{\mathbf u}\) \(\newcommand{\vvec}{\mathbf v}\) \(\newcommand{\wvec}{\mathbf w}\) \(\newcommand{\xvec}{\mathbf x}\) \(\newcommand{\yvec}{\mathbf y}\) \(\newcommand{\zvec}{\mathbf z}\) \(\newcommand{\rvec}{\mathbf r}\) \(\newcommand{\mvec}{\mathbf m}\) \(\newcommand{\zerovec}{\mathbf 0}\) \(\newcommand{\onevec}{\mathbf 1}\) \(\newcommand{\real}{\mathbb R}\) \(\newcommand{\twovec}[2]{\left[\begin{array}{r}#1 \\ #2 \end{array}\right]}\) \(\newcommand{\ctwovec}[2]{\left[\begin{array}{c}#1 \\ #2 \end{array}\right]}\) \(\newcommand{\threevec}[3]{\left[\begin{array}{r}#1 \\ #2 \\ #3 \end{array}\right]}\) \(\newcommand{\cthreevec}[3]{\left[\begin{array}{c}#1 \\ #2 \\ #3 \end{array}\right]}\) \(\newcommand{\fourvec}[4]{\left[\begin{array}{r}#1 \\ #2 \\ #3 \\ #4 \end{array}\right]}\) \(\newcommand{\cfourvec}[4]{\left[\begin{array}{c}#1 \\ #2 \\ #3 \\ #4 \end{array}\right]}\) \(\newcommand{\fivevec}[5]{\left[\begin{array}{r}#1 \\ #2 \\ #3 \\ #4 \\ #5 \\ \end{array}\right]}\) \(\newcommand{\cfivevec}[5]{\left[\begin{array}{c}#1 \\ #2 \\ #3 \\ #4 \\ #5 \\ \end{array}\right]}\) \(\newcommand{\mattwo}[4]{\left[\begin{array}{rr}#1 \amp #2 \\ #3 \amp #4 \\ \end{array}\right]}\) \(\newcommand{\laspan}[1]{\text{Span}\{#1\}}\) \(\newcommand{\bcal}{\cal B}\) \(\newcommand{\ccal}{\cal C}\) \(\newcommand{\scal}{\cal S}\) \(\newcommand{\wcal}{\cal W}\) \(\newcommand{\ecal}{\cal E}\) \(\newcommand{\coords}[2]{\left\{#1\right\}_{#2}}\) \(\newcommand{\gray}[1]{\color{gray}{#1}}\) \(\newcommand{\lgray}[1]{\color{lightgray}{#1}}\) \(\newcommand{\rank}{\operatorname{rank}}\) \(\newcommand{\row}{\text{Row}}\) \(\newcommand{\col}{\text{Col}}\) \(\renewcommand{\row}{\text{Row}}\) \(\newcommand{\nul}{\text{Nul}}\) \(\newcommand{\var}{\text{Var}}\) \(\newcommand{\corr}{\text{corr}}\) \(\newcommand{\len}[1]{\left|#1\right|}\) \(\newcommand{\bbar}{\overline{\bvec}}\) \(\newcommand{\bhat}{\widehat{\bvec}}\) \(\newcommand{\bperp}{\bvec^\perp}\) \(\newcommand{\xhat}{\widehat{\xvec}}\) \(\newcommand{\vhat}{\widehat{\vvec}}\) \(\newcommand{\uhat}{\widehat{\uvec}}\) \(\newcommand{\what}{\widehat{\wvec}}\) \(\newcommand{\Sighat}{\widehat{\Sigma}}\) \(\newcommand{\lt}{<}\) \(\newcommand{\gt}{>}\) \(\newcommand{\amp}{&}\) \(\definecolor{fillinmathshade}{gray}{0.9}\)Suction Filtration Overview
Suction filtration (vacuum filtration) is the standard technique used for separating a solid-liquid mixture when the goal is to retain the solid (for example in crystallization). Similar to gravity filtration, a solid-liquid mixture is poured onto a filter paper, with the main difference being that the process is aided by suction beneath the funnel (Figures 1.70 + 1.71).
The process has advantages and disadvantages in comparison to gravity filtration.
Advantages: 1) Suction filtration is much faster than gravity filtration, often taking less than one minute with good seals and a good vacuum source. 2) Suction filtration is more efficient at removing residual liquid, leading to a purer solid. This is especially important in crystallization, as the liquid may contain soluble impurities which could adsorb back onto the solid surface when the solvent evaporates.
Disadvantages: The force of suction may draw fine crystals through the filter paper pores, leading to a quantity of material that cannot be recovered from the filter paper, and possibly an additional quantity that is lost in the filtrate. This method therefore works best with large crystals. On small scales, the loss of material to the filter paper and filtrate is significant, and so other methods are recommended for microscale work.
.png?revision=1&size=bestfit&width=1109&height=371)
Rinsing
As the goal of suction filtration is to fully separate a solid from its surrounding liquid, rinsing the solid is necessary if the liquid cannot easily evaporate. In the case of crystallization, the liquid may contain impurities that can reincorporate into the solid if not removed.
To rinse a suction-filtered solid, the vacuum is removed and a small portion of cold solvent is poured over the solid (the "filter cake"). In the case of crystallization, the same solvent from the crystallization is used. The solid is then delicately slushed around in the solvent with a glass rod, and the vacuum is reapplied to remove the rinse solvent.
To demonstrate the importance of a rinse, Figure 1.72 shows the recovery of a white solid from a yellow liquid using suction filtration. The yellow liquid seemed to be somewhat retained by the solid, as the first crystals collected had a yellow tint (Figure 1.72b). However, rinsing with a few portions of cold solvent were effective at removing the yellow liquid (Figure 1.72d), which could have been reincorporated into the solid without the rinse.
.png?revision=1&size=bestfit&width=1106&height=370)
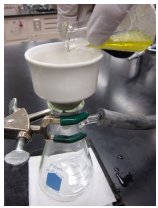
Assemble the suction filtration flask
- Clamp a side-arm Erlenmeyer flask to a ring stand or latticework and attach a thick-walled rubber hose to its sidearm. Connect this thick tubing to the yellow nozzle on the side of the hood. It is best not to bend or strain the tubing as much as is practical, as this may cause poor suction.
.png?revision=1&size=bestfit&width=1110&height=368)
- Place a rubber sleeve (or filter adapter) and Buchner funnel atop the side-arm Erlenmeyer flask (Figure 1.73a). Alternatively, use a Hirsch funnel for small scales (Figure 1.73d).
- Obtain a filter paper that will fit perfectly into the Buchner or Hirsch funnel. Filter papers are not completely flat and have a subtle arc to their shape (Figure 1.73b). Place the filter paper inside the funnel concave side down (Figure 1.75b+c). The paper should cover all the holes in the funnel, and with the paper arching downward (Figure 1.74a), the solid will be less likely to creep around the edges.
.png?revision=1&size=bestfit&width=1100&height=360)
- Turn on the vacuum using the yellow handle. Wet the filter paper with cold solvent (using the same solvent used in crystallization, if applicable, Figure 1.74b).
- Suction should drain the liquid and hold the moist filter paper snugly over the holes in the filter. If the solvent does not drain or suction is not occurring, you may need to press down on the funnel (Figure 1.74c) to create a good seal between the glass and rubber sleeve.
Lack of suction may also be from a faulty aspirator or a leak in the system: to test for suction remove the tubing from the suction flask and place your finger over the end (Figure 1.74d).
.png?revision=1&size=bestfit&width=1107&height=370)
Filter and Rinse the Mixture
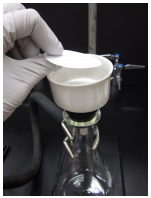
- Swirl the mixture to be filtered to dislodge the solid from the sides of the flask. If the solid is thick, use a spatula or stirring rod to free it from the glass (Figure 1.75a).
In the context of crystallization, the flask will have previously been in an ice bath. Use a paper towel to dry water residue from the outside of the flask so water does not accidentally pour onto the solid. - With a quick motion, swirl and dump the solid into the funnel in portions (Figure 1.75b). If the solid is thick, scoop it out of the flask onto the filter paper (Figure 1.75c).
It's best if the solid can be directed toward the middle of the filter paper, as solid near the edges may creep around the filter paper. - A small amount of chilled solvent (\(1\)-\(2 \: \text{mL}\) for macroscale work) can be used to help rinse any residual solid from the flask into the funnel (Figure 1.75d). In crystallization, it is not wise to use an excessive amount of solvent as it will decrease the yield by dissolving small amounts of crystals. Again, press on the funnel to create a good seal and efficient drainage if necessary.
.png?revision=1&size=bestfit&width=1109&height=393)
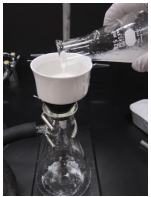
- Rinse the solid on the filter paper to remove contaminants that may remain in the residual liquid.
- Break the vacuum on the flask by removing the rubber tubing on the filter flask.
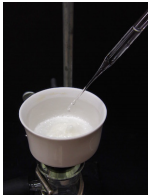
- Add \(1\)-\(2 \: \text{mL}\) of cold solvent (Figure 1.76b). Use a glass stirring rod to break up any solid chunks and distribute the solvent to all portions of the solid (Figure 1.76c), taking care to not rip or dislodge the filter paper.
- Reapply the vacuum to the flask, and dry the solid with suction for a few minutes.
- After filtration is complete, again open the flask to the atmosphere by releasing the pinch clamp or opening it elsewhere, and turn off the water connected to the aspirator.
.png?revision=1&size=bestfit&width=1101&height=367)
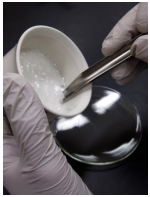
- Transfer the solid, filter paper and all, to a pre-weighed watch glass using a spatula (Figures 1.77a+b). The filter cake shouldn't be mushy, and if it is, the liquid was not adequately removed (try a different aspirator and repeat suction filtration).
- Allow the solid to dry overnight if possible before recording a final mass or melting point. The solid will flake off the filter paper more easily when completely dry (Figure 1.77c).
- If pressed for time, a solid can be quickly dried in the following ways:
- If the solid is wet with water, it can be placed in a \(110^\text{o} \text{C}\) oven (if the melting point is not below this temperature). If the solid is wet with organic solvent, it should never be placed in an oven as it may ignite.
- If the solid is wet with organic solvent, it can be pressed between fresh pieces of filter paper (multiple times if needed) to quickly dry them. Inevitably some solid will be lost on the filter paper.
Suction Filtration Summary
 |
 |
 |
 |
|
Clamp a side-armed Erlenmeyer flask. Connect thick-walled hosing from the side arm to a vacuum trap and the water aspirator. Place a vacuum sleeve on the Buchner (or Hirsch) funnel, then filter paper on the funnel so it arches downward. |
Turn on the aspirator. Add a few \(\text{mL}\) of the same solvent used in the flask to wet the filter. The solvent should drain with suction. Swirl the mixture to be filtered to dislodge the solid from the sides of the flask. With a quick motion, pour the slurry into the funnel in portions. |
In some applications, (e.g. crystallization), rinse with solvent:
|
Apply suction again for a few minutes (repeat the rinse step if necessary). Dry the solid on a watch glass along with the filter paper, overnight if possible. The solid will flake off the paper when dried. |
Table 1.10: Procedural summary for suction filtration.