
4.2: Creating and Modifying Courses
- Page ID
- 353821
\( \newcommand{\vecs}[1]{\overset { \scriptstyle \rightharpoonup} {\mathbf{#1}} } \)
\( \newcommand{\vecd}[1]{\overset{-\!-\!\rightharpoonup}{\vphantom{a}\smash {#1}}} \)
\( \newcommand{\id}{\mathrm{id}}\) \( \newcommand{\Span}{\mathrm{span}}\)
( \newcommand{\kernel}{\mathrm{null}\,}\) \( \newcommand{\range}{\mathrm{range}\,}\)
\( \newcommand{\RealPart}{\mathrm{Re}}\) \( \newcommand{\ImaginaryPart}{\mathrm{Im}}\)
\( \newcommand{\Argument}{\mathrm{Arg}}\) \( \newcommand{\norm}[1]{\| #1 \|}\)
\( \newcommand{\inner}[2]{\langle #1, #2 \rangle}\)
\( \newcommand{\Span}{\mathrm{span}}\)
\( \newcommand{\id}{\mathrm{id}}\)
\( \newcommand{\Span}{\mathrm{span}}\)
\( \newcommand{\kernel}{\mathrm{null}\,}\)
\( \newcommand{\range}{\mathrm{range}\,}\)
\( \newcommand{\RealPart}{\mathrm{Re}}\)
\( \newcommand{\ImaginaryPart}{\mathrm{Im}}\)
\( \newcommand{\Argument}{\mathrm{Arg}}\)
\( \newcommand{\norm}[1]{\| #1 \|}\)
\( \newcommand{\inner}[2]{\langle #1, #2 \rangle}\)
\( \newcommand{\Span}{\mathrm{span}}\) \( \newcommand{\AA}{\unicode[.8,0]{x212B}}\)
\( \newcommand{\vectorA}[1]{\vec{#1}} % arrow\)
\( \newcommand{\vectorAt}[1]{\vec{\text{#1}}} % arrow\)
\( \newcommand{\vectorB}[1]{\overset { \scriptstyle \rightharpoonup} {\mathbf{#1}} } \)
\( \newcommand{\vectorC}[1]{\textbf{#1}} \)
\( \newcommand{\vectorD}[1]{\overrightarrow{#1}} \)
\( \newcommand{\vectorDt}[1]{\overrightarrow{\text{#1}}} \)
\( \newcommand{\vectE}[1]{\overset{-\!-\!\rightharpoonup}{\vphantom{a}\smash{\mathbf {#1}}}} \)
\( \newcommand{\vecs}[1]{\overset { \scriptstyle \rightharpoonup} {\mathbf{#1}} } \)
\( \newcommand{\vecd}[1]{\overset{-\!-\!\rightharpoonup}{\vphantom{a}\smash {#1}}} \)
\(\newcommand{\avec}{\mathbf a}\) \(\newcommand{\bvec}{\mathbf b}\) \(\newcommand{\cvec}{\mathbf c}\) \(\newcommand{\dvec}{\mathbf d}\) \(\newcommand{\dtil}{\widetilde{\mathbf d}}\) \(\newcommand{\evec}{\mathbf e}\) \(\newcommand{\fvec}{\mathbf f}\) \(\newcommand{\nvec}{\mathbf n}\) \(\newcommand{\pvec}{\mathbf p}\) \(\newcommand{\qvec}{\mathbf q}\) \(\newcommand{\svec}{\mathbf s}\) \(\newcommand{\tvec}{\mathbf t}\) \(\newcommand{\uvec}{\mathbf u}\) \(\newcommand{\vvec}{\mathbf v}\) \(\newcommand{\wvec}{\mathbf w}\) \(\newcommand{\xvec}{\mathbf x}\) \(\newcommand{\yvec}{\mathbf y}\) \(\newcommand{\zvec}{\mathbf z}\) \(\newcommand{\rvec}{\mathbf r}\) \(\newcommand{\mvec}{\mathbf m}\) \(\newcommand{\zerovec}{\mathbf 0}\) \(\newcommand{\onevec}{\mathbf 1}\) \(\newcommand{\real}{\mathbb R}\) \(\newcommand{\twovec}[2]{\left[\begin{array}{r}#1 \\ #2 \end{array}\right]}\) \(\newcommand{\ctwovec}[2]{\left[\begin{array}{c}#1 \\ #2 \end{array}\right]}\) \(\newcommand{\threevec}[3]{\left[\begin{array}{r}#1 \\ #2 \\ #3 \end{array}\right]}\) \(\newcommand{\cthreevec}[3]{\left[\begin{array}{c}#1 \\ #2 \\ #3 \end{array}\right]}\) \(\newcommand{\fourvec}[4]{\left[\begin{array}{r}#1 \\ #2 \\ #3 \\ #4 \end{array}\right]}\) \(\newcommand{\cfourvec}[4]{\left[\begin{array}{c}#1 \\ #2 \\ #3 \\ #4 \end{array}\right]}\) \(\newcommand{\fivevec}[5]{\left[\begin{array}{r}#1 \\ #2 \\ #3 \\ #4 \\ #5 \\ \end{array}\right]}\) \(\newcommand{\cfivevec}[5]{\left[\begin{array}{c}#1 \\ #2 \\ #3 \\ #4 \\ #5 \\ \end{array}\right]}\) \(\newcommand{\mattwo}[4]{\left[\begin{array}{rr}#1 \amp #2 \\ #3 \amp #4 \\ \end{array}\right]}\) \(\newcommand{\laspan}[1]{\text{Span}\{#1\}}\) \(\newcommand{\bcal}{\cal B}\) \(\newcommand{\ccal}{\cal C}\) \(\newcommand{\scal}{\cal S}\) \(\newcommand{\wcal}{\cal W}\) \(\newcommand{\ecal}{\cal E}\) \(\newcommand{\coords}[2]{\left\{#1\right\}_{#2}}\) \(\newcommand{\gray}[1]{\color{gray}{#1}}\) \(\newcommand{\lgray}[1]{\color{lightgray}{#1}}\) \(\newcommand{\rank}{\operatorname{rank}}\) \(\newcommand{\row}{\text{Row}}\) \(\newcommand{\col}{\text{Col}}\) \(\renewcommand{\row}{\text{Row}}\) \(\newcommand{\nul}{\text{Nul}}\) \(\newcommand{\var}{\text{Var}}\) \(\newcommand{\corr}{\text{corr}}\) \(\newcommand{\len}[1]{\left|#1\right|}\) \(\newcommand{\bbar}{\overline{\bvec}}\) \(\newcommand{\bhat}{\widehat{\bvec}}\) \(\newcommand{\bperp}{\bvec^\perp}\) \(\newcommand{\xhat}{\widehat{\xvec}}\) \(\newcommand{\vhat}{\widehat{\vvec}}\) \(\newcommand{\uhat}{\widehat{\uvec}}\) \(\newcommand{\what}{\widehat{\wvec}}\) \(\newcommand{\Sighat}{\widehat{\Sigma}}\) \(\newcommand{\lt}{<}\) \(\newcommand{\gt}{>}\) \(\newcommand{\amp}{&}\) \(\definecolor{fillinmathshade}{gray}{0.9}\)There are several ways to create, copy, import, and integrate your Adapt courses. This section of the Adapt user guide walks you through setting up courses and provides an overview of the different course options.
General Course Information
There are several ways to create, copy, import, and integrate your Adapt courses. This section of the Adapt user guide walks you through setting up courses and provides an overview of the different course options.
When creating courses, you will have the opportunity to fill in or edit various course details described here:
- Course Name: The name of the course students are enrolling in.
- Public Description: A general description of a course that is viewable by anyone accessing or viewing the course.
- Private description: A description of a course that is viewable by only the instructor.
- Textbook URL: you can include a link to online texts for your students to access.
- Modality: There are three modality options – traditional, formative, and anonymous.
- Section: a course may contain different sections. When creating a course, you can add the name of one section and update others later – See section 4.3.
- CRN: The course reference or identification number.
- Term: The term of the course. Your entry can vary and depends on how you or your institution identify terms.
- Start Date: the start of the course - the course will not be available to students before this date.
- End Date: the end of the course – the course will not be available to students after this date.
- Public: the options are yes or no.
- Alpha: the options are yes or no.
- LMS: Adapt can integrate into your school’s learning management system. If you are interested, have your LMS administrator contact Adapt.
The required course details are course name, modality, sections, CRN, term, start and end dates, public option, alpha option, and LMS.
Types of Courses
The course details introduced a few options that impact the type of course you are generating. Here are some details and recommendations about the different types of courses you can create.
Course Modalities
Traditional: courses using summative or formative assignments that are only viewable by the students enrolled in the course. This modality is best used as a homework platform where students are graded for their assignments.
Formative Only: courses that only use formative assignments. This modality is great for in-class clicker questions, practice assignments, and other ungraded assessments.
Anonymous Users: courses where anyone can view the assignments. The users are anonymous, and their responses are not saved. This modality is best for surveys in a course or optional practice assignments.
Public Courses
A public course is available for copying or importing by any instructor using Adapt, and they are great for those who want to share their materials with other faculty at their institution or the greater community. When another instructor copies your course, they copy the assignments and settings. They do not copy any student information, grades, responses, etc.
Alpha and Beta Courses
An alpha course is like a master course that can have connected beta courses. When a beta course is connected to an alpha course, all of the assignments, properties, and changes in the alpha course are transferred to the beta course. This option is best used when multiple instructors are teaching the same course or you have multiple courses of the same class.
Creating a New Course
Starting at the courses dashboard, you can create a new course by:
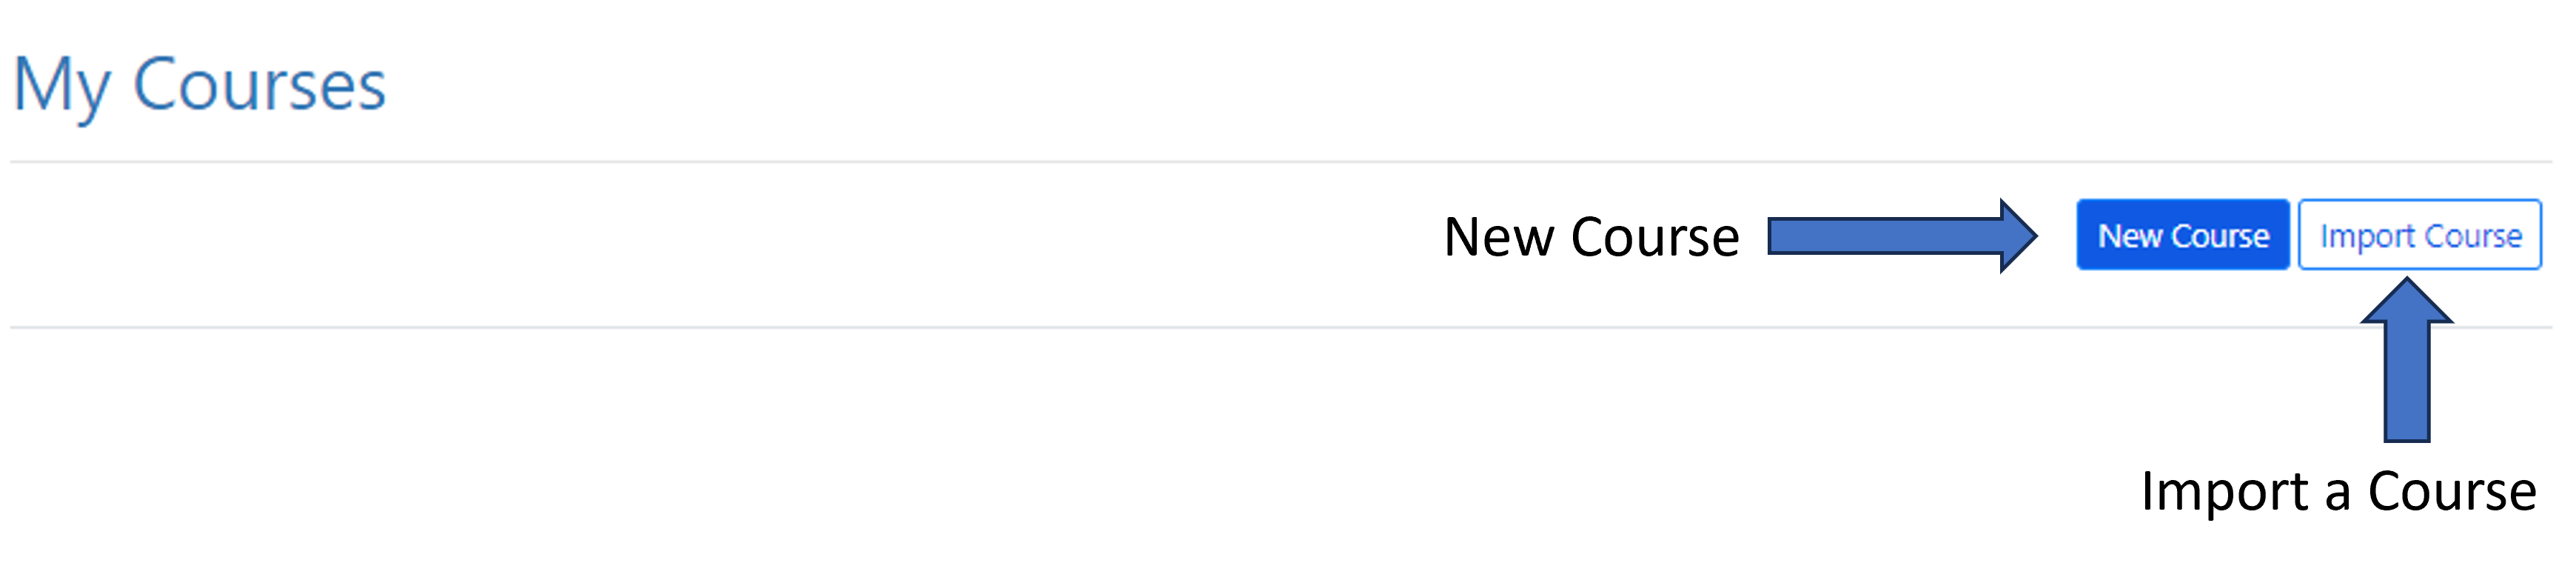
- Selecting the “New Course” icon (See (Figure \(\PageIndex{1}\))).
- Fill in the required course details and optional details if you would like.
- Save the course by clicking the “save” icon.
Please note: if you are missing any required fields, you will receive a form error with the fields you need to fix or complete.
Importing Courses from the Commons
You can import a course by clicking the “Import Course” Icon on the My Courses dashboard (See (Figure \(\PageIndex{1}\))). Then, select the course you want to import from the dropdown menu that appears and click the “Yes, import course!” icon. The imported course will appear in your “My Courses” dashboard with the name + import of the imported course. You can then edit the course properties and details (discussed in section 4.3)
Copying a Previous Course
If you have already created a course, you can copy that course by selecting the clone course icon in the actions section of the My Courses page (See (Figure \(\PageIndex{2}\))).

When you copy a course, you have the option to adjust the due dates for the course. If you want to shift the due dates, click the Yes option of “Shifting Dates” and enter your first assignment’s due date and time. The copied course will appear in your “My Courses” dashboard with the name + copy of the copied course. You can then edit the course properties and details (discussed in section 4.3)