6.3: Molecular shapes –Valence shell electron pair repulsion (VSEPR) theory
- Page ID
- 419304

The Lewis structure tells the connection between atoms and any lone pair present, but it does not tell the exact angles of bonds around the central atom or the actual shape of the molecule. The conventional way of presenting a Lewis structure of a molecule shows it as a planer, e.g., CH4 as  which implies the molecule to be planar and H-C-H bond angles to be either 90o or 180o. The actual CH4 molecule is nonplanar as
  with all H-C-H bond angles 109.5o. the following theory helps explain the actual shapes of molecules.
Valence shell electron pair repulsion (VSERP) theory
The valence shell electron pair repulsion theory predicts the shape of the molecule and bond angles based on the fact that valence shell electrons around the central atom in a molecule are grouped. The electron groups repel each other and go as far apart from each other as possible.
Electron groups
A lone pair, a single bond, a double bond, and a triple bond, each of these is one electron group. This is because two elections of single bond, four electrons of a double bond, and six electrons of a triple bond are located in the region along the axis of the bond, i.e., they are grouped together. Similarly, a lone pair is located in a defined space around the atom. For example, carbon in methane () has four electron groups that are the four single bonds (C-H bonds) around the carbon. Carbon in carbon dioxide (O=C=O) has two electron groups that are the two double bonds around the carbon, and in H-C≡N has two electron groups that are a single bond (C-H bond) and a triple bond (C≡N bond).
Molecular shapes and bond angles based on VSEPR theory
One electron group
One electron group between two atoms is always a linear molecule. For example, H-H ,O=O, N≡N, and H-Cl 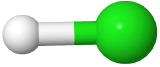 , are linear molecules, where hydrogen is white and chlorine is green in the H-Cl model.
Two-electron groups
Two-electron groups are farthest apart in a linear geometry with the central atom in the middle of the line and the bond angles of 180o around the central atom. The examples include CO2  and HCN
 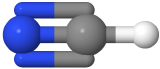 , where the central carbon atom is gray, hydrogen is white, nitrogen is blue, and oxygen is red.
Three-electron groups
Three-electron groups are farthest apart when they are at the corners of a triangle in a planar trigonal geometry with the central atom in the middle of the triangle and the bond angles of 120o around the central atom. Examples include BF3 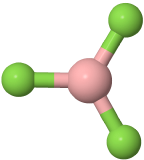 , and H2CO
 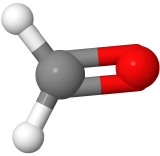 , where boron is pink, F is green, carbon is gray, oxygen is red, and hydrogen is white.
If one of the electron domains is a lone pair, the electron domain geometry remains the same, but the geometry of the atoms in the molecule, i.e., molecule geometry, is bent. For example,  has three electron domains and trigonal planar electron domain geometry, but there is one lone pair. So, the molecule geometry is bent as
 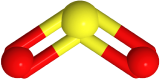 , where sulfur is yellow, and oxygen is red (lone pair in not shown).
Four-electron groups
Four-electron groups are farthest apart when they are at the corners of a tetrahedron in a tetrahedral geometry with the central atom at the center of the tetrahedron and the bond angles of 109.5o around the central atom as: ![]() . An example is methane CH4
. An example is methane CH4  , where carbon is gray, and hydrogens are white.
If one of the electron domains is a lone pair, the electron domain geometry is still tetrahedral, but the molecule geometry is trigonal pyramidal as with three pereferal atoms at the corners of the triangel and the central atom raised to the top of the pyramid. An example is ammonia (:NH3)
 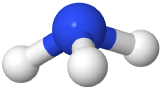 , where nitrogen is blue, and hydrogens are white.
If two electron domains are lone pairs, the electron domains geometry is still tetrahedral, but the molecule geometry is bent. An example is water (
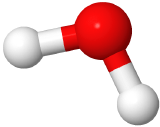 ), where oxygen is red, and hydrogens are white.
Table 1 is the summary of the electron domain geometries and the corresponding molecular geometries.
| Electron domain | Lone pair | Electron domain geometry | Molecule geometry | Bond angles | Examples |
|---|---|---|---|---|---|
| 1 | 0 | Linear | Linear | - | HCl  |
| 2 | 0 | Linear | Linear | 180o |
CO2 HCN |
| 3 | 0 | Trigonal pyramidal | Trigonal pyramidal | 120o | H2CO  |
| 3 | 2 | Trigonal pyramidal | Bent | 120o |  |
| 4 | 0 | Tetrahedral | Tetrahedral | 109.5o | CH4 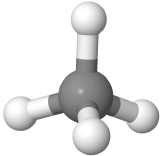 |
| 4 | 1 | Tetrahedral | Trigonal pyramidal | 109.5o | :NH3  |
| 4 | 2 | Tetrahedral | Bent | 109.5o |  |