
9.3: Simple Distillation Procedure
- Page ID
- 536837
\( \newcommand{\vecs}[1]{\overset { \scriptstyle \rightharpoonup} {\mathbf{#1}} } \)
\( \newcommand{\vecd}[1]{\overset{-\!-\!\rightharpoonup}{\vphantom{a}\smash {#1}}} \)
\( \newcommand{\dsum}{\displaystyle\sum\limits} \)
\( \newcommand{\dint}{\displaystyle\int\limits} \)
\( \newcommand{\dlim}{\displaystyle\lim\limits} \)
\( \newcommand{\id}{\mathrm{id}}\) \( \newcommand{\Span}{\mathrm{span}}\)
( \newcommand{\kernel}{\mathrm{null}\,}\) \( \newcommand{\range}{\mathrm{range}\,}\)
\( \newcommand{\RealPart}{\mathrm{Re}}\) \( \newcommand{\ImaginaryPart}{\mathrm{Im}}\)
\( \newcommand{\Argument}{\mathrm{Arg}}\) \( \newcommand{\norm}[1]{\| #1 \|}\)
\( \newcommand{\inner}[2]{\langle #1, #2 \rangle}\)
\( \newcommand{\Span}{\mathrm{span}}\)
\( \newcommand{\id}{\mathrm{id}}\)
\( \newcommand{\Span}{\mathrm{span}}\)
\( \newcommand{\kernel}{\mathrm{null}\,}\)
\( \newcommand{\range}{\mathrm{range}\,}\)
\( \newcommand{\RealPart}{\mathrm{Re}}\)
\( \newcommand{\ImaginaryPart}{\mathrm{Im}}\)
\( \newcommand{\Argument}{\mathrm{Arg}}\)
\( \newcommand{\norm}[1]{\| #1 \|}\)
\( \newcommand{\inner}[2]{\langle #1, #2 \rangle}\)
\( \newcommand{\Span}{\mathrm{span}}\) \( \newcommand{\AA}{\unicode[.8,0]{x212B}}\)
\( \newcommand{\vectorA}[1]{\vec{#1}} % arrow\)
\( \newcommand{\vectorAt}[1]{\vec{\text{#1}}} % arrow\)
\( \newcommand{\vectorB}[1]{\overset { \scriptstyle \rightharpoonup} {\mathbf{#1}} } \)
\( \newcommand{\vectorC}[1]{\textbf{#1}} \)
\( \newcommand{\vectorD}[1]{\overrightarrow{#1}} \)
\( \newcommand{\vectorDt}[1]{\overrightarrow{\text{#1}}} \)
\( \newcommand{\vectE}[1]{\overset{-\!-\!\rightharpoonup}{\vphantom{a}\smash{\mathbf {#1}}}} \)
\( \newcommand{\vecs}[1]{\overset { \scriptstyle \rightharpoonup} {\mathbf{#1}} } \)
\(\newcommand{\longvect}{\overrightarrow}\)
\( \newcommand{\vecd}[1]{\overset{-\!-\!\rightharpoonup}{\vphantom{a}\smash {#1}}} \)
\(\newcommand{\avec}{\mathbf a}\) \(\newcommand{\bvec}{\mathbf b}\) \(\newcommand{\cvec}{\mathbf c}\) \(\newcommand{\dvec}{\mathbf d}\) \(\newcommand{\dtil}{\widetilde{\mathbf d}}\) \(\newcommand{\evec}{\mathbf e}\) \(\newcommand{\fvec}{\mathbf f}\) \(\newcommand{\nvec}{\mathbf n}\) \(\newcommand{\pvec}{\mathbf p}\) \(\newcommand{\qvec}{\mathbf q}\) \(\newcommand{\svec}{\mathbf s}\) \(\newcommand{\tvec}{\mathbf t}\) \(\newcommand{\uvec}{\mathbf u}\) \(\newcommand{\vvec}{\mathbf v}\) \(\newcommand{\wvec}{\mathbf w}\) \(\newcommand{\xvec}{\mathbf x}\) \(\newcommand{\yvec}{\mathbf y}\) \(\newcommand{\zvec}{\mathbf z}\) \(\newcommand{\rvec}{\mathbf r}\) \(\newcommand{\mvec}{\mathbf m}\) \(\newcommand{\zerovec}{\mathbf 0}\) \(\newcommand{\onevec}{\mathbf 1}\) \(\newcommand{\real}{\mathbb R}\) \(\newcommand{\twovec}[2]{\left[\begin{array}{r}#1 \\ #2 \end{array}\right]}\) \(\newcommand{\ctwovec}[2]{\left[\begin{array}{c}#1 \\ #2 \end{array}\right]}\) \(\newcommand{\threevec}[3]{\left[\begin{array}{r}#1 \\ #2 \\ #3 \end{array}\right]}\) \(\newcommand{\cthreevec}[3]{\left[\begin{array}{c}#1 \\ #2 \\ #3 \end{array}\right]}\) \(\newcommand{\fourvec}[4]{\left[\begin{array}{r}#1 \\ #2 \\ #3 \\ #4 \end{array}\right]}\) \(\newcommand{\cfourvec}[4]{\left[\begin{array}{c}#1 \\ #2 \\ #3 \\ #4 \end{array}\right]}\) \(\newcommand{\fivevec}[5]{\left[\begin{array}{r}#1 \\ #2 \\ #3 \\ #4 \\ #5 \\ \end{array}\right]}\) \(\newcommand{\cfivevec}[5]{\left[\begin{array}{c}#1 \\ #2 \\ #3 \\ #4 \\ #5 \\ \end{array}\right]}\) \(\newcommand{\mattwo}[4]{\left[\begin{array}{rr}#1 \amp #2 \\ #3 \amp #4 \\ \end{array}\right]}\) \(\newcommand{\laspan}[1]{\text{Span}\{#1\}}\) \(\newcommand{\bcal}{\cal B}\) \(\newcommand{\ccal}{\cal C}\) \(\newcommand{\scal}{\cal S}\) \(\newcommand{\wcal}{\cal W}\) \(\newcommand{\ecal}{\cal E}\) \(\newcommand{\coords}[2]{\left\{#1\right\}_{#2}}\) \(\newcommand{\gray}[1]{\color{gray}{#1}}\) \(\newcommand{\lgray}[1]{\color{lightgray}{#1}}\) \(\newcommand{\rank}{\operatorname{rank}}\) \(\newcommand{\row}{\text{Row}}\) \(\newcommand{\col}{\text{Col}}\) \(\renewcommand{\row}{\text{Row}}\) \(\newcommand{\nul}{\text{Nul}}\) \(\newcommand{\var}{\text{Var}}\) \(\newcommand{\corr}{\text{corr}}\) \(\newcommand{\len}[1]{\left|#1\right|}\) \(\newcommand{\bbar}{\overline{\bvec}}\) \(\newcommand{\bhat}{\widehat{\bvec}}\) \(\newcommand{\bperp}{\bvec^\perp}\) \(\newcommand{\xhat}{\widehat{\xvec}}\) \(\newcommand{\vhat}{\widehat{\vvec}}\) \(\newcommand{\uhat}{\widehat{\uvec}}\) \(\newcommand{\what}{\widehat{\wvec}}\) \(\newcommand{\Sighat}{\widehat{\Sigma}}\) \(\newcommand{\lt}{<}\) \(\newcommand{\gt}{>}\) \(\newcommand{\amp}{&}\) \(\definecolor{fillinmathshade}{gray}{0.9}\)Condenser Hoses
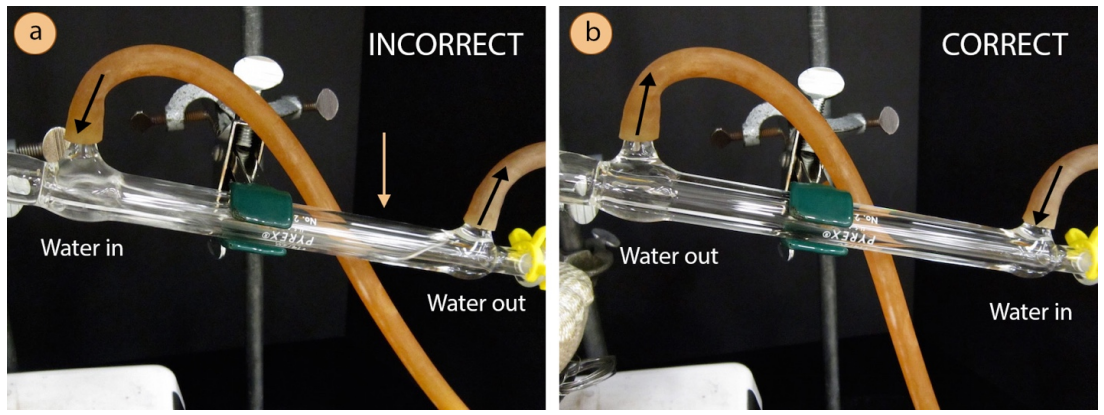
The condenser is an intricate piece of glassware, and allows for cold water to circulate through the distillation apparatus. The circulating water does not mix with the sample to be purified, but instead passes through another jacket surrounding the hollow tube where the gaseous sample travels. It is important that the water jacket be full of cold water, to maximize the efficiency of condensing the gaseous sample. It is for this reason that the water hoses must be attached to the condenser in a certain way.
A hose should connect from the submersible pump to the lower arm of the condenser, forcing water to travel against gravity through the condenser. The hose connecting the upper arm of the condenser should then drain to the bowl of ice water. By forcing the water uphill, it will completely fill the condenser.

Simple Distillation Procedure
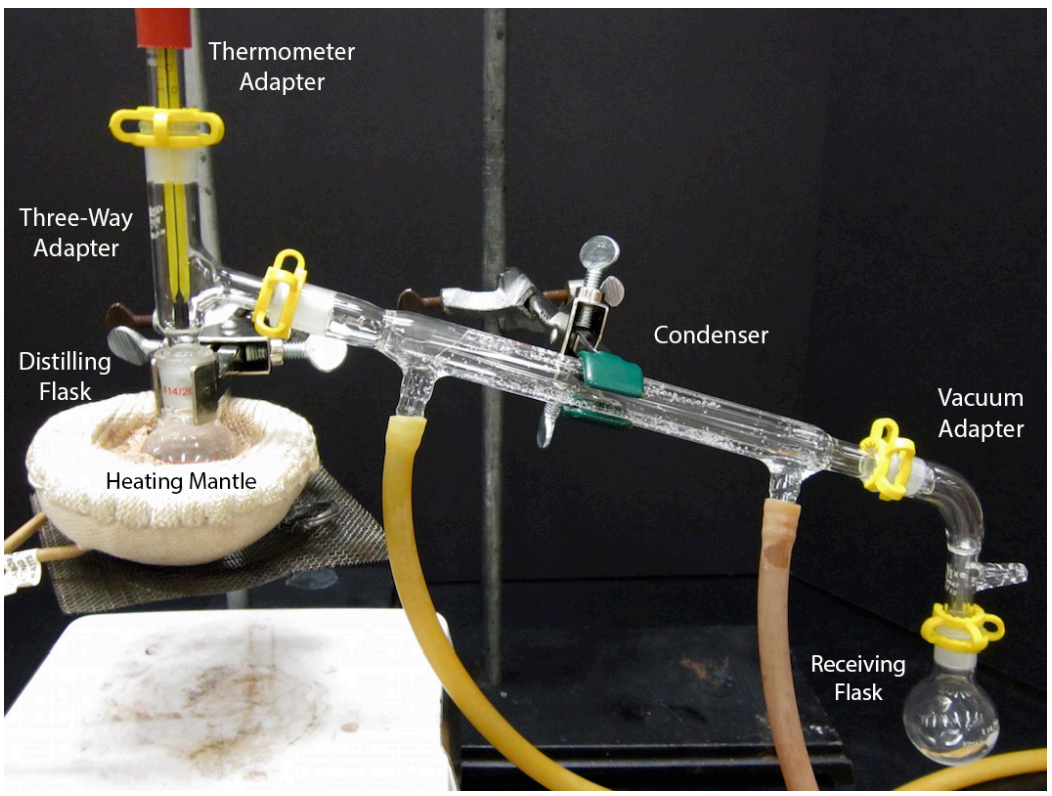
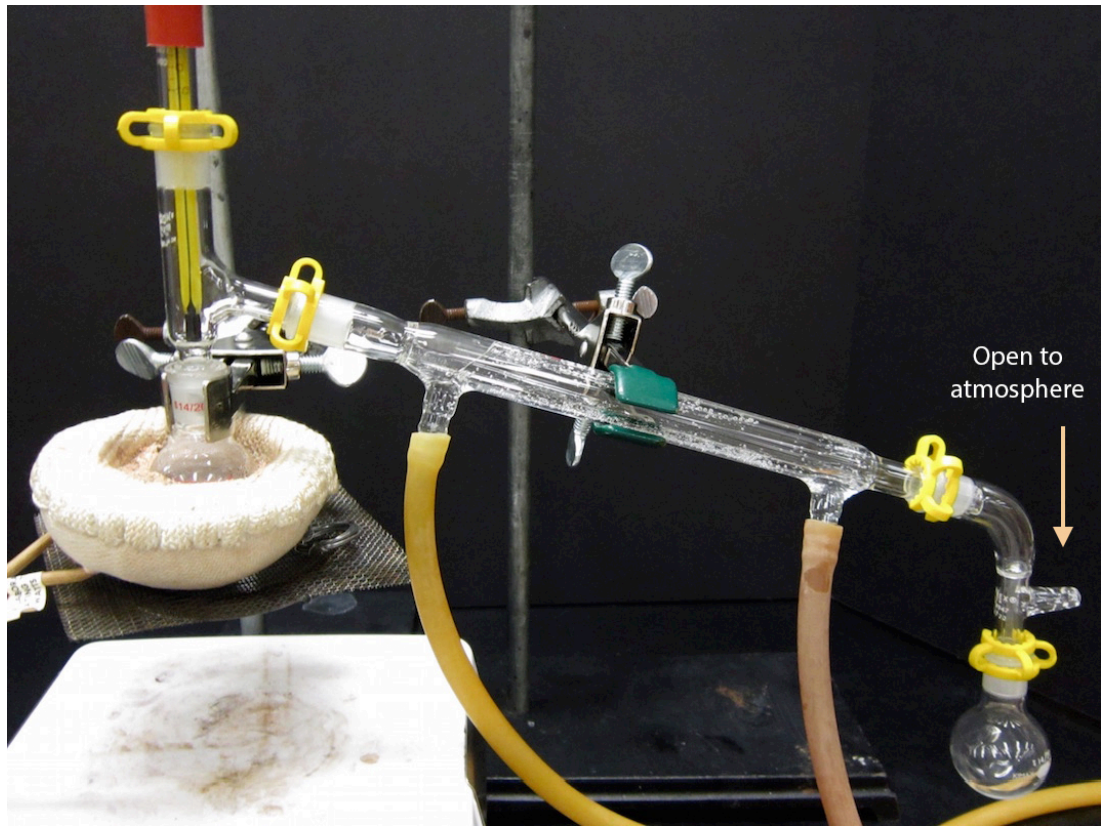
An assembled simple distillation apparatus is shown below. Assembly of this complicated apparatus is shown in this section piece by piece. The glassware used for this apparatus is quite expensive, and undoubtedly your instructor would appreciate care being taken when using this experiment.
Assemble the Apparatus:
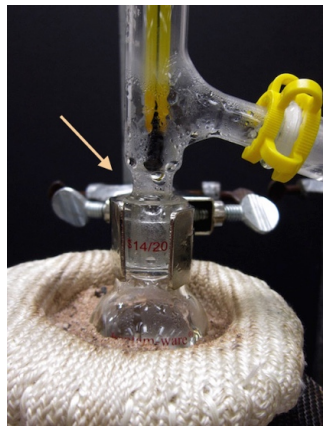
- Pour the liquid to be distilled into a round bottomed flask, trying to avoid pouring liquid on the ground glass joint. The flask should ideally be between one-third to one-half full of the liquid to be distilled. If the flask is more than half full, it will be difficult to control the boil.
- Add a few boiling stones to the solution to prevent bumping during heating.
- Use a metal extension clamp to secure the round bottomed flask containing the sample to the ring stand or latticework. The clamp should securely hold the joint below the glass protrusion on the flask.
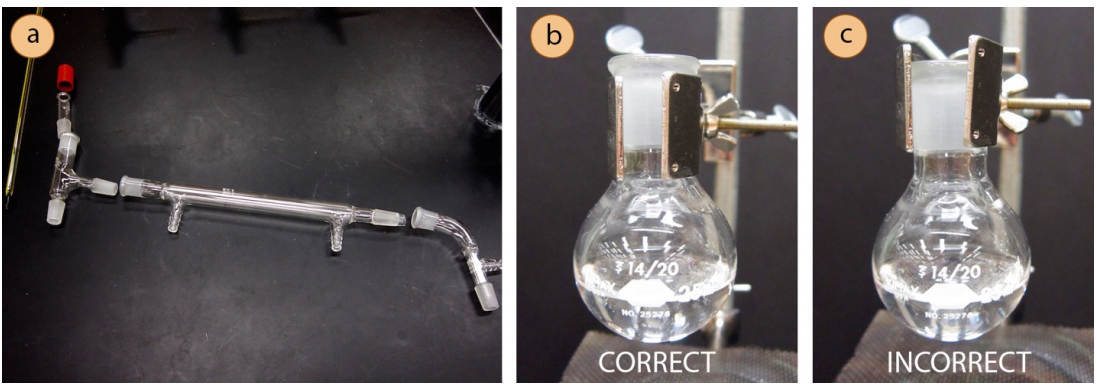
- Attach a three-way adapter (or "distilling adapter") to the round bottomed flask.
- Attach a rubber fitting to the top of a thermometer adapter by stretching it over the glass. Then delicately insert a thermometer into the hole of the rubber fitting.
Safety note: While inserting the thermometer, position your hands near the joint, not far from the joint or it may snap.
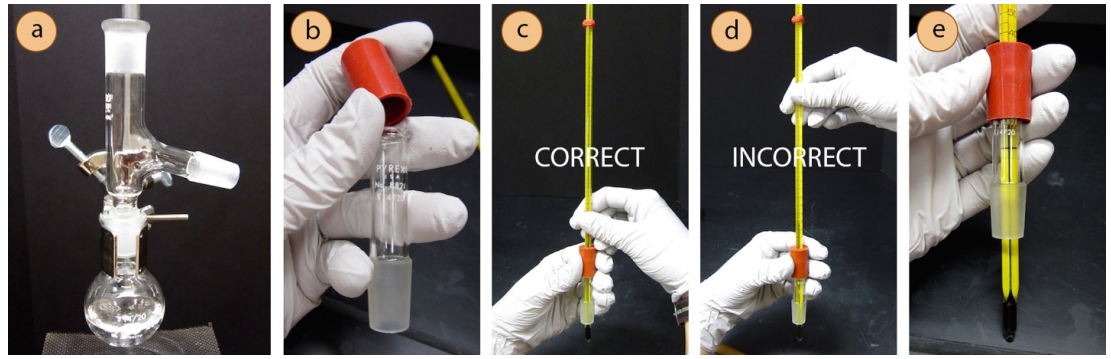
- Connect the thermometer adapter to the three-way adapter, securing the joint with a plastic clip ("Keck clip"). The clip is directional, and if it doesn't easily snap on it is probably upside down. Check that the clip is not broken, and if it is, replace it.
- Adjust the thermometer so the bulb is just below the arm of the adapter. If the bulb is positioned too high, it will not register the correct temperature of the vapors as they make their turn toward the condenser.
- Wet the ends of two hoses using the faucet or by dipping into a beaker of water, then twist the wet ends of the two arms on the condenser. The hoses should fit onto the condenser arms higher than one centimeter or else water pressure may cause them to pop off.
- Connect the condenser to the rest of the apparatus with another plastic clip. Use another clamp to secure the condenser to the ring stand or latticework, and position the condenser at a slight downward angle.
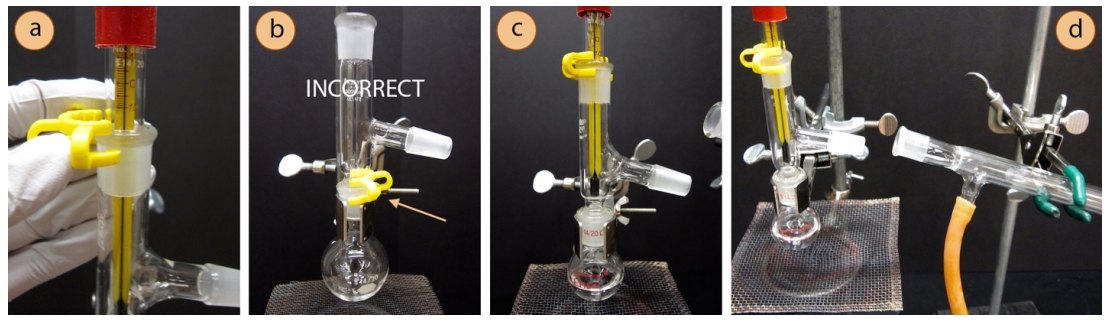
- Connect the rubber hose attached to the lower arm of the condenser to the submersible pump and allow the hose attached to the upper arm of the condenser to drain to the bowl with ice water. The hoses may point either up or down.
- Connect a vacuum adapter to the end of the condenser with a plastic clip. A receiving flask should be placed under the vacuum adapter. This can be another round bottom flask, graduated cylinder, or Erlenmeyer flask.
- A completed distillation apparatus is shown below. No parts should be able to jiggle or they are not adequately clamped. Although it may appear to be a closed system (which would be dangerous to heat), the system is actually open to the atmosphere at the arm in the vacuum adapter.
- Position the heating mantle beneath the round bottom flask using an adjustable lab jack that allows for some mechanism by which the heat can be lowered and removed at the end of the distillation.
- When ready to begin the distillation, start circulating water in the condenser.
- Begin heating the flask. Depending on the size of the flask and the necessary temperature, the liquid may start boiling between 1-20 minutes. Condensation will eventually be seen on the sides of the flask, but the reading on the thermometer will not increase until the vapors immerse the thermometer bulb. Eventually condensation should be seen in the three-way adapter, and the thermometer temperature will rise.
- Eventually a droplet may be seen traveling down the length of the condenser and liquid will begin to collect in the receiving flask. An appropriate distillation collects distillate at a rate of 1 drop per second. Distilling at too fast a rate prevents proper equilibration between liquid and gas phases, and results in poor separation. Although a slow distillation is necessary, heating the solution such that nothing is dripping into the receiving flask simply wastes time. There is no reason to heat so gradually that nothing distills.
- Pay attention to the temperature on the thermometer throughout the entire time that liquid is distilling. Record the temperature when it has plateaued, or the highest temperature seen. If you know a mixture is distilling, record the temperature range over which liquid is actively dripping into the receiving flask. Only record temperatures that correspond to active distillation and full immersion of the thermometer with vapor.
Stop Distilling
Cease the distillation when one of the following takes place:
- If the liquid is nearly gone in the distilling flask.
Safety note: It is unsafe to distill a flask to dryness as side reactions can occur when components are concentrated. This is especially dangerous with compounds that can form peroxides, as these can become explosive when reacting with concentrated solutions. Additionally, when the entire sample is in the gas phase, the system is not longer restricted to the boiling point of the liquid and may reach dangerous temperatures. - If the thermometer temperature was higher during the distillation but has dropped significantly. This normally corresponds to a lull between distilling two components, and means that one component has essentially completed distilling.
- If the thermometer temperature has a dramatic spike. This normally corresponds to the beginning of distillation of a higher boiling component, and would contaminate the distillate if allowed to continue.
- If anything surprising or unusual happens, such as thick smoke, darkening/thickening in the distilling flask, or uncontrollable bumping.
To stop the distillation, lower and remove the heat source from the round bottomed flask.
Glass wool
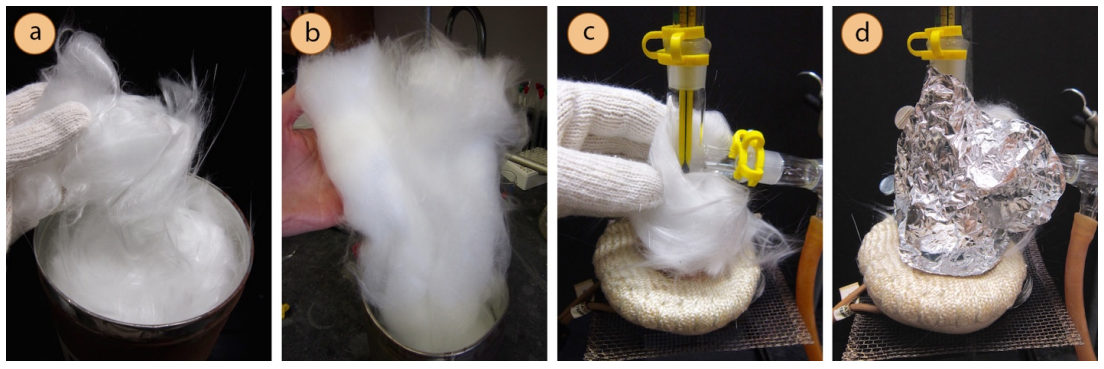
For high-boiling liquids, it may be difficult for vapors to reach the condenser as they too quickly are cooled by the glassware which is in contact with the air in the room. It may be helpful to insulate the distilling flask and three-way adapter to better retain heat and allow the sample to remain in the gas phase longer.
To insulate a portion of the distillation, wrap the parts prior to the condenser with glass wool. A small gap can be left in the insulation in order to "peek in" on activity inside the apparatus. Glass wool has an appearance similar to cotton, but unlike cotton is not flammable so is useful as an insulating material when an apparatus is to be heated.
Adapted from Step-by-Step Procedures by Lisa Nichols.