
3.3: Crystallization Theory
- Page ID
- 535867
\( \newcommand{\vecs}[1]{\overset { \scriptstyle \rightharpoonup} {\mathbf{#1}} } \)
\( \newcommand{\vecd}[1]{\overset{-\!-\!\rightharpoonup}{\vphantom{a}\smash {#1}}} \)
\( \newcommand{\dsum}{\displaystyle\sum\limits} \)
\( \newcommand{\dint}{\displaystyle\int\limits} \)
\( \newcommand{\dlim}{\displaystyle\lim\limits} \)
\( \newcommand{\id}{\mathrm{id}}\) \( \newcommand{\Span}{\mathrm{span}}\)
( \newcommand{\kernel}{\mathrm{null}\,}\) \( \newcommand{\range}{\mathrm{range}\,}\)
\( \newcommand{\RealPart}{\mathrm{Re}}\) \( \newcommand{\ImaginaryPart}{\mathrm{Im}}\)
\( \newcommand{\Argument}{\mathrm{Arg}}\) \( \newcommand{\norm}[1]{\| #1 \|}\)
\( \newcommand{\inner}[2]{\langle #1, #2 \rangle}\)
\( \newcommand{\Span}{\mathrm{span}}\)
\( \newcommand{\id}{\mathrm{id}}\)
\( \newcommand{\Span}{\mathrm{span}}\)
\( \newcommand{\kernel}{\mathrm{null}\,}\)
\( \newcommand{\range}{\mathrm{range}\,}\)
\( \newcommand{\RealPart}{\mathrm{Re}}\)
\( \newcommand{\ImaginaryPart}{\mathrm{Im}}\)
\( \newcommand{\Argument}{\mathrm{Arg}}\)
\( \newcommand{\norm}[1]{\| #1 \|}\)
\( \newcommand{\inner}[2]{\langle #1, #2 \rangle}\)
\( \newcommand{\Span}{\mathrm{span}}\) \( \newcommand{\AA}{\unicode[.8,0]{x212B}}\)
\( \newcommand{\vectorA}[1]{\vec{#1}} % arrow\)
\( \newcommand{\vectorAt}[1]{\vec{\text{#1}}} % arrow\)
\( \newcommand{\vectorB}[1]{\overset { \scriptstyle \rightharpoonup} {\mathbf{#1}} } \)
\( \newcommand{\vectorC}[1]{\textbf{#1}} \)
\( \newcommand{\vectorD}[1]{\overrightarrow{#1}} \)
\( \newcommand{\vectorDt}[1]{\overrightarrow{\text{#1}}} \)
\( \newcommand{\vectE}[1]{\overset{-\!-\!\rightharpoonup}{\vphantom{a}\smash{\mathbf {#1}}}} \)
\( \newcommand{\vecs}[1]{\overset { \scriptstyle \rightharpoonup} {\mathbf{#1}} } \)
\(\newcommand{\longvect}{\overrightarrow}\)
\( \newcommand{\vecd}[1]{\overset{-\!-\!\rightharpoonup}{\vphantom{a}\smash {#1}}} \)
\(\newcommand{\avec}{\mathbf a}\) \(\newcommand{\bvec}{\mathbf b}\) \(\newcommand{\cvec}{\mathbf c}\) \(\newcommand{\dvec}{\mathbf d}\) \(\newcommand{\dtil}{\widetilde{\mathbf d}}\) \(\newcommand{\evec}{\mathbf e}\) \(\newcommand{\fvec}{\mathbf f}\) \(\newcommand{\nvec}{\mathbf n}\) \(\newcommand{\pvec}{\mathbf p}\) \(\newcommand{\qvec}{\mathbf q}\) \(\newcommand{\svec}{\mathbf s}\) \(\newcommand{\tvec}{\mathbf t}\) \(\newcommand{\uvec}{\mathbf u}\) \(\newcommand{\vvec}{\mathbf v}\) \(\newcommand{\wvec}{\mathbf w}\) \(\newcommand{\xvec}{\mathbf x}\) \(\newcommand{\yvec}{\mathbf y}\) \(\newcommand{\zvec}{\mathbf z}\) \(\newcommand{\rvec}{\mathbf r}\) \(\newcommand{\mvec}{\mathbf m}\) \(\newcommand{\zerovec}{\mathbf 0}\) \(\newcommand{\onevec}{\mathbf 1}\) \(\newcommand{\real}{\mathbb R}\) \(\newcommand{\twovec}[2]{\left[\begin{array}{r}#1 \\ #2 \end{array}\right]}\) \(\newcommand{\ctwovec}[2]{\left[\begin{array}{c}#1 \\ #2 \end{array}\right]}\) \(\newcommand{\threevec}[3]{\left[\begin{array}{r}#1 \\ #2 \\ #3 \end{array}\right]}\) \(\newcommand{\cthreevec}[3]{\left[\begin{array}{c}#1 \\ #2 \\ #3 \end{array}\right]}\) \(\newcommand{\fourvec}[4]{\left[\begin{array}{r}#1 \\ #2 \\ #3 \\ #4 \end{array}\right]}\) \(\newcommand{\cfourvec}[4]{\left[\begin{array}{c}#1 \\ #2 \\ #3 \\ #4 \end{array}\right]}\) \(\newcommand{\fivevec}[5]{\left[\begin{array}{r}#1 \\ #2 \\ #3 \\ #4 \\ #5 \\ \end{array}\right]}\) \(\newcommand{\cfivevec}[5]{\left[\begin{array}{c}#1 \\ #2 \\ #3 \\ #4 \\ #5 \\ \end{array}\right]}\) \(\newcommand{\mattwo}[4]{\left[\begin{array}{rr}#1 \amp #2 \\ #3 \amp #4 \\ \end{array}\right]}\) \(\newcommand{\laspan}[1]{\text{Span}\{#1\}}\) \(\newcommand{\bcal}{\cal B}\) \(\newcommand{\ccal}{\cal C}\) \(\newcommand{\scal}{\cal S}\) \(\newcommand{\wcal}{\cal W}\) \(\newcommand{\ecal}{\cal E}\) \(\newcommand{\coords}[2]{\left\{#1\right\}_{#2}}\) \(\newcommand{\gray}[1]{\color{gray}{#1}}\) \(\newcommand{\lgray}[1]{\color{lightgray}{#1}}\) \(\newcommand{\rank}{\operatorname{rank}}\) \(\newcommand{\row}{\text{Row}}\) \(\newcommand{\col}{\text{Col}}\) \(\renewcommand{\row}{\text{Row}}\) \(\newcommand{\nul}{\text{Nul}}\) \(\newcommand{\var}{\text{Var}}\) \(\newcommand{\corr}{\text{corr}}\) \(\newcommand{\len}[1]{\left|#1\right|}\) \(\newcommand{\bbar}{\overline{\bvec}}\) \(\newcommand{\bhat}{\widehat{\bvec}}\) \(\newcommand{\bperp}{\bvec^\perp}\) \(\newcommand{\xhat}{\widehat{\xvec}}\) \(\newcommand{\vhat}{\widehat{\vvec}}\) \(\newcommand{\uhat}{\widehat{\uvec}}\) \(\newcommand{\what}{\widehat{\wvec}}\) \(\newcommand{\Sighat}{\widehat{\Sigma}}\) \(\newcommand{\lt}{<}\) \(\newcommand{\gt}{>}\) \(\newcommand{\amp}{&}\) \(\definecolor{fillinmathshade}{gray}{0.9}\)Crystallization is an excellent purification technique for solids because a crystal slowly forming from a saturated solution tends to selectively incorporate particles of the same type into its crystal structure (modeled below). A developing solid will tend to incorporate particles of the same type in order to create the lowest energy solid, and exclude impurities that disrupt the idealized packing of the solid. This process works best if the impurity is present as a minor component of the crude solid.
The difference in crystal lattice energy between pure and impure solids is marginal, so a solution must be cooled SLOWLY to allow for differentiation. If a hot solution is plunged immediately into an ice bath, the system will favor the formation of a solid (any solid!) so strongly that there may be little preference for purity. Impurities can become engulfed in the developing solid and trapped as solutes are deposited unselectively onto the growing solid. It is only when enough time is allowed for equilibration between the developing solid and the solution that the lowest energy pure solid is formed.
The crystallization process can be though of as the crystal lattice "grabbing" solutes from solution. If the process is hurried, solutes may be "grabbed" indiscriminately, and once embedded in the interior of the solid they become trapped as the equilibrium between solid and solution happens only on the surface.
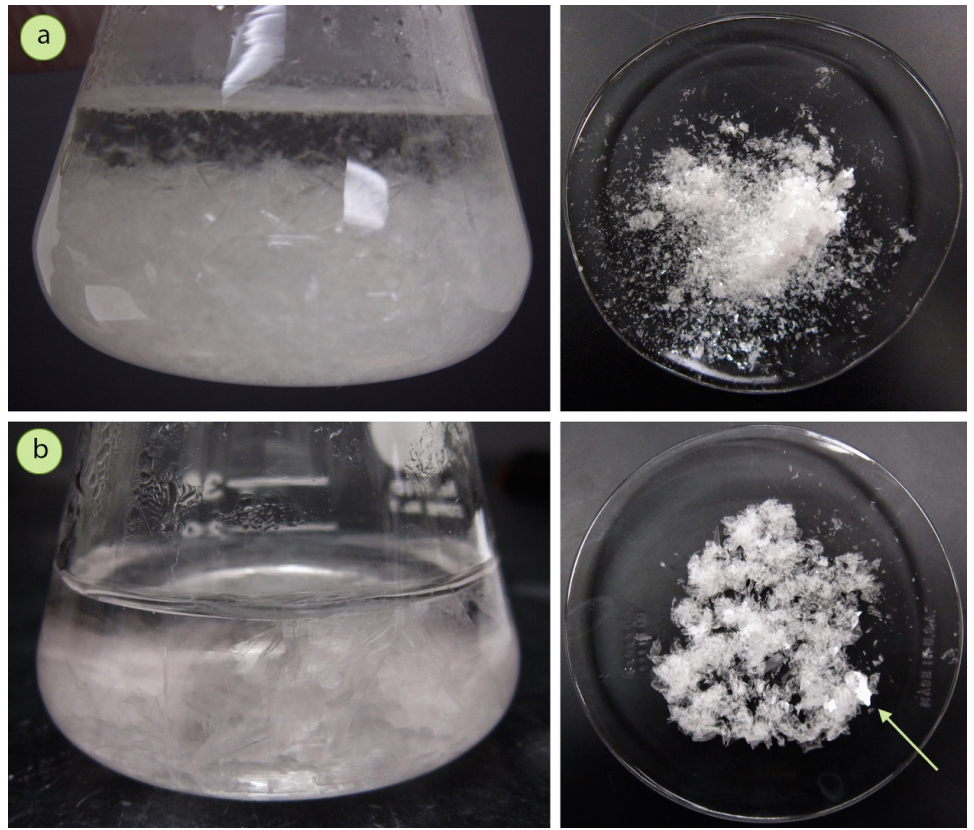
Along with increased purity, a slow crystallization process also encourages the growth of larger crystals. The pictures below shows crystallization of acetanilide from water with two different rates. The crystals grown in A were formed much more quickly, and are smaller than the slower grown, larger crystals shown in B. There are several benefits to larger crystals. Most importantly they tend to be purer than small crystals. They are also more easily collected by vacuum filtration, as very small crystals may pass through or wedge themselves into the pores of the filter paper.
The quantity of solvent used in crystallization is usually kept to a minimum, to support the goal of recovering the maximum amount of crystals.
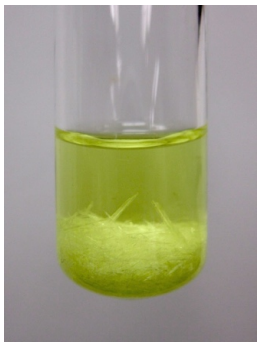
Every solid has partial solubility in the solvents used, even at cold temperatures. In the picture below, the cold solvent surrounding a yellow solid is tinted yellow as some compound dissolves. Solids that appear insoluble in a solvent do in fact have a (normally small) portion of material that dissolves.
Crystallization is most common with solids that have moderate solubility at low temperatures, so that heat can "tip them over the edge" to completely dissolve. This means that in practice there will be a quantity of compound that dissolves in the mother liquor at low temperatures, which can be significant depending on the compound's solubility. Use of the minimal amount of hot solvent lessens the quantity of compound that is lost to the mother liquid.
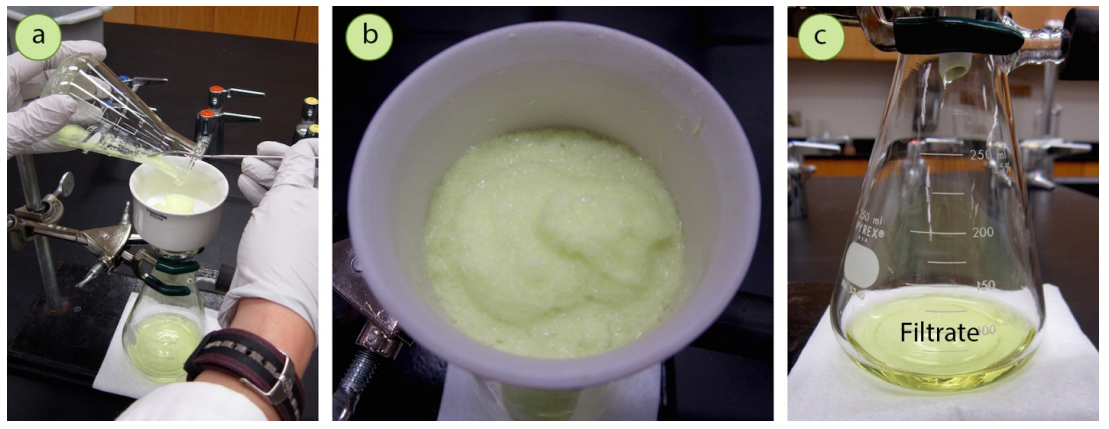
A loss of recovery should be expected when performing a crystallization. Although there are ways to maximize the return of crystals, a portion of the desired compound will always be lost. A portion of the compound of interest will remain dissolved in the mother liquor and be filtered away, as shown in the pictures below.
The loss of solid material can also be seen with every manipulation of the solid. Only the majority of the crystals can be delicately scraped off the glassware, Buchner funnel, and filter paper, and there will always be a residue that is left behind. When there is such an obvious loss of yield from solid clinging to glassware, it may seem wise to use solvent to rinse additional solid out of the flasks. A few rinses with cold solvent are indeed recommended, but it is not recommended to use solvent excessively in an attempt to recover every granule of solid. The more solvent that is used, the more compound will dissolve in the cold mother liquor, decreasing the yield. The loss of material due to residue on the glassware is an unfortunate, but accepted aspect of this technique.
It is common for new organic chemistry students to be disappointed by a low yield and to worry that it is somehow their fault. Students are often inclined to cite "user error" as a main cause for a loss of yield in any process. Although spilling solid on the benchtop or addition of too much solvent will of course compromise the yield, the modest recovery of acetanilide in this section should demonstrate that sometimes low yields are inherent to the process and the chosen solvent.
Adapted from Crystallization Theory by Lisa Nichols.