
4.1: Covalent Bonds
- Page ID
- 393873
\( \newcommand{\vecs}[1]{\overset { \scriptstyle \rightharpoonup} {\mathbf{#1}} } \)
\( \newcommand{\vecd}[1]{\overset{-\!-\!\rightharpoonup}{\vphantom{a}\smash {#1}}} \)
\( \newcommand{\dsum}{\displaystyle\sum\limits} \)
\( \newcommand{\dint}{\displaystyle\int\limits} \)
\( \newcommand{\dlim}{\displaystyle\lim\limits} \)
\( \newcommand{\id}{\mathrm{id}}\) \( \newcommand{\Span}{\mathrm{span}}\)
( \newcommand{\kernel}{\mathrm{null}\,}\) \( \newcommand{\range}{\mathrm{range}\,}\)
\( \newcommand{\RealPart}{\mathrm{Re}}\) \( \newcommand{\ImaginaryPart}{\mathrm{Im}}\)
\( \newcommand{\Argument}{\mathrm{Arg}}\) \( \newcommand{\norm}[1]{\| #1 \|}\)
\( \newcommand{\inner}[2]{\langle #1, #2 \rangle}\)
\( \newcommand{\Span}{\mathrm{span}}\)
\( \newcommand{\id}{\mathrm{id}}\)
\( \newcommand{\Span}{\mathrm{span}}\)
\( \newcommand{\kernel}{\mathrm{null}\,}\)
\( \newcommand{\range}{\mathrm{range}\,}\)
\( \newcommand{\RealPart}{\mathrm{Re}}\)
\( \newcommand{\ImaginaryPart}{\mathrm{Im}}\)
\( \newcommand{\Argument}{\mathrm{Arg}}\)
\( \newcommand{\norm}[1]{\| #1 \|}\)
\( \newcommand{\inner}[2]{\langle #1, #2 \rangle}\)
\( \newcommand{\Span}{\mathrm{span}}\) \( \newcommand{\AA}{\unicode[.8,0]{x212B}}\)
\( \newcommand{\vectorA}[1]{\vec{#1}} % arrow\)
\( \newcommand{\vectorAt}[1]{\vec{\text{#1}}} % arrow\)
\( \newcommand{\vectorB}[1]{\overset { \scriptstyle \rightharpoonup} {\mathbf{#1}} } \)
\( \newcommand{\vectorC}[1]{\textbf{#1}} \)
\( \newcommand{\vectorD}[1]{\overrightarrow{#1}} \)
\( \newcommand{\vectorDt}[1]{\overrightarrow{\text{#1}}} \)
\( \newcommand{\vectE}[1]{\overset{-\!-\!\rightharpoonup}{\vphantom{a}\smash{\mathbf {#1}}}} \)
\( \newcommand{\vecs}[1]{\overset { \scriptstyle \rightharpoonup} {\mathbf{#1}} } \)
\(\newcommand{\longvect}{\overrightarrow}\)
\( \newcommand{\vecd}[1]{\overset{-\!-\!\rightharpoonup}{\vphantom{a}\smash {#1}}} \)
\(\newcommand{\avec}{\mathbf a}\) \(\newcommand{\bvec}{\mathbf b}\) \(\newcommand{\cvec}{\mathbf c}\) \(\newcommand{\dvec}{\mathbf d}\) \(\newcommand{\dtil}{\widetilde{\mathbf d}}\) \(\newcommand{\evec}{\mathbf e}\) \(\newcommand{\fvec}{\mathbf f}\) \(\newcommand{\nvec}{\mathbf n}\) \(\newcommand{\pvec}{\mathbf p}\) \(\newcommand{\qvec}{\mathbf q}\) \(\newcommand{\svec}{\mathbf s}\) \(\newcommand{\tvec}{\mathbf t}\) \(\newcommand{\uvec}{\mathbf u}\) \(\newcommand{\vvec}{\mathbf v}\) \(\newcommand{\wvec}{\mathbf w}\) \(\newcommand{\xvec}{\mathbf x}\) \(\newcommand{\yvec}{\mathbf y}\) \(\newcommand{\zvec}{\mathbf z}\) \(\newcommand{\rvec}{\mathbf r}\) \(\newcommand{\mvec}{\mathbf m}\) \(\newcommand{\zerovec}{\mathbf 0}\) \(\newcommand{\onevec}{\mathbf 1}\) \(\newcommand{\real}{\mathbb R}\) \(\newcommand{\twovec}[2]{\left[\begin{array}{r}#1 \\ #2 \end{array}\right]}\) \(\newcommand{\ctwovec}[2]{\left[\begin{array}{c}#1 \\ #2 \end{array}\right]}\) \(\newcommand{\threevec}[3]{\left[\begin{array}{r}#1 \\ #2 \\ #3 \end{array}\right]}\) \(\newcommand{\cthreevec}[3]{\left[\begin{array}{c}#1 \\ #2 \\ #3 \end{array}\right]}\) \(\newcommand{\fourvec}[4]{\left[\begin{array}{r}#1 \\ #2 \\ #3 \\ #4 \end{array}\right]}\) \(\newcommand{\cfourvec}[4]{\left[\begin{array}{c}#1 \\ #2 \\ #3 \\ #4 \end{array}\right]}\) \(\newcommand{\fivevec}[5]{\left[\begin{array}{r}#1 \\ #2 \\ #3 \\ #4 \\ #5 \\ \end{array}\right]}\) \(\newcommand{\cfivevec}[5]{\left[\begin{array}{c}#1 \\ #2 \\ #3 \\ #4 \\ #5 \\ \end{array}\right]}\) \(\newcommand{\mattwo}[4]{\left[\begin{array}{rr}#1 \amp #2 \\ #3 \amp #4 \\ \end{array}\right]}\) \(\newcommand{\laspan}[1]{\text{Span}\{#1\}}\) \(\newcommand{\bcal}{\cal B}\) \(\newcommand{\ccal}{\cal C}\) \(\newcommand{\scal}{\cal S}\) \(\newcommand{\wcal}{\cal W}\) \(\newcommand{\ecal}{\cal E}\) \(\newcommand{\coords}[2]{\left\{#1\right\}_{#2}}\) \(\newcommand{\gray}[1]{\color{gray}{#1}}\) \(\newcommand{\lgray}[1]{\color{lightgray}{#1}}\) \(\newcommand{\rank}{\operatorname{rank}}\) \(\newcommand{\row}{\text{Row}}\) \(\newcommand{\col}{\text{Col}}\) \(\renewcommand{\row}{\text{Row}}\) \(\newcommand{\nul}{\text{Nul}}\) \(\newcommand{\var}{\text{Var}}\) \(\newcommand{\corr}{\text{corr}}\) \(\newcommand{\len}[1]{\left|#1\right|}\) \(\newcommand{\bbar}{\overline{\bvec}}\) \(\newcommand{\bhat}{\widehat{\bvec}}\) \(\newcommand{\bperp}{\bvec^\perp}\) \(\newcommand{\xhat}{\widehat{\xvec}}\) \(\newcommand{\vhat}{\widehat{\vvec}}\) \(\newcommand{\uhat}{\widehat{\uvec}}\) \(\newcommand{\what}{\widehat{\wvec}}\) \(\newcommand{\Sighat}{\widehat{\Sigma}}\) \(\newcommand{\lt}{<}\) \(\newcommand{\gt}{>}\) \(\newcommand{\amp}{&}\) \(\definecolor{fillinmathshade}{gray}{0.9}\)- Describe how covalent bonds form using the octet rule.
Formation of Covalent Bonds
Nonmetal atoms frequently form covalent bonds with other nonmetal atoms. Covalent bonds are formed between two atoms when both have similar tendencies to attract electrons to themselves (i.e., when both atoms have identical or fairly similar ionization energies and electron affinities). For example, two hydrogen atoms bond covalently to form an H2 molecule; each hydrogen atom in the H2 molecule has two electrons stabilizing it, giving each atom the same number of valence electrons as the noble gas He.
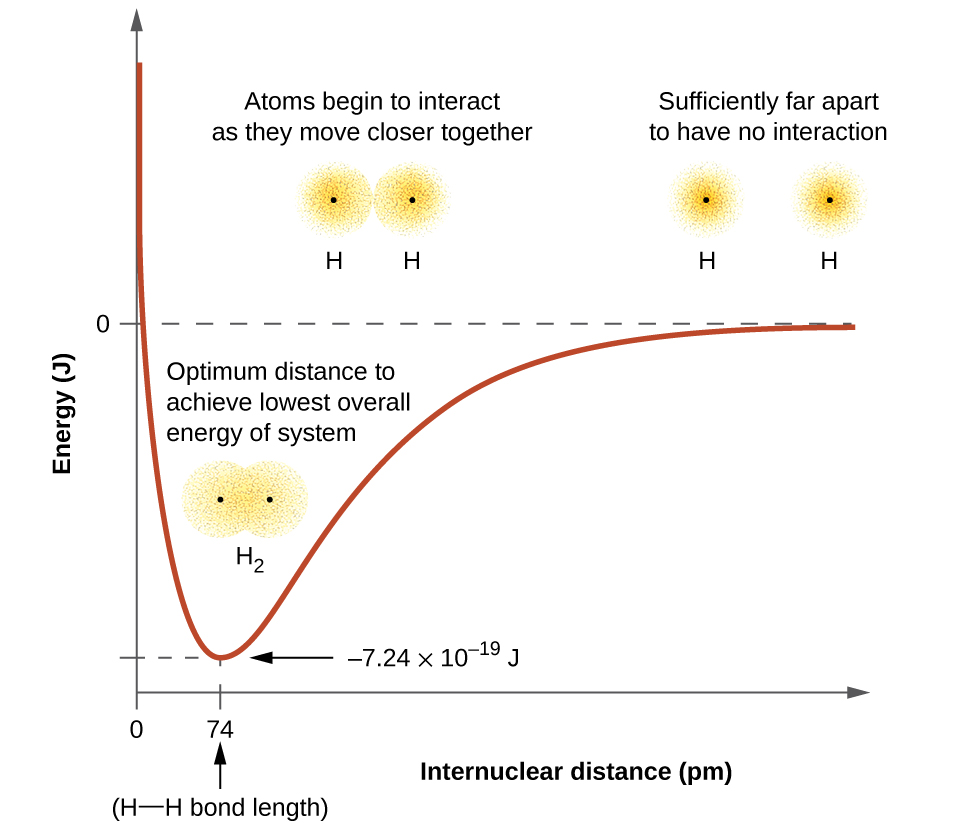
The bond in a hydrogen molecule, measured as the distance between the two nuclei, is about 7.4 × 10⁻¹¹ m, or 74 picometers (pm; 1 pm = 1 × 10⁻¹² m). This particular bond length represents the lowest potential energy state of two hydrogen atoms and is a balance between several forces: the attractions between oppositely charged electrons and nuclei, the repulsion between two negatively charged electrons, and the repulsion between two positively charged nuclei.

A plot of the potential energy of the system as a function of the internuclear distance (Figure \(\PageIndex{2}\)) shows that energy decreases as two hydrogen atoms move toward each other. Starting on the far right, we have two separate hydrogen atoms with a particular potential energy, indicated by the red line. Along the x-axis is the distance between the two atoms. As the two atoms approach each other (moving left along the x-axis), their valence orbitals (1s) begin to overlap. The single electrons on each hydrogen atom then interact with both atomic nuclei, occupying the space around both atoms. The strong attraction of each shared electron to both nuclei stabilizes the system, and the potential energy decreases as the bond distance decreases. If the atoms continue to approach each other, the positive charges in the two nuclei begin to repel each other, and the potential energy increases.
Lewis Structures
Chemists frequently use Lewis structures to represent covalent bonding in molecular substances. For example, the Lewis symbols of two separate hydrogen atoms are as follows:

The Lewis structures of two hydrogen atoms sharing electrons looks like this:

We can use circles to show that each H atom has two electrons around the nucleus, completely filling each atom’s valence shell:

Because each H atom has a filled valence shell, this bond is stable, and we have made a diatomic hydrogen molecule. For simplicity’s sake, it is common to represent the covalent bond with a dash, instead of with two dots:
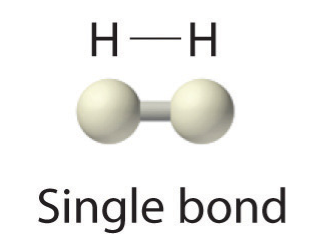
Because two atoms are sharing one pair of electrons, this covalent bond is called a single bond. As another example, consider fluorine. F atoms have seven electrons in their valence shell:

These two atoms can do the same thing that the H atoms did; they share their unpaired electrons to make a covalent bond.

Note that each F atom has a complete octet around it now:

We can also write this using a dash to represent the shared electron pair:

You will notice that there are two different types of electrons in the fluorine diatomic molecule. The bonding electron pair makes the covalent bond. Each F atom has three other pairs of electrons that do not participate in the bonding; they are called lone pair electrons. Each F atom has one bonding pair and three lone pairs of electrons.
Diatomic Molecules
Hydrogen (\(\ce{H2}\)) and fluorine (\(\ce{F2}\)) are both described as diatomic molecules. These elements and others (see Table \(\PageIndex{1}\)) exist naturally as molecules rather than as individual atoms. It is important to note that the names of these elements represent molecules and not individual atoms. When describing a single atom rather than a molecule, the word atom is used.
| Hydrogen (\(\ce{H2}\)) | Oxygen (\(\ce{O2}\)) | Nitrogen (\(\ce{N2}\)) | Fluorine (\(\ce{F2}\)) |
|---|---|---|---|
| Chlorine (\(\ce{Cl2}\)) | Bromine (\(\ce{Br2}\)) | Iodine (\(\ce{I2}\)) |