
1.7: Measuring Temperature
- Page ID
- 212103

\( \newcommand{\vecs}[1]{\overset { \scriptstyle \rightharpoonup} {\mathbf{#1}} } \)
\( \newcommand{\vecd}[1]{\overset{-\!-\!\rightharpoonup}{\vphantom{a}\smash {#1}}} \)
\( \newcommand{\dsum}{\displaystyle\sum\limits} \)
\( \newcommand{\dint}{\displaystyle\int\limits} \)
\( \newcommand{\dlim}{\displaystyle\lim\limits} \)
\( \newcommand{\id}{\mathrm{id}}\) \( \newcommand{\Span}{\mathrm{span}}\)
( \newcommand{\kernel}{\mathrm{null}\,}\) \( \newcommand{\range}{\mathrm{range}\,}\)
\( \newcommand{\RealPart}{\mathrm{Re}}\) \( \newcommand{\ImaginaryPart}{\mathrm{Im}}\)
\( \newcommand{\Argument}{\mathrm{Arg}}\) \( \newcommand{\norm}[1]{\| #1 \|}\)
\( \newcommand{\inner}[2]{\langle #1, #2 \rangle}\)
\( \newcommand{\Span}{\mathrm{span}}\)
\( \newcommand{\id}{\mathrm{id}}\)
\( \newcommand{\Span}{\mathrm{span}}\)
\( \newcommand{\kernel}{\mathrm{null}\,}\)
\( \newcommand{\range}{\mathrm{range}\,}\)
\( \newcommand{\RealPart}{\mathrm{Re}}\)
\( \newcommand{\ImaginaryPart}{\mathrm{Im}}\)
\( \newcommand{\Argument}{\mathrm{Arg}}\)
\( \newcommand{\norm}[1]{\| #1 \|}\)
\( \newcommand{\inner}[2]{\langle #1, #2 \rangle}\)
\( \newcommand{\Span}{\mathrm{span}}\) \( \newcommand{\AA}{\unicode[.8,0]{x212B}}\)
\( \newcommand{\vectorA}[1]{\vec{#1}} % arrow\)
\( \newcommand{\vectorAt}[1]{\vec{\text{#1}}} % arrow\)
\( \newcommand{\vectorB}[1]{\overset { \scriptstyle \rightharpoonup} {\mathbf{#1}} } \)
\( \newcommand{\vectorC}[1]{\textbf{#1}} \)
\( \newcommand{\vectorD}[1]{\overrightarrow{#1}} \)
\( \newcommand{\vectorDt}[1]{\overrightarrow{\text{#1}}} \)
\( \newcommand{\vectE}[1]{\overset{-\!-\!\rightharpoonup}{\vphantom{a}\smash{\mathbf {#1}}}} \)
\( \newcommand{\vecs}[1]{\overset { \scriptstyle \rightharpoonup} {\mathbf{#1}} } \)
\(\newcommand{\longvect}{\overrightarrow}\)
\( \newcommand{\vecd}[1]{\overset{-\!-\!\rightharpoonup}{\vphantom{a}\smash {#1}}} \)
\(\newcommand{\avec}{\mathbf a}\) \(\newcommand{\bvec}{\mathbf b}\) \(\newcommand{\cvec}{\mathbf c}\) \(\newcommand{\dvec}{\mathbf d}\) \(\newcommand{\dtil}{\widetilde{\mathbf d}}\) \(\newcommand{\evec}{\mathbf e}\) \(\newcommand{\fvec}{\mathbf f}\) \(\newcommand{\nvec}{\mathbf n}\) \(\newcommand{\pvec}{\mathbf p}\) \(\newcommand{\qvec}{\mathbf q}\) \(\newcommand{\svec}{\mathbf s}\) \(\newcommand{\tvec}{\mathbf t}\) \(\newcommand{\uvec}{\mathbf u}\) \(\newcommand{\vvec}{\mathbf v}\) \(\newcommand{\wvec}{\mathbf w}\) \(\newcommand{\xvec}{\mathbf x}\) \(\newcommand{\yvec}{\mathbf y}\) \(\newcommand{\zvec}{\mathbf z}\) \(\newcommand{\rvec}{\mathbf r}\) \(\newcommand{\mvec}{\mathbf m}\) \(\newcommand{\zerovec}{\mathbf 0}\) \(\newcommand{\onevec}{\mathbf 1}\) \(\newcommand{\real}{\mathbb R}\) \(\newcommand{\twovec}[2]{\left[\begin{array}{r}#1 \\ #2 \end{array}\right]}\) \(\newcommand{\ctwovec}[2]{\left[\begin{array}{c}#1 \\ #2 \end{array}\right]}\) \(\newcommand{\threevec}[3]{\left[\begin{array}{r}#1 \\ #2 \\ #3 \end{array}\right]}\) \(\newcommand{\cthreevec}[3]{\left[\begin{array}{c}#1 \\ #2 \\ #3 \end{array}\right]}\) \(\newcommand{\fourvec}[4]{\left[\begin{array}{r}#1 \\ #2 \\ #3 \\ #4 \end{array}\right]}\) \(\newcommand{\cfourvec}[4]{\left[\begin{array}{c}#1 \\ #2 \\ #3 \\ #4 \end{array}\right]}\) \(\newcommand{\fivevec}[5]{\left[\begin{array}{r}#1 \\ #2 \\ #3 \\ #4 \\ #5 \\ \end{array}\right]}\) \(\newcommand{\cfivevec}[5]{\left[\begin{array}{c}#1 \\ #2 \\ #3 \\ #4 \\ #5 \\ \end{array}\right]}\) \(\newcommand{\mattwo}[4]{\left[\begin{array}{rr}#1 \amp #2 \\ #3 \amp #4 \\ \end{array}\right]}\) \(\newcommand{\laspan}[1]{\text{Span}\{#1\}}\) \(\newcommand{\bcal}{\cal B}\) \(\newcommand{\ccal}{\cal C}\) \(\newcommand{\scal}{\cal S}\) \(\newcommand{\wcal}{\cal W}\) \(\newcommand{\ecal}{\cal E}\) \(\newcommand{\coords}[2]{\left\{#1\right\}_{#2}}\) \(\newcommand{\gray}[1]{\color{gray}{#1}}\) \(\newcommand{\lgray}[1]{\color{lightgray}{#1}}\) \(\newcommand{\rank}{\operatorname{rank}}\) \(\newcommand{\row}{\text{Row}}\) \(\newcommand{\col}{\text{Col}}\) \(\renewcommand{\row}{\text{Row}}\) \(\newcommand{\nul}{\text{Nul}}\) \(\newcommand{\var}{\text{Var}}\) \(\newcommand{\corr}{\text{corr}}\) \(\newcommand{\len}[1]{\left|#1\right|}\) \(\newcommand{\bbar}{\overline{\bvec}}\) \(\newcommand{\bhat}{\widehat{\bvec}}\) \(\newcommand{\bperp}{\bvec^\perp}\) \(\newcommand{\xhat}{\widehat{\xvec}}\) \(\newcommand{\vhat}{\widehat{\vvec}}\) \(\newcommand{\uhat}{\widehat{\uvec}}\) \(\newcommand{\what}{\widehat{\wvec}}\) \(\newcommand{\Sighat}{\widehat{\Sigma}}\) \(\newcommand{\lt}{<}\) \(\newcommand{\gt}{>}\) \(\newcommand{\amp}{&}\) \(\definecolor{fillinmathshade}{gray}{0.9}\)hypothes.is tag:
Download Assignment: S20IOT_07
Learning Objectives
Students will be able to:
Content:
- Set up and monitor temperature/humidity with a DHT22 sensor
- Write data to a file
- Plot data
Process:
- Install appropriate python libraries
- Read temperature and output to screen or file
- Read data from csv file and make a graph
Prior Knowledge
- Python concepts from previous Python Activities and IoT Activities
Further Reading
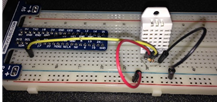
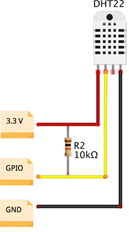
Task 1: Build the following circuit
Build the following circuit containing a DHT22 temperature and humidity sensor. There are four pins on the sensor. Pin 1 goes to 3v3. Pin 2 goes to GPIO. For this exercise use GPIO4. Pin 3 is unused and Pin 4 is connected to ground. A 10k ohm resistor must be placed between Pins 1 and 2. The sensor comes with the appropriate resistor. It is brown, black, black, red. Band 1 is brown and coded 1, Band 2 is black and coded 0, and band 3 is black and coded 0. This gives 100. The multiplier is red which is 100, so 100*100 is 10000 ohms.
Task 2: Get the library for the sensor
To install the libraries we need the python developers kit. To do that open up a terminal and at the prompt type each of the following lines(you should be able to copy and paste each of these after the $ into a terminal. note- hostname is the name of your raspberry pi at the prompt; we set this to our last names you don’t type that in)
pi@hostname:~ $sudo apt-get update
pi@hostname:~ $sudo apt-get upgrade
pi@hostname:~ $sudo apt-get install build-essential python-dev
Now we need to install the Adafruit DHT-22 python library
pi@hostname:~ $mkdir -p /home/pi/sources
pi@hostname:~ $cd /home/pi/sources
pi@hostname:~/sources $git clone http://github.com/adafruit/Adafruit_Python_DHT.git
pi@hostname:~/sources $cd Adafruit_Python_DHT
pi@hostname:~/sources/Adafruit_Python_DHT $sudo python3 setup.py install
Critical Thinking question
1. What do each of the commands you typed at the prompt in the terminal do?
pi@hostname:~ $sudo apt-get update
pi@hostname:~ $sudo apt-get upgrade
pi@hostname:~ $sudo apt-get install build-essential python-dev
pi@hostname:~ $mkdir -p /home/pi/sources
pi@hostname:~ $cd /home/pi/sources
pi@hostname:~ $git clone http://github.com/adafruit/Adafruit_Python_DHT.git
pi@hostname:~$cd Adafruit_Python_DHT
pi@hostname:~$sudo python3 setup.py install
Task 3: Run the following program
Raspberry Pi 3
| Python Program 1 |
|---|
import Adafruit_DHT sensor = Adafruit_DHT.DHT22 pin = 4 humidity,temperature = Adafruit_DHT.read_retry(sensor,pin) print(humidity,temperature) |
2. What attributes are required for the Adafruit_DHT.read_retry method?
3. How did you indicate which GPIO the sensor was to be read?
4. What do you think the units for humidity and temperature are?
Raspberry Pi 4
Adafruit DHT library for Python was deprecated and doesn't work on Raspberry Pi 4. There are a few ways to work around that and you can try other options if you'd like. In this lesson we will use CircuitPython to solve this problem.
Open terminal and execute the following commands:
pip3 install adafruit-circuitpython-dht
sudo apt-get install libgpiod2
Now run the following program in Thonny:
| Python Program 1 |
|---|
#import external modules
import time
import board
import adafruit_dht

dhtDevice = adafruit_dht.DHT22(board.D4, use_pulseio=False)

while True:
    # Print the values to the serial port
    temperature = dhtDevice.temperature
    #temperature_f = temperature * (9 / 5) + 32 #to read temperature in degrees Fahrenheit
    humidity = dhtDevice.humidity
    print("Temp: {:.1f} C    Humidity: {}% ".format(temperature, humidity))
    time.sleep(5.0)  #pause for 5 seconds between readings
|
2. What attributes are required for the adafruit_dht.DHT22 method?
3. How did you indicate which GPIO the sensor was to be read?
4. What changes would you have to make to add temperature in °F to the print statement?
Task 4: Remove the print statement from your code and include the following if statement
Raspberry Pi 3
| Python Program 2 |
|---|
if humidity is not None and temperature is not None:
    print('Temp={0:0.1f}*C  Humidity={1:0.1f}%'.format(temperature, humidity))
else:    print('Failed to get reading. Try again!')
|
5. What does each line in this new part of the code do?
6. Alter your code so that the temperature is read out in Fahrenheit.
7. Alter your code so that the temperature and humidity are read 20 times and printed to the screen. While the data is being collected breathe on the sensor and see what happens.
8. Alter your code so that the temperature and humidity are read 20 times and write this data to a file called temperature.txt
Raspberry Pi 4
You can see the exact error that happened during the reading by replacing your while loop with this code:
| Python Program 2 |
|---|
while True:
    try:
        # Print the values to the serial port
        temperature = dhtDevice.temperature
        #temperature_f = temperature * (9 / 5) + 32
        humidity = dhtDevice.humidity
        print("Temp: {:.1f} C    Humidity: {}% ".format(temperature, humidity))

    except RuntimeError as error:
        # Errors happen fairly often, DHT's are hard to read, just keep going
        print(error.args[0]) #print error
        time.sleep(2.0) #pause for 2 seconds if there's an error
        continue
    except Exception as error:
        dhtDevice.exit()
        raise error

    time.sleep(5.0) #pause for 5 seconds between readings
|
5. What does each line in this new part of the code do?
6. Alter your code so that the temperature is read out in Fahrenheit.
7. Alter your code so that the temperature and humidity are read 20 times and printed to the screen. While the data is being collected breathe on the sensor and see what happens.
8. Alter your code so that the temperature and humidity are read 20 times and write this data to a file called temperature.txt
Model 1: Time
Time intervals are floating-point numbers in units of seconds. Particular instants in time are expressed in seconds since 12:00am, January 1, 1970(epoch).
There is a popular time module available in Python which provides functions for working with times, and for converting between representations. The function time.time()returns the current system time in ticks since 12:00am, January 1, 1970(epoch).
| Python Program 3 |
|---|
import time

ticks= time.time()
print ("The number of ticks since 12:00 am, January 1, 1970 is: ", ticks)

start = time.time()
time.sleep(5)
end= time.time()
diff= end-startprint("The time I slept was %s seconds." %diff)
|
9. What is a tick?
10. What do the time.time() and time.sleep functions do?
11. Why was the value of diff not exactly 5? (Note on a Raspberry Pi Model 3 the value for diff was 5.0050854)
12. The last print statement is different from other print statements. What does the %s appear to do?
Task 5: Enter and execute the following program on your Raspberry Pi
| Python Program 4 |
|---|
import datetime

print ("Current date and time: " , datetime.datetime.now())
print ("Or like this: " ,datetime.datetime.now().strftime("%y-%m-%d-%H-%M"))

print ("Current year: ", datetime.date.today().strftime("%Y"))
print ("Month of year: ", datetime.date.today().strftime("%B"))
print ("Week number of the year: ", datetime.date.today().strftime("%W"))
print ("Weekday of the week: ", datetime.date.today().strftime("%w"))
print ("Day of year: ", datetime.date.today().strftime("%j"))
print ("Day of the month : ", datetime.date.today().strftime("%d"))
print ("Day of week: ", datetime.date.today().strftime("%A"))

print("now variable")
now = datetime.datetime.now()
print(now)
full = "%Y-%m-%d %H:%M:%S.%f"
total = datetime.datetime.strftime(now,full)
print (total)
year = datetime.datetime.strftime(now,"%Y")
print (year)
time = datetime.datetime.strftime(now,"%X")print(time)
|
13. How is datetime module different from the time module?
14. Give an example of how you might use the time module and another of how you might use the datetime module.
15. What does the strftime(format) method allow you to do with the the information available as output from datetime?
16. Write a program that stores the current time in a variable and then print out the month and weekday from that variable.
Task 6: Enter and execute the following program on your Raspberry Pi
Raspberry Pi 3
| Python Program 5 |
|---|
import datetime, Adafruit_DHT
from time import sleep

def getTemp():
    humidity,temperature = Adafruit_DHT.read_retry(Adafruit_DHT.AM2302, 4)
    if humidity is not None and temperature is not None:
        return (humidity, temperature)
    else:
        print('Failed to get reading. Try again!')
        humidity= "no read"
        temperature = "no read"
        return(humidity,temperature)

inFile= open("DHTtemperatures.csv","w")
inFile.write("time,humidity,temperature\n")

for x in range(0,5):
    humidity,temperature = getTemp()
    now = datetime.datetime.now()
    inFile.write('%s,%s,%s\n' %(now,humidity,temperature))
    sleep(1)
    print(x)

inFile.close()

readFile = open("DHTtemperatures.csv")
for x in range (0,6,1):
    print(x)
    data = readFile.readline()
    data = data.rstrip()
    print(data)
    print()
 readFile.close()
|
17. What does this program accomplish?
18. What happens if the sensor fails to read temperature or humidity?
19. The write method only allows 1 argument, but there are three arguments to write. How does this progam solve that problem?
20. The first for statement loops for 5 iterations; the second for statement loops for 6 iterations. Why are these different?
Raspberry Pi 4
| Python Program 5 |
|---|
import datetime
from time import sleep
import board
import adafruit_dht

def getValues():
    dhtDevice = adafruit_dht.DHT22(board.D4, use_pulseio=False)
    for i in range(0,5):
        try:
            humidity = dhtDevice.humidity
            temperature = dhtDevice.temperature
        except RuntimeError as error:
            print(error.args[0])
            sleep(2.0)
            continue
        except Exception as error:
            dhtDevice.exit()
            raise error
    if humidity is not None and temperature is not None:
        return (humidity, temperature)


inFile= open("DHTtemperatures.csv","w")
inFile.write("time,humidity,temperature\n")

for x in range(0,5):
    humidity,temperature = getValues()
    now = datetime.datetime.now()
    inFile.write('%s,%s,%s\n' %(now,humidity,temperature))
    sleep(1)
    print(x)

inFile.close()

readFile = open("DHTtemperatures.csv")
for x in range (0,6,1):
    print(x)
    data = readFile.readline()
    data = data.rstrip()
    print(data)
    print()
readFile.close()
|
17. What does this program accomplish?
18. What happens if the sensor fails to read temperature or humidity?
19. The write method only allows 1 argument, but there are three arguments to write. How does this progam solve that problem?
20. The first for statement loops for 5 iterations; the second for statement loops for 6 iterations. Why are these different?
Task 7: Enter and execute the following program on your Raspberry Pi.
The program code continues on the next page.
| Python Program 6 |
|---|
#import external modules
import matplotlib.pyplot as plt
import matplotlib.dates as mdates
import csv, datetime


#set up variables
stored_date_format = "%Y-%m-%d %H:%M:%S.%f"
# set up list variables
time= []
humidity=[]
temperature=[]
counter=[]
newtime=[] #new time list after taking file data and making datetimes again

# user defined functions
def getDateFromFile(time,humidity,temperature):
    x=0
    readFile = open('DHTtemperatures.csv', 'rt')
    reader = csv.reader(readFile)
    for row in reader:
        print(x)
        print("row0: ",row[0])
        print("row1: ",row[1])
        print("row2: ",row[2])
        time.append(row[0])
        humidity.append(row[1])
        temperature.append(row[2])
        counter.append(x)
        x+=1
    readFile.close()
    del time[0]
    del humidity[0]
    del temperature[0]
    return(time,humidity,temperature)

def convertTime(newtime,time,stored_date_format):
    for x in time:
        totaltime = datetime.datetime.strptime(x,stored_date_format)
        newtime.append(totaltime)
    print(newtime)
    return(newtime)

def graphData(newtime,humidity,temperature):

    #plot graph
    myGraphValues = humidity
    myOtherGraphValues = temperature
    plt.plot(newtime, myGraphValues,'o--c')
    plt.plot(newtime, myOtherGraphValues,'D:m')
    plt.title('Room Conditions')

    ax= plt.axes()
    ax.grid()
    plt.ylabel('value')
    plt.xlabel('time')
    plt.legend(['%humidity','temperature C'],loc=10)

    plt.gcf().autofmt_xdate()
    altered_date_format = "%Y-%m-%d %H:%M:%S"
    xfmt = mdates.DateFormatter(altered_date_format)
    ax.xaxis.set_major_formatter(xfmt)
    plt.show()

###### main program ###############
time,humidity,temperature=getDateFromFile(time,humidity,temperature)
newtime=convertTime(newtime,time,stored_date_format)
graphData(newtime, humidity, temperature)
|
21. Next to each line of code above, make a note as to what that line accomplishes.
22. How does reading the csv file make it easier to store values into lists?
23. Line 8 in the program is the format for dates and times in your csv file. Line 60 in the graphing function in the program is the format for the dates to use for printing.
- How are these two variables different?
- Alter line 60 to create a graph that indicates the time to milliseconds.
- Alter line 60 to create a graph that only indicates the times and not the dates.