
Read Temperature with DS18B20
- Page ID
- 290608
You will need
- ESP8266-NodeMCU Development Board
- DS18B20 Waterproof Temperature Probes
- 4.7kΩ Resistor
- Bradboard
- Jumper Wires
- USB to MicroUSB Cable
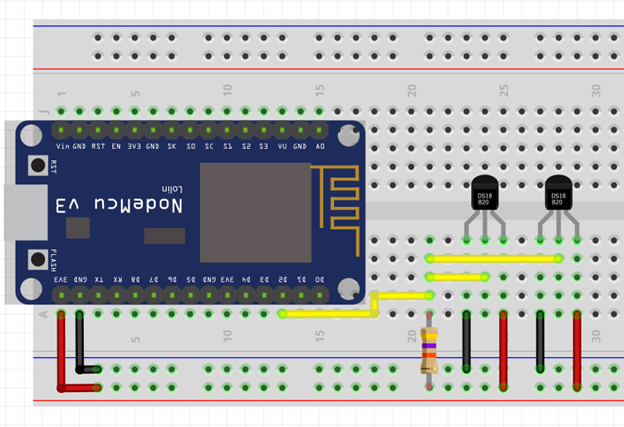
Connect DS18B20 to Node MCU
DS18B20 Temperature probes use 1-Wire protocol, which means that several devices can be connected to the same pin.
Arduino Sketch
We will use a two step approach. In the first step we will create a loop that will go through all connected Ds18B20 probes and print out their addresses. Each DS18B20 probe has its unique address (sometimes also called ID) and it doesn’t change no matter what pin it is connected to or even what microcontroller it is connected to. You can think of it as a fingerprint.
Step 1: Get Device Address
Open Arduino IDE and create a new Sketch. Copy the code below and upload it to your ESP8266-NodeMCU microcontroller. Make sure to adjust the pin that your probes are connected to.
#include <OneWire.h>
#include <DallasTemperature.h>

#define ONE_WIRE_BUS D2 // Data wire is connected to pin D2

OneWire oneWire(ONE_WIRE_BUS); //We need to setup 1-Wire protocol

DallasTemperature sensors(&oneWire); //And then pass it to DallasTemperature

DeviceAddress Address; //Variable to store addresses

int deviceCount = 0; //Start at zero

void setup(void) {
  Serial.begin(115200);
  sensors.begin(); //Initiate the sensors

  // Locate all connected devices
  Serial.println("Locating devices...");
  Serial.print("Found ");
  deviceCount = sensors.getDeviceCount();
  Serial.print(deviceCount, DEC);
  Serial.println(" devices.");
  Serial.println("");
  // Loop through all connected devices and print their addresses
  Serial.println("Printing addresses...");
  for (int i = 0;  i < deviceCount;  i++) {
    Serial.print("Sensor ");
    Serial.print(i+1);
    Serial.print(" : ");
    sensors.getAddress(Address, i);
    printAddress(Address); //Call void printAddress (see below)
  }
}

void loop(void){
  }

void printAddress(DeviceAddress deviceAddress) {
  for (uint8_t i = 0; i < 8; i++) {
    Serial.print("0x");
    if (deviceAddress[i] < 0x10) Serial.print("0");
    Serial.print(deviceAddress[i], HEX);
    if (i < 7) Serial.print(", ");
  }
  Serial.println("");
}
Note: The void loop() in the code is empty, but it is still present since the code won’t work if either void setup() or void loop() is missing.
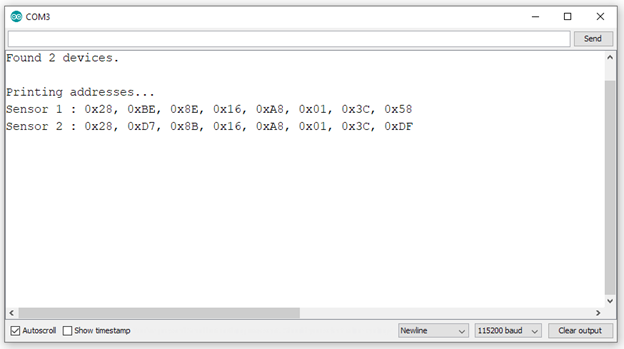
Once you uploaded the code you need to open Serial Monitor and push the “RST” button. This will reboot it and print the addresses. Save the addresses, we will need them in the next step.
Step 2: Get Temperature Readings
We will use the addresses in the following code to get temperature readings. The advantage of this two-step approach over just looping through the sensors to get readings is that now you can easily assign variables to each sensor and it is very useful if you are sending this data to a Google Sheet or a website.
Create a new Sketch and paste the following code. Replace the addresses with your own and upload it to the microcontroller.
#include <OneWire.h>
#include <DallasTemperature.h>

#define ONE_WIRE_BUS D2 // Data wire is connected to pin D2

OneWire oneWire(ONE_WIRE_BUS); //We need to setup 1-Wire protocol
DallasTemperature sensors(&oneWire); //And then pass it to DallasTemperature

float tempSensor1, tempSensor2; //Add more variables as needed
uint8_t sensor1[8] = { 0x28, 0xBE, 0x8E, 0x16, 0xA8, 0x01, 0x3C, 0x58  }; // Paste the first address here
uint8_t sensor2[8] = { 0x28, 0xD7, 0x8B, 0x16, 0xA8, 0x01, 0x3C, 0xDF  }; // Paste the second address here

void setup() {
  Serial.begin(115200);
  sensors.begin(); //Initiate the sensors
}

void loop() {
  sensors.requestTemperatures();
  tempSensor1 = sensors.getTempC(sensor1); // Get temperaure reading from probe#1
  tempSensor2 = sensors.getTempC(sensor2); // Get temperaure reading from probe#2

  Serial.print("Temperature Probe #1: ");
  Serial.print(tempSensor1);
  Serial.println("C");
  Serial.print("Temperature Probe #2: ");
  Serial.print(tempSensor2);
  Serial.println("C");
  delay(5*1000); // Wait 5 seconds between readings
}
Note: You can add more sensors any time. You will need to repeat both steps and add new variables for additional sensors.

Contributors and Attributions
Robert E. Belford (University of Arkansas Little Rock; Department of Chemistry). The breadth, depth and veracity of this work is the responsibility of Robert E. Belford, rebelford@ualr.edu. You should contact him if you have any concerns. This material has both original contributions, and content built upon prior contributions of the LibreTexts Community and other resources, including but not limited to:
- Elena Lisitsyna