4.2: Crystal Field Theory
- Page ID
- 83494
\( \newcommand{\vecs}[1]{\overset { \scriptstyle \rightharpoonup} {\mathbf{#1}} } \)
\( \newcommand{\vecd}[1]{\overset{-\!-\!\rightharpoonup}{\vphantom{a}\smash {#1}}} \)
\( \newcommand{\id}{\mathrm{id}}\) \( \newcommand{\Span}{\mathrm{span}}\)
( \newcommand{\kernel}{\mathrm{null}\,}\) \( \newcommand{\range}{\mathrm{range}\,}\)
\( \newcommand{\RealPart}{\mathrm{Re}}\) \( \newcommand{\ImaginaryPart}{\mathrm{Im}}\)
\( \newcommand{\Argument}{\mathrm{Arg}}\) \( \newcommand{\norm}[1]{\| #1 \|}\)
\( \newcommand{\inner}[2]{\langle #1, #2 \rangle}\)
\( \newcommand{\Span}{\mathrm{span}}\)
\( \newcommand{\id}{\mathrm{id}}\)
\( \newcommand{\Span}{\mathrm{span}}\)
\( \newcommand{\kernel}{\mathrm{null}\,}\)
\( \newcommand{\range}{\mathrm{range}\,}\)
\( \newcommand{\RealPart}{\mathrm{Re}}\)
\( \newcommand{\ImaginaryPart}{\mathrm{Im}}\)
\( \newcommand{\Argument}{\mathrm{Arg}}\)
\( \newcommand{\norm}[1]{\| #1 \|}\)
\( \newcommand{\inner}[2]{\langle #1, #2 \rangle}\)
\( \newcommand{\Span}{\mathrm{span}}\) \( \newcommand{\AA}{\unicode[.8,0]{x212B}}\)
\( \newcommand{\vectorA}[1]{\vec{#1}} % arrow\)
\( \newcommand{\vectorAt}[1]{\vec{\text{#1}}} % arrow\)
\( \newcommand{\vectorB}[1]{\overset { \scriptstyle \rightharpoonup} {\mathbf{#1}} } \)
\( \newcommand{\vectorC}[1]{\textbf{#1}} \)
\( \newcommand{\vectorD}[1]{\overrightarrow{#1}} \)
\( \newcommand{\vectorDt}[1]{\overrightarrow{\text{#1}}} \)
\( \newcommand{\vectE}[1]{\overset{-\!-\!\rightharpoonup}{\vphantom{a}\smash{\mathbf {#1}}}} \)
\( \newcommand{\vecs}[1]{\overset { \scriptstyle \rightharpoonup} {\mathbf{#1}} } \)
\( \newcommand{\vecd}[1]{\overset{-\!-\!\rightharpoonup}{\vphantom{a}\smash {#1}}} \)
\(\newcommand{\avec}{\mathbf a}\) \(\newcommand{\bvec}{\mathbf b}\) \(\newcommand{\cvec}{\mathbf c}\) \(\newcommand{\dvec}{\mathbf d}\) \(\newcommand{\dtil}{\widetilde{\mathbf d}}\) \(\newcommand{\evec}{\mathbf e}\) \(\newcommand{\fvec}{\mathbf f}\) \(\newcommand{\nvec}{\mathbf n}\) \(\newcommand{\pvec}{\mathbf p}\) \(\newcommand{\qvec}{\mathbf q}\) \(\newcommand{\svec}{\mathbf s}\) \(\newcommand{\tvec}{\mathbf t}\) \(\newcommand{\uvec}{\mathbf u}\) \(\newcommand{\vvec}{\mathbf v}\) \(\newcommand{\wvec}{\mathbf w}\) \(\newcommand{\xvec}{\mathbf x}\) \(\newcommand{\yvec}{\mathbf y}\) \(\newcommand{\zvec}{\mathbf z}\) \(\newcommand{\rvec}{\mathbf r}\) \(\newcommand{\mvec}{\mathbf m}\) \(\newcommand{\zerovec}{\mathbf 0}\) \(\newcommand{\onevec}{\mathbf 1}\) \(\newcommand{\real}{\mathbb R}\) \(\newcommand{\twovec}[2]{\left[\begin{array}{r}#1 \\ #2 \end{array}\right]}\) \(\newcommand{\ctwovec}[2]{\left[\begin{array}{c}#1 \\ #2 \end{array}\right]}\) \(\newcommand{\threevec}[3]{\left[\begin{array}{r}#1 \\ #2 \\ #3 \end{array}\right]}\) \(\newcommand{\cthreevec}[3]{\left[\begin{array}{c}#1 \\ #2 \\ #3 \end{array}\right]}\) \(\newcommand{\fourvec}[4]{\left[\begin{array}{r}#1 \\ #2 \\ #3 \\ #4 \end{array}\right]}\) \(\newcommand{\cfourvec}[4]{\left[\begin{array}{c}#1 \\ #2 \\ #3 \\ #4 \end{array}\right]}\) \(\newcommand{\fivevec}[5]{\left[\begin{array}{r}#1 \\ #2 \\ #3 \\ #4 \\ #5 \\ \end{array}\right]}\) \(\newcommand{\cfivevec}[5]{\left[\begin{array}{c}#1 \\ #2 \\ #3 \\ #4 \\ #5 \\ \end{array}\right]}\) \(\newcommand{\mattwo}[4]{\left[\begin{array}{rr}#1 \amp #2 \\ #3 \amp #4 \\ \end{array}\right]}\) \(\newcommand{\laspan}[1]{\text{Span}\{#1\}}\) \(\newcommand{\bcal}{\cal B}\) \(\newcommand{\ccal}{\cal C}\) \(\newcommand{\scal}{\cal S}\) \(\newcommand{\wcal}{\cal W}\) \(\newcommand{\ecal}{\cal E}\) \(\newcommand{\coords}[2]{\left\{#1\right\}_{#2}}\) \(\newcommand{\gray}[1]{\color{gray}{#1}}\) \(\newcommand{\lgray}[1]{\color{lightgray}{#1}}\) \(\newcommand{\rank}{\operatorname{rank}}\) \(\newcommand{\row}{\text{Row}}\) \(\newcommand{\col}{\text{Col}}\) \(\renewcommand{\row}{\text{Row}}\) \(\newcommand{\nul}{\text{Nul}}\) \(\newcommand{\var}{\text{Var}}\) \(\newcommand{\corr}{\text{corr}}\) \(\newcommand{\len}[1]{\left|#1\right|}\) \(\newcommand{\bbar}{\overline{\bvec}}\) \(\newcommand{\bhat}{\widehat{\bvec}}\) \(\newcommand{\bperp}{\bvec^\perp}\) \(\newcommand{\xhat}{\widehat{\xvec}}\) \(\newcommand{\vhat}{\widehat{\vvec}}\) \(\newcommand{\uhat}{\widehat{\uvec}}\) \(\newcommand{\what}{\widehat{\wvec}}\) \(\newcommand{\Sighat}{\widehat{\Sigma}}\) \(\newcommand{\lt}{<}\) \(\newcommand{\gt}{>}\) \(\newcommand{\amp}{&}\) \(\definecolor{fillinmathshade}{gray}{0.9}\)Crystal field theory (CFT) describes the breaking of orbital degeneracy in transition metal complexes due to the presence of ligands. CFT qualitatively describes the strength of the metal-ligand bonds. Based on the strength of the metal-ligand bonds, the energy of the system is altered. This may lead to a change in magnetic properties as well as color. This theory was developed by Hans Bethe and John Hasbrouck van Vleck [3].
Basic Concept
In Crystal Field Theory, it is assumed that the ions are simple point charges (a simplification). When applied to alkali metal ions containing a symmetric sphere of charge, calculations of bond energies are generally quite successful. The approach taken uses classical potential energy equations that take into account the attractive and repulsive interactions between charged particles (that is, Coulomb's Law interactions).
\[E \propto \dfrac{q_1 q_2}{r}\]
with
- \(E\) the bond energy between the charges and
- \(q_1\) and \(q_2\) are the charges of the interacting ions and
- \(r\) is the distance separating them.
This approach leads to the correct prediction that large cations of low charge, such as \(K^+\) and \(Na^+\), should form few coordination compounds. For transition metal cations that contain varying numbers of d electrons in orbitals that are NOT spherically symmetric, however, the situation is quite different. The shape and occupation of these d-orbitals then becomes important in an accurate description of the bond energy and properties of the transition metal compound.
When examining a single transition metal ion, the five d-orbitals have the same energy. When ligands approach the metal ion, some experience more opposition from the d-orbital electrons than others based on the geometric structure of the molecule. Since ligands approach from different directions, not all d-orbitals interact directly. These interactions, however, create a splitting due to the electrostatic environment.
For example, consider a molecule with octahedral geometry. Ligands approach the metal ion along the \(x\), \(y\), and \(z\) axes. Therefore, the electrons in the \(d_{z^2}\) and \(d_{x^2-y^2}\) orbitals (which lie along these axes) experience greater repulsion. It requires more energy to have an electron in these orbitals than it would to put an electron in one of the other orbitals. This causes a splitting in the energy levels of the d-orbitals. This is known as crystal field splitting. For octahedral complexes, crystal field splitting is denoted by \(\Delta_o\) (or \(\Delta_{oct}\)). The energies of the \(d_{z^2}\) and \(d_{x^2-y^2}\) orbitals increase due to greater interactions with the ligands. The \(d_{xy}\), \(d_{xz}\), and \(d_{yz}\) orbitals decrease with respect to this normal energy level and become more stable.
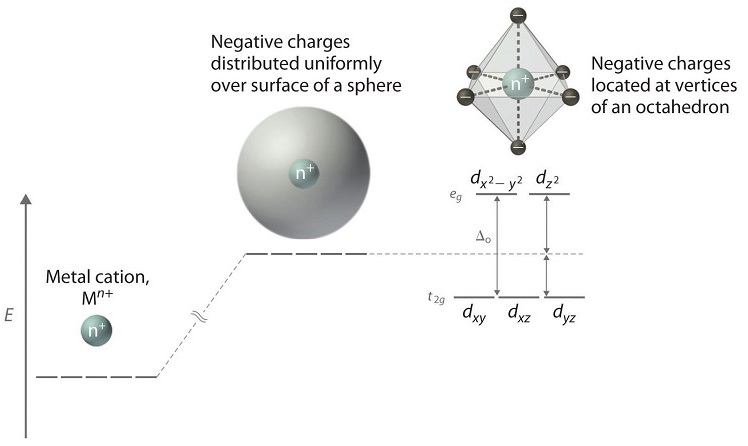
Figure 1: (a) Distributing a charge of −6 uniformly over a spherical surface surrounding a metal ion causes the energy of all five d orbitals to increase due to electrostatic repulsions, but the five d orbitals remain degenerate. Placing a charge of −1 at each vertex of an octahedron causes the d orbitals to split into two groups with different energies: the
Electrons in Orbitals
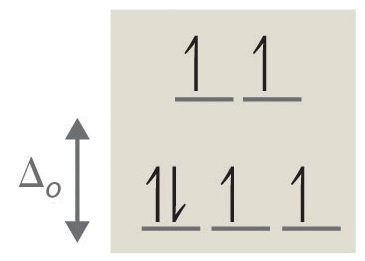
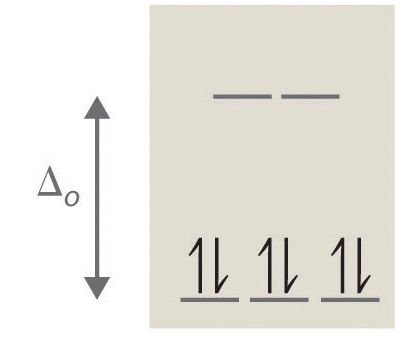
According to the Aufbau principle, electrons are filled from lower to higher energy orbitals. For the octahedral case above, this corresponds to the dxy, dxz, and dyz orbitals. Following Hund's rule, electrons are filled in order to have the highest number of unpaired electrons. For example, if one had a d3 complex, there would be three unpaired electrons. If one were to add an electron, however, it has the ability to fill a higher energy orbital ( dz² or dx²-y²) or pair with an electron residing in the dxy, dxz, or dyz orbitals. This pairing of the electrons requires energy (spin pairing energy). If the pairing energy is less than the crystal field splitting energy, ∆₀, then the next electron will go into the dxy, dxz, or dyz orbitals due to stability. This situation allows for the least amount of unpaired electrons, and is known as low spin. If the pairing energy is greater than ∆₀, then the next electron will go into the dz² or dx²-y² orbitals as an unpaired electron. This situation allows for the most number of unpaired electrons, and is known as high spin. Ligands that cause a transition metal to have a small crystal field splitting, which leads to high spin, are called weak-field ligands. Ligands that produce a large crystal field splitting, which leads to low spin, are called strong field ligands.
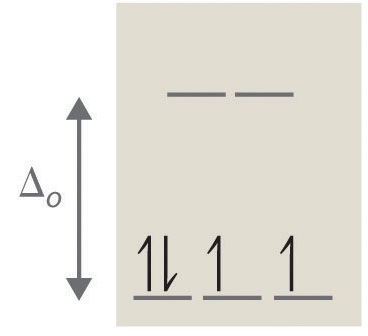
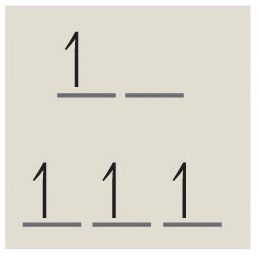
Low Spin, Strong Field (∆o˃P) High Spin, Weak Field (∆o˂P)
Figure 2: Splitting for a \(d^4\) complex under a strong field (left) and a weak field (right). The strong field is a low spin complex, while the weak field is a high spin complex.
As mentioned above, CFT is based primarily on symmetry of ligands around a central metal/ion and how this anisotropic (properties depending on direction) ligand field affects the metal's atomic orbitals; the energies of which may increase, decrease or not be affected at all. Once the ligands' electrons interact with the electrons of the d-orbitals, the electrostatic interactions cause the energy levels of the d-orbital to fluctuate depending on the orientation and the nature of the ligands. For example, the oxidation state and the strength of the ligands determine splitting; the higher the oxidation state or the stronger the ligand, the larger the splitting. Ligands are classified as strong or weak based on the spectrochemical series:
I- < Br- < Cl- < SCN- < F- < OH- < ox2-< ONO- < H2O < SCN- < EDTA4- < NH3 < en < NO2- < CN-
Note that SCN- and NO2- ligands are represented twice in the above spectrochemical series since there is two different Lewis base sites (e.g., free electron pairs to share) on each ligand (e.g., for SCN- the electron pair on the sulfur or the oxygen can form the coordinate covalent bond to a metal). The specific atom that binds in such ligands is underlined.
In addition to octahedral complexes, two common geometries observed are that of tetrahedral and square planar. These complexes differ from the octahedral complexes in that the orbital levels are raised in energy due to the interference with electrons from ligands. For the tetrahedral complex, the dxy, dxz, and dyz orbitals are raised in energy while the dz², dx²-y² orbitals are lowered. For the square planar complexes, there is greatest interaction with the dx²-y² orbital and therefore it has higher energy. The next orbital with the greatest interaction is dxy, followed below by dz². The orbitals with the lowest energy are the dxz and dyz orbitals. There is a large energy separation between the dz² orbital and the dxz and dyz orbitals, meaning that the crystal field splitting energy is large. We find that the square planar complexes have the greatest crystal field splitting energy compared to all the other complexes. This means that most square planar complexes are low spin, strong field ligands.
Description of d-Orbitals
To understand CFT, one must understand the description of the lobes:
- dxy: lobes lie in-between the x and the y axes.
- dxz: lobes lie in-between the x and the z axes.
- dyz: lobes lie in-between the y and the z axes.
- dx2-y2: lobes lie on the x and y axes.
- dz2: there are two lobes on the z axes and there is a donut shape ring that lies on the xy plane around the other two lobes.

Figure 3: Spatial arrangement of ligands in the an octahedral ligand field with respect to the five d-orbitals.
Octahedral Complexes
In an octahedral complex, there are six ligands attached to the central transition metal. The d-orbital splits into two different levels. The bottom three energy levels are named \(d_{xy}\), \(d_{xz}\), and \(d_{yz}\) (collectively referred to as \(t_{2g}\)). The two upper energy levels are named \(d_{x^²-y^²}\), and \(d_{z^²}\) (collectively referred to as \(e_g\)).
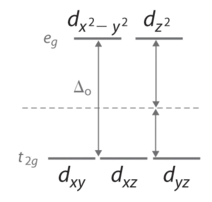
Figure 4: Splitting of the degenerate d-orbitals (without a ligand field) due to an octahedral ligand field shown in Figure 3.
The reason they split is because of the electrostatic interactions between the electrons of the ligand and the lobes of the d-orbital. In an octahedral, the electrons are attracted to the axes. Any orbital that has a lobe on the axes moves to a higher energy level. This means that in an octahedral, the energy levels of \(e_g\) are higher (0.6∆o) while \(t_{2g}\) is lower (0.4∆o). The distance that the electrons have to move from \(t_{2g}\) from \(e_g\) and it dictates the energy that the complex will absorb from white light, which will determine the color. Whether the complex is paramagnetic or diamagnetic will be determined by the spin state. If there are unpaired electrons, the complex is paramagnetic; if all electrons are paired, the complex is diamagnetic.
Tetrahedral Complexes
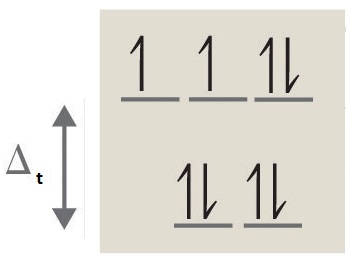
In a tetrahedral complex, there are four ligands attached to the central metal. The d orbitals also split into two different energy levels. The top three consist of the \(d_{xy}\), \(d_{xz}\), and \(d_{yz}\) orbitals. The bottom two consist of the \(d_{x^2-y^2}\) and \(d_{z^2}\) orbitals. The reason for this is due to poor orbital overlap between the metal and the ligand orbitals. The orbitals are directed on the axes, while the ligands are not.
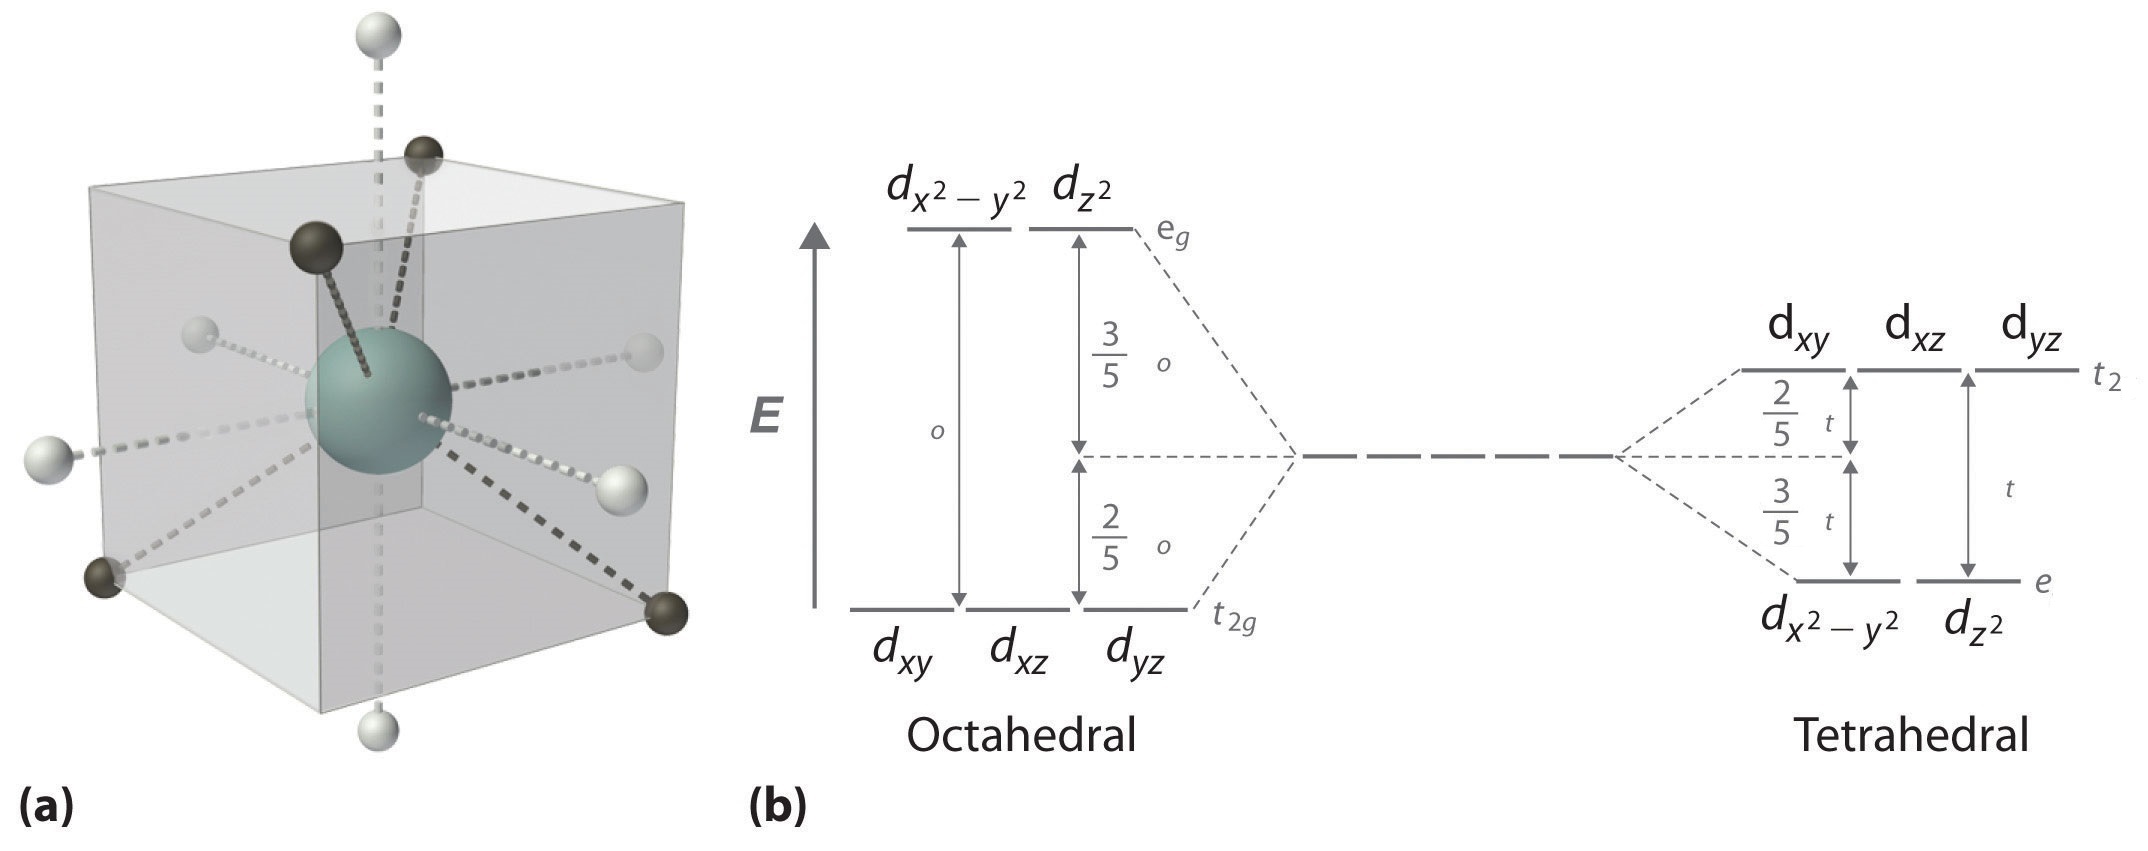
Figure 5: (a) Tetraheral ligand field surrounding a central transition metal (blue sphere). (b) Splitting of the degenerate d-orbitals (without a ligand field) due to an octahedral ligand field (left diagram) and the tetrahedral field (right diagram).
The difference in the splitting energy is tetrahedral splitting constant (\(\Delta_{t}\)), which less than (\(\Delta_{o}\)) for the same ligands:
\[\Delta_{t} = 0.44\,\Delta_o \tag{1}\]
Consequentially, \(\Delta_{t}\) is typically smaller than the spin pairing energy, so tetrahedral complexes are usually high spin.
Square Planar Complexes
In a square planar, there are four ligands as well. However, the difference is that the electrons of the ligands are only attracted to the \(xy\) plane. Any orbital in the xy plane has a higher energy level. There are four different energy levels for the square planar (from the highest energy level to the lowest energy level): dx2-y2, dxy, dz2, and both dxz and dyz.
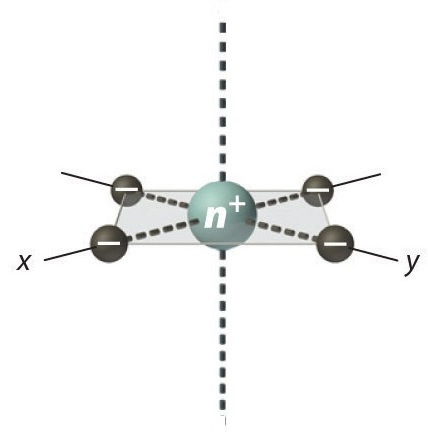
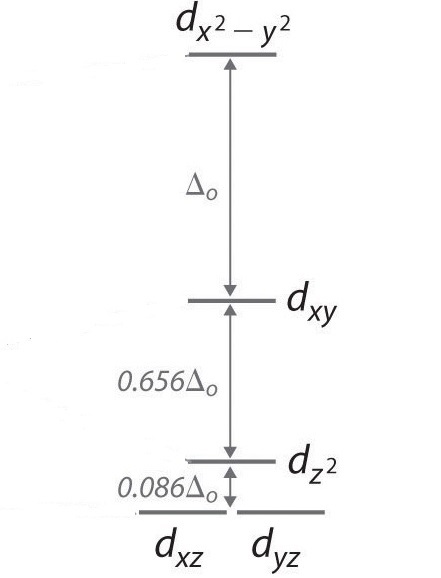
Figure 6: Splitting of the degenerate d-orbitals (without a ligand field) due to an square planar ligand field.
The splitting energy (from highest orbital to lowest orbital) is \(\Delta_{sp}\) and tends to be larger then \(\Delta_{o}\)
\[\Delta_{sp} = 1.74\,\Delta_o \tag{2}\]
Moreover, \(\Delta_{sp}\) is also larger than the pairing energy, so the square planar complexes are usually low spin complexes.
Example
For the complex ion [Fe(Cl)6]3- determine the number of d electrons for Fe, sketch the d-orbital energy levels and the distribution of d electrons among them, list the number of lone electrons, and label whether the complex is paramagnetic or diamagnetic.
SOLUTION
- Step 1: Determine the oxidation state of Fe. Here it is Fe3+. Based on its electron configuration, Fe3+ has 5 d-electrons.
- Step 2: Determine the geometry of the ion. Here it is an octahedral which means the energy splitting should look like:

- Step 3: Determine whether the ligand induces is a strong or weak field spin by looking at the spectrochemical series. Cl- is a weak field ligand (i.e., it induces high spin complexes). Therefore, electrons fill all orbitals before being paired.

- Step four: Count the number of lone electrons. Here, there are 5 electrons.
- Step five: The five unpaired electrons means this complex ion is paramagnetic (and strongly so).
Example 2
A tetrahedral complex absorbs at 545 nm. What is the respective octahedral crystal field splitting (\(\Delta_o\))? What is the color of the complex?
SOLUTION
\[\Delta_t = \dfrac{hc}{\lambda}\]
\[\Delta_t = \dfrac{ (6.626 \times 10^{-34} J \cdot s)(3 \times 10^8 m/s)}{545 \times 10^{-9} m}=3.65 \times 10^{-19}\; J \]
However, the tetrahedral splitting (\(\Delta_t\)) is ~4/9 that of the octahedral splitting (\(\Delta_o\)).
\[\Delta_t = 0.44\Delta_o \]
\[\Delta_o = \dfrac{\Delta_t}{0.44} = \dfrac{3.65 \times 10^{-19} J}{0.44} = 8.30 \times 10^{-18}J\]
This is the energy needed to promote one electron in one complex. Often the crystal field splitting is given per mole, which requires this number to be multiplied by Avogadro's Number (\(6.022 \times 10^{23}\)).
This complex appears red, since it absorbs in the complementary green color (determined via the color wheel).
Video:
Problems
For each of the following, sketch the d-orbital energy levels and the distribution of d electrons among them, state the geometry, list the number of d-electrons, list the number of lone electrons, and label whether they are paramagnetic or dimagnetic:
- [Ti(H2O)6]2+
- [NiCl4]2-
- [CoF6]3- (also state whether this is low or high spin)
- [Co(NH3)6]3+ (also state whether this is low or high spin)
- True or False: Square Planer complex compounds are usually low spin.
Answers
1. octahedral, 2, 2, paramagnetic
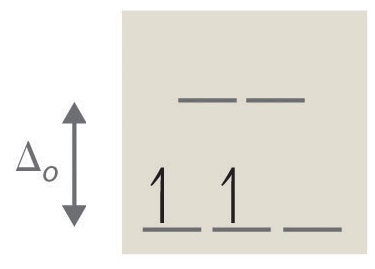
2. tetrahedral, 8, 2, paramagnetic (see Octahedral vs. Tetrahedral Geometries)
3. octahedral, 6, 4, paramagnetic, high spin
4. octahedral, 6, 0, diamagnetic, low spin
5. True
Contributors
- Asadullah Awan (UCD), Hong Truong (UCD)
Prof. Robert J. Lancashire (The Department of Chemistry, University of the West Indies)

