
2.5: Lewis Dot and Bonding
- Page ID
- 466581
\( \newcommand{\vecs}[1]{\overset { \scriptstyle \rightharpoonup} {\mathbf{#1}} } \)
\( \newcommand{\vecd}[1]{\overset{-\!-\!\rightharpoonup}{\vphantom{a}\smash {#1}}} \)
\( \newcommand{\id}{\mathrm{id}}\) \( \newcommand{\Span}{\mathrm{span}}\)
( \newcommand{\kernel}{\mathrm{null}\,}\) \( \newcommand{\range}{\mathrm{range}\,}\)
\( \newcommand{\RealPart}{\mathrm{Re}}\) \( \newcommand{\ImaginaryPart}{\mathrm{Im}}\)
\( \newcommand{\Argument}{\mathrm{Arg}}\) \( \newcommand{\norm}[1]{\| #1 \|}\)
\( \newcommand{\inner}[2]{\langle #1, #2 \rangle}\)
\( \newcommand{\Span}{\mathrm{span}}\)
\( \newcommand{\id}{\mathrm{id}}\)
\( \newcommand{\Span}{\mathrm{span}}\)
\( \newcommand{\kernel}{\mathrm{null}\,}\)
\( \newcommand{\range}{\mathrm{range}\,}\)
\( \newcommand{\RealPart}{\mathrm{Re}}\)
\( \newcommand{\ImaginaryPart}{\mathrm{Im}}\)
\( \newcommand{\Argument}{\mathrm{Arg}}\)
\( \newcommand{\norm}[1]{\| #1 \|}\)
\( \newcommand{\inner}[2]{\langle #1, #2 \rangle}\)
\( \newcommand{\Span}{\mathrm{span}}\) \( \newcommand{\AA}{\unicode[.8,0]{x212B}}\)
\( \newcommand{\vectorA}[1]{\vec{#1}} % arrow\)
\( \newcommand{\vectorAt}[1]{\vec{\text{#1}}} % arrow\)
\( \newcommand{\vectorB}[1]{\overset { \scriptstyle \rightharpoonup} {\mathbf{#1}} } \)
\( \newcommand{\vectorC}[1]{\textbf{#1}} \)
\( \newcommand{\vectorD}[1]{\overrightarrow{#1}} \)
\( \newcommand{\vectorDt}[1]{\overrightarrow{\text{#1}}} \)
\( \newcommand{\vectE}[1]{\overset{-\!-\!\rightharpoonup}{\vphantom{a}\smash{\mathbf {#1}}}} \)
\( \newcommand{\vecs}[1]{\overset { \scriptstyle \rightharpoonup} {\mathbf{#1}} } \)
\( \newcommand{\vecd}[1]{\overset{-\!-\!\rightharpoonup}{\vphantom{a}\smash {#1}}} \)
\(\newcommand{\avec}{\mathbf a}\) \(\newcommand{\bvec}{\mathbf b}\) \(\newcommand{\cvec}{\mathbf c}\) \(\newcommand{\dvec}{\mathbf d}\) \(\newcommand{\dtil}{\widetilde{\mathbf d}}\) \(\newcommand{\evec}{\mathbf e}\) \(\newcommand{\fvec}{\mathbf f}\) \(\newcommand{\nvec}{\mathbf n}\) \(\newcommand{\pvec}{\mathbf p}\) \(\newcommand{\qvec}{\mathbf q}\) \(\newcommand{\svec}{\mathbf s}\) \(\newcommand{\tvec}{\mathbf t}\) \(\newcommand{\uvec}{\mathbf u}\) \(\newcommand{\vvec}{\mathbf v}\) \(\newcommand{\wvec}{\mathbf w}\) \(\newcommand{\xvec}{\mathbf x}\) \(\newcommand{\yvec}{\mathbf y}\) \(\newcommand{\zvec}{\mathbf z}\) \(\newcommand{\rvec}{\mathbf r}\) \(\newcommand{\mvec}{\mathbf m}\) \(\newcommand{\zerovec}{\mathbf 0}\) \(\newcommand{\onevec}{\mathbf 1}\) \(\newcommand{\real}{\mathbb R}\) \(\newcommand{\twovec}[2]{\left[\begin{array}{r}#1 \\ #2 \end{array}\right]}\) \(\newcommand{\ctwovec}[2]{\left[\begin{array}{c}#1 \\ #2 \end{array}\right]}\) \(\newcommand{\threevec}[3]{\left[\begin{array}{r}#1 \\ #2 \\ #3 \end{array}\right]}\) \(\newcommand{\cthreevec}[3]{\left[\begin{array}{c}#1 \\ #2 \\ #3 \end{array}\right]}\) \(\newcommand{\fourvec}[4]{\left[\begin{array}{r}#1 \\ #2 \\ #3 \\ #4 \end{array}\right]}\) \(\newcommand{\cfourvec}[4]{\left[\begin{array}{c}#1 \\ #2 \\ #3 \\ #4 \end{array}\right]}\) \(\newcommand{\fivevec}[5]{\left[\begin{array}{r}#1 \\ #2 \\ #3 \\ #4 \\ #5 \\ \end{array}\right]}\) \(\newcommand{\cfivevec}[5]{\left[\begin{array}{c}#1 \\ #2 \\ #3 \\ #4 \\ #5 \\ \end{array}\right]}\) \(\newcommand{\mattwo}[4]{\left[\begin{array}{rr}#1 \amp #2 \\ #3 \amp #4 \\ \end{array}\right]}\) \(\newcommand{\laspan}[1]{\text{Span}\{#1\}}\) \(\newcommand{\bcal}{\cal B}\) \(\newcommand{\ccal}{\cal C}\) \(\newcommand{\scal}{\cal S}\) \(\newcommand{\wcal}{\cal W}\) \(\newcommand{\ecal}{\cal E}\) \(\newcommand{\coords}[2]{\left\{#1\right\}_{#2}}\) \(\newcommand{\gray}[1]{\color{gray}{#1}}\) \(\newcommand{\lgray}[1]{\color{lightgray}{#1}}\) \(\newcommand{\rank}{\operatorname{rank}}\) \(\newcommand{\row}{\text{Row}}\) \(\newcommand{\col}{\text{Col}}\) \(\renewcommand{\row}{\text{Row}}\) \(\newcommand{\nul}{\text{Nul}}\) \(\newcommand{\var}{\text{Var}}\) \(\newcommand{\corr}{\text{corr}}\) \(\newcommand{\len}[1]{\left|#1\right|}\) \(\newcommand{\bbar}{\overline{\bvec}}\) \(\newcommand{\bhat}{\widehat{\bvec}}\) \(\newcommand{\bperp}{\bvec^\perp}\) \(\newcommand{\xhat}{\widehat{\xvec}}\) \(\newcommand{\vhat}{\widehat{\vvec}}\) \(\newcommand{\uhat}{\widehat{\uvec}}\) \(\newcommand{\what}{\widehat{\wvec}}\) \(\newcommand{\Sighat}{\widehat{\Sigma}}\) \(\newcommand{\lt}{<}\) \(\newcommand{\gt}{>}\) \(\newcommand{\amp}{&}\) \(\definecolor{fillinmathshade}{gray}{0.9}\)- Identify and describe covalent bonds and ionic bonds.
- Draw the Lewis dot structure for an atom.
Bonding (Ionic and Covalent Basics)
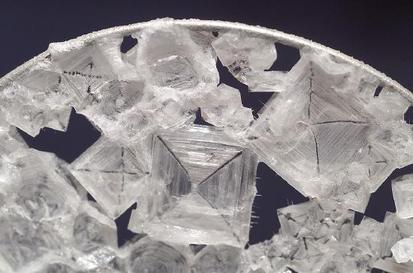
When two atoms approach each other, they have the potential to bond (or connect). If a metal and a nonmetal interact, then an ionic bond will result. These types of bonds involve the metal donating its valence electron(s) to a nonmetal, forming an ionic compound. As the transfer of electrons occurs, both atoms will achieve a more stabile confirmation. The end result will be a less reactive compound. These ionic species are composed of both cations (positively charged ions) and anions (negatively charged ions). In addition, ionic compounds are crystalline and solid in nature. A few examples of real-world ionic compounds would be NaCl (sodium chloride, table salt) and NaF (sodium fluoride, the active ingredient in toothpaste).


If two nonmetals interact, then a covalent bond will result. The connection that forms is due to each atom sharing its valence electron(s). In this type of bonding, each atom (except for H, B, and Be) obtains an octet (eight valence electrons) and becomes stable. Metalloids and nonmetals can bond to form covalent compounds as well. Solid covalent compounds are not crystalline in texture, unlike ionic compounds. Covalent compounds can be liquids or even gases.
| Ionic Bonding | Covalent Bonding |
|---|---|
| Metal and nonmetal combination | nonmetal and nonmetal or metalloid and nonmetal combination |
| Metal loses valence electrons and nonmetal gains up to eight. | Both elements share valence electrons to achieve stability |
| Individual atoms have charges (anions or cations) | No charges are present in these compounds |
| All ionic compounds are solids | Covalent compounds can be solid, liquid, or gas. |
| Examples could include: Li2CO3, Fe2O3, and MgSO4 | Examples include: CO2, H2O, and CH3CH2OH |
ADAPT \(\PageIndex{1}\)
Lewis Symbols
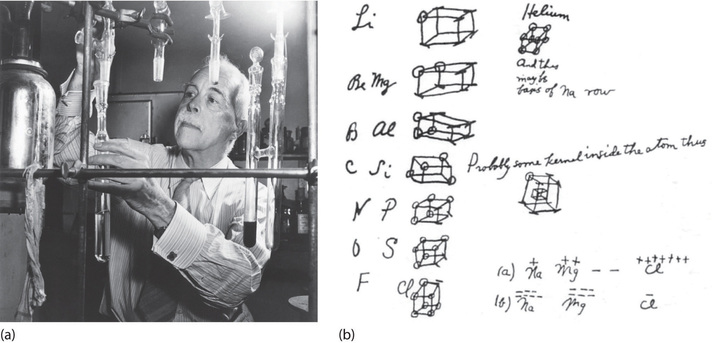
At the beginning of the 20th century, an American physical chemist G. N. Lewis (1875–1946) devised a system of symbols—now called Lewis electron dot symbols (often shortened to Lewis dot symbols) that can be used for predicting the number of bonds formed by most elements in their compounds. Each Lewis dot symbol consists of the chemical symbol for an element surrounded by dots that represent its valence electrons. Lewis knew that incorporating models into his teaching would enable students to visualize chemical bonding more easily. Gilbert Lewis was known for his interactive teaching methods and his interest in student success. Unfortunately, his nervous personality limited his ability to lecture in front of large groups of people.
Regarding his research, Lewis constructed his own theory to explain the nature of acids and bases. He was the first to synthesize D2O (heavy water) and wrote numerous textbooks for his courses. In World War I, he served as a Major in the Gas Service unit of the American Army. He trained over 200 soldiers a week on how to adequately protect themselves from gas warfare. From these efforts, he helped reduce fatalities due to chemical gas exposures and was awarded the Distinguish Service Medal in 1922.
Lewis was nominated over thirty times for the Nobel Prize. He never received this award and does not have an element named in honor of him. For more on Gilbert Lewis, click on this link to read a bibliographic memoir published by the National Academy of Sciences.
- convenient representation of valence electrons
- allows scientists to keep track of valence electrons during bond formation
- consists of the chemical symbol for the element plus a dot for each valence electron
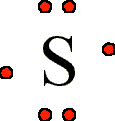
To write an element’s Lewis dot symbol, we place dots representing its valence electrons, one at a time, around the element’s chemical symbol. Up to four dots are placed above, below, to the left, and to the right of the symbol (in any order, as long as elements with four or fewer valence electrons have no more than one dot in each position). The next dots, for elements with more than four valence electrons, are again distributed one at a time, each paired with one of the first four. For example, the element sulfur has six valence electrons (this can be determined by looking at the Roman numeral listed above the element's group on the periodic table) and its Lewis symbol would be:
Fluorine, for example, has seven valence electrons, so its Lewis dot symbol is constructed as follows:

The number of dots in the Lewis dot symbol is the same as the number of valence electrons, which is the same as the last digit of the element’s group number in the periodic table. Lewis dot symbols and electron configurations (not a topic for this course) for the elements in period 2 are given in Table \(\PageIndex{2}\).
Table \(\PageIndex{2}\): Lewis Dot Symbols for the Elements in Period 2

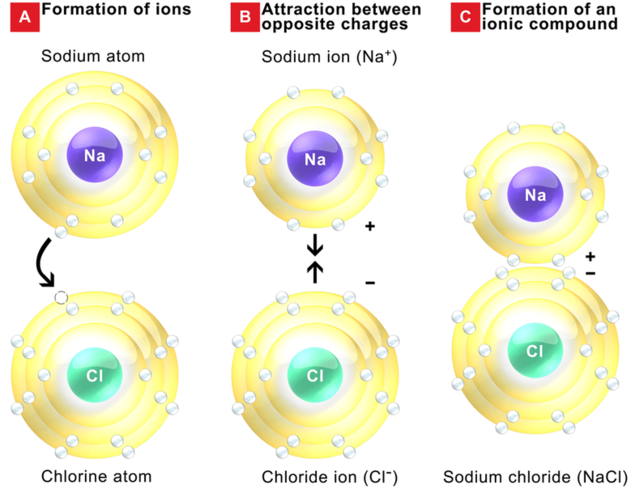
Ionic compounds are produced when a metal bonds with a nonmetal. Stability is achieved for both atoms once the transfer of electrons has occurred. The image below shows how sodium and chlorine bond to form the compound sodium chloride. Unlike sodium metal, the resulting compound is not explosive and is less corrosive than chlorine gas. Ionic bonding can be viewed by noting the donation of valence electrons from a metal atom to a nonmetal atom by using the Bohr model. From this theory, we will move on to the Lewis structure with an understanding that metals will always lose valence electrons, and nonmetals will gain up to eight to form stable compounds.
When drawing Lewis structures for compounds formed from the combination of a metal and a nonmetal, use the list of rules shown below:
- Locate the elements of interest and recall how many valence electrons each species has (look at the Roman numeral listed above the element's group).
- Draw dots around each element individually, one dot for each valence electron.
- To obtain an octet, the metal atom must transfer all of its valence electrons to the nonmetal.
- At this point, the metal should have no valence electrons around it (and have a positive charge). With the newly acquired electrons from the metal, the nonmetal atom will have an octet (and a negative charge). If this does not occur, then refer to step e.
- Additional atoms of the same two elements may be brought in to accomplish rules a - c.
- Cation and anion charges must be on Lewis structure to indicate the number of electrons gained or lost (this is an ionic compound).
- To check the structure, write a formula for the ionic compound, the charges of all atoms in the compound must add up to zero.
ADAPT \(\PageIndex{2}\)
ADAPT \(\PageIndex{3}\)
.jpg?revision=2)
In this example, the sodium atom donates its 1 valence electron to the chlorine atom. This creates a sodium cation (+ charge) and a chloride anion (- charge). Notice that the net charge of the resulting compound is 0 (+1 - 1 = 0). In this example, only one atom of each element is needed to obtain a stable compound.
.jpg?revision=2)
In this next example, the magnesium atom is donating both of its valence electrons, one electron to each chlorine atom. Each chlorine atom can only accept 1 electron before it achieves an octet; therefore, 2 atoms of chlorine are required to accept the 2 electrons donated by the magnesium. Each chloride anion has a charge of -1, the magnesium ion has a charge of 2+. Notice that the net charge of the compound is 0 (+2 - 1 - 1 = 0). This Lewis structure requires two chloride anions per one magnesium cation to produce a stable compound.
Contributors and Attributions
- Wikipedia
- National Programme on Technology Enhanced Learning (India)
Isabella Quiros (Furman University)
- Erin Avram (Cleveland State University)