B. Column Chromatography
- Page ID
- 202043
\( \newcommand{\vecs}[1]{\overset { \scriptstyle \rightharpoonup} {\mathbf{#1}} } \)
\( \newcommand{\vecd}[1]{\overset{-\!-\!\rightharpoonup}{\vphantom{a}\smash {#1}}} \)
\( \newcommand{\dsum}{\displaystyle\sum\limits} \)
\( \newcommand{\dint}{\displaystyle\int\limits} \)
\( \newcommand{\dlim}{\displaystyle\lim\limits} \)
\( \newcommand{\id}{\mathrm{id}}\) \( \newcommand{\Span}{\mathrm{span}}\)
( \newcommand{\kernel}{\mathrm{null}\,}\) \( \newcommand{\range}{\mathrm{range}\,}\)
\( \newcommand{\RealPart}{\mathrm{Re}}\) \( \newcommand{\ImaginaryPart}{\mathrm{Im}}\)
\( \newcommand{\Argument}{\mathrm{Arg}}\) \( \newcommand{\norm}[1]{\| #1 \|}\)
\( \newcommand{\inner}[2]{\langle #1, #2 \rangle}\)
\( \newcommand{\Span}{\mathrm{span}}\)
\( \newcommand{\id}{\mathrm{id}}\)
\( \newcommand{\Span}{\mathrm{span}}\)
\( \newcommand{\kernel}{\mathrm{null}\,}\)
\( \newcommand{\range}{\mathrm{range}\,}\)
\( \newcommand{\RealPart}{\mathrm{Re}}\)
\( \newcommand{\ImaginaryPart}{\mathrm{Im}}\)
\( \newcommand{\Argument}{\mathrm{Arg}}\)
\( \newcommand{\norm}[1]{\| #1 \|}\)
\( \newcommand{\inner}[2]{\langle #1, #2 \rangle}\)
\( \newcommand{\Span}{\mathrm{span}}\) \( \newcommand{\AA}{\unicode[.8,0]{x212B}}\)
\( \newcommand{\vectorA}[1]{\vec{#1}} % arrow\)
\( \newcommand{\vectorAt}[1]{\vec{\text{#1}}} % arrow\)
\( \newcommand{\vectorB}[1]{\overset { \scriptstyle \rightharpoonup} {\mathbf{#1}} } \)
\( \newcommand{\vectorC}[1]{\textbf{#1}} \)
\( \newcommand{\vectorD}[1]{\overrightarrow{#1}} \)
\( \newcommand{\vectorDt}[1]{\overrightarrow{\text{#1}}} \)
\( \newcommand{\vectE}[1]{\overset{-\!-\!\rightharpoonup}{\vphantom{a}\smash{\mathbf {#1}}}} \)
\( \newcommand{\vecs}[1]{\overset { \scriptstyle \rightharpoonup} {\mathbf{#1}} } \)
\(\newcommand{\longvect}{\overrightarrow}\)
\( \newcommand{\vecd}[1]{\overset{-\!-\!\rightharpoonup}{\vphantom{a}\smash {#1}}} \)
\(\newcommand{\avec}{\mathbf a}\) \(\newcommand{\bvec}{\mathbf b}\) \(\newcommand{\cvec}{\mathbf c}\) \(\newcommand{\dvec}{\mathbf d}\) \(\newcommand{\dtil}{\widetilde{\mathbf d}}\) \(\newcommand{\evec}{\mathbf e}\) \(\newcommand{\fvec}{\mathbf f}\) \(\newcommand{\nvec}{\mathbf n}\) \(\newcommand{\pvec}{\mathbf p}\) \(\newcommand{\qvec}{\mathbf q}\) \(\newcommand{\svec}{\mathbf s}\) \(\newcommand{\tvec}{\mathbf t}\) \(\newcommand{\uvec}{\mathbf u}\) \(\newcommand{\vvec}{\mathbf v}\) \(\newcommand{\wvec}{\mathbf w}\) \(\newcommand{\xvec}{\mathbf x}\) \(\newcommand{\yvec}{\mathbf y}\) \(\newcommand{\zvec}{\mathbf z}\) \(\newcommand{\rvec}{\mathbf r}\) \(\newcommand{\mvec}{\mathbf m}\) \(\newcommand{\zerovec}{\mathbf 0}\) \(\newcommand{\onevec}{\mathbf 1}\) \(\newcommand{\real}{\mathbb R}\) \(\newcommand{\twovec}[2]{\left[\begin{array}{r}#1 \\ #2 \end{array}\right]}\) \(\newcommand{\ctwovec}[2]{\left[\begin{array}{c}#1 \\ #2 \end{array}\right]}\) \(\newcommand{\threevec}[3]{\left[\begin{array}{r}#1 \\ #2 \\ #3 \end{array}\right]}\) \(\newcommand{\cthreevec}[3]{\left[\begin{array}{c}#1 \\ #2 \\ #3 \end{array}\right]}\) \(\newcommand{\fourvec}[4]{\left[\begin{array}{r}#1 \\ #2 \\ #3 \\ #4 \end{array}\right]}\) \(\newcommand{\cfourvec}[4]{\left[\begin{array}{c}#1 \\ #2 \\ #3 \\ #4 \end{array}\right]}\) \(\newcommand{\fivevec}[5]{\left[\begin{array}{r}#1 \\ #2 \\ #3 \\ #4 \\ #5 \\ \end{array}\right]}\) \(\newcommand{\cfivevec}[5]{\left[\begin{array}{c}#1 \\ #2 \\ #3 \\ #4 \\ #5 \\ \end{array}\right]}\) \(\newcommand{\mattwo}[4]{\left[\begin{array}{rr}#1 \amp #2 \\ #3 \amp #4 \\ \end{array}\right]}\) \(\newcommand{\laspan}[1]{\text{Span}\{#1\}}\) \(\newcommand{\bcal}{\cal B}\) \(\newcommand{\ccal}{\cal C}\) \(\newcommand{\scal}{\cal S}\) \(\newcommand{\wcal}{\cal W}\) \(\newcommand{\ecal}{\cal E}\) \(\newcommand{\coords}[2]{\left\{#1\right\}_{#2}}\) \(\newcommand{\gray}[1]{\color{gray}{#1}}\) \(\newcommand{\lgray}[1]{\color{lightgray}{#1}}\) \(\newcommand{\rank}{\operatorname{rank}}\) \(\newcommand{\row}{\text{Row}}\) \(\newcommand{\col}{\text{Col}}\) \(\renewcommand{\row}{\text{Row}}\) \(\newcommand{\nul}{\text{Nul}}\) \(\newcommand{\var}{\text{Var}}\) \(\newcommand{\corr}{\text{corr}}\) \(\newcommand{\len}[1]{\left|#1\right|}\) \(\newcommand{\bbar}{\overline{\bvec}}\) \(\newcommand{\bhat}{\widehat{\bvec}}\) \(\newcommand{\bperp}{\bvec^\perp}\) \(\newcommand{\xhat}{\widehat{\xvec}}\) \(\newcommand{\vhat}{\widehat{\vvec}}\) \(\newcommand{\uhat}{\widehat{\uvec}}\) \(\newcommand{\what}{\widehat{\wvec}}\) \(\newcommand{\Sighat}{\widehat{\Sigma}}\) \(\newcommand{\lt}{<}\) \(\newcommand{\gt}{>}\) \(\newcommand{\amp}{&}\) \(\definecolor{fillinmathshade}{gray}{0.9}\)This page shows how the same principles used in thin layer chromatography can be applied on a larger scale to separate mixtures in column chromatography. Column chromatography is often used to purify compounds made in the lab.
The column
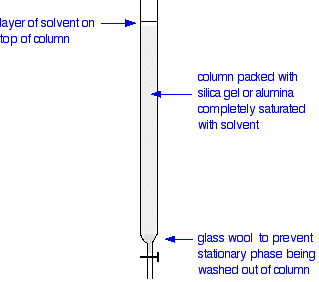
In thin layer chromatography, the stationary phase is a thin layer of silica gel or alumina on a glass, metal or plastic plate. Column chromatography works on a much larger scale by packing the same materials into a vertical glass column. Various sizes of chromatography columns are used, and if you follow a link at the bottom of the page to the Organic Chemistry section of the Colorado University site, you will find photographs of various columns. In a school lab, it is often convenient to use an ordinary burette as a chromatography column.

Using the Column
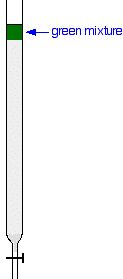
Suppose you wanted to separate a mixture of two colored compounds - one yellow, one blue. The mixture looks green. You would make a concentrated solution of the mixture preferably in the solvent used in the column. First you open the tap to allow the solvent already in the column to drain so that it is level with the top of the packing material, and then add the solution carefully to the top of the column. Then you open the tap again so that the colored mixture is all absorbed into the top of the packing material, so that it might look like this:

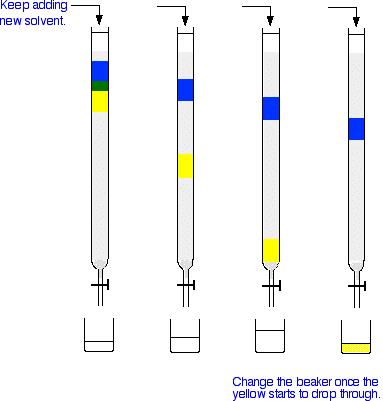
Next you add fresh solvent to the top of the column, trying to disturb the packing material as little as possible. Then you open the tap so that the solvent can flow down through the column, collecting it in a beaker or flask at the bottom. As the solvent runs through, you keep adding fresh solvent to the top so that the column never dries out. The next set of diagrams shows what might happen over time.

Explaining what is happening
This assumes that you have read the explanation for what happens during thin layer chromatography. If you haven't, follow the very first link at the top of the page and come back to this point afterwards.
The blue compound is obviously more polar than the yellow one - it perhaps even has the ability to hydrogen bond. You can tell this because the blue compound doesn't travel through the column very quickly. That means that it must adsorb more strongly to the silica gel or alumina than the yellow one. The less polar yellow one spends more of its time in the solvent and therefore washes through the column much faster. The process of washing a compound through a column using a solvent is known as elution. The solvent is sometimes known as the eluent.
What if you want to collect the blue compound as well?
It is going to take ages to wash the blue compound through at the rate it is travelling at the moment! However, there is no reason why you can't change the solvent during elution. Suppose you replace the solvent you have been using by a more polar solvent once the yellow has all been collected. That will have two effects, both of which will speed the blue compound through the column.
- The polar solvent will compete for space on the silica gel or alumina with the blue compound. Any space temporarily occupied by solvent molecules on the surface of the stationary phase isn't available for blue molecules to stick to and this will tend to keep them moving along in the solvent.
- There will be a greater attraction between the polar solvent molecules and the polar blue molecules. This will tend to attract any blue molecules sticking to the stationary phase back into solution.
The net effect is that with a more polar solvent, the blue compound spends more time in solution, and so moves faster.
So why not use this alternative solvent in the first place? The answer is that if both of the compounds in the mixture travel quickly through the column right from the beginning, you probably won't get such a good separation.
What if everything in your mixture is colorless?
If you were going to use column chromatography to purify the product of an organic preparation, it is quite likely that the product that you want will be colorless even if one or more of the impurities is colored. Let's assume the worst case that everything is colorless.
How do you know when the substance you want has reached the bottom of the column?
There is no quick and easy way of doing this! What you do is collect what comes out of the bottom of the column in a whole series of labelled tubes. How big each sample is will obviously depend on how big the column is - you might collect 1 cm3 samples or 5 cm3 samples or whatever is appropriate.
You can then take a drop from each solution and make a thin layer chromatogram from it. You would place the drop on the base line alongside a drop from a pure sample of the compound that you are making. By doing this repeatedly, you can identify which of your samples collected at the bottom of the column contain the desired product, and only the desired product.
Once you know this, you can combine all of the samples which contain your pure product, and then remove the solvent. (How you would separate the solvent from the product isn't directly relevant to this topic and would vary depending on their exact nature - so I'm not even going to attempt a generalisation.)
Contributors
Jim Clark (Chemguide.co.uk)


