
4.6: Step-by-Step Procedures For Extractions
- Page ID
- 93534

\( \newcommand{\vecs}[1]{\overset { \scriptstyle \rightharpoonup} {\mathbf{#1}} } \)
\( \newcommand{\vecd}[1]{\overset{-\!-\!\rightharpoonup}{\vphantom{a}\smash {#1}}} \)
\( \newcommand{\id}{\mathrm{id}}\) \( \newcommand{\Span}{\mathrm{span}}\)
( \newcommand{\kernel}{\mathrm{null}\,}\) \( \newcommand{\range}{\mathrm{range}\,}\)
\( \newcommand{\RealPart}{\mathrm{Re}}\) \( \newcommand{\ImaginaryPart}{\mathrm{Im}}\)
\( \newcommand{\Argument}{\mathrm{Arg}}\) \( \newcommand{\norm}[1]{\| #1 \|}\)
\( \newcommand{\inner}[2]{\langle #1, #2 \rangle}\)
\( \newcommand{\Span}{\mathrm{span}}\)
\( \newcommand{\id}{\mathrm{id}}\)
\( \newcommand{\Span}{\mathrm{span}}\)
\( \newcommand{\kernel}{\mathrm{null}\,}\)
\( \newcommand{\range}{\mathrm{range}\,}\)
\( \newcommand{\RealPart}{\mathrm{Re}}\)
\( \newcommand{\ImaginaryPart}{\mathrm{Im}}\)
\( \newcommand{\Argument}{\mathrm{Arg}}\)
\( \newcommand{\norm}[1]{\| #1 \|}\)
\( \newcommand{\inner}[2]{\langle #1, #2 \rangle}\)
\( \newcommand{\Span}{\mathrm{span}}\) \( \newcommand{\AA}{\unicode[.8,0]{x212B}}\)
\( \newcommand{\vectorA}[1]{\vec{#1}} % arrow\)
\( \newcommand{\vectorAt}[1]{\vec{\text{#1}}} % arrow\)
\( \newcommand{\vectorB}[1]{\overset { \scriptstyle \rightharpoonup} {\mathbf{#1}} } \)
\( \newcommand{\vectorC}[1]{\textbf{#1}} \)
\( \newcommand{\vectorD}[1]{\overrightarrow{#1}} \)
\( \newcommand{\vectorDt}[1]{\overrightarrow{\text{#1}}} \)
\( \newcommand{\vectE}[1]{\overset{-\!-\!\rightharpoonup}{\vphantom{a}\smash{\mathbf {#1}}}} \)
\( \newcommand{\vecs}[1]{\overset { \scriptstyle \rightharpoonup} {\mathbf{#1}} } \)
\( \newcommand{\vecd}[1]{\overset{-\!-\!\rightharpoonup}{\vphantom{a}\smash {#1}}} \)
\(\newcommand{\avec}{\mathbf a}\) \(\newcommand{\bvec}{\mathbf b}\) \(\newcommand{\cvec}{\mathbf c}\) \(\newcommand{\dvec}{\mathbf d}\) \(\newcommand{\dtil}{\widetilde{\mathbf d}}\) \(\newcommand{\evec}{\mathbf e}\) \(\newcommand{\fvec}{\mathbf f}\) \(\newcommand{\nvec}{\mathbf n}\) \(\newcommand{\pvec}{\mathbf p}\) \(\newcommand{\qvec}{\mathbf q}\) \(\newcommand{\svec}{\mathbf s}\) \(\newcommand{\tvec}{\mathbf t}\) \(\newcommand{\uvec}{\mathbf u}\) \(\newcommand{\vvec}{\mathbf v}\) \(\newcommand{\wvec}{\mathbf w}\) \(\newcommand{\xvec}{\mathbf x}\) \(\newcommand{\yvec}{\mathbf y}\) \(\newcommand{\zvec}{\mathbf z}\) \(\newcommand{\rvec}{\mathbf r}\) \(\newcommand{\mvec}{\mathbf m}\) \(\newcommand{\zerovec}{\mathbf 0}\) \(\newcommand{\onevec}{\mathbf 1}\) \(\newcommand{\real}{\mathbb R}\) \(\newcommand{\twovec}[2]{\left[\begin{array}{r}#1 \\ #2 \end{array}\right]}\) \(\newcommand{\ctwovec}[2]{\left[\begin{array}{c}#1 \\ #2 \end{array}\right]}\) \(\newcommand{\threevec}[3]{\left[\begin{array}{r}#1 \\ #2 \\ #3 \end{array}\right]}\) \(\newcommand{\cthreevec}[3]{\left[\begin{array}{c}#1 \\ #2 \\ #3 \end{array}\right]}\) \(\newcommand{\fourvec}[4]{\left[\begin{array}{r}#1 \\ #2 \\ #3 \\ #4 \end{array}\right]}\) \(\newcommand{\cfourvec}[4]{\left[\begin{array}{c}#1 \\ #2 \\ #3 \\ #4 \end{array}\right]}\) \(\newcommand{\fivevec}[5]{\left[\begin{array}{r}#1 \\ #2 \\ #3 \\ #4 \\ #5 \\ \end{array}\right]}\) \(\newcommand{\cfivevec}[5]{\left[\begin{array}{c}#1 \\ #2 \\ #3 \\ #4 \\ #5 \\ \end{array}\right]}\) \(\newcommand{\mattwo}[4]{\left[\begin{array}{rr}#1 \amp #2 \\ #3 \amp #4 \\ \end{array}\right]}\) \(\newcommand{\laspan}[1]{\text{Span}\{#1\}}\) \(\newcommand{\bcal}{\cal B}\) \(\newcommand{\ccal}{\cal C}\) \(\newcommand{\scal}{\cal S}\) \(\newcommand{\wcal}{\cal W}\) \(\newcommand{\ecal}{\cal E}\) \(\newcommand{\coords}[2]{\left\{#1\right\}_{#2}}\) \(\newcommand{\gray}[1]{\color{gray}{#1}}\) \(\newcommand{\lgray}[1]{\color{lightgray}{#1}}\) \(\newcommand{\rank}{\operatorname{rank}}\) \(\newcommand{\row}{\text{Row}}\) \(\newcommand{\col}{\text{Col}}\) \(\renewcommand{\row}{\text{Row}}\) \(\newcommand{\nul}{\text{Nul}}\) \(\newcommand{\var}{\text{Var}}\) \(\newcommand{\corr}{\text{corr}}\) \(\newcommand{\len}[1]{\left|#1\right|}\) \(\newcommand{\bbar}{\overline{\bvec}}\) \(\newcommand{\bhat}{\widehat{\bvec}}\) \(\newcommand{\bperp}{\bvec^\perp}\) \(\newcommand{\xhat}{\widehat{\xvec}}\) \(\newcommand{\vhat}{\widehat{\vvec}}\) \(\newcommand{\uhat}{\widehat{\uvec}}\) \(\newcommand{\what}{\widehat{\wvec}}\) \(\newcommand{\Sighat}{\widehat{\Sigma}}\) \(\newcommand{\lt}{<}\) \(\newcommand{\gt}{>}\) \(\newcommand{\amp}{&}\) \(\definecolor{fillinmathshade}{gray}{0.9}\)Single Extraction
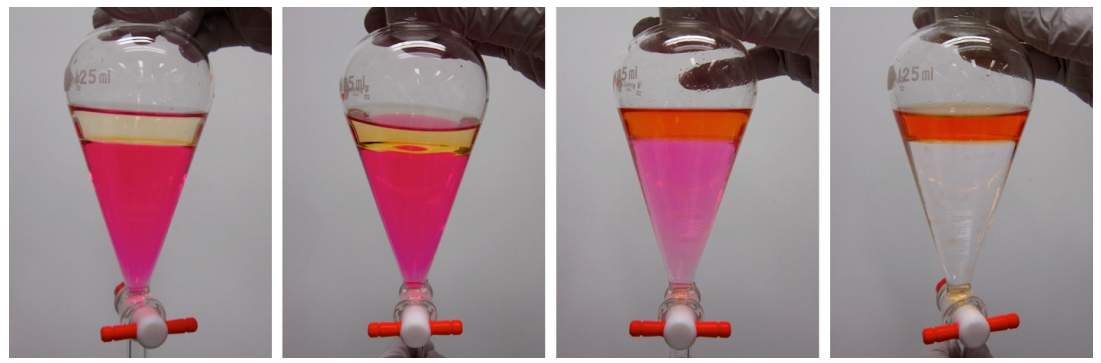
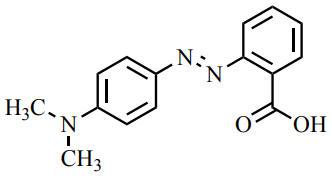
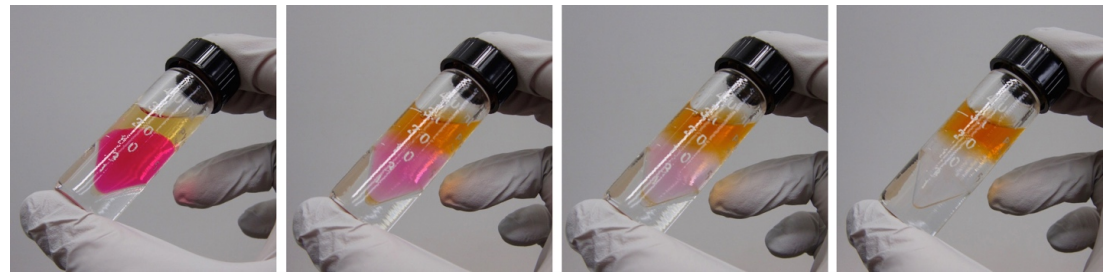
The pictures in this section show a single extraction of methyl red (colored compound, Figure 4.21) from an aqueous solution (bottom layer) into \(25 \: \text{mL}\) of ethyl acetate (top layer). The aqueous solution originally has a pink color, as the methyl red appears red in acidic solution (the aqueous solution was made from \(50 \: \text{mL}\) water, 5 drops of \(0.1 \: \text{M} \: \ce{HCl}\) and 5 drops of \(1\%\) methyl red indicator solution). The methyl red has a large partition coefficient and is extracted from the aqueous layer into the ethyl acetate in this process.
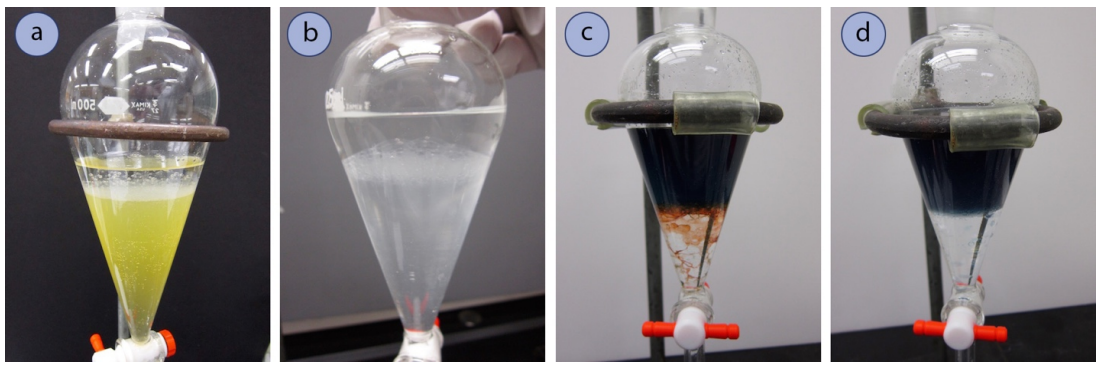
Prepare the Setup (for single extraction)
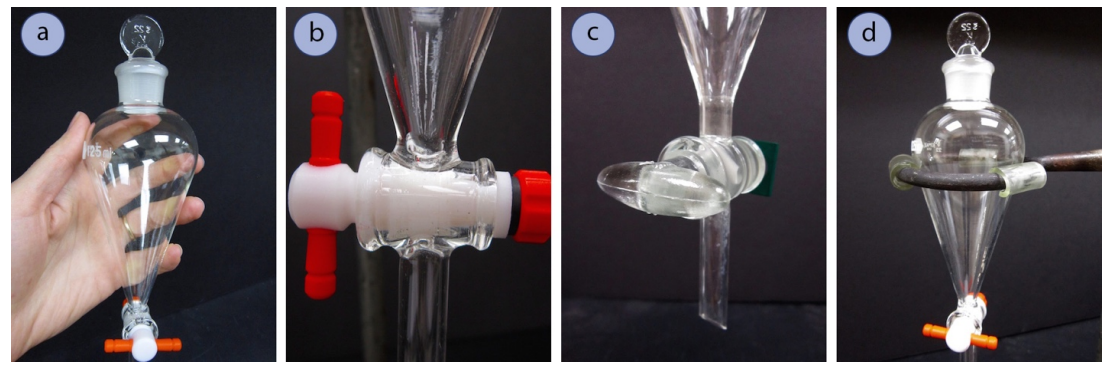
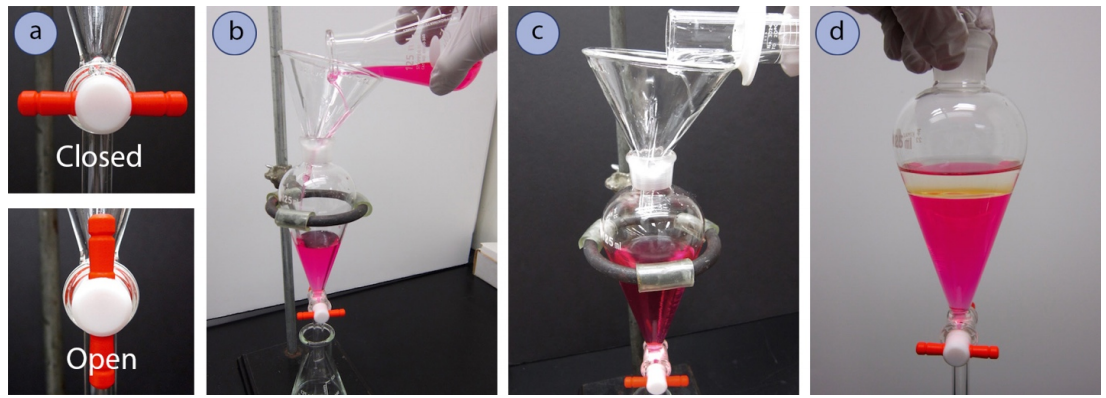
- Obtain a separatory funnel (Figure 4.23a).
- If the separatory funnel has a Teflon stopcock, reassemble the stopcock if it was taken apart to dry, placing the parts in the appropriate order (Figure 4.23b). Be sure that the Teflon stopcock is moderately tight so that it can still easily turn, but is not so loose that liquid can seep around the joint.
- If using a glass stopcock (Figure 4.23c), it likely needs no further preparation. There should be a very thin layer of grease used to seal the stopcock and prevent freezing. If both glass and Teflon stopcocks are available, Teflon is a better choice as there is always a possibility that solvent can dissolve the grease used with glass stopcocks and contaminate the sample.
- Also obtain a stopper (Teflon or ground glass) that fits well in the top joint of the funnel (Figure 4.23a).
- Place the separatory funnel in a ring clamp attached to a ring stand or latticework. The funnels are easy to break, so cushion the funnel in the metal clamp using pieces of slit rubber or plastic tubing (Figure 4.23d).
Add the Solutions (for single extraction)
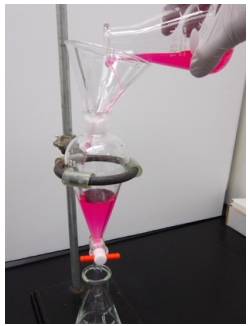
- Before pouring anything into a separatory funnel, be sure that the stopcock is in the "closed" position, where the stopcock is horizontal (Figure 4.24a).
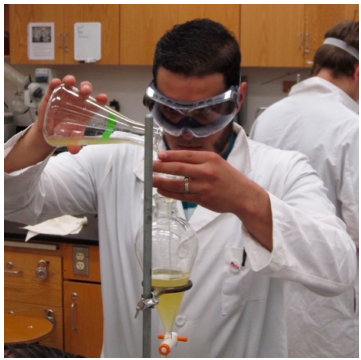
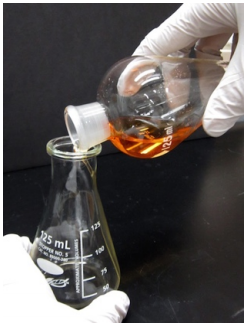
As a fail-safe, always position an Erlenmeyer flask beneath the separatory funnel before pouring (Figure 4.24b). This can catch liquid in case the stopcock is accidentally left open, or if the stopcock is loose and liquid leaks through unintentionally. - Using a funnel, pour the liquid to be extracted into the separatory funnel (Figures 4.24b + 4.25). A separatory funnel should never be used with a hot or warm liquid.
The ground glass joint atop a separatory funnel is more prone to stick to the stopper if there was liquid in the joint at some point. Pouring liquid into the separatory funnel using a short-stemmed funnel avoids getting the joint wet, so that it will be less likely to freeze during mixing.
- Pour a quantity of the extractive solvent into the separatory funnel, as indicated by the procedure (Figure 4.24c).
It is unnecessary to use precise quantities of solvent for extractions, and the volumes can be measured in a graduated cylinder. If a procedure calls for \(20 \: \text{mL}\) of solvent, it is acceptable if between \(20\)-\(25 \: \text{mL}\) is used each time.
Mix the Solutions (for single extraction)
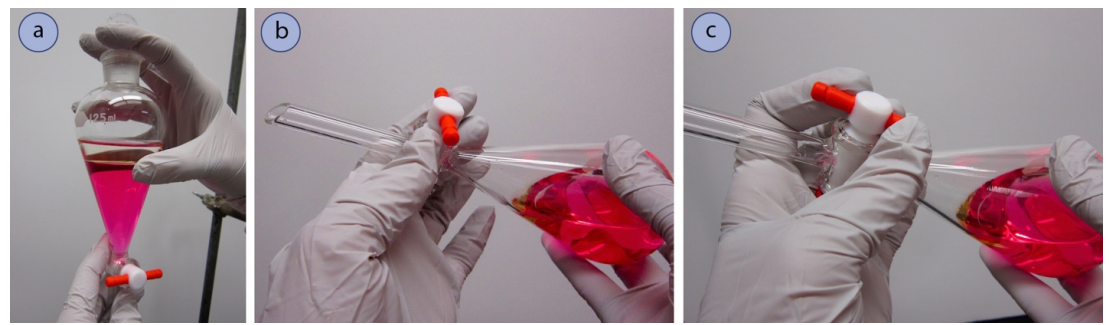
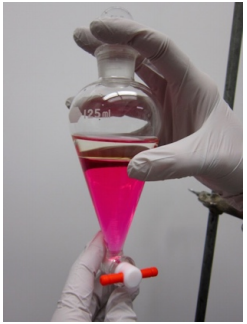
- Place the stopper on the funnel, and hold the funnel such that the fingers of one hand securely cover the stopper, while the other hand grips the bottom of the funnel (Figure 4.26a).
- Gently invert the funnel (Figure 4.26b), and swirl the mixture a little.
Although it is not uncommon for some liquid to creep into the ground glass joint when inverted, it should be minimal. If liquid drips onto your fingers or gloves when you invert the funnel, the stopper is probably the wrong size. - Pressure may build up inside the separatory funnel when solutions are mixed, so immediately after swirling, and with the funnel still inverted, "vent" the funnel by briefly opening the stopcock to allow for a release of pressure (Figure 4.26c).
Pressure builds in the funnel as solvent evaporates into the headspace and contributes additional vapor to the initial \(\sim\)1 atmosphere of air pressure in the funnel. With highly volatile solvents (like diethyl ether), a definite "swoosh" can be heard upon venting, and small amounts of liquid may even sputter out the stopcock. If liquid spits out the stopcock, try to allow it to drain back into the funnel. The noise associated with venting normally ceases after the second or third inversions, as the headspace becomes saturated with solvent vapors and the pressures inside and outside the funnel are equalized.
Safety note: Never point the stopcock toward someone as you vent, as it's possible some liquid may splatter onto him or her. - Close the stopcock and mix the solutions a bit more vigorously, periodically stopping to vent the system.
There are differences of opinion on how vigorously solutions should be mixed in separatory funnels, and for how long. As a general guide, a mild mixing for 10-20 seconds should be enough. With some solutions (e.g. dichloromethane), care should be taken to not shake too vigorously, as these solutions often form emulsions (where the interface between the solutions doesn't clarify). With solutions prone to emulsions, a funnel should be gently rocked for one minute. - Place the separatory funnel upright in the ring clamp to allow the layers to fully separate. The interface between the layers should settle rather quickly, often within 10 seconds or so. If the interface is clouded or not well defined (an emulsion has formed), see the troubleshooting section for tips.
Separate the Layers (for single extraction)
- Liquid will not drain well from a separatory funnel if the stopper remains on, as air cannot enter the funnel to replace the displaced liquid. If liquid did drain from the funnel without replacement by an equal volume of air, a negative pressure would form in the funnel. Thus, before draining liquid from a separatory funnel, remove the stopper (Figure 4.27a).
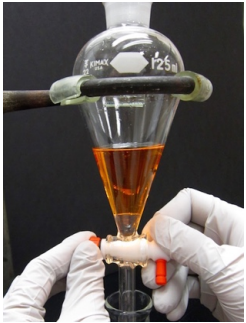
- Drain the majority of the bottom layer into a clean Erlenmeyer flask, positioning the ring clamp so that the tip of the separatory funnel is nestled in the Erlenmeyer flask to prevent splashing (Figure 4.27b). Stop draining when the interface is within \(1 \: \text{cm}\) of the bottom of the stopcock.
- Gently swirl the funnel to dislodge any droplets clinging to the glass (Figure 4.27c). A glass stirring rod can be used to knock down stubborn clinging droplets.
- Further drain the bottom layer, stopping when the interface just enters the stopcock chamber (Figure 4.27d). Label the Erlenmeyer flask (e.g. "bottom layer").
When labeling flasks, it's often best to use terminology that is without question correct, such as "top layer" or "bottom layer". If the layers are labeled with statements like "organic layer" or "aqueous layer", it's possible that the layers have been incorrectly identified. It may be best to use combined statements like "top organic layer" as it's quite useful to track the aqueous and organic layers. If the layers have been incorrectly identified, at least the "top" part of the label will always be correct.
Flasks can be labeled using labeling tape or by writing directly on the glass with a permanent marker (e.g. Sharpie). Marker ink can be removed from glass by rubbing it with a KimWipe moistened with a bit of acetone.
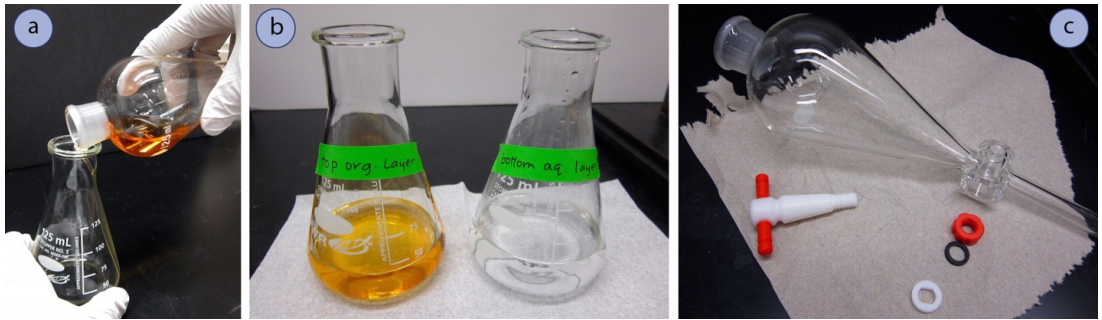
- Pour out the top layer from the top of the separatory funnel into another clean Erlenmeyer flask (Figure 4.28a), making sure to again label this flask (Figure 4.28b).
It is proper technique to drain the bottom layer through the stopcock, and to pour out the top layer from the top of the funnel. This method minimizes re-mixing the solutions, as only the lower layer touches the stem of the funnel. - Never throw away any liquids from an extraction until you are absolutely sure that you have the desired compound. Undesired layers can be properly disposed of when the desired compound is in your hands (e.g. after the rotary evaporator has removed the solvent).
Mistakes made during extractions (e.g. carrying on with the wrong layer), can be solved as long as the solutions have not been placed in the waste container! The layers should also be saved until after evaporation because the desired compound may not be very soluble in the solvent used. If the compound failed to extract in one solvent, a different solvent could be tried later, again only if the layers had not yet been thrown away.
Clean Up (for single extraction)
- To clean a separatory funnel, first rinse it with acetone into a waste container. Then wash the funnel with soap and water at your benchtop. Disassemble the Teflon stopcock (if used). After rinsing with distilled water, allow the parts to dry separated in your locker (Figure 4.28c).
Single Extraction Summary
 |
 |
 |
 |
|
Use slit tubing to cushion the separatory funnel in the ring clamp. Close the stopcock on the separatory funnel and position an Erlenmeyer flask beneath the setup, in case it drips. Into the separatory funnel pour the liquid to be extracted using a funnel: this prevents liquid from getting on the ground glass joint which can cause it to stick. Pour the extractive solvent into the funnel. |
Hold the separatory funnel so that your fingers firmly cover the stopper. Invert the funnel and shake gently for 10-20 seconds. Periodically "vent" the funnel (open the stopcock while inverted to release pressure). Never point the tip at someone while venting. |
Return the separatory funnel to the ring clamp, and allow the layers to separate. Remove the stopper (it won't drain otherwise). Drain the majority of the bottom layer into an Erlenmeyer flask. Stop when roughly \(1 \: \text{cm}\) of the bottom layer is in the funnel, and swirl to dislodge clinging droplets. Drain the rest of the bottom layer, stopping when the interface is inside the stopcock. |
Label the flask (e.g. "bottom aqueous layer"). Pour out the top layer into another Erlenmeyer flask (and label it). Don't throw away either layer until you are sure you've accomplished the goal of the extraction. |
Multiple Extractions
Organic Layer is on the Top
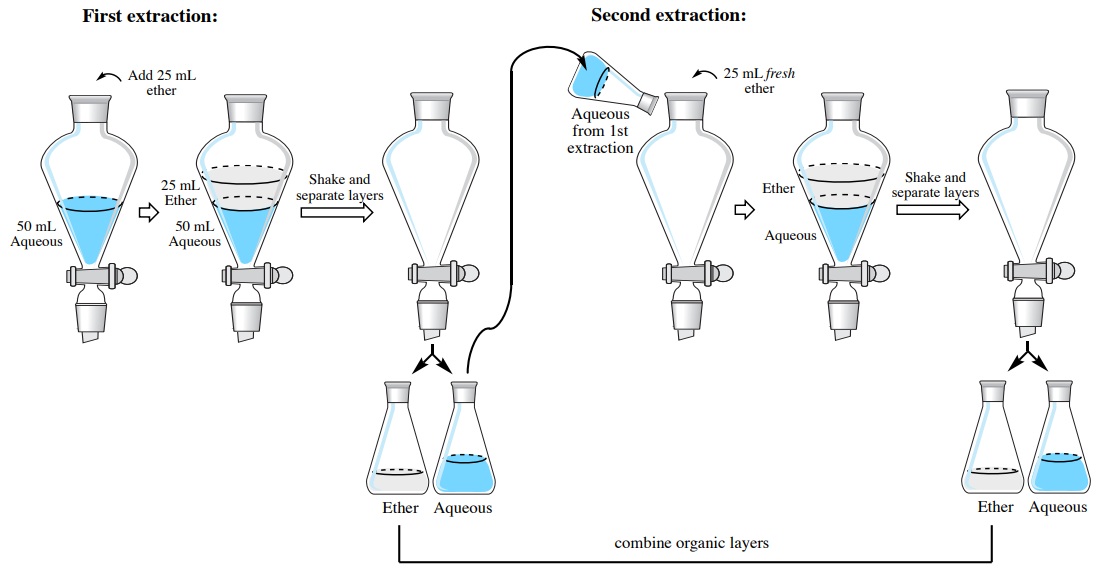
In this section are stepwise instructions on how to extract an aqueous solution with an organic solvent that is less dense than water (the organic layer will be on the top). As an example, the instructions are written to extract an aqueous solution three times using \(25 \: \text{mL}\) diethyl ether each time (\(3 \times 25 \: \text{mL}\) diethyl ether). A procedural summary of the first two extractions is in Figure 4.29.
Extraction #1
- Perform a single extraction using approximately \(25 \: \text{mL}\) of diethyl ether (an exact amount is not necessary), as described previously, making sure to appropriately label each layer (e.g. "top organic layer" and "bottom aqueous layer").
Extraction #2
- Return the aqueous layer to the separatory funnel. There is no need to wash the funnel in between extractions.
- Add a fresh \(25 \: \text{mL}\) portion of diethyl ether to the separatory funnel. Stopper the funnel, invert and shake with venting, then allow the layers to separate.
At this step, there should be two layers in the separatory funnel. If two layers aren't present, it's likely that the wrong layer was added to the funnel in step 2 (a common mistake). One way to test if this was the mistake is to add a bit of water from a squirt bottle. If the layer returned to the separatory funnel is the organic layer (incorrect), the squirt bottle water will not mix with the solution, and will instead fall as droplets to the bottom.
If the organic layer (incorrect) was accidentally returned to the separatory funnel, there is no harm done, as the organic layer was simply diluted. Pour the liquid back into the flask designed for the organic layer, and instead add the aqueous solution to the funnel. - Drain the bottom aqueous layer into an Erlenmeyer flask: it is acceptable to use the same flask that was used for the aqueous layer in the first extraction (that may have been labeled "bottom aqueous layer").
- Since it is most common to combine the organic layers in multiple extractions, the top organic layer can be poured out of the separatory funnel into the same flask that was used for the organic layer in the first extraction (that may have been labeled "top organic layer"). In this flask, there should be roughly \(50 \: \text{mL}\) of diethyl ether from the two extractions.
Extraction #3
- Repeat the extraction a third time by adding the aqueous layer from the second extraction into the separatory funnel, followed by another fresh \(25 \: \text{mL}\) portion of diethyl ether. Stopper the funnel, invert and shake with venting, then allow the layers to separate.
- Drain the aqueous layer into the appropriate flask, and again pour the top layer into the organic layer flask, where there should be roughly \(75 \: \text{mL}\) of diethyl ether from the three extractions.
Organic Layer is on the Bottom
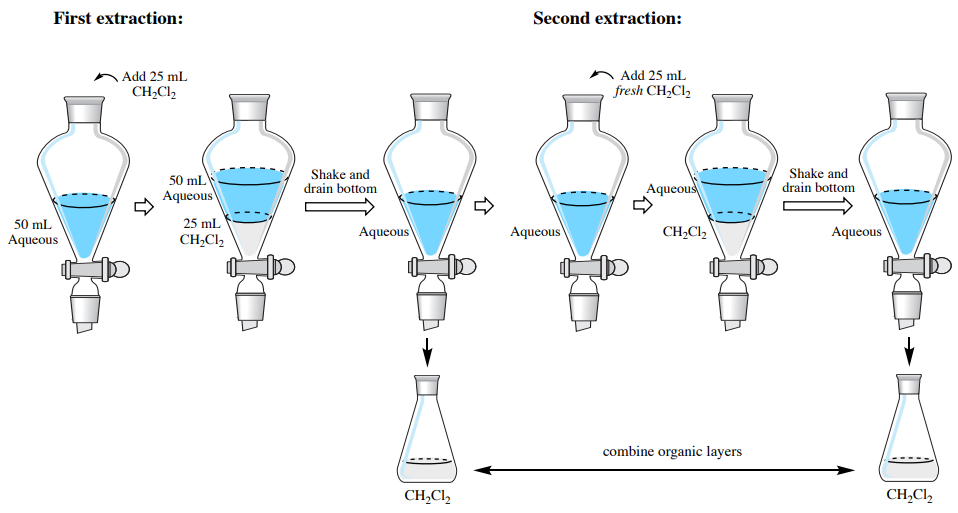
In this section are stepwise instructions on how to extract an aqueous solution with an organic solvent that is denser than water (the organic layer will be on the bottom). As an example, the instructions are written to extract an aqueous solution three times using \(25 \: \text{mL} \: \ce{CH_2Cl_2}\) each time (\(3 \times 25 \: \text{mL} \: \ce{CH_2Cl_2}\), Figure 4.30).
Extraction #1
- Perform a single extraction using approximately \(25 \: \text{mL}\) of dichloromethane (\(\ce{CH_2Cl_2}\), an exact amount is not necessary), as described previously, with the following differences:
- As \(\ce{CH_2Cl_2}\) is prone to emulsions, invert the funnel and shake gently for one minute with venting.
- After allowing the layers to separate in the funnel, drain the bottom organic layer into a clean Erlenmeyer flask (and label the flask, e.g. "bottom organic layer"). Do not drain the top aqueous layer from the funnel.
Extraction #2
- To the aqueous layer remaining in the funnel, add a fresh \(25 \: \text{mL}\) portion of dichloromethane. Stopper the funnel, invert and shake gently for 1 minute with venting, then allow the layers to separate.
- Since it is most common to combine the organic layers in multiple extractions, the bottom organic layer can be drained from the separatory funnel into the same flask that was used for the organic layer in the first extraction (that may have been labeled "bottom organic layer"). In this flask, there should be roughly \(50 \: \text{mL}\) of dichloromethane from the two extractions.
Extraction #3
- Repeat the extraction by adding another fresh \(25 \: \text{mL}\) portion of dichloromethane to the aqueous layer in the separatory funnel. Stopper the funnel, invert and shake gently with venting, then allow the layers to separate.
- Drain the bottom organic layer into the flask used previously, where there should be roughly \(75 \: \text{mL}\) of dichloromethane from the three extractions.
Troubleshooting
This section descries common problems and solutions in extractions.
There is Only One Layer
The most common reason for having only one layer in a separatory funnel when there should be two (as in when the procedure tells you to "separate the layers"), is to have made a mistake. What likely happened is that the wrong layer was added to the separatory funnel - for example the organic layer was unknowingly added instead of the aqueous layer. When organic solvent is added to an organic layer in the separatory funnel, the result is only one layer. The mistake can be remedied as long as the layers have not yet been thrown away! If the correct layer is added to the funnel, everything will work out as planned.
To prevent making this mistake in the future, be sure to label the Erlenmeyer flasks. Also, be sure to never throw away a layer until you are absolutely sure that you've done everything correctly.
An occasional reason that only one layer forms in a separatory funnel is if there are large quantities of compounds present that dissolve in both solvents, for example if large amounts of ethanol are present, which dissolve well in both aqueous and organic solvents. In this situation, the best approach is to remove the troublesome compound (i.e. the ethanol) on a rotary evaporator before extraction.
There are Three Layers
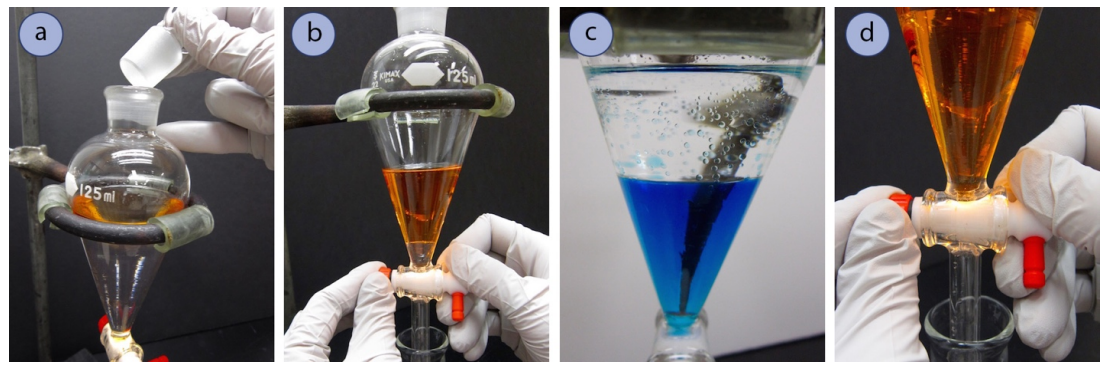
The most common reason for three layers in a separatory funnel is inadequate mixing (Figure 4.31a). If the funnel is shaken with more vigor it will likely settle into two layers (Figure 4.31b).
It is also possible that a middle third layer is an emulsion, where the two layers are not fully separated.

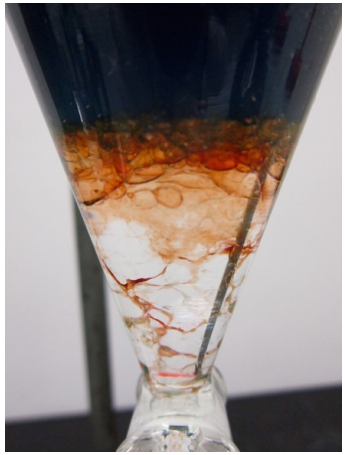
There is Insoluble Material at the Interface
A small amount of insoluble film between two layers is not uncommon during an extraction. Polymeric materials tend to rest between layers as solvent interactions are minimized at the interface. A minor film is not something to worry about because if a small amount does make it into the organic layer, a subsequent drying and filtration step will often remove it.
The Interface Cannot be Seen
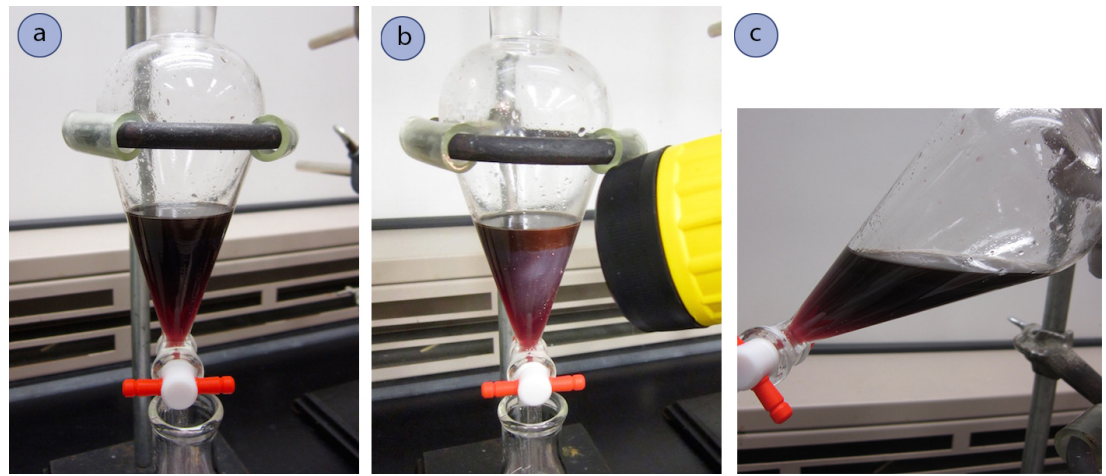
On occasion the compounds in a separatory funnel are so dark that they obscure the interface between the two layers. If this happens, there are several methods that might help you see the interface. One is to hold the separatory funnel up to the light, or to shine a flashlight onto the glass (Figure 4.32b). Additional light sometimes allows you to see the interface. A second method is to carefully observe the layers while tilting the funnel back and forth to the side (Figure 4.32c). Your eye can sometimes pick up on subtle differences in the way the liquids flow. A third method is to add a bit more solvent to the funnel to somewhat dilute one of the layers, or to add a different solvent to alter the index of refraction.
The Layers Don't Separate Well (An Emulsion Formed)
Emulsions are when tiny droplets of one layer are suspended in the other layer, resulting in no distinct interface between the two layers (Figure 4.33). Often an emulsion looks like a bubbly mess near the interface, and can even appear to be an odd-looking third layer.
Emulsions can happen for several reasons:
- The density of each layer may be so similar that there is weak motivation for the liquids to separate.
- There may be soap-like compounds or other emulsifying agents present that dissolve some of the components in one another.
Emulsions can be very difficult to rectify, and it's best if they are avoided in the first place by shaking solutions that are prone to emulsions (e.g. dichloromethane with highly basic or dense solutions) gently in the separatory funnel. Nonetheless, if an emulsion does form, there are some ways to attempt to clarify them:
- For mild emulsions, gently swirl the layers and try to knock down suspended droplets with a glass stirring rod.
- Allow the solution to sit for a period of time (even until the next lab period) if possible. With enough time, some solutions do settle out on their own. This of course may not be practical.
- For small volumes, use a centrifuge if one is available. A centrifuge hastens the process of letting an emulsion settle on its own. Remember that a centrifuge needs to be balanced or it may wobble off the benchtop. Divide the solutions equally, putting tubes of equal volume opposite one another inside the centrifuge.
- If an emulsion is formed because the two layers have similar densities, try to alter the density of each layer to make them more different. To help clarify an emulsion, try to decrease the density of the top layer or increase the density of the bottom layer.
For example, if an emulsion occurs with ethyl acetate (top layer) and an aqueous solution (bottom layer), add some \(\ce{NaCl}\). \(\ce{NaCl}\) will dissolve in the aqueous layer and increase the density of the aqueous solution. Alternatively add additional ethyl acetate, which will dilute the organic layer and lower its density. As a last resort add some pentane, which will mix with the top organic layer and decrease its density (pentane is one of the least dense organic solvents). The addition of pentane is used as a final effort as it will negatively affect the ability of the organic layer to extract somewhat polar compounds.
If an emulsion occurs with an aqueous solution (top layer) and dichloromethane (bottom layer), add some water from a squirt bottle to dilute the top layer and decrease its density. This method worked well to clarify the emulsion in Figure 4.32c, as evidenced by Figure 4.32d. - Try decreasing the solubility of one component in the other. One method is to add \(\ce{NaCl}\) or \(\ce{NH_4Cl}\) to the separatory funnel, which dissolves in the aqueous layer and decreases the ability of organic compounds to dissolve in water ("salting out").
Microscale Extractions
Microscale work involves the manipulation of less than \(300 \: \text{mg}\) of compound, and usually involves solvent volumes of \(5 \: \text{mL}\) or less. A separatory funnel would be impractical when working with such small quantities, and conical vials (Figure 4.35) or centrifuge tubes are typically used instead.
The pictures in this section show the extraction of \(2 \: \text{mL}\) of a mildly acidic aqueous solution containing a single drop of methyl red solution into \(2 \: \text{mL}\) of ethyl acetate. The color (methyl red), is extracted from the aqueous layer (bottom) into the ethyl acetate layer (top).

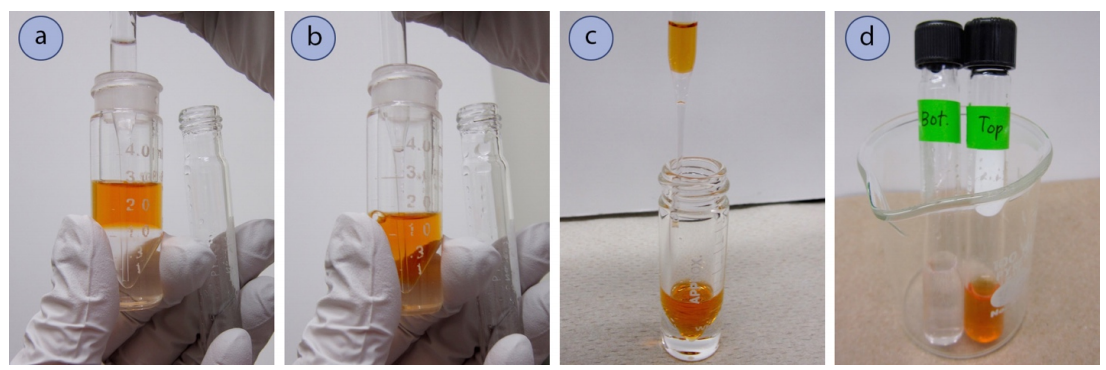
Mix the Solutions (for microscale extraction)
- Pour the contents to be extracted into a conical vial, or a glass tube with a tapered end (e.g. centrifuge tube). As these containers are prone to tip, use a beaker (Figure 4.36a) or inverted cork ring (Figure 4.36b) for support.
- Add the extractive solvent by pipette (Figure 4.36a). If using a conical vial, the volume markings on the glass may be helpful.
- Gently mix the two solutions using one of the following methods:
- Secure a cap firmly on the vial (Figure 4.36c+d) then invert and shake the tube for 10-20 seconds (Figure 4.35). Conical vials and centrifuge tubes tend to be less airtight than separatory funnels, so there should be no need to vent the system during shaking unless \(\ce{NaHCO_3}\) or \(\ce{Na_2CO_3}\) solutions are used.
- Alternatively, manually mix the layers using a pipette. Withdraw a pipette-full of the bottom layer from the vial, and then vigorously expunge the solution through the top layer (Figure 4.36e). Do this repeatedly for at least one minute. Manual mixing is not recommended when using low-boiling solvents (e.g. diethyl ether), as the volume often decreases dramatically after mixing. Instead use the first mixing method described.
Separate the Layers (for microscale extraction)
- Separate the layers with a Pasteur pipette. The design of conical vials and centrifuge tubes allows for efficient separation of the layers through withdrawal of the bottom layer by pipette. This means that even if the top layer is to be reserved, the bottom layer still needs to be removed first.
- Hold the conical vial or tapered tube in the same hand as a container for the bottom layer (label it). Withdraw the majority of the bottom layer by Pasteur pipette, and dispense into the container (Figure 4.37a).
- When withdrawing, always place the pipette tip to the point of the conical vial or tapered tube (Figure 4.37b).
- It may be difficult to remove the very last drop of bottom layer from the point of the vial. To do so, withdraw the entirety of the bottom layer and a small amount of the top layer into the pipette. Allow the layers to separate inside the pipette (Figure 4.37c), then delicately expel the bottom layer from the pipette into the container. Return the rest of the top layer to the conical vial.
- If the bottom layer is the desired layer, and another extraction is to be done, add fresh organic solvent to the top layer still in the conical vial and repeat the extraction and separation.
- If the top layer is the desired layer, remove it from the conical vial using a fresh pipette into a clean container. If another extraction is to be done, return the bottom layer to the conical vial, add fresh solvent and repeat the extraction and separation.