
Gravimetric Sulfate Determination
- Page ID
- 77630

\( \newcommand{\vecs}[1]{\overset { \scriptstyle \rightharpoonup} {\mathbf{#1}} } \)
\( \newcommand{\vecd}[1]{\overset{-\!-\!\rightharpoonup}{\vphantom{a}\smash {#1}}} \)
\( \newcommand{\dsum}{\displaystyle\sum\limits} \)
\( \newcommand{\dint}{\displaystyle\int\limits} \)
\( \newcommand{\dlim}{\displaystyle\lim\limits} \)
\( \newcommand{\id}{\mathrm{id}}\) \( \newcommand{\Span}{\mathrm{span}}\)
( \newcommand{\kernel}{\mathrm{null}\,}\) \( \newcommand{\range}{\mathrm{range}\,}\)
\( \newcommand{\RealPart}{\mathrm{Re}}\) \( \newcommand{\ImaginaryPart}{\mathrm{Im}}\)
\( \newcommand{\Argument}{\mathrm{Arg}}\) \( \newcommand{\norm}[1]{\| #1 \|}\)
\( \newcommand{\inner}[2]{\langle #1, #2 \rangle}\)
\( \newcommand{\Span}{\mathrm{span}}\)
\( \newcommand{\id}{\mathrm{id}}\)
\( \newcommand{\Span}{\mathrm{span}}\)
\( \newcommand{\kernel}{\mathrm{null}\,}\)
\( \newcommand{\range}{\mathrm{range}\,}\)
\( \newcommand{\RealPart}{\mathrm{Re}}\)
\( \newcommand{\ImaginaryPart}{\mathrm{Im}}\)
\( \newcommand{\Argument}{\mathrm{Arg}}\)
\( \newcommand{\norm}[1]{\| #1 \|}\)
\( \newcommand{\inner}[2]{\langle #1, #2 \rangle}\)
\( \newcommand{\Span}{\mathrm{span}}\) \( \newcommand{\AA}{\unicode[.8,0]{x212B}}\)
\( \newcommand{\vectorA}[1]{\vec{#1}} % arrow\)
\( \newcommand{\vectorAt}[1]{\vec{\text{#1}}} % arrow\)
\( \newcommand{\vectorB}[1]{\overset { \scriptstyle \rightharpoonup} {\mathbf{#1}} } \)
\( \newcommand{\vectorC}[1]{\textbf{#1}} \)
\( \newcommand{\vectorD}[1]{\overrightarrow{#1}} \)
\( \newcommand{\vectorDt}[1]{\overrightarrow{\text{#1}}} \)
\( \newcommand{\vectE}[1]{\overset{-\!-\!\rightharpoonup}{\vphantom{a}\smash{\mathbf {#1}}}} \)
\( \newcommand{\vecs}[1]{\overset { \scriptstyle \rightharpoonup} {\mathbf{#1}} } \)
\(\newcommand{\longvect}{\overrightarrow}\)
\( \newcommand{\vecd}[1]{\overset{-\!-\!\rightharpoonup}{\vphantom{a}\smash {#1}}} \)
\(\newcommand{\avec}{\mathbf a}\) \(\newcommand{\bvec}{\mathbf b}\) \(\newcommand{\cvec}{\mathbf c}\) \(\newcommand{\dvec}{\mathbf d}\) \(\newcommand{\dtil}{\widetilde{\mathbf d}}\) \(\newcommand{\evec}{\mathbf e}\) \(\newcommand{\fvec}{\mathbf f}\) \(\newcommand{\nvec}{\mathbf n}\) \(\newcommand{\pvec}{\mathbf p}\) \(\newcommand{\qvec}{\mathbf q}\) \(\newcommand{\svec}{\mathbf s}\) \(\newcommand{\tvec}{\mathbf t}\) \(\newcommand{\uvec}{\mathbf u}\) \(\newcommand{\vvec}{\mathbf v}\) \(\newcommand{\wvec}{\mathbf w}\) \(\newcommand{\xvec}{\mathbf x}\) \(\newcommand{\yvec}{\mathbf y}\) \(\newcommand{\zvec}{\mathbf z}\) \(\newcommand{\rvec}{\mathbf r}\) \(\newcommand{\mvec}{\mathbf m}\) \(\newcommand{\zerovec}{\mathbf 0}\) \(\newcommand{\onevec}{\mathbf 1}\) \(\newcommand{\real}{\mathbb R}\) \(\newcommand{\twovec}[2]{\left[\begin{array}{r}#1 \\ #2 \end{array}\right]}\) \(\newcommand{\ctwovec}[2]{\left[\begin{array}{c}#1 \\ #2 \end{array}\right]}\) \(\newcommand{\threevec}[3]{\left[\begin{array}{r}#1 \\ #2 \\ #3 \end{array}\right]}\) \(\newcommand{\cthreevec}[3]{\left[\begin{array}{c}#1 \\ #2 \\ #3 \end{array}\right]}\) \(\newcommand{\fourvec}[4]{\left[\begin{array}{r}#1 \\ #2 \\ #3 \\ #4 \end{array}\right]}\) \(\newcommand{\cfourvec}[4]{\left[\begin{array}{c}#1 \\ #2 \\ #3 \\ #4 \end{array}\right]}\) \(\newcommand{\fivevec}[5]{\left[\begin{array}{r}#1 \\ #2 \\ #3 \\ #4 \\ #5 \\ \end{array}\right]}\) \(\newcommand{\cfivevec}[5]{\left[\begin{array}{c}#1 \\ #2 \\ #3 \\ #4 \\ #5 \\ \end{array}\right]}\) \(\newcommand{\mattwo}[4]{\left[\begin{array}{rr}#1 \amp #2 \\ #3 \amp #4 \\ \end{array}\right]}\) \(\newcommand{\laspan}[1]{\text{Span}\{#1\}}\) \(\newcommand{\bcal}{\cal B}\) \(\newcommand{\ccal}{\cal C}\) \(\newcommand{\scal}{\cal S}\) \(\newcommand{\wcal}{\cal W}\) \(\newcommand{\ecal}{\cal E}\) \(\newcommand{\coords}[2]{\left\{#1\right\}_{#2}}\) \(\newcommand{\gray}[1]{\color{gray}{#1}}\) \(\newcommand{\lgray}[1]{\color{lightgray}{#1}}\) \(\newcommand{\rank}{\operatorname{rank}}\) \(\newcommand{\row}{\text{Row}}\) \(\newcommand{\col}{\text{Col}}\) \(\renewcommand{\row}{\text{Row}}\) \(\newcommand{\nul}{\text{Nul}}\) \(\newcommand{\var}{\text{Var}}\) \(\newcommand{\corr}{\text{corr}}\) \(\newcommand{\len}[1]{\left|#1\right|}\) \(\newcommand{\bbar}{\overline{\bvec}}\) \(\newcommand{\bhat}{\widehat{\bvec}}\) \(\newcommand{\bperp}{\bvec^\perp}\) \(\newcommand{\xhat}{\widehat{\xvec}}\) \(\newcommand{\vhat}{\widehat{\vvec}}\) \(\newcommand{\uhat}{\widehat{\uvec}}\) \(\newcommand{\what}{\widehat{\wvec}}\) \(\newcommand{\Sighat}{\widehat{\Sigma}}\) \(\newcommand{\lt}{<}\) \(\newcommand{\gt}{>}\) \(\newcommand{\amp}{&}\) \(\definecolor{fillinmathshade}{gray}{0.9}\)A sample containing an alkali sulfate is dried, weighed and dissolved in dilute HCl. Barium chloride solution is added in excess to precipitate barium sulfate, and the precipitate is digested in the hot solution. The precipitate is filtered through a paper filter which is then ignited and completely ashed. From the weight of the sample and weight of the precipitate, the percentage of sulfate in the sample is calculated. The precipitation reaction is the following:
\[Ba^{2+} (aq) + SO_4^{2-} (aq) \rightarrow BaSO_4 (s)\]
Variations in the acidity, temperature, manner of addition of the precipitant and time of digestion markedly affect the filterability of the barium sulfate precipitate and the extent to which various foreign ions are coprecipitated. Foreign anions such as nitrate, chlorate and chloride are coprecipitated as their barium salts, and the ignited precipitate contains the salt or oxide as an additive impurity. The coprecipitation of chloride can be decreased by slow addition of the precipitant. Since nitrate and chlorate interfere even at low concentrations, they should be removed from the solution before precipitation.
Foreign cations such as ferric iron, calcium and, to a lesser extent, the alkali metals are coprecipitated as the sulfates. These are substitutional impurities, and the magnitude of the error depends upon the differences between the weight of the foreign sulfate or oxide and the weight of an equivalent amount of barium sulfate. The presence of ferric iron can produce errors as high as 2% in the determination.
Preparations
Wash three 100 mm watch glasses, three stirring rods and three 400 mL beakers; rinse them thoroughly with tap water and then with distilled water. Number the beakers on the ground areas for identification using a graphite pencil. Cover each beaker with a watch glass, and store the equipment until needed.
Transfer the unknown sample to a clean dry weighing bottle. Place the uncovered weighing bottle in its upturned cap in a small beaker, cover the beaker with a dry watch glass, identify the beaker with a graphite pencil and dry the sample in a 105-110 oC oven for at least one hour.
Store the dried sample in the desiccator until it has cooled to room temperature.
You are going to transfer to three 400 mL beakers three samples weighing in the vicinity of 0.35 g but known to a precision of ±0.0001 g. You will use the method of weighing by difference.
For additional instruction on the use of balances in the laboratory and information on how to handle a weighing bottle without touching it, click here.
Weighing by difference: Take your three 400 mL beakers, your weighing bottle containing your sample and your lab notebook to the weighing room. Weigh the covered weighing bottle to a precision of ±0.0001 g. Uncover the weighing bottle and gently tap a small amount of unknown into the first beaker. Turn the weighing bottle upright again and tap it gently to recover in the weighing bottle any quantity of unknown that may still be caught on the rim. Cover the weighing bottle and weigh the contents again. Continue to do that until the difference between a subsequent weighing and your first weighing is near 0.35... g (but known to ±0.0001 g). That difference then is the weight of your first sample. Repeat the process using the other two 400 mL beakers. Care must be taken both not to lose any of your sample that stays on the rim of the weighing bottle then falls off OUTSIDE of the weighing bottle onto your laboratory bench. You must also be careful not to dump into your beaker a far greater amount than 0.35 g.
Weighing directly: The accuracy of our analytical balances is retained up to and a little beyond the mass of a 400 mL beaker. If you choose to weigh your samples directly you must be sure that your 400 mL beakers are clean, dry and at room temperature. Dry so that evaporation won't give you a negative systematic error and at room temperature so that convection currents won't give you either a positive or negative systematic error. Place the first 400 mL beaker on the balance pan and close all balance doors. Momentarily press the "tare" button and watch to make sure the balance readout shows 0.0000 g. Watch it for 10-15 seconds to make sure that it doesn't change. If it changes, press the tare button again and watch it until it is stable. Using a clean and dry spatula, transfer between 0.32 and 0.38 g of sample into the beaker. Close all balance doors and record the mass to ±0.0001 g. If you choose this method you must take care not to lose any sample on the balance pan OUTSIDE the beaker or that you don't drop any sample on the lip of the beaker from where it might fall off OUTSIDE the beaker. Repeat the process using the other two 400 mL beakers.
Add 50 mL distilled water to the sample in each beaker, then 5 mL of 6 M HCl and then add another 200 mL distilled water. Cover the beakers with the 100 mm watch glasses and store them in your cabinet until it is convenient to proceed with the determination.
Precipitation
Heat the solutions prepared above on a small hot plate to about 90 °C. Boiling the solution must be avoided since it is possible to lose some of the solution through spattering. However, it is necessary to keep the solution at an elevated temperature in order to facilitate the formation of large, filterable particles and to minimize coprecipitation of foreign ions. If, at this stage, you are using a thermometer to measure the temperature of the solution you must be very careful to rinse it with distilled water before removing it completely from the beaker. A thermometer or stirring rod when inserted into the solution will upon withdrawal remove a significant amount of solution.
Add 5% barium chloride solution dropwise from a buret which is mounted above the beaker. After 15 - 20 mL have been added, interrupt the process, allow the precipitate to settle, and test for completeness of precipitation by adding a few more drops of barium chloride. If you detect the appearance of some fine precipitate as the drop of barium chloride solution moves downward through the solution add an additional 5 mL of the barium chloride solution. Cover the beaker, and heat it on the hot plate for an hour at 90 °C. This process of "digestion" will aid in the formation of larger and purer crystals of barium sulfate. After an hour the precipitate should be coarse enough to settle readily after stirring, and the supernatant liquid should-be clear.
Filtration and Washing
Obtain three glass funnels and a wooden funnel holder from the drawers at the front of the laboratory. Clean the funnels and support them in the holder above numbered beakers or flasks of suitable volume.
The filtration will be carried out using glass or plastic funnels fitted with ashless filter paper. Ashless filter paper is pure cellulose which decomposes in the presence of heat and air to water and carbon dioxide. No residual non-volatile substances remain. Ashless filter paper comes in the form of circles which must be folded appropriately to trap all of the barium sulfate precipitate. Click here to see how to fold ashless filter paper.
In this manner insert three Whatman, ashless #42 filter papers into the funnels. Heat 200 mL of distilled water to 80C for later washings.
It is convenient to filter the barium sulfate from a hot solution since the speed of filtration is greater at the higher temperature (the solubility loss is insignificant). Care must be exercised not to lose any precipitate while transferring the filtrate (liquid) and precipitate (solid) to your filter paper.Click here for some illustrations of the experiment and proper techniques for decantation and filtering of precipitates.
Decant the supernatant through the filter, and then with the aid of the rubber policeman and small washes of hot, distilled water transfer the precipitate into the filter funnel. Since the precipitate readily clings to the side of the beaker you must carefully scrape the side of the beaker with the rubber policeman and using small water washes remove any adhering particles. After all the precipitate has been transferred wash the material in the funnel with three 5 mL portions of hot distilled water. Collect each washing separately in a small, clean beaker and then add two drops of AgNO3solution. The appearance of a cloudy, white precipitate indicates that the precipitate is still contaminated with chloride ion. If after three washings you still observe some cloudiness wash the precipitate a fourth time. Remove the filter paper from the funnel and fold it, as shown in the Web link above, and then place it in one of your crucibles. Be sure to record the identification of the sample which is stored in each crucible. If it is inconvenient to ash the filter paper immediately, store the crucibles in covered beakers in you cabinet. Do not store the crucibles in your desiccator!
Ashing and Taking to Constant Weight
Be certain that you are familiar with the points made about ashing in the Web link, above, before proceeding with the ashing step.
Support the crucible in a wire triangle and begin the heating with a small flame. Move the flame around so that all parts of the crucible are evenly heated. Gradually increase the size of the flame. Avoid heating the sample so strongly that the paper catches on fire. If it should do so quickly remove the flame and wait until burning ceases. As soon as the paper has been charred, increase the temperature of the flame. Again, move the flame as required so that all parts of the crucible get heated strongly. When all the carbon residue as been removed, the temperature should be maximized by bringing the tip of the blue cone of the flame to a point just below the wall of the crucible. Heat the crucible in this manner for ten minutes. Allow the crucible to cool for a few minutes; then place it in the desiccator and let it cool to room temperature. After weighing, repeat the process until successive heatings and weighings agree to within 0.2 mg.
Calculate the percentage of SO42- in the unknown for each sample, the average percentage and the average deviation for your results.
Report
On the report sheet, give the following information:
- The unknown number
- The weight of unknown used for each sample
- The weight of the precipitate for each sample
- The percentage of SO42- in each sample
- The average percentage of the three samples
- The average deviation from the mean of the percentage of the three samples
- Pages in your lab notebook containing the pertinent data
Questions on Sulfate Analysis
- Approximately how many mL of 5% BaCl22H2O solution would be required to precipitate all the sulfate if we assume that your samples are pure sodium sulfate? Assume that the density of the barium chloride solution is 1.00 g/mL.
- If the samples were pure potassium sulfate would you require a smaller or larger volume of barium chloride solution than the amount calculated in 1. above?
- If ordinary filter paper, instead of ashless paper were used, how would your experimental results be affected? Would they be too high or too low?
- Why are the washes of the barium sulfate tested with AgNO3?
- Does the solubility of BaSO4 increase significantly as the temperature of the solution is increased?
- What are the most important errors in this procedure?
- From you answer to question 6. above, would you say that the procedure for the sulfate analysis is likely to give results that are too high or too low?
Demonstration
The small heating pads available in the laboratory are large enough to hold the three 400 mL beakers to be used in this experiment, as shown in the photo at the right. Heating all three in such close quarters has its dangers, of course, mainly that of tipping one over and losing one sample! So as not to mix up your samples, label each 1,2 and 3 with a graphite pencil.
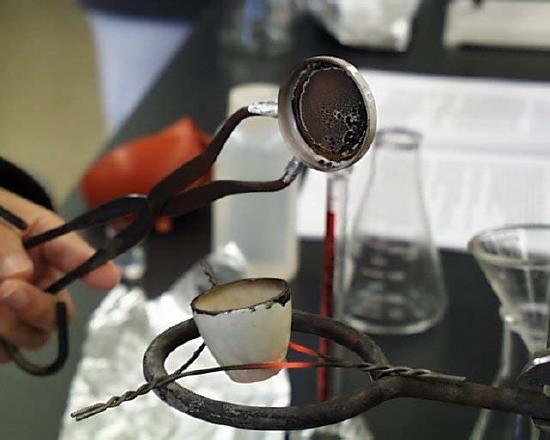
Notice below how one of the beakers containing the dissolved sulfate sample is placed beneath a buret filled with 5% barium chloride solution. The precipitate is formed by adding the barium chloride slowly to the hot sulfate solution. The slow addition assures that the relative supersaturation always remains low so as to avoid the formation of a non-crystalline colloidal suspension of barium sulfate particles. The aluminum foil seen in this photograph is not necessary as the temperature of the solution is not high enough to melt the paint on the base of the ring stand.


The addition of barium chloride solution can also be done dropwise using an eyedropper (below right) but you must make sure that the eyedropper is clean before you start, that you do the addition using a measured amount of barium chloride solution placed in a small beaker and that you don't allow any barium chloride solution to contaminate the rubber bulb of the eyedropper. Using this method allows you to add the barium chloride solution to the beakers while they are continuing to be heated on the hot pads.


The filtration will be carried out using glass or plastic funnels fitted with ashless filter paper. Ashless filter paper is pure cellulose and will decompose in the presence of heat and air to water and carbon dioxide. No residual non-volatile substances remain. Ashless filter paper comes in the form of circles which must be folded appropriately to trap all of the barium sulfate precipitate. Click here to see how to fold ashless filter paper.


The funnel rack (below left) is useful to allow you to carry out the filtration of all samples simultaneously. Make sure that the filter paper you use is ASHLESS. Erlenmeyer flasks may be used to catch the filtrate. As each flask fills up, examine the filtrate to make sure that it is free of any precipitate. If the filtrate samples are clear they may be discarded. Presence of precipitate suggests either a hole in your filter paper or overfilling a funnel so that precipitate was not caught by the filter. In either case, ask your instructor about the procedure to be followed.
As is often the case in laboratory chemistry there is more than one correct way to carry out a procedure and the same can be said for the incorrect execution of a procedure. Here are four pictures to illustrate the point. The first two illustrate correct ways of pouring your filtrate and suspended precipitate into the filter in the funnel. In the first one on the right note that the student is using a stirring rod to provide a route for the solution into the filter. The lip of the beaker is sufficiently close to the filter so that the falling solution never speeds up fast enough to form droplets and end up above the filter paper or, worse, on the lab bench.

The picture at the left shows the pouring operation near the end of the transfer. A stirring rod is used again but held in place across the top of the beaker for stability. The lip of the beaker is again close enough to the funnel not to let any of the solution get away. The only criticism that might be offered here is that the length of the fall of solution is a little too great. So as to minimize the possibility of loss owing to solution turbulence as it falls, the path of fall ought to be shortened.

The next picture on the right shows a student simply pouring his solution out of the beaker. Immediately after this photo was taken, the falling liquid curled up onto the beaker owing to the surface tension of water. Some was lost on the filter above the filter paper and some dribbled down the side of the beaker. A stirring rod ought to be used to provide a good path for the solution being transferred.

The photo immediately to the left shows the use of a stirring rod to provide a path, but the rod is at an angle of inclination too low to provide a good path for the solution. The path ought to be more vertical or there is a good chance that some solution will be lost by dribbling off the rod. In addition, the distance of the lip of the beaker is too far from the funnel and there is every likelihood that at some point some of the liquid traveling down the rod will separate from it and be lost from the analysis.


There certainly is no need to beat this subject to death, but I'll lay two more photos on you then move on to the rest of these helpful hints. Even though it is slightly out of focus, the photo on the left shows a nearly vertical stirring rod. This is about as good as it is going to get. The possibility that any of the supernatant is going to dribble down the outside of the beaker under the lip is kept to a minimum by this technique. Please be cognizant that the rod DOES NOT TOUCH the filter paper. You must avoid that so as not to make holes through which the precipitate might be lost. The photo on the right illustrates that one ought to try to pour practically all of the supernatant through the filter paper before starting on the precipitate. That way the filter paper remains unclogged by precipitate until the very end. The student is in the process of transferring the precipitate. This can be done by a combination of low-volume washes from your wash bottle and coaxing the precipitate out with your rubber policement, as shown here.
Finally, the setup on the right shows a filtrate which resulted from leakage either through or around the filter paper in the small beaker. The appropriate technique would have been for the student to fold a new piece of filter paper and place it UNDER the first one and continue filtering, including a refiltration of the filtrate with the residue followed by washing as described below and then ashing of both pieces of filter paper. In fact the student washed the precipitate off the filter paper back into the suspension yet to be filtered and threw away the old filter paper. Recovery of the filter paper from the trash can is not recommended because of the possibility it has picked up other material, so he has the choice of risking a low result if all precipitate was not washed from it or starting over. In any case, the filtrate in the larger beaker is appropriately clear, so there is no apparent leakage of precipitate into it.

Hot water washes of 15 mL each need to be tested with two drops of silver nitrate solution for any lingering chloride ion. These three photographs, from left to right show what you might expect to see as all of the chloride is leached from the precipitate.


Fold your filter paper so that the precipitate is trapped inside and so that the final shape is small enough to be stuffed into a clean crucible which has been previously weighed. It doesn't matter if the filter paper is still damp. It may be easier to fold and to stuff if it IS damp, but be careful not to fold it in a manner which causes the paper itself to rupture because you might lose some of your precipitate. Note in the image on the left that the filter paper has been stuffed into the crucible and heating has begun. The image in the middle shows that as the ashing process progresses the filter paper blackens and there is the possibility of spontaneous combustion. Keep your crucible cover ready to extinguish any flame which might produce sufficient turbulence to allow the escape of fragments of filter paper coated with precipitate. Finally, the image on the right shows the crucible just prior to final ashing.


By way of some final observations, as the filter paper is heated and loses its moisture and then begins to distill destructively, turning to carbon and releasing the inevitable tars from the thermal destruction of the cellulose, it is important to cover it so as not to allow it to burst into flame because the turbulence might allow some barium sulfate caked on it to escape with the fumes.

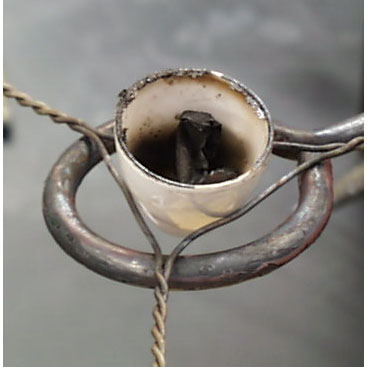
On the other hand, covering the crucible has its perils as well as the photo on the left shows. Look closely and you can see that the crucible is held in mid-air because the top has stuck to the rim. The destructively distilled tar can cause the cap to stick to the crucible allowing both to be lifted together by the cover knob. Don't lift such a pair too high because the cover may suddenly separate from the crucible causing breakage of the crucible.


Allow the crucible and cover to cool, then gently pry the two apart. The rim of the crucible and the roof of the cover both will have tar and carbonaceous material caked on them. Note the underside of the crucible cap in the photo at the left
Both can be subjected to heating and ultimately lose all of that residue as shown in the photo immediately on the right. If there is any suspicion that some of the barium sulfate may have deposited on the roof of the cover, you may weigh it after heating it thoroughly to remove all of the carbonaceous material , then wash it, heat it to dryness and weigh it again. Experience has shown though that rarely does any barium sulfate deposit with the destructively distilled residue on the cover.


Even if you have a speck of black material, it is good to continue heating for a while to get rid of it if it is carbonaceous material as shown here in the photos at the left and the right.


The carbonaceous material on the underside of a cover can be quickly removed by heating it upside down. The one at the left was heated as shown and the carbonaceous material oxidized and disappeared in a matter of minutes.
Contributor
Oliver Seely (Professor of Chemistry, Emeritus; California State University Dominguez Hills). This content are in the public domain and may be copied without restriction.