Packing Normal Phase Columns
- Page ID
- 2026
\( \newcommand{\vecs}[1]{\overset { \scriptstyle \rightharpoonup} {\mathbf{#1}} } \)
\( \newcommand{\vecd}[1]{\overset{-\!-\!\rightharpoonup}{\vphantom{a}\smash {#1}}} \)
\( \newcommand{\dsum}{\displaystyle\sum\limits} \)
\( \newcommand{\dint}{\displaystyle\int\limits} \)
\( \newcommand{\dlim}{\displaystyle\lim\limits} \)
\( \newcommand{\id}{\mathrm{id}}\) \( \newcommand{\Span}{\mathrm{span}}\)
( \newcommand{\kernel}{\mathrm{null}\,}\) \( \newcommand{\range}{\mathrm{range}\,}\)
\( \newcommand{\RealPart}{\mathrm{Re}}\) \( \newcommand{\ImaginaryPart}{\mathrm{Im}}\)
\( \newcommand{\Argument}{\mathrm{Arg}}\) \( \newcommand{\norm}[1]{\| #1 \|}\)
\( \newcommand{\inner}[2]{\langle #1, #2 \rangle}\)
\( \newcommand{\Span}{\mathrm{span}}\)
\( \newcommand{\id}{\mathrm{id}}\)
\( \newcommand{\Span}{\mathrm{span}}\)
\( \newcommand{\kernel}{\mathrm{null}\,}\)
\( \newcommand{\range}{\mathrm{range}\,}\)
\( \newcommand{\RealPart}{\mathrm{Re}}\)
\( \newcommand{\ImaginaryPart}{\mathrm{Im}}\)
\( \newcommand{\Argument}{\mathrm{Arg}}\)
\( \newcommand{\norm}[1]{\| #1 \|}\)
\( \newcommand{\inner}[2]{\langle #1, #2 \rangle}\)
\( \newcommand{\Span}{\mathrm{span}}\) \( \newcommand{\AA}{\unicode[.8,0]{x212B}}\)
\( \newcommand{\vectorA}[1]{\vec{#1}} % arrow\)
\( \newcommand{\vectorAt}[1]{\vec{\text{#1}}} % arrow\)
\( \newcommand{\vectorB}[1]{\overset { \scriptstyle \rightharpoonup} {\mathbf{#1}} } \)
\( \newcommand{\vectorC}[1]{\textbf{#1}} \)
\( \newcommand{\vectorD}[1]{\overrightarrow{#1}} \)
\( \newcommand{\vectorDt}[1]{\overrightarrow{\text{#1}}} \)
\( \newcommand{\vectE}[1]{\overset{-\!-\!\rightharpoonup}{\vphantom{a}\smash{\mathbf {#1}}}} \)
\( \newcommand{\vecs}[1]{\overset { \scriptstyle \rightharpoonup} {\mathbf{#1}} } \)
\( \newcommand{\vecd}[1]{\overset{-\!-\!\rightharpoonup}{\vphantom{a}\smash {#1}}} \)
\(\newcommand{\avec}{\mathbf a}\) \(\newcommand{\bvec}{\mathbf b}\) \(\newcommand{\cvec}{\mathbf c}\) \(\newcommand{\dvec}{\mathbf d}\) \(\newcommand{\dtil}{\widetilde{\mathbf d}}\) \(\newcommand{\evec}{\mathbf e}\) \(\newcommand{\fvec}{\mathbf f}\) \(\newcommand{\nvec}{\mathbf n}\) \(\newcommand{\pvec}{\mathbf p}\) \(\newcommand{\qvec}{\mathbf q}\) \(\newcommand{\svec}{\mathbf s}\) \(\newcommand{\tvec}{\mathbf t}\) \(\newcommand{\uvec}{\mathbf u}\) \(\newcommand{\vvec}{\mathbf v}\) \(\newcommand{\wvec}{\mathbf w}\) \(\newcommand{\xvec}{\mathbf x}\) \(\newcommand{\yvec}{\mathbf y}\) \(\newcommand{\zvec}{\mathbf z}\) \(\newcommand{\rvec}{\mathbf r}\) \(\newcommand{\mvec}{\mathbf m}\) \(\newcommand{\zerovec}{\mathbf 0}\) \(\newcommand{\onevec}{\mathbf 1}\) \(\newcommand{\real}{\mathbb R}\) \(\newcommand{\twovec}[2]{\left[\begin{array}{r}#1 \\ #2 \end{array}\right]}\) \(\newcommand{\ctwovec}[2]{\left[\begin{array}{c}#1 \\ #2 \end{array}\right]}\) \(\newcommand{\threevec}[3]{\left[\begin{array}{r}#1 \\ #2 \\ #3 \end{array}\right]}\) \(\newcommand{\cthreevec}[3]{\left[\begin{array}{c}#1 \\ #2 \\ #3 \end{array}\right]}\) \(\newcommand{\fourvec}[4]{\left[\begin{array}{r}#1 \\ #2 \\ #3 \\ #4 \end{array}\right]}\) \(\newcommand{\cfourvec}[4]{\left[\begin{array}{c}#1 \\ #2 \\ #3 \\ #4 \end{array}\right]}\) \(\newcommand{\fivevec}[5]{\left[\begin{array}{r}#1 \\ #2 \\ #3 \\ #4 \\ #5 \\ \end{array}\right]}\) \(\newcommand{\cfivevec}[5]{\left[\begin{array}{c}#1 \\ #2 \\ #3 \\ #4 \\ #5 \\ \end{array}\right]}\) \(\newcommand{\mattwo}[4]{\left[\begin{array}{rr}#1 \amp #2 \\ #3 \amp #4 \\ \end{array}\right]}\) \(\newcommand{\laspan}[1]{\text{Span}\{#1\}}\) \(\newcommand{\bcal}{\cal B}\) \(\newcommand{\ccal}{\cal C}\) \(\newcommand{\scal}{\cal S}\) \(\newcommand{\wcal}{\cal W}\) \(\newcommand{\ecal}{\cal E}\) \(\newcommand{\coords}[2]{\left\{#1\right\}_{#2}}\) \(\newcommand{\gray}[1]{\color{gray}{#1}}\) \(\newcommand{\lgray}[1]{\color{lightgray}{#1}}\) \(\newcommand{\rank}{\operatorname{rank}}\) \(\newcommand{\row}{\text{Row}}\) \(\newcommand{\col}{\text{Col}}\) \(\renewcommand{\row}{\text{Row}}\) \(\newcommand{\nul}{\text{Nul}}\) \(\newcommand{\var}{\text{Var}}\) \(\newcommand{\corr}{\text{corr}}\) \(\newcommand{\len}[1]{\left|#1\right|}\) \(\newcommand{\bbar}{\overline{\bvec}}\) \(\newcommand{\bhat}{\widehat{\bvec}}\) \(\newcommand{\bperp}{\bvec^\perp}\) \(\newcommand{\xhat}{\widehat{\xvec}}\) \(\newcommand{\vhat}{\widehat{\vvec}}\) \(\newcommand{\uhat}{\widehat{\uvec}}\) \(\newcommand{\what}{\widehat{\wvec}}\) \(\newcommand{\Sighat}{\widehat{\Sigma}}\) \(\newcommand{\lt}{<}\) \(\newcommand{\gt}{>}\) \(\newcommand{\amp}{&}\) \(\definecolor{fillinmathshade}{gray}{0.9}\)"Normal Phase" chromatography is used to seperate compounds on the basis of their polarity, the the least polar eluting first. This is typically accomplished by using silica gel, which is avaliable in various qualities and particle sizes. The phrase "Normal phase" is meant to distinguish it from reverse phase.
Packing the Column
The most important part of running a column is packing it, though I don’t think that’s where the bulk of the confusion comes in. I think most people, when they enter into a lab, just don’t know what size column to use for the sample they’re running - and I’ll get to that this week. But first, a photo montage on how I pack my columns:
Phase 1: Preparing the Column
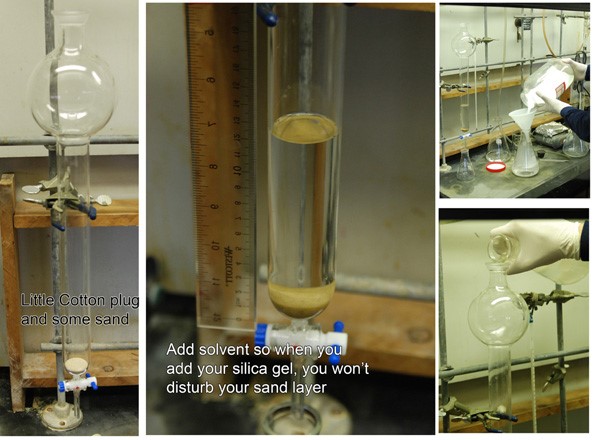
From the above photo, you can see that I like to start out with a cotton and sand plug. The cotton keeps the sand from grinding on the stopcock. You can get these things fitted with a glass frit if you take it to your glassblower… but I have never seen the need for that and don’t find establishing this plug to be particularly challenging. Second step is adding enough solvent (in this case 13 cm) such that when you pour stuff into your column, you won’t molest the nice sand layer at the bottom. For this column, I was running chloroform. Nasty stuff, but it’s fun to run columns on. On the far right, you can see how one prepares the slurry - just dump silica gel into an Erlenmeyer flask filled with solvent. Stir it up good, (you don’t want chunks) and dump it in! w00t.
Phase 2: Packing the Column
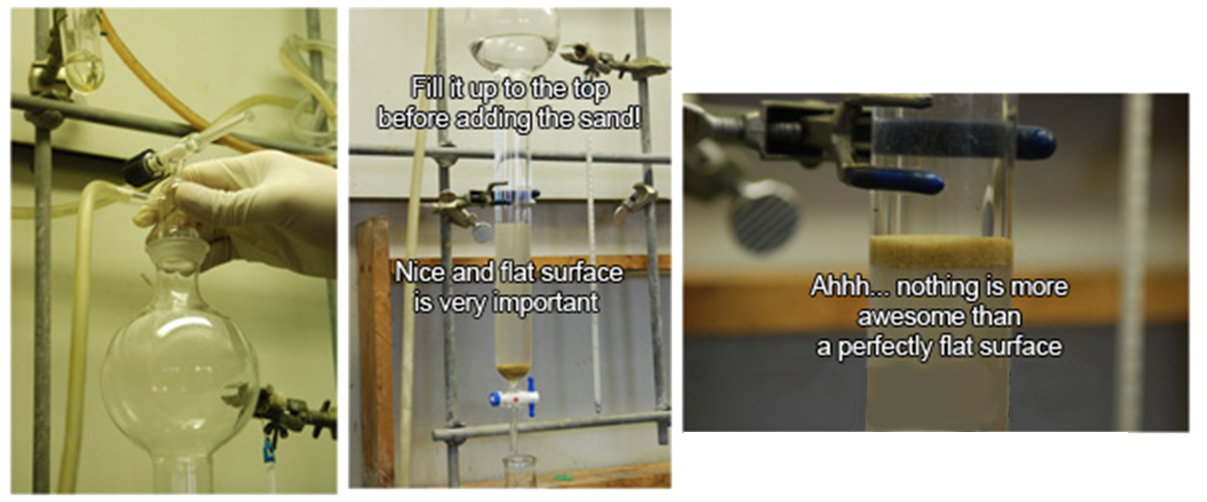
Pressurize the column to pack it. Hopefully you added enough silica gel. If not, just add more. Nothing big about that. Once you’re satisfied with the amount of silica gel you have, fill the column up with solvent to the top - make sure your silica layer is FLAT - and add sand gently. If you have enough solvent, the sand will gently float down to the surface of the silica, where it will provide a comfortable layer of protection against splashing solvents. Blow the solvent all the way down to the sand level. Running solvent through the column at modest pressure will help you prevent cracking later on. Don’t over pressurize a column - it’s still made of glass.
Phase 3: Loading the Column
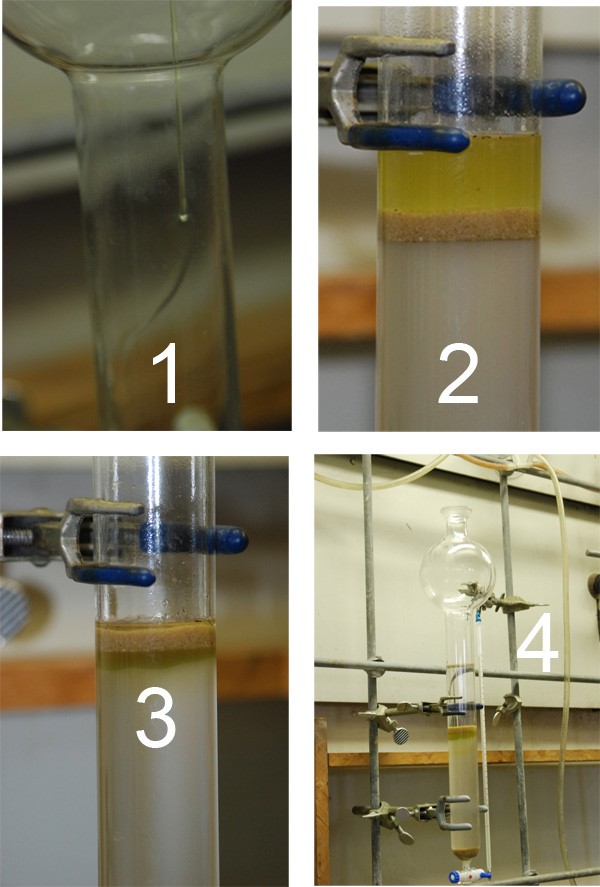
So, in the 3rd and final photo montage, we can see how one loads a column. This isn’t too surprising, I think, since it involves just adding your sample (dissolved in toluene or the least polar solvent you can dissolve it in) to the sand layer. You can see in photo 3, the material is allowed to load onto the column. I usually do this via gravity until the column stops dripping. *MOST* of the time, your column will stop dripping once the solvent level reaches the silica gel (it will dry out the sand, but that’s fine). Volatile solvents like pet ether and pentane cause problems with this, but it’s not a big deal. Rinse the sides of the columns with a pipette of whatever you used to load it, allowing it to load the sample fully into the silica gel (not the sand!) and then top it up (gently at first) with your solvent.
This method gives me separation essentially every time for me on the first run, even with obnoxious Rf’s. This obviously doesn’t address dry packing samples or the myriad of other ways you can pack a column…
Choosing a column based upon size
This is possibly the toughest aspect of column chromatography and the least important. Selecting the appropriate sized column, imho, falls way behind the ability to properly pack and load a column. You could, even in practice, use the same column for everything from 100 mg to 5 g samples. Through the years I’ve heard that there’s a 20:1 silica to sample mass ratio that you should employ (not substaniated) or that the length of the column is the inverse of the Rf in decimeters (?!) or some other nonsense like that. What I have posted below are 5 “typical” column sizes that can be used from everything from 40 mg to 20 g. I have used each one to great affect for sample sizes in between.
Column 1, you can see, has the inner diameter of a pencil whilst column 5 has the inner diameter of… hugeness. Let’s say, for our purposes, all the columns are filled to about half the column length.
Scientists, many centuries ago published a table on this stuff and it is shown to the right. You can read the full article here. Having said that scientists have determined the best size I’m going to now say that there are no real rules to the picking of the column, since the amount of silica gel you use, the length of the column, your solvent system… all these things go into making a decision. One thing you should avoid is making a lot of compounds that are really hard to separate on a column. Maybe this isn’t avoidable? I dunno. There’s nothing wrong with running two columns, if you must, but you certainly don’t want to run more than that.

There is also the issue of the “pipette column.” You can run those, you know, if you want. I tried to run one on a 40 mg sample once, but I found that short packing column 1 is way easier - even if you can’t just chuck the column into the glass box when you finish it.
You can usually get columns made by your lazy glass blower for cheap - typically far cheaper than if you had ordered them from Aldrich. We get ours made for about $6 plus the cost of the glass and the stop cock (usually another $20.)
That’s about all I can really offer on this subject. I myself use columns 1, 3 or 5 for almost everything I run between 200 mg and 3 g when I need to run a column.
To recap, things I don’t do:
- I don’t weigh out silica gel. That’s just gross and you’ll get silica gel lungs.
- I don’t really stress over the size of the column because it’s not *that* important.
- I don’t believe anyone can create hard-and-fast rules on column sizes. Though I gave it my best shot.
- I don’t do massive scale on compounds that is hard to separate on a column.
Mobile Phase Selection
A discussion on column chromatography wouldn’t be complete without touching on the subject of the mobile phase. What is it that makes us choose a mobile phase? It becomes almost instinct, sorta like what kind of solvent you should run a reaction in to get the best yields. But it’s not instinct we are born with, it’s instinct we must develop. If you take it into consideration that there are many different solvent systems you can run, then you should appreciate that I can’t possibly cover them all.
Normal phase silica can run a host of solvents - from the least polar, like cyclohexane (an expensive column…) to outrageously polar like methanol/water. The solvent systems can also become incredibly complex, with the addition of acids or bases, depending on how you need to move a product. For instance, it wouldn’t be outrageous to run a column on some cyclodextrin containing molecule in 5:4:3:2 - butanol:ethanol:water:ammonium hydroxide. You could substitute the ammonium hydroxide for acetic acid (depending on how protonated you want to run your column.)
You can also pre-neutralize an acidic column by running a 3% solution of triethylamine in hexanes on it… but you have to keep in mind that chloroform will reverse any hard work you put into neutralizing it (unless, of course, you run the chloroform through activated neutral alumina).
And then there’s the perpetual myths that surround solvents - like methanol eating silica1 or water not working on normal phase silica (It’s not an ideal mobile phase at 100%, that’s true).
But, here are some good solvent mixtures I have come across that are always a good first shot:
- Hexanes:Ethyl acetate - so standard it hardly needs mentioning. Greasy stuff works great on this.
- Methylene Chloride:Ethyl acetate - again, pretty standard. More polar than the above, but it’s good
- Chloroform:Methanol - at about 2-3% methanol, this solvent system is the tits for almost everything I do, which usually involves separation and isolation of macrolactams.
Compounds sensitive to heat
pet ether:ethyl ether - the solvent system your grandpa would have used. Light boiling solvents are wonderful when you’re working with sensitive compounds that decompose under the heat of a rotavap. You can also use pentanes and methylene chloride in this instance, too.
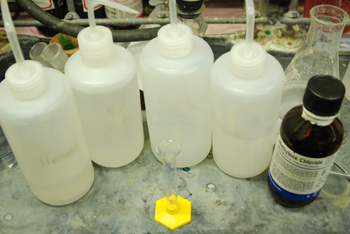
I keep bottles of all those solvents on my bench in squirt bottles and a handy 10 mL graduated cylinder,which helps me make a number of solvent systems for quick TLC tests. Don’t forget to make a quick reusable TLC spotter. (the needle in that link is too large. I use a much smaller needle).
Gradients:
Because no one has had the foresight to create a great gradient TLC chamber, the use of a gradient is arrived at after realizing that good separation on a static system appears not to work. Tight Rfs being a clear sign that a gradient may be useful. Gradients are convenient because sometimes a family of related compounds will work with just one gradient solvent system, if you ramp the gradient up slowly enough, you’ll almost always get some separation. Of course, ramp it up too much (and too quickly), any nice seperation you had will disappear. The key is simply not to suddenly go from, say, 0% ethyl acetate in hexane to a 50% mixture. For various reasons, this could cause your column to crack, most specifically any resolution you were trying to obtain with running pure hexanes will likely be lost by such a huge polarity jump.
I dunno if there’s a rule of thumb, but I generally limit myself to an increase of 10-20% of the total concentration each time I add solvent to a column - for instance, If I’m running a chloroform:methanol column (5% MeOH), I’ll start at 0% methanol and increase the mobile phase by half to one percent each time I add more solvent. Methanol is particularly tricky, because adding too much too quick will crack your column due to exotherm effects. Other solvents seem to be more forgiving.
Amines
I have run very few columns with amines on them, but have run enough to know that the more you have, the worse the column gets. You can cut back on streaking by deprotonating your column with a solution of TEA in base or running with some ammonium hydroxide (if you have a polar compound.) Keep in mind that halogenated solvents (in particular chloroform) can be acidic and are generally bad news for compounds with amines. You could also just run a column in basic or neutral alumina.2
References
- Silica appears to be mildly soluble in methanol. Unless the column heats up because the solvent is suddenly switched to methanol, I’ve never found it to be a problem…
- Don’t buy alumina TLC plates on glass. Buy the ones on Aluminum. The alumina falls right off the glass when you cut the plates.
Contributors
- Kyle Finchsigmate

