
1.4.1: Effective Nuclear Charge
- Page ID
- 510533

\( \newcommand{\vecs}[1]{\overset { \scriptstyle \rightharpoonup} {\mathbf{#1}} } \)
\( \newcommand{\vecd}[1]{\overset{-\!-\!\rightharpoonup}{\vphantom{a}\smash {#1}}} \)
\( \newcommand{\dsum}{\displaystyle\sum\limits} \)
\( \newcommand{\dint}{\displaystyle\int\limits} \)
\( \newcommand{\dlim}{\displaystyle\lim\limits} \)
\( \newcommand{\id}{\mathrm{id}}\) \( \newcommand{\Span}{\mathrm{span}}\)
( \newcommand{\kernel}{\mathrm{null}\,}\) \( \newcommand{\range}{\mathrm{range}\,}\)
\( \newcommand{\RealPart}{\mathrm{Re}}\) \( \newcommand{\ImaginaryPart}{\mathrm{Im}}\)
\( \newcommand{\Argument}{\mathrm{Arg}}\) \( \newcommand{\norm}[1]{\| #1 \|}\)
\( \newcommand{\inner}[2]{\langle #1, #2 \rangle}\)
\( \newcommand{\Span}{\mathrm{span}}\)
\( \newcommand{\id}{\mathrm{id}}\)
\( \newcommand{\Span}{\mathrm{span}}\)
\( \newcommand{\kernel}{\mathrm{null}\,}\)
\( \newcommand{\range}{\mathrm{range}\,}\)
\( \newcommand{\RealPart}{\mathrm{Re}}\)
\( \newcommand{\ImaginaryPart}{\mathrm{Im}}\)
\( \newcommand{\Argument}{\mathrm{Arg}}\)
\( \newcommand{\norm}[1]{\| #1 \|}\)
\( \newcommand{\inner}[2]{\langle #1, #2 \rangle}\)
\( \newcommand{\Span}{\mathrm{span}}\) \( \newcommand{\AA}{\unicode[.8,0]{x212B}}\)
\( \newcommand{\vectorA}[1]{\vec{#1}} % arrow\)
\( \newcommand{\vectorAt}[1]{\vec{\text{#1}}} % arrow\)
\( \newcommand{\vectorB}[1]{\overset { \scriptstyle \rightharpoonup} {\mathbf{#1}} } \)
\( \newcommand{\vectorC}[1]{\textbf{#1}} \)
\( \newcommand{\vectorD}[1]{\overrightarrow{#1}} \)
\( \newcommand{\vectorDt}[1]{\overrightarrow{\text{#1}}} \)
\( \newcommand{\vectE}[1]{\overset{-\!-\!\rightharpoonup}{\vphantom{a}\smash{\mathbf {#1}}}} \)
\( \newcommand{\vecs}[1]{\overset { \scriptstyle \rightharpoonup} {\mathbf{#1}} } \)
\(\newcommand{\longvect}{\overrightarrow}\)
\( \newcommand{\vecd}[1]{\overset{-\!-\!\rightharpoonup}{\vphantom{a}\smash {#1}}} \)
\(\newcommand{\avec}{\mathbf a}\) \(\newcommand{\bvec}{\mathbf b}\) \(\newcommand{\cvec}{\mathbf c}\) \(\newcommand{\dvec}{\mathbf d}\) \(\newcommand{\dtil}{\widetilde{\mathbf d}}\) \(\newcommand{\evec}{\mathbf e}\) \(\newcommand{\fvec}{\mathbf f}\) \(\newcommand{\nvec}{\mathbf n}\) \(\newcommand{\pvec}{\mathbf p}\) \(\newcommand{\qvec}{\mathbf q}\) \(\newcommand{\svec}{\mathbf s}\) \(\newcommand{\tvec}{\mathbf t}\) \(\newcommand{\uvec}{\mathbf u}\) \(\newcommand{\vvec}{\mathbf v}\) \(\newcommand{\wvec}{\mathbf w}\) \(\newcommand{\xvec}{\mathbf x}\) \(\newcommand{\yvec}{\mathbf y}\) \(\newcommand{\zvec}{\mathbf z}\) \(\newcommand{\rvec}{\mathbf r}\) \(\newcommand{\mvec}{\mathbf m}\) \(\newcommand{\zerovec}{\mathbf 0}\) \(\newcommand{\onevec}{\mathbf 1}\) \(\newcommand{\real}{\mathbb R}\) \(\newcommand{\twovec}[2]{\left[\begin{array}{r}#1 \\ #2 \end{array}\right]}\) \(\newcommand{\ctwovec}[2]{\left[\begin{array}{c}#1 \\ #2 \end{array}\right]}\) \(\newcommand{\threevec}[3]{\left[\begin{array}{r}#1 \\ #2 \\ #3 \end{array}\right]}\) \(\newcommand{\cthreevec}[3]{\left[\begin{array}{c}#1 \\ #2 \\ #3 \end{array}\right]}\) \(\newcommand{\fourvec}[4]{\left[\begin{array}{r}#1 \\ #2 \\ #3 \\ #4 \end{array}\right]}\) \(\newcommand{\cfourvec}[4]{\left[\begin{array}{c}#1 \\ #2 \\ #3 \\ #4 \end{array}\right]}\) \(\newcommand{\fivevec}[5]{\left[\begin{array}{r}#1 \\ #2 \\ #3 \\ #4 \\ #5 \\ \end{array}\right]}\) \(\newcommand{\cfivevec}[5]{\left[\begin{array}{c}#1 \\ #2 \\ #3 \\ #4 \\ #5 \\ \end{array}\right]}\) \(\newcommand{\mattwo}[4]{\left[\begin{array}{rr}#1 \amp #2 \\ #3 \amp #4 \\ \end{array}\right]}\) \(\newcommand{\laspan}[1]{\text{Span}\{#1\}}\) \(\newcommand{\bcal}{\cal B}\) \(\newcommand{\ccal}{\cal C}\) \(\newcommand{\scal}{\cal S}\) \(\newcommand{\wcal}{\cal W}\) \(\newcommand{\ecal}{\cal E}\) \(\newcommand{\coords}[2]{\left\{#1\right\}_{#2}}\) \(\newcommand{\gray}[1]{\color{gray}{#1}}\) \(\newcommand{\lgray}[1]{\color{lightgray}{#1}}\) \(\newcommand{\rank}{\operatorname{rank}}\) \(\newcommand{\row}{\text{Row}}\) \(\newcommand{\col}{\text{Col}}\) \(\renewcommand{\row}{\text{Row}}\) \(\newcommand{\nul}{\text{Nul}}\) \(\newcommand{\var}{\text{Var}}\) \(\newcommand{\corr}{\text{corr}}\) \(\newcommand{\len}[1]{\left|#1\right|}\) \(\newcommand{\bbar}{\overline{\bvec}}\) \(\newcommand{\bhat}{\widehat{\bvec}}\) \(\newcommand{\bperp}{\bvec^\perp}\) \(\newcommand{\xhat}{\widehat{\xvec}}\) \(\newcommand{\vhat}{\widehat{\vvec}}\) \(\newcommand{\uhat}{\widehat{\uvec}}\) \(\newcommand{\what}{\widehat{\wvec}}\) \(\newcommand{\Sighat}{\widehat{\Sigma}}\) \(\newcommand{\lt}{<}\) \(\newcommand{\gt}{>}\) \(\newcommand{\amp}{&}\) \(\definecolor{fillinmathshade}{gray}{0.9}\)Z* modulates attraction
When valence electrons experience less nuclear charge than core electrons, different electrons experience different magnitudes of attraction to the nucleus. A modified form of Coulomb's Law is written below, where \(e\) is the charge of an electron, Z* is the effective nuclear charge experienced by that electron, and \(r\) is the radius (distance of the electron from the nucleus).
\[ F_{eff}=k \dfrac{Z*e^2}{r^2} \nonumber \]
This formula suggests that if we can estimate Z*, then we can predict the attractive force experienced by, and the energy of, an electron in a multi-electron atom (ex. Li).
The attraction of the nucleus to valence electrons determines the atomic or ionic size, ionization energy, electron affinity, and electronegativity. The stronger the attraction, and the stronger Z*, the closer the electrons are pulled toward the nucleus. This in turn results in a smaller size, higher ionization energy, higher electron affinity, and stronger electronegativity.
General Periodic Trends in Z*
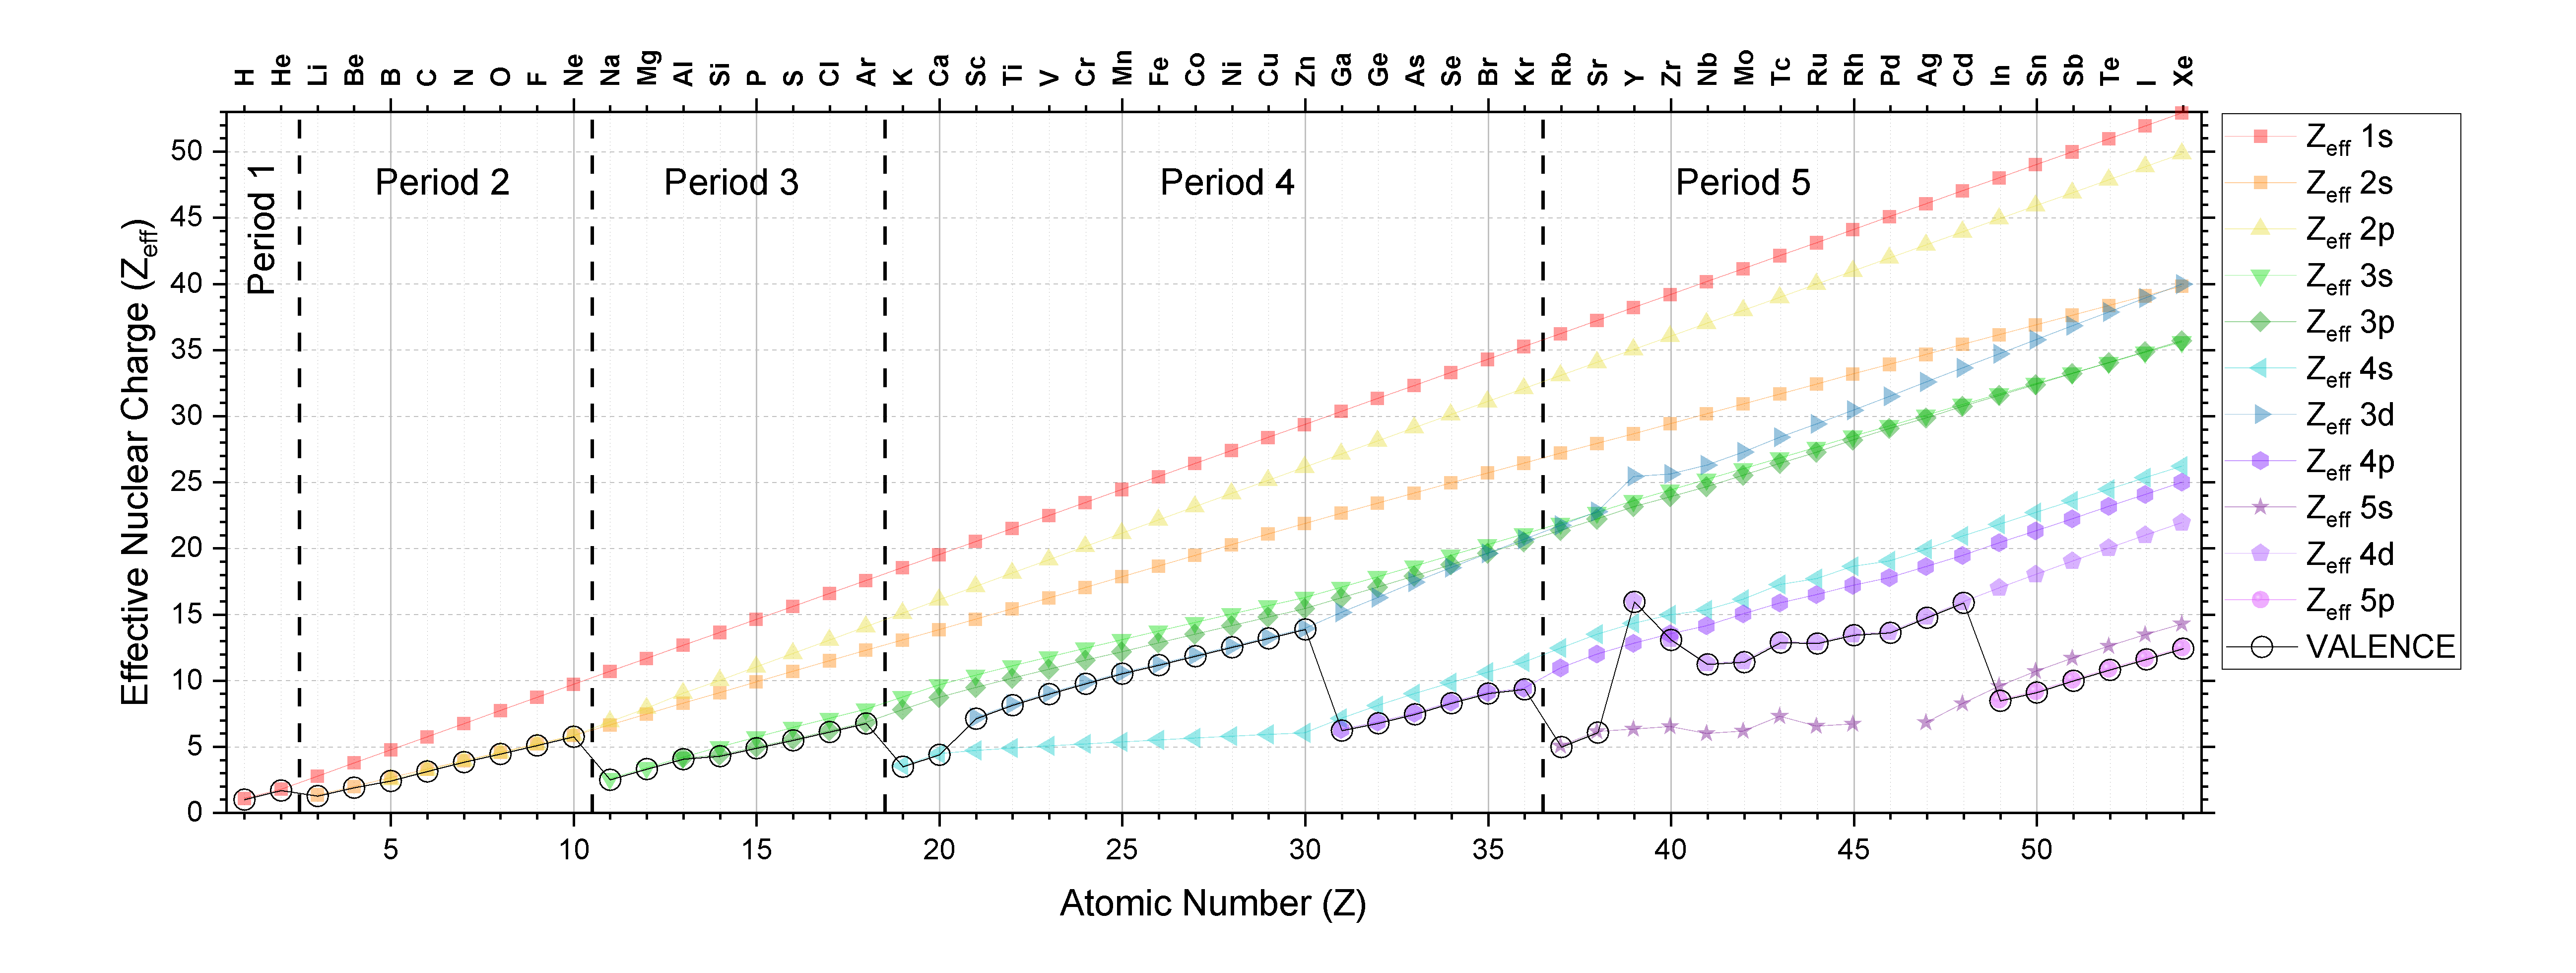
Close inspection of Figure \(\PageIndex{3}\) and analysis of Slater's rules indicate that there are some predictable trends in Z*. The data from Figure \(\PageIndex{3}\) is plotted below in Figure \(\PageIndex{4}\) to provide a visual aid to the discussion below.
Trends in Z* for electrons in a specific shell and subshell
The Z* for electrons in a given shell and subshell generally increases as atomic number increases; this trend holds true going across the periodic table and down the periodic table. Convince yourself that this is true for any subshell by examining Figure \(\PageIndex{4}\). (CC-BY-NC-SA; Kathryn Haas)
- Do you notice any exceptions to this general trend?
-
Inspection of Figure \(\PageIndex{4}\) should confirm for you that the Z* increases as Z increases for electrons in any subshell (like the 1s subshell for example, which is plotted above as a red line with square points). You can see this trend as the positive slope in each series. There is one obvious exception in Period 5 in elements 39 (Y) to 41 (Nb; the Z* of 4s actually decreases across these three elements as atomic number increases. There is also an exception between Y and Zr in the 3d subshell, and between Tc and Ru in the 5s subshell.
For valence electrons:
It is useful to understand trends in valence Z* because the valence Z* determines atomic/ionic properties and chemical reactivity. The trends in the valence Z* are not simple because as atomic number increases, the valence shell and/or subshell also changes. The valence Z* is indicated in Figure \(\PageIndex{4}\) as a black line with open circles.
Down the table: As we go down a column of the periodic table, the valence Z* increases. This is a simple trend because type of subshell is consistent and there is an increase only in shell and in atomic number, Z. This trend is best illustrated by inspection of Figure \(\PageIndex{3}\).
Across the table: the trend depends on shell and subshell, but generally Z* increases across a period.
Periods 1-3 (s and p only): As we go across the table in periods 1-3, the shell stays constant as Z increases and the subshell changes from s to p. In these periods, there is a gradual increase in valence Z* as we move across any of the first three periods.
Periods 4 and 5 (s, p, and d): Now we have some more complex trends because valence subshell and shell are changing as we increase in atomic number. Notice that the valence Z* generally increases going across a period as long as the subshell isn't changing; the exception is within the 4d subshell (elements 39-44 or Y-Ru). In general, going from an \((n)s\) subshell to an \((n-1)d\) subshell, there a relatively large increase in valence Z*. And in going from an \((n-1\)d\) subshell to an \((n)p\) subshell, there is a relatively large decrease in Z*.
From one period to another: From Figure \(\PageIndex{4}\), we can see that as we increase Z by one proton, going from one period to the next, there is a relatively large decrease in Z* (from Ne to Na, for example). This is because as Z increases by a small interval, the shell number increases, and so the electrons in the valence shell are much farther from the nucleus and are more shielded by all the electrons in the lower shell numbers.
Exercises
- Compare trends in Z* and atomic size. Explain how and why atomic size depends on Z*.
- Compare trends in Z* and ionization energy. Explain how and why ionization energy depends on Z*.
- Answer
-
1. On the periodic table, atomic radius generally decreases across the periods (left to right) and increases down the groups. As atomic number increases across the periodic table, nuclear charge (Z) increases and Z* increases. In turn, the atomic radius decreases because the higher nuclear charge (and thus higher Z*) pulls electrons closer to the nucleus. Atomic radius increases down the periodic table because the shell number increases. Despite an increase in Z* going down the periodic table, larger atomic radii result from electrons occupying higher shells.
2. Ionization energies (IE) are inversely related to atomic radius; IE increases across the periods and decreases down the groups. Since the nucleus holds valence electrons more strongly (due to higher Z*) across the periods, IE increases because valence electrons are harder to remove. Down the periodic table, larger atomic radii cause electrons in valence orbitals to be shielded by core electrons. Recall that shielding reduces the nuclear charge available to electrons in higher orbital levels, resulting in a lower Z*. With more shielding and lower Z*, the valence electrons are held less tightly by the nucleus such that ionization energy decreases (i.e., valence electrons are easier to remove).
References
- Petrucci, Ralph H., William S. Harwood, F. Geoffrey Herring, and Jeffry D. Madura. General Chemistry: Principles and Modern Applications, Ninth Edition. Pearson Education Inc. Upper Saddle River, New Jersey: 2007.
- Raymond Chang. Physical Chemistry for Biological Sciences. Sausalito, California: University Science Books, 2005
- R. S. Mulliken, Electronic Structures of Molecules and Valence. II General Considerations, Physical Review, vol. 41, pp. 49-71 (1932)
- Anastopoulos, Charis (2008). Particle Or Wave: The Evolution of the Concept of Matter in Modern Physics. Princeton University Press. pp. 236–237. ISBN 0691135126. http://books.google.com/?id=rDEvQZhpltEC&pg=PA236.
Contributors and Attributions
- Sidra Ayub (UCD), Alan Chu (UCD)
Emily V Eames (City College of San Francisco)
Curated or created by Kathryn Haas