
4.10: Grading - Submissions, Overrides, and Gradebooks
- Page ID
- 466736
\( \newcommand{\vecs}[1]{\overset { \scriptstyle \rightharpoonup} {\mathbf{#1}} } \)
\( \newcommand{\vecd}[1]{\overset{-\!-\!\rightharpoonup}{\vphantom{a}\smash {#1}}} \)
\( \newcommand{\id}{\mathrm{id}}\) \( \newcommand{\Span}{\mathrm{span}}\)
( \newcommand{\kernel}{\mathrm{null}\,}\) \( \newcommand{\range}{\mathrm{range}\,}\)
\( \newcommand{\RealPart}{\mathrm{Re}}\) \( \newcommand{\ImaginaryPart}{\mathrm{Im}}\)
\( \newcommand{\Argument}{\mathrm{Arg}}\) \( \newcommand{\norm}[1]{\| #1 \|}\)
\( \newcommand{\inner}[2]{\langle #1, #2 \rangle}\)
\( \newcommand{\Span}{\mathrm{span}}\)
\( \newcommand{\id}{\mathrm{id}}\)
\( \newcommand{\Span}{\mathrm{span}}\)
\( \newcommand{\kernel}{\mathrm{null}\,}\)
\( \newcommand{\range}{\mathrm{range}\,}\)
\( \newcommand{\RealPart}{\mathrm{Re}}\)
\( \newcommand{\ImaginaryPart}{\mathrm{Im}}\)
\( \newcommand{\Argument}{\mathrm{Arg}}\)
\( \newcommand{\norm}[1]{\| #1 \|}\)
\( \newcommand{\inner}[2]{\langle #1, #2 \rangle}\)
\( \newcommand{\Span}{\mathrm{span}}\) \( \newcommand{\AA}{\unicode[.8,0]{x212B}}\)
\( \newcommand{\vectorA}[1]{\vec{#1}} % arrow\)
\( \newcommand{\vectorAt}[1]{\vec{\text{#1}}} % arrow\)
\( \newcommand{\vectorB}[1]{\overset { \scriptstyle \rightharpoonup} {\mathbf{#1}} } \)
\( \newcommand{\vectorC}[1]{\textbf{#1}} \)
\( \newcommand{\vectorD}[1]{\overrightarrow{#1}} \)
\( \newcommand{\vectorDt}[1]{\overrightarrow{\text{#1}}} \)
\( \newcommand{\vectE}[1]{\overset{-\!-\!\rightharpoonup}{\vphantom{a}\smash{\mathbf {#1}}}} \)
\( \newcommand{\vecs}[1]{\overset { \scriptstyle \rightharpoonup} {\mathbf{#1}} } \)
\( \newcommand{\vecd}[1]{\overset{-\!-\!\rightharpoonup}{\vphantom{a}\smash {#1}}} \)
\(\newcommand{\avec}{\mathbf a}\) \(\newcommand{\bvec}{\mathbf b}\) \(\newcommand{\cvec}{\mathbf c}\) \(\newcommand{\dvec}{\mathbf d}\) \(\newcommand{\dtil}{\widetilde{\mathbf d}}\) \(\newcommand{\evec}{\mathbf e}\) \(\newcommand{\fvec}{\mathbf f}\) \(\newcommand{\nvec}{\mathbf n}\) \(\newcommand{\pvec}{\mathbf p}\) \(\newcommand{\qvec}{\mathbf q}\) \(\newcommand{\svec}{\mathbf s}\) \(\newcommand{\tvec}{\mathbf t}\) \(\newcommand{\uvec}{\mathbf u}\) \(\newcommand{\vvec}{\mathbf v}\) \(\newcommand{\wvec}{\mathbf w}\) \(\newcommand{\xvec}{\mathbf x}\) \(\newcommand{\yvec}{\mathbf y}\) \(\newcommand{\zvec}{\mathbf z}\) \(\newcommand{\rvec}{\mathbf r}\) \(\newcommand{\mvec}{\mathbf m}\) \(\newcommand{\zerovec}{\mathbf 0}\) \(\newcommand{\onevec}{\mathbf 1}\) \(\newcommand{\real}{\mathbb R}\) \(\newcommand{\twovec}[2]{\left[\begin{array}{r}#1 \\ #2 \end{array}\right]}\) \(\newcommand{\ctwovec}[2]{\left[\begin{array}{c}#1 \\ #2 \end{array}\right]}\) \(\newcommand{\threevec}[3]{\left[\begin{array}{r}#1 \\ #2 \\ #3 \end{array}\right]}\) \(\newcommand{\cthreevec}[3]{\left[\begin{array}{c}#1 \\ #2 \\ #3 \end{array}\right]}\) \(\newcommand{\fourvec}[4]{\left[\begin{array}{r}#1 \\ #2 \\ #3 \\ #4 \end{array}\right]}\) \(\newcommand{\cfourvec}[4]{\left[\begin{array}{c}#1 \\ #2 \\ #3 \\ #4 \end{array}\right]}\) \(\newcommand{\fivevec}[5]{\left[\begin{array}{r}#1 \\ #2 \\ #3 \\ #4 \\ #5 \\ \end{array}\right]}\) \(\newcommand{\cfivevec}[5]{\left[\begin{array}{c}#1 \\ #2 \\ #3 \\ #4 \\ #5 \\ \end{array}\right]}\) \(\newcommand{\mattwo}[4]{\left[\begin{array}{rr}#1 \amp #2 \\ #3 \amp #4 \\ \end{array}\right]}\) \(\newcommand{\laspan}[1]{\text{Span}\{#1\}}\) \(\newcommand{\bcal}{\cal B}\) \(\newcommand{\ccal}{\cal C}\) \(\newcommand{\scal}{\cal S}\) \(\newcommand{\wcal}{\cal W}\) \(\newcommand{\ecal}{\cal E}\) \(\newcommand{\coords}[2]{\left\{#1\right\}_{#2}}\) \(\newcommand{\gray}[1]{\color{gray}{#1}}\) \(\newcommand{\lgray}[1]{\color{lightgray}{#1}}\) \(\newcommand{\rank}{\operatorname{rank}}\) \(\newcommand{\row}{\text{Row}}\) \(\newcommand{\col}{\text{Col}}\) \(\renewcommand{\row}{\text{Row}}\) \(\newcommand{\nul}{\text{Nul}}\) \(\newcommand{\var}{\text{Var}}\) \(\newcommand{\corr}{\text{corr}}\) \(\newcommand{\len}[1]{\left|#1\right|}\) \(\newcommand{\bbar}{\overline{\bvec}}\) \(\newcommand{\bhat}{\widehat{\bvec}}\) \(\newcommand{\bperp}{\bvec^\perp}\) \(\newcommand{\xhat}{\widehat{\xvec}}\) \(\newcommand{\vhat}{\widehat{\vvec}}\) \(\newcommand{\uhat}{\widehat{\uvec}}\) \(\newcommand{\what}{\widehat{\wvec}}\) \(\newcommand{\Sighat}{\widehat{\Sigma}}\) \(\newcommand{\lt}{<}\) \(\newcommand{\gt}{>}\) \(\newcommand{\amp}{&}\) \(\definecolor{fillinmathshade}{gray}{0.9}\)This section aims to give you an overview of how to view and grade student submissions and allow students to resubmit or change their due dates. Before discussing, it’s important to understand how to view your course/assignments as a general or specific student. You can view your course/assignments as a student using Instructor/Student view toggle button in the upper right-hand portion (next to the Dashboard menu) of ADAPT. To see a specific student,
- Click the “Course Properties” button in your course Dashboard.
- Navigate to the “Student” section.
- Click on the student’s name you want to view.
While in a specific student’s view, you are logged into ADAPT as that student, and you can view their assignments and submissions. You may also submit responses and upload files as that student, so be careful when entering answers into questions and navigating through the pages. To get out of this view, click the “Exit Login As” button in the upper right-hand section of the ADAPT page.
Getting to Regrader and Open Grader
There are two main ways to grade assignments in ADAPT: Regrader and Open Grader. Regrader is used to adjust point values for automatically graded assessments, whereas Open Grader alows you to view student submissions while grading. Open Grader is also how you can grade open-ended/free-response questions requiring manual grading.
From the homepage: click the checkmark from the course homepage in the assignment actions section (Figure \(\PageIndex{1}\)), which takes you to the “Open Grader.” When you have submissions that require grading, the checkmark will appear orange instead of black.

In the Assignment page: you can navigate to the Regrader and Open Grader options by clicking the links in the Assignment Information section (see Figure \(\PageIndex{2}\)).

Regrader
In the Regrader, you can edit scores and view student submissions. Figure \(\PageIndex{3}\) shows the Regrader view, where you can filter the submissions by student, submission, score, and question.

If you want to change the score of a student, submission, or score,
- Set your filter settings
- Select the appropriate “Apply To” criteria
- Enter the new score in the “New Score” box
- Click “Update.”
Open Grader
The Open Grader is great for viewing and grading open-ended ADAPT questions. However, you can also view and grade automatically graded submissions. Figures \(\PageIndex{4}\) and \(\PageIndex{5}\) show the information you will see in Open Grader. You can view all submissions or choose to view graded or ungraded submissions only using the Submission Group (Figure \(\PageIndex{4}\)). You can also navigate between questions using the Question dropdown menu shown in Figure \(\PageIndex{4}\). To navigate between students, you can either use the student numbers or enter the student’s name in the search box (Figure \(\PageIndex{4}\)).

The student submissions and scores (Figure (\PageIndex{4}\)) are located below the student navigation options.
The scores section shows the scores for submission type. The feedback section is where you can add feedback for the student by typing text or uploading a file.

There are two ways to grade a submission:
- Using the Full Score or Zero Score buttons in the scores section (Figure (\PageIndex{5}\)). Clicking these buttons automatically updates the score and takes you to the next student.
- Entering and submitting a score: enter the score in the box provided and click the “Submit” or “Submit and Next” button (Figure (\PageIndex{5}\)).
- Using the “Submit” button saves your feedback and entered grade.
- The “Submit and Next” button saves your feedback and entered grade and takes you to the next student.
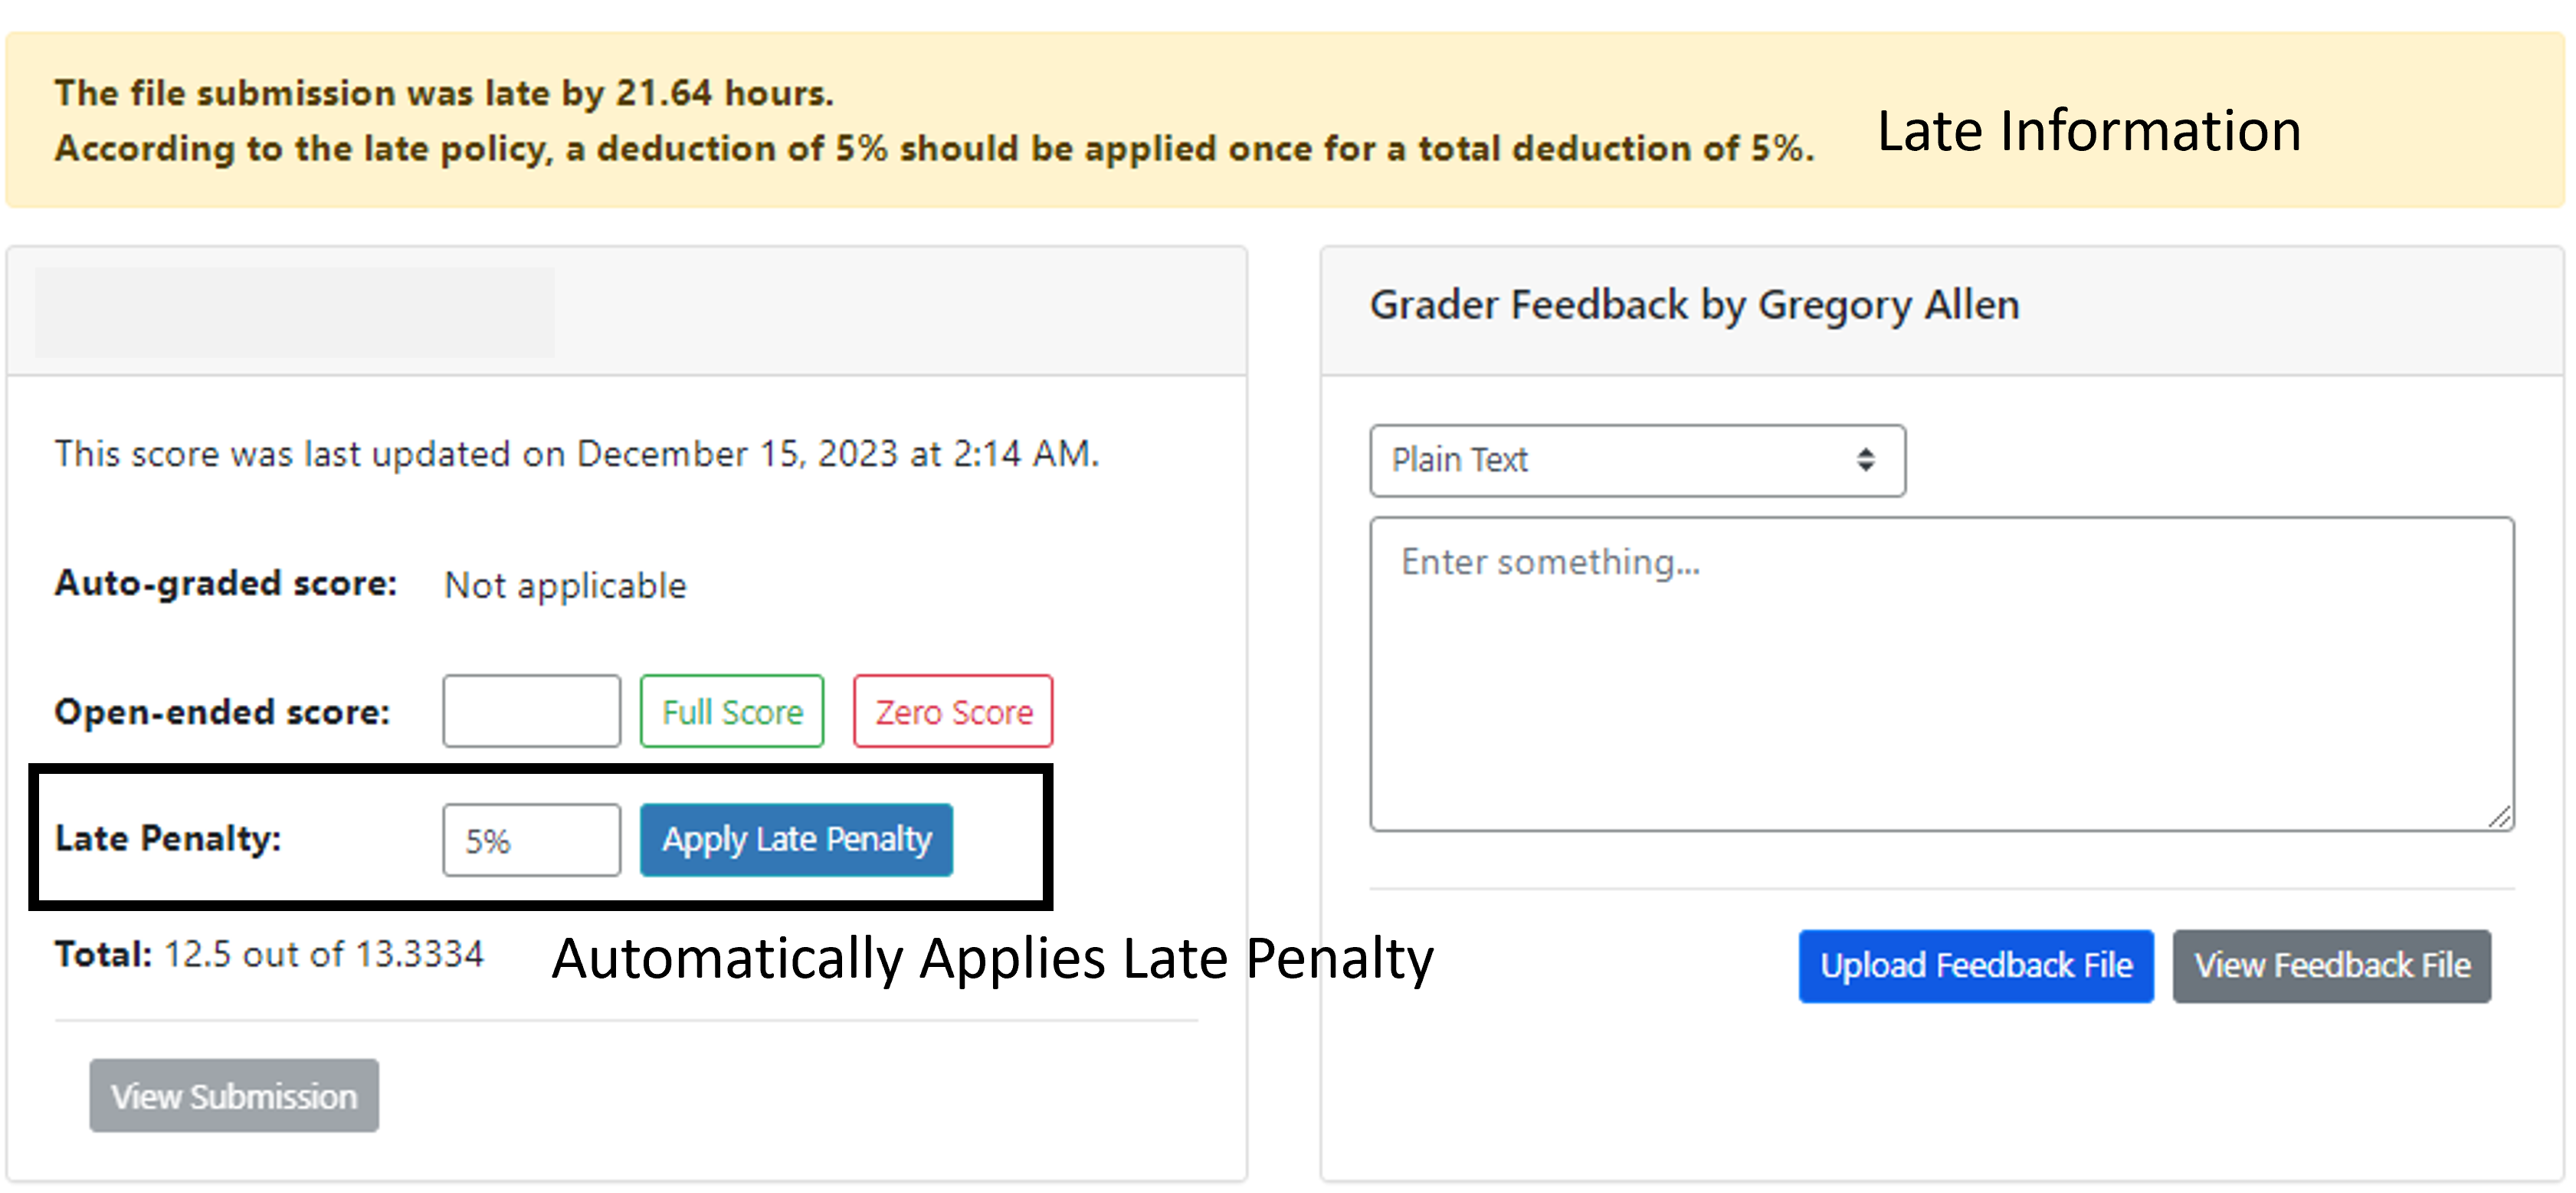
If the submission is late, it will show how many hrs/days it is late and give you the option to adjust the grade according to the assignment’s late policy. Figure (\PageIndex{6}\) shows what you will see for a late submission. To add the penalty, grade the question, submit the grade and/or feedback, and then click the “Apply Late Penalty” button.
Assignment and Course Gradebooks
To view the Assignment gradebook, click on the assignment and select the “Assignment Gradebook” option in the Assignment Information pane. When first viewing the assignment gradebook, you will see each student’s score for the individual questions. You can look at the time spent on a question by changing the option in the “Time Spent” dropdown menu. You can also download the scores by clicking on the “download Scores” button.
To view the Course Gradebook, you can either:
- Click the “Course Gradebook” button on your course’s homepage or,
- Select the “Course Gradebook” option in the Assignment Information pane
In the Course Gradebook, you can download the gradebook by clicking the “Download Scores” button. You can also view the assignments as individuals or by assignment group using the “Assignment View” toggle button, or look at the time spent on an assignment using the “Time Spent” dropdown menu.
There is also the option to override scores by uploading a file with the updated scores. To do this,
- Click the “Override Assignment Scores” button.
- Download the gradebook following the prompt.
- Download the Assignment Scores Template by following the prompt.
- Updating score in the Template.
- Uploading the Template containing the new scores by following the prompt.
Releasing scores, solutions, and hints
You may wait to release assignment scores, solutions, or hints until after the assignment is due or graded. However, adjusting the course properties can release these at any time. There are two ways to change the properties:
In an Assignment, click the “Control Panel” link in the Assignment Information pane. Then, use the toggle buttons to show or hide the different options.
From the Course Homepage, click the “Main View” toggle button to Control Panel (Figure \(\PageIndex{7}\). Changing the view shows the Control Panel for all assignments, allowing for quick changes.

Submission Overrides and Extension
You can use an assignment’s “Submissions Overrides” section to give a student more attempts or the ability to submit after an assignment is closed. To navigate to the “Submissions Overrides,” go to the assignment and click the “Submissions Overrides” link in the Assignment Information. There are four options in the Overrides section:
Allow Submitting, Uploading PDF, and Assigning (all questions in assignment): This option allows students to submitting to any question using the appropriate submission type.
Allow Uploading PDF and Assigning (all questions in assignment): this option only allows students to upload PDFs to the appropriate questions.
Allow Assigning to Existing Uploaded PDF (all questions in assignment): this option lets students go into their compiled PDF submission and set the pages for that submission.
Allow Full Submitting (single question in assignment): this option allows a student to submit to a single question in an assignment.
You can add a student to any option by selecting their name from the “Apply to” dropdown menu and clicking the “Update” button. If you want to remove an Override, click the “Remove All Overrides” button in the appropriate section.