
4.7: Assignments- Adding, Removing, Reordering, and Viewing Questions
- Page ID
- 466565
\( \newcommand{\vecs}[1]{\overset { \scriptstyle \rightharpoonup} {\mathbf{#1}} } \)
\( \newcommand{\vecd}[1]{\overset{-\!-\!\rightharpoonup}{\vphantom{a}\smash {#1}}} \)
\( \newcommand{\id}{\mathrm{id}}\) \( \newcommand{\Span}{\mathrm{span}}\)
( \newcommand{\kernel}{\mathrm{null}\,}\) \( \newcommand{\range}{\mathrm{range}\,}\)
\( \newcommand{\RealPart}{\mathrm{Re}}\) \( \newcommand{\ImaginaryPart}{\mathrm{Im}}\)
\( \newcommand{\Argument}{\mathrm{Arg}}\) \( \newcommand{\norm}[1]{\| #1 \|}\)
\( \newcommand{\inner}[2]{\langle #1, #2 \rangle}\)
\( \newcommand{\Span}{\mathrm{span}}\)
\( \newcommand{\id}{\mathrm{id}}\)
\( \newcommand{\Span}{\mathrm{span}}\)
\( \newcommand{\kernel}{\mathrm{null}\,}\)
\( \newcommand{\range}{\mathrm{range}\,}\)
\( \newcommand{\RealPart}{\mathrm{Re}}\)
\( \newcommand{\ImaginaryPart}{\mathrm{Im}}\)
\( \newcommand{\Argument}{\mathrm{Arg}}\)
\( \newcommand{\norm}[1]{\| #1 \|}\)
\( \newcommand{\inner}[2]{\langle #1, #2 \rangle}\)
\( \newcommand{\Span}{\mathrm{span}}\) \( \newcommand{\AA}{\unicode[.8,0]{x212B}}\)
\( \newcommand{\vectorA}[1]{\vec{#1}} % arrow\)
\( \newcommand{\vectorAt}[1]{\vec{\text{#1}}} % arrow\)
\( \newcommand{\vectorB}[1]{\overset { \scriptstyle \rightharpoonup} {\mathbf{#1}} } \)
\( \newcommand{\vectorC}[1]{\textbf{#1}} \)
\( \newcommand{\vectorD}[1]{\overrightarrow{#1}} \)
\( \newcommand{\vectorDt}[1]{\overrightarrow{\text{#1}}} \)
\( \newcommand{\vectE}[1]{\overset{-\!-\!\rightharpoonup}{\vphantom{a}\smash{\mathbf {#1}}}} \)
\( \newcommand{\vecs}[1]{\overset { \scriptstyle \rightharpoonup} {\mathbf{#1}} } \)
\( \newcommand{\vecd}[1]{\overset{-\!-\!\rightharpoonup}{\vphantom{a}\smash {#1}}} \)
\(\newcommand{\avec}{\mathbf a}\) \(\newcommand{\bvec}{\mathbf b}\) \(\newcommand{\cvec}{\mathbf c}\) \(\newcommand{\dvec}{\mathbf d}\) \(\newcommand{\dtil}{\widetilde{\mathbf d}}\) \(\newcommand{\evec}{\mathbf e}\) \(\newcommand{\fvec}{\mathbf f}\) \(\newcommand{\nvec}{\mathbf n}\) \(\newcommand{\pvec}{\mathbf p}\) \(\newcommand{\qvec}{\mathbf q}\) \(\newcommand{\svec}{\mathbf s}\) \(\newcommand{\tvec}{\mathbf t}\) \(\newcommand{\uvec}{\mathbf u}\) \(\newcommand{\vvec}{\mathbf v}\) \(\newcommand{\wvec}{\mathbf w}\) \(\newcommand{\xvec}{\mathbf x}\) \(\newcommand{\yvec}{\mathbf y}\) \(\newcommand{\zvec}{\mathbf z}\) \(\newcommand{\rvec}{\mathbf r}\) \(\newcommand{\mvec}{\mathbf m}\) \(\newcommand{\zerovec}{\mathbf 0}\) \(\newcommand{\onevec}{\mathbf 1}\) \(\newcommand{\real}{\mathbb R}\) \(\newcommand{\twovec}[2]{\left[\begin{array}{r}#1 \\ #2 \end{array}\right]}\) \(\newcommand{\ctwovec}[2]{\left[\begin{array}{c}#1 \\ #2 \end{array}\right]}\) \(\newcommand{\threevec}[3]{\left[\begin{array}{r}#1 \\ #2 \\ #3 \end{array}\right]}\) \(\newcommand{\cthreevec}[3]{\left[\begin{array}{c}#1 \\ #2 \\ #3 \end{array}\right]}\) \(\newcommand{\fourvec}[4]{\left[\begin{array}{r}#1 \\ #2 \\ #3 \\ #4 \end{array}\right]}\) \(\newcommand{\cfourvec}[4]{\left[\begin{array}{c}#1 \\ #2 \\ #3 \\ #4 \end{array}\right]}\) \(\newcommand{\fivevec}[5]{\left[\begin{array}{r}#1 \\ #2 \\ #3 \\ #4 \\ #5 \\ \end{array}\right]}\) \(\newcommand{\cfivevec}[5]{\left[\begin{array}{c}#1 \\ #2 \\ #3 \\ #4 \\ #5 \\ \end{array}\right]}\) \(\newcommand{\mattwo}[4]{\left[\begin{array}{rr}#1 \amp #2 \\ #3 \amp #4 \\ \end{array}\right]}\) \(\newcommand{\laspan}[1]{\text{Span}\{#1\}}\) \(\newcommand{\bcal}{\cal B}\) \(\newcommand{\ccal}{\cal C}\) \(\newcommand{\scal}{\cal S}\) \(\newcommand{\wcal}{\cal W}\) \(\newcommand{\ecal}{\cal E}\) \(\newcommand{\coords}[2]{\left\{#1\right\}_{#2}}\) \(\newcommand{\gray}[1]{\color{gray}{#1}}\) \(\newcommand{\lgray}[1]{\color{lightgray}{#1}}\) \(\newcommand{\rank}{\operatorname{rank}}\) \(\newcommand{\row}{\text{Row}}\) \(\newcommand{\col}{\text{Col}}\) \(\renewcommand{\row}{\text{Row}}\) \(\newcommand{\nul}{\text{Nul}}\) \(\newcommand{\var}{\text{Var}}\) \(\newcommand{\corr}{\text{corr}}\) \(\newcommand{\len}[1]{\left|#1\right|}\) \(\newcommand{\bbar}{\overline{\bvec}}\) \(\newcommand{\bhat}{\widehat{\bvec}}\) \(\newcommand{\bperp}{\bvec^\perp}\) \(\newcommand{\xhat}{\widehat{\xvec}}\) \(\newcommand{\vhat}{\widehat{\vvec}}\) \(\newcommand{\uhat}{\widehat{\uvec}}\) \(\newcommand{\what}{\widehat{\wvec}}\) \(\newcommand{\Sighat}{\widehat{\Sigma}}\) \(\newcommand{\lt}{<}\) \(\newcommand{\gt}{>}\) \(\newcommand{\amp}{&}\) \(\definecolor{fillinmathshade}{gray}{0.9}\)This section will describe how to add questions to your assignment, how to adjust the order or remove questions in an assignment, and the view options for questions within an assignment.
Adding Questions to an Assignment
There are two main ways to add questions to an assignment: using a question bank or importing ADAPT IDs.
Using a Question Bank
To add questions to an assignment using a question source (Question Bank),
- Navigate to the Assignment
- Click the “Add Questions” icon – See (Figure \(\PageIndex{1}\))

- Select the question Source: Search Questions, My Questions, My Favorites, My Courses, Commons, or All Public Courses.
- The next steps change based on your source selectionSearch Questions: Enter your search criteria to find the question you are looking for
- My Questions: find the question you are looking for in your question folders.
- My Favorites: find the question you are looking for in your favorite folders.
- My Courses: select the course in the next dropdown menu and then select the assignment where you have the question.
- Commons: select the collection in the next dropdown menu and then select the assignment where you have the question.
- All Public Courses: select the course in the next dropdown menu and then select the assignment where you have the question.
- You can view questions by clicking the question name, which brings up an overlay with the question.
- Add questions by clicking “plus” icon in the actions tab (Figure \(\PageIndex{2}\))) or checking the box next to the question name and selecting the bulk action ((Figure \(\PageIndex{3}\))).


You can add questions directly to your assignment using the Import By ID option if you know the ADAPT ID. ADAPT IDs are found while searching or finding sections, and they generally have a copy icon next to them that will copy the ID (See (Figure \(\PageIndex{3}\))).
Adding Using ADAPT IDs
To add questions using their IDs,
- Navigate to the Assignment
- Click the “Add Questions” icon (See Figure \(\PageIndex{1}\))
- Select the Direct Import By ID tab (Figure \(\PageIndex{5}\)))

- Enter the IDs in the box provided. If entering multiple IDs, separate them by commas.
When you are done adding questions, you can view them by clicking “View Questions” icon on the right side of the Add Questions dashboard, or navigating back to the assignment.
Removing and Reordering Questions
You can reorder or delete questions in the Questions section of your assignment. To reorder, drag (click and hold) the question to its new location. To delete, click the trashcan icon in the actions section of the question.
It’s important to know that once a student has responded to a question, you cannot add or remove questions from an assignment.
Viewing Questions and Adjusting Individual Point Values
Once you have entered questions into your assignment, you can view them by clicking on a question in the Questions section of your assignment information. Once you have clicked on a question, you can navigate between questions using the left/right arrows or selecting the question number (See Figure \(\PageIndex{6}\))). You can also try out the questions and enter answers. If you want to reset your submissions, click the Reset Submissions icon about the question. Please note that the submission reset button only resets your submission, not your student submissions.
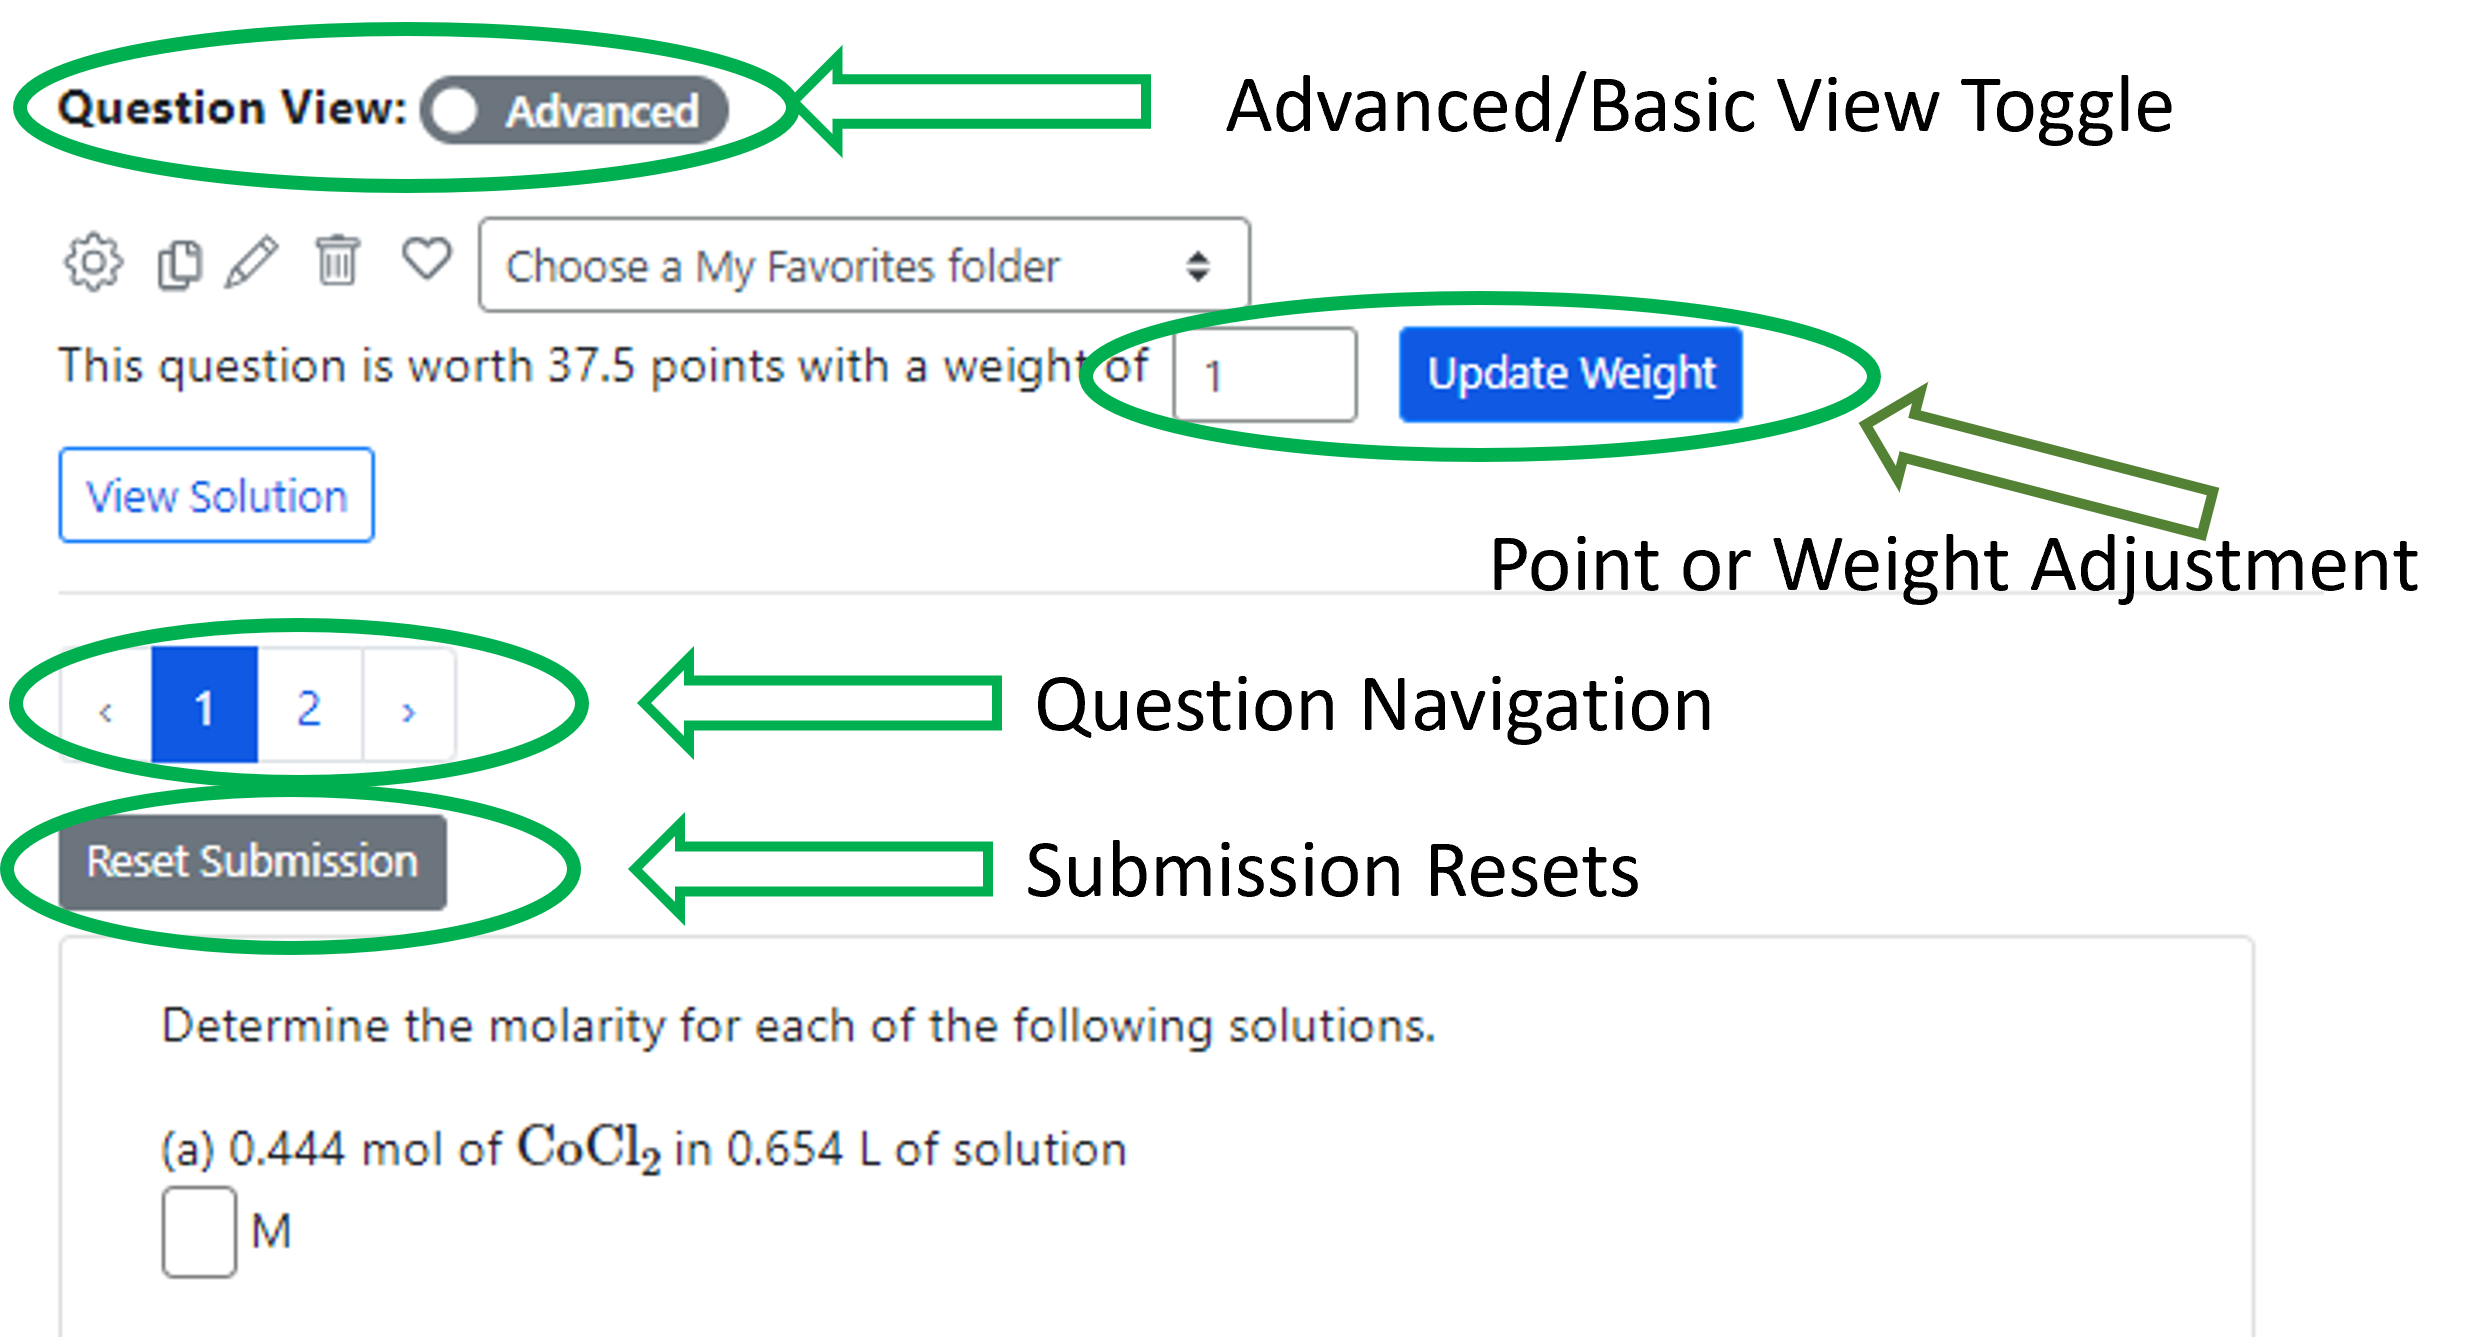
Figure \(\PageIndex{6}\): General options when viewing a question in an assignment
There are multiple view options that you can toggle between for a question. The Basic and Advanced question views show different options for a question. In the Basic View, you can view and respond to a question. In the Advanced View, you can view and respond to a question, update question points/weights, review the solution, find the answer, look at the student performance statistics, and other action items. You can use the toggle button shown in figure xx to switch between Basic and Advanced views.
Finally, you can view the question, assignment, or course as a student by using the Instructor/Student view toggle button in the upper right corner of your ADAPT page ((See Figure \(\PageIndex{7}\)))).In the Student View, you access the ADAPT platform as a fake student and have the same view as students in your courses. Using this view is great for ensuring students see what you see when accessing your assignments.
