
5.6: Set up a sequence for the Agilent 1100/1200 HPLC
- Page ID
- 401152

\( \newcommand{\vecs}[1]{\overset { \scriptstyle \rightharpoonup} {\mathbf{#1}} } \)
\( \newcommand{\vecd}[1]{\overset{-\!-\!\rightharpoonup}{\vphantom{a}\smash {#1}}} \)
\( \newcommand{\dsum}{\displaystyle\sum\limits} \)
\( \newcommand{\dint}{\displaystyle\int\limits} \)
\( \newcommand{\dlim}{\displaystyle\lim\limits} \)
\( \newcommand{\id}{\mathrm{id}}\) \( \newcommand{\Span}{\mathrm{span}}\)
( \newcommand{\kernel}{\mathrm{null}\,}\) \( \newcommand{\range}{\mathrm{range}\,}\)
\( \newcommand{\RealPart}{\mathrm{Re}}\) \( \newcommand{\ImaginaryPart}{\mathrm{Im}}\)
\( \newcommand{\Argument}{\mathrm{Arg}}\) \( \newcommand{\norm}[1]{\| #1 \|}\)
\( \newcommand{\inner}[2]{\langle #1, #2 \rangle}\)
\( \newcommand{\Span}{\mathrm{span}}\)
\( \newcommand{\id}{\mathrm{id}}\)
\( \newcommand{\Span}{\mathrm{span}}\)
\( \newcommand{\kernel}{\mathrm{null}\,}\)
\( \newcommand{\range}{\mathrm{range}\,}\)
\( \newcommand{\RealPart}{\mathrm{Re}}\)
\( \newcommand{\ImaginaryPart}{\mathrm{Im}}\)
\( \newcommand{\Argument}{\mathrm{Arg}}\)
\( \newcommand{\norm}[1]{\| #1 \|}\)
\( \newcommand{\inner}[2]{\langle #1, #2 \rangle}\)
\( \newcommand{\Span}{\mathrm{span}}\) \( \newcommand{\AA}{\unicode[.8,0]{x212B}}\)
\( \newcommand{\vectorA}[1]{\vec{#1}} % arrow\)
\( \newcommand{\vectorAt}[1]{\vec{\text{#1}}} % arrow\)
\( \newcommand{\vectorB}[1]{\overset { \scriptstyle \rightharpoonup} {\mathbf{#1}} } \)
\( \newcommand{\vectorC}[1]{\textbf{#1}} \)
\( \newcommand{\vectorD}[1]{\overrightarrow{#1}} \)
\( \newcommand{\vectorDt}[1]{\overrightarrow{\text{#1}}} \)
\( \newcommand{\vectE}[1]{\overset{-\!-\!\rightharpoonup}{\vphantom{a}\smash{\mathbf {#1}}}} \)
\( \newcommand{\vecs}[1]{\overset { \scriptstyle \rightharpoonup} {\mathbf{#1}} } \)
\(\newcommand{\longvect}{\overrightarrow}\)
\( \newcommand{\vecd}[1]{\overset{-\!-\!\rightharpoonup}{\vphantom{a}\smash {#1}}} \)
\(\newcommand{\avec}{\mathbf a}\) \(\newcommand{\bvec}{\mathbf b}\) \(\newcommand{\cvec}{\mathbf c}\) \(\newcommand{\dvec}{\mathbf d}\) \(\newcommand{\dtil}{\widetilde{\mathbf d}}\) \(\newcommand{\evec}{\mathbf e}\) \(\newcommand{\fvec}{\mathbf f}\) \(\newcommand{\nvec}{\mathbf n}\) \(\newcommand{\pvec}{\mathbf p}\) \(\newcommand{\qvec}{\mathbf q}\) \(\newcommand{\svec}{\mathbf s}\) \(\newcommand{\tvec}{\mathbf t}\) \(\newcommand{\uvec}{\mathbf u}\) \(\newcommand{\vvec}{\mathbf v}\) \(\newcommand{\wvec}{\mathbf w}\) \(\newcommand{\xvec}{\mathbf x}\) \(\newcommand{\yvec}{\mathbf y}\) \(\newcommand{\zvec}{\mathbf z}\) \(\newcommand{\rvec}{\mathbf r}\) \(\newcommand{\mvec}{\mathbf m}\) \(\newcommand{\zerovec}{\mathbf 0}\) \(\newcommand{\onevec}{\mathbf 1}\) \(\newcommand{\real}{\mathbb R}\) \(\newcommand{\twovec}[2]{\left[\begin{array}{r}#1 \\ #2 \end{array}\right]}\) \(\newcommand{\ctwovec}[2]{\left[\begin{array}{c}#1 \\ #2 \end{array}\right]}\) \(\newcommand{\threevec}[3]{\left[\begin{array}{r}#1 \\ #2 \\ #3 \end{array}\right]}\) \(\newcommand{\cthreevec}[3]{\left[\begin{array}{c}#1 \\ #2 \\ #3 \end{array}\right]}\) \(\newcommand{\fourvec}[4]{\left[\begin{array}{r}#1 \\ #2 \\ #3 \\ #4 \end{array}\right]}\) \(\newcommand{\cfourvec}[4]{\left[\begin{array}{c}#1 \\ #2 \\ #3 \\ #4 \end{array}\right]}\) \(\newcommand{\fivevec}[5]{\left[\begin{array}{r}#1 \\ #2 \\ #3 \\ #4 \\ #5 \\ \end{array}\right]}\) \(\newcommand{\cfivevec}[5]{\left[\begin{array}{c}#1 \\ #2 \\ #3 \\ #4 \\ #5 \\ \end{array}\right]}\) \(\newcommand{\mattwo}[4]{\left[\begin{array}{rr}#1 \amp #2 \\ #3 \amp #4 \\ \end{array}\right]}\) \(\newcommand{\laspan}[1]{\text{Span}\{#1\}}\) \(\newcommand{\bcal}{\cal B}\) \(\newcommand{\ccal}{\cal C}\) \(\newcommand{\scal}{\cal S}\) \(\newcommand{\wcal}{\cal W}\) \(\newcommand{\ecal}{\cal E}\) \(\newcommand{\coords}[2]{\left\{#1\right\}_{#2}}\) \(\newcommand{\gray}[1]{\color{gray}{#1}}\) \(\newcommand{\lgray}[1]{\color{lightgray}{#1}}\) \(\newcommand{\rank}{\operatorname{rank}}\) \(\newcommand{\row}{\text{Row}}\) \(\newcommand{\col}{\text{Col}}\) \(\renewcommand{\row}{\text{Row}}\) \(\newcommand{\nul}{\text{Nul}}\) \(\newcommand{\var}{\text{Var}}\) \(\newcommand{\corr}{\text{corr}}\) \(\newcommand{\len}[1]{\left|#1\right|}\) \(\newcommand{\bbar}{\overline{\bvec}}\) \(\newcommand{\bhat}{\widehat{\bvec}}\) \(\newcommand{\bperp}{\bvec^\perp}\) \(\newcommand{\xhat}{\widehat{\xvec}}\) \(\newcommand{\vhat}{\widehat{\vvec}}\) \(\newcommand{\uhat}{\widehat{\uvec}}\) \(\newcommand{\what}{\widehat{\wvec}}\) \(\newcommand{\Sighat}{\widehat{\Sigma}}\) \(\newcommand{\lt}{<}\) \(\newcommand{\gt}{>}\) \(\newcommand{\amp}{&}\) \(\definecolor{fillinmathshade}{gray}{0.9}\)A sequence tells the instrument which samples to analyze using which methods. Once the sequence is programmed and initiated, the user need not be present to monitor the analysis. If desired, the sequence can include steps for cleaning the system and shutting it down.
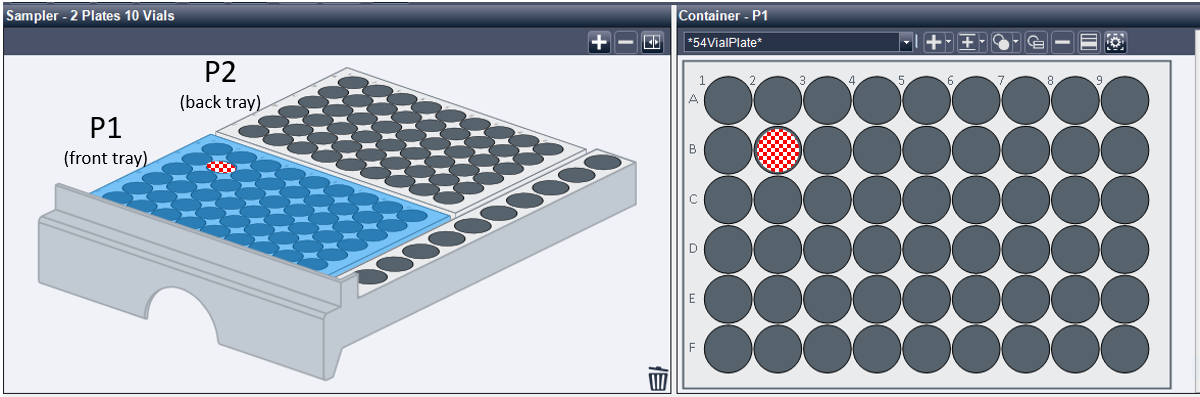
Before you begin, you must place the sample vials in the autosampler tray in the appropriate locations. The most critical part of this step is that you know the position of each sample, and that you enter the correct location in the sequence table. A map of the sample trays is below. There are two trays in the instrument. The front tray is P1 (tray position 1), while the back tray is P2 (tray position 2). Each tray has nine columns, labeled 1-9, and six rows, labeled A-F. You must know the position of your sample(s) so that you can correctly direct the injector robot to the correct sample location. For example, the position of the red checkered space in Figure \(\PageIndex{11}\) is P1-B2.
Quick Start:
- Go to the Sequence menu in the top tool bar and select Load Sequence Template...
 Figure \(\PageIndex{2}\): Copy and Paste Caption here. (Copyright; author via source)
- The software will prompt you to save changes to the current sequence file - select NO so that you do not save over another person's work.
- The Load Sequence window will appear
- Navigate to the main sequence folder
- Select the default sequence template called "def_LC.S"
- Do not overwrite the default sequence! Go to Sequence in the top tool bar and select Save Sequence Template As...

Figure \(\PageIndex{3}\): Copy and Paste Caption here. (Copyright; author via source) - Use the convention YYYYMMDD_INITIALS to name your sequence; if this is a group sequence use the group name.
- View and edit the sequence file by going to the Sequence menu at the top toolbar and selecting Sequence Table...

Figure \(\PageIndex{1}\): Copy and Paste Caption here. (Copyright; author via source) - The sample tray diagram will open when you click the drop down arrow in the Sample Position cell.
Programing the first injection (or a single injection)
The following text describes how to create a sequence of methods for a single injection or the first injection in a series.
- Make sure that the vials containing the samples to be analyzed are placed in the rack, and that their locations are known.
- Make sure the column is equilibrated before you run your sample! Consider running an equilibration method with a blank injection to accomplish this if you haven't equilibrated manually.
- Select Load Sequence Template from the Sequence menu, and then choose a default template the list of sequences. Click OK.
- Select Save Sequence As from the Sequence menu. When the Save Sequence As box appears, type YYYYMMMMDD_ourinitials in the text box. Click on OK to save the sequence.
- You will now edit the sequence. Select Sequence Table from the Sequence menu. Select (highlight) the first line in the sequence table.
- Enter the following information: NOTE: If there are any extra rows of information, delete them by clicking on the row # (in gray), which will highlight the row, and then right-clicking and choose cut.
- Location: The tray location (eg. P1-B3) of the vial to be analyzed.
- Sample Name: An area to enter comments (such as the composition of the mixture to be analyzed) that will appear on the report as Sample Comments.
- Method Name: Enter the method you set up previously to run the sample use (yourinitials).
- Injection Vol.: This is the volume of sample to be injected. If you do not enter a value, it will resort to the value programed in the method. Typically 1 uL is sufficient for the paraben mix. For caffeine, we typically use 5 uL injections.
*Please note that it is most convenient to use the same injection volume for calibration and sample injections. if you use different injection volumes for calibration and for sample injections, you will need to account for this in data analysis! In either case, take note of your injection volumes! - Inj/Location: Enter 1. This entry indicates how many injections (runs) should be made from the vial.
- Sample Type: Choose the type of sample (optional)
- When the table is complete, click OK to exit from the Sequence Table and return to the Top Level Menu. As long as you have already Saved using a new sequence name (step 2 above), select Save Sequence from the Sequence menu.
- To run this single method sequence, proceed to the Run Analysis Section.
Programing additional injections
The following text describes how to create a sequence of methods for multiple injections.
- Follow the first five steps given above as you would for a single injection. It is good practice to always begin a series of injections by running at least one "blank" injection to start with.
- To run a second sample, using the same or a different method, click on the Append Line box at the bottom of the screen (there are also shortcut buttons at the top of the screen). This will insert a line after the first line and before the last line marker.
- If you plan to add several sample injections using the same method, highlight the last line number and use the Insert/Fill Down button. Select Increment in the Locations box. Add From Location (eg P1-A3) and To Location (eg P1-B2) values. Add a Method Name (e.g. default.M); Inj/Location value (eg 1); and, Sample Type (eg Paraben Mixture). You will have to go back and enter the names of the samples in each line after the lines have been created.
- After entering the sample names in the newly-created sequence lines you can select that range and use Copy and Paste to create new lines for each method. Remember to change the Method Name for each new method.
If you change the mobile phase composition between two injections, the column must be equilibrated with the new solvent conditions prior to the second injection. This can be accomplished by running one or two "blank" injections with the new method or with a custom "equilibration" method.
- Clean and Flush the column at the end of each sequence:
- After your samples have created a list of runs, add a final "blank" injection to be sure the column is clean.
- Finally, the last line of your sequence table should flush the aqueous solvent out of the column and leave it in a high percentage of strong solvent. Use the flush.M method and a blank injection. This method flushes the column with 100% acetonitrile at a low flow rate of 0.10 ml/min for 1 hour.
- When the entire table is complete, select OK to exit from the Sample Log Table and return to the Top Level menu. Select Save Sequence As from the Sequence menu. When the Save Sequence As box appears, type yourinitials_yyymmdd_# in the text box. Click on OK to save the sequence.