
Proper Use of a Buret
- Page ID
- 35068

\( \newcommand{\vecs}[1]{\overset { \scriptstyle \rightharpoonup} {\mathbf{#1}} } \)
\( \newcommand{\vecd}[1]{\overset{-\!-\!\rightharpoonup}{\vphantom{a}\smash {#1}}} \)
\( \newcommand{\dsum}{\displaystyle\sum\limits} \)
\( \newcommand{\dint}{\displaystyle\int\limits} \)
\( \newcommand{\dlim}{\displaystyle\lim\limits} \)
\( \newcommand{\id}{\mathrm{id}}\) \( \newcommand{\Span}{\mathrm{span}}\)
( \newcommand{\kernel}{\mathrm{null}\,}\) \( \newcommand{\range}{\mathrm{range}\,}\)
\( \newcommand{\RealPart}{\mathrm{Re}}\) \( \newcommand{\ImaginaryPart}{\mathrm{Im}}\)
\( \newcommand{\Argument}{\mathrm{Arg}}\) \( \newcommand{\norm}[1]{\| #1 \|}\)
\( \newcommand{\inner}[2]{\langle #1, #2 \rangle}\)
\( \newcommand{\Span}{\mathrm{span}}\)
\( \newcommand{\id}{\mathrm{id}}\)
\( \newcommand{\Span}{\mathrm{span}}\)
\( \newcommand{\kernel}{\mathrm{null}\,}\)
\( \newcommand{\range}{\mathrm{range}\,}\)
\( \newcommand{\RealPart}{\mathrm{Re}}\)
\( \newcommand{\ImaginaryPart}{\mathrm{Im}}\)
\( \newcommand{\Argument}{\mathrm{Arg}}\)
\( \newcommand{\norm}[1]{\| #1 \|}\)
\( \newcommand{\inner}[2]{\langle #1, #2 \rangle}\)
\( \newcommand{\Span}{\mathrm{span}}\) \( \newcommand{\AA}{\unicode[.8,0]{x212B}}\)
\( \newcommand{\vectorA}[1]{\vec{#1}} % arrow\)
\( \newcommand{\vectorAt}[1]{\vec{\text{#1}}} % arrow\)
\( \newcommand{\vectorB}[1]{\overset { \scriptstyle \rightharpoonup} {\mathbf{#1}} } \)
\( \newcommand{\vectorC}[1]{\textbf{#1}} \)
\( \newcommand{\vectorD}[1]{\overrightarrow{#1}} \)
\( \newcommand{\vectorDt}[1]{\overrightarrow{\text{#1}}} \)
\( \newcommand{\vectE}[1]{\overset{-\!-\!\rightharpoonup}{\vphantom{a}\smash{\mathbf {#1}}}} \)
\( \newcommand{\vecs}[1]{\overset { \scriptstyle \rightharpoonup} {\mathbf{#1}} } \)
\(\newcommand{\longvect}{\overrightarrow}\)
\( \newcommand{\vecd}[1]{\overset{-\!-\!\rightharpoonup}{\vphantom{a}\smash {#1}}} \)
\(\newcommand{\avec}{\mathbf a}\) \(\newcommand{\bvec}{\mathbf b}\) \(\newcommand{\cvec}{\mathbf c}\) \(\newcommand{\dvec}{\mathbf d}\) \(\newcommand{\dtil}{\widetilde{\mathbf d}}\) \(\newcommand{\evec}{\mathbf e}\) \(\newcommand{\fvec}{\mathbf f}\) \(\newcommand{\nvec}{\mathbf n}\) \(\newcommand{\pvec}{\mathbf p}\) \(\newcommand{\qvec}{\mathbf q}\) \(\newcommand{\svec}{\mathbf s}\) \(\newcommand{\tvec}{\mathbf t}\) \(\newcommand{\uvec}{\mathbf u}\) \(\newcommand{\vvec}{\mathbf v}\) \(\newcommand{\wvec}{\mathbf w}\) \(\newcommand{\xvec}{\mathbf x}\) \(\newcommand{\yvec}{\mathbf y}\) \(\newcommand{\zvec}{\mathbf z}\) \(\newcommand{\rvec}{\mathbf r}\) \(\newcommand{\mvec}{\mathbf m}\) \(\newcommand{\zerovec}{\mathbf 0}\) \(\newcommand{\onevec}{\mathbf 1}\) \(\newcommand{\real}{\mathbb R}\) \(\newcommand{\twovec}[2]{\left[\begin{array}{r}#1 \\ #2 \end{array}\right]}\) \(\newcommand{\ctwovec}[2]{\left[\begin{array}{c}#1 \\ #2 \end{array}\right]}\) \(\newcommand{\threevec}[3]{\left[\begin{array}{r}#1 \\ #2 \\ #3 \end{array}\right]}\) \(\newcommand{\cthreevec}[3]{\left[\begin{array}{c}#1 \\ #2 \\ #3 \end{array}\right]}\) \(\newcommand{\fourvec}[4]{\left[\begin{array}{r}#1 \\ #2 \\ #3 \\ #4 \end{array}\right]}\) \(\newcommand{\cfourvec}[4]{\left[\begin{array}{c}#1 \\ #2 \\ #3 \\ #4 \end{array}\right]}\) \(\newcommand{\fivevec}[5]{\left[\begin{array}{r}#1 \\ #2 \\ #3 \\ #4 \\ #5 \\ \end{array}\right]}\) \(\newcommand{\cfivevec}[5]{\left[\begin{array}{c}#1 \\ #2 \\ #3 \\ #4 \\ #5 \\ \end{array}\right]}\) \(\newcommand{\mattwo}[4]{\left[\begin{array}{rr}#1 \amp #2 \\ #3 \amp #4 \\ \end{array}\right]}\) \(\newcommand{\laspan}[1]{\text{Span}\{#1\}}\) \(\newcommand{\bcal}{\cal B}\) \(\newcommand{\ccal}{\cal C}\) \(\newcommand{\scal}{\cal S}\) \(\newcommand{\wcal}{\cal W}\) \(\newcommand{\ecal}{\cal E}\) \(\newcommand{\coords}[2]{\left\{#1\right\}_{#2}}\) \(\newcommand{\gray}[1]{\color{gray}{#1}}\) \(\newcommand{\lgray}[1]{\color{lightgray}{#1}}\) \(\newcommand{\rank}{\operatorname{rank}}\) \(\newcommand{\row}{\text{Row}}\) \(\newcommand{\col}{\text{Col}}\) \(\renewcommand{\row}{\text{Row}}\) \(\newcommand{\nul}{\text{Nul}}\) \(\newcommand{\var}{\text{Var}}\) \(\newcommand{\corr}{\text{corr}}\) \(\newcommand{\len}[1]{\left|#1\right|}\) \(\newcommand{\bbar}{\overline{\bvec}}\) \(\newcommand{\bhat}{\widehat{\bvec}}\) \(\newcommand{\bperp}{\bvec^\perp}\) \(\newcommand{\xhat}{\widehat{\xvec}}\) \(\newcommand{\vhat}{\widehat{\vvec}}\) \(\newcommand{\uhat}{\widehat{\uvec}}\) \(\newcommand{\what}{\widehat{\wvec}}\) \(\newcommand{\Sighat}{\widehat{\Sigma}}\) \(\newcommand{\lt}{<}\) \(\newcommand{\gt}{>}\) \(\newcommand{\amp}{&}\) \(\definecolor{fillinmathshade}{gray}{0.9}\)The volumetric analysis exercises will make use of a 50 mL buret.
Storing Buret Tubes
First of all, you MUST learn how to put your buret away properly in the buret cabinet. Here's a picture of the buret cabinet on the left. On the right we have three burets stored properly. Note the arrows pointing to the holes into which one "ear" of the petcock valve is placed. Placing the buret in the cabinet this way assures that the buret will not fall out when the cabinet is opened.
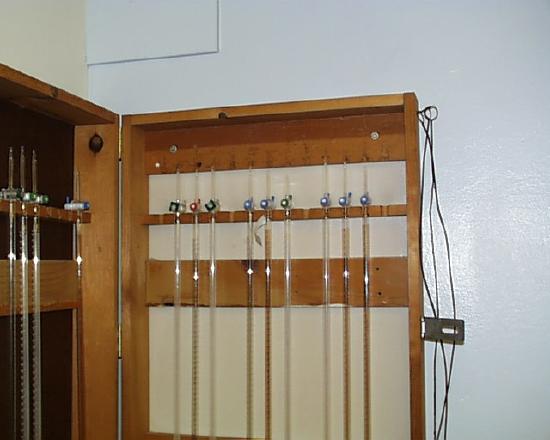
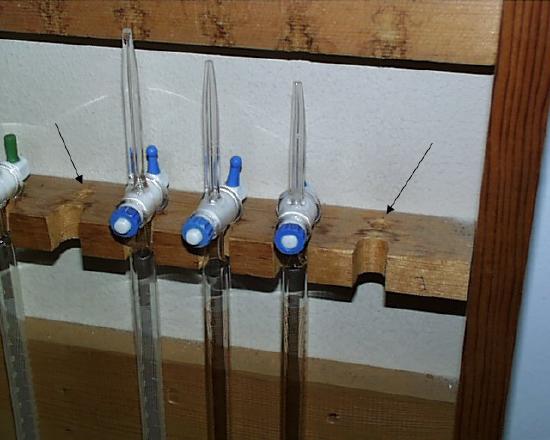
But get a load of these two pictures below. Notice how the burets have been placed precariously so that just a quick opening of the door will allow either to slip out, fall on the floor and break. So make sure that you exercise due care in the storage of your buret. I want everyone to know how to store their burets safely after the first period during which they are used.

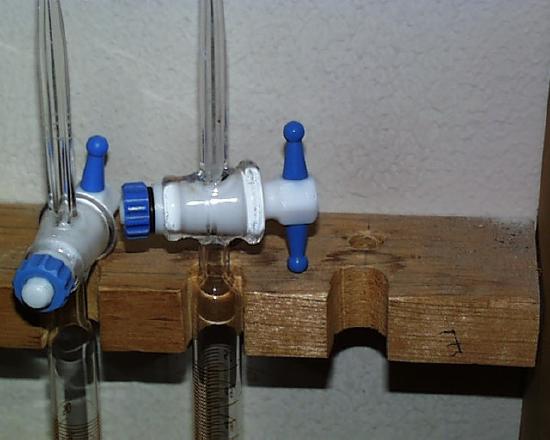
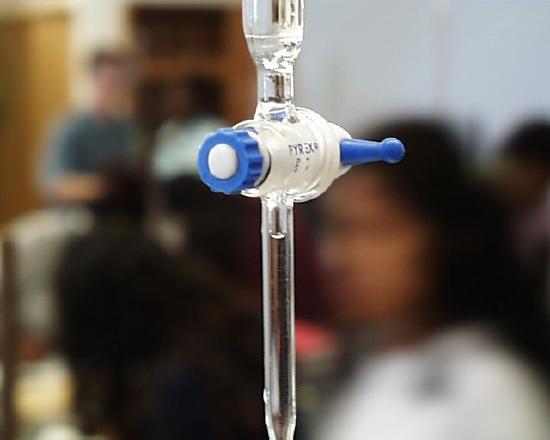
The "petcock" or draining valve which allows titrant to flow out the nozzle is made of teflon. On one end is a handle for opening and closing it. On the other is a tightening nut, a rubber o-ring and a teflon spacer. Your buret ought to be assembled as shown in the photo at the left with the teflon spacer rubbing against the buret and the rubber o-ring between the spacer and the nut. Otherwise there is a tendency for the nut to loosen with repeated turns of the petcock.

Read Buret Tubes
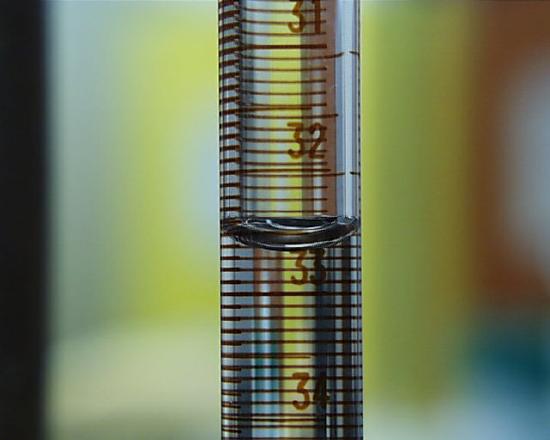
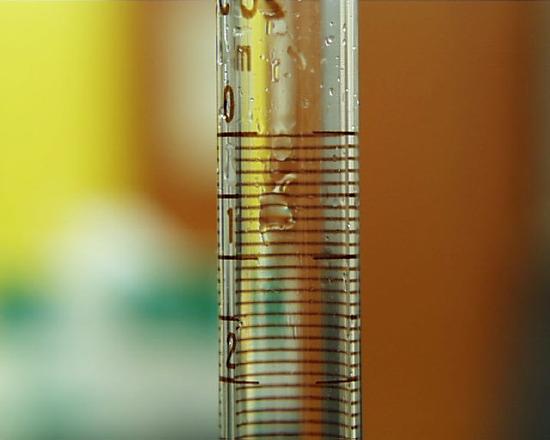
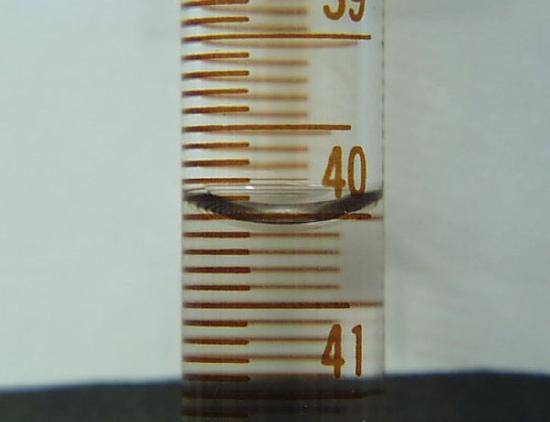
When reading a buret it is important that your line of sight be in a direction perpendicular to the buret column. Note in this photograph that although the bottom of the meniscus is clearly outlined, the variability of the background does not always offer such visibility. More likely than not, the bottom of the mensicus is lightened by random reflections in the laboratory. Such variability can produce errors of several hundredths of a milliliter. All buret reading should be done using a buret card.
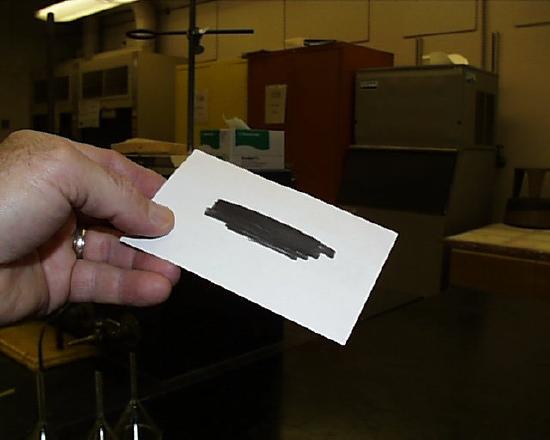
The black streak is produced using a felt tipped pen and offers the student a constant dark reflection against a white background for higher precision in determining relative titrant volumes.
Another problem often encountered by students is poor drainage. Note that this buret has droplets which stick to the inner wall. If your buret shows such droplets, use one of the buret brushes and Alconox to wash the inner surface. If that doesn't improve the drainage, ask your instructor to draw some dichromate/sulfuric acid cleaning solution into the buret for more thorough cleaning.
A 50 mL buret can be read to ±0.01 mL, but in order to be able to interpolate to the last digit, the perpendicular line of sight must be followed with meticulous care.

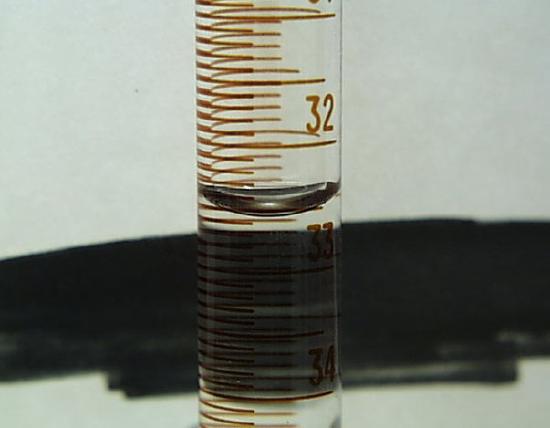
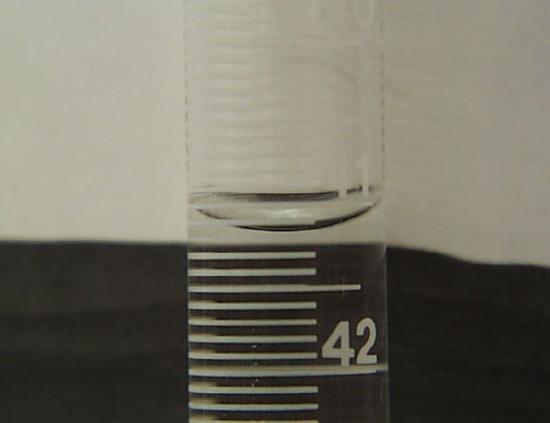
Note in these two photographs, one in which the line of sight is slightly upward and the other in which it is downward, that an interpolation is difficult because the calibration lines don't appear to be parallel.
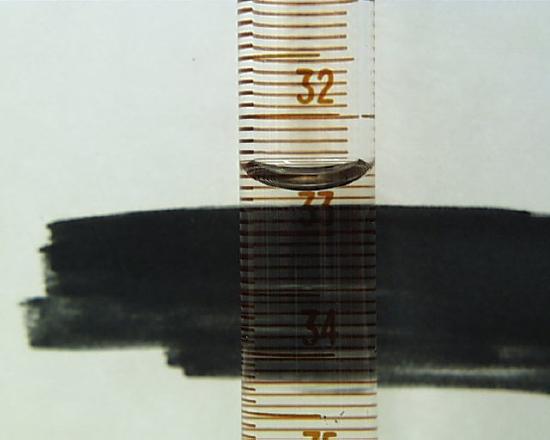
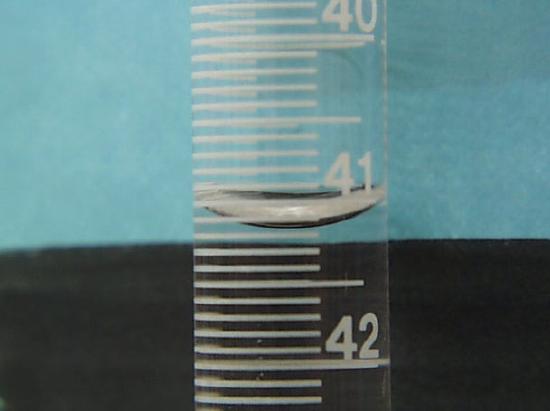
The use of a buret card and a line of sight perpendicular to the buret column are techniques which must be adopted to achieve maximum precision. Note the final photograph in which the level of the meniscus bottom can be determined to within ±0.01 mL. What reading would you report for this buret volume?

A buret card ought to have a black streak with a distinct horizontal zone of black against white. Moreover, when held behind the buret, the upper limit of the black streak ought to be placed just under the meniscus, so that the bottom of the meniscus can be seen distinctly against a narrow zone of white. Note in the photo at the left that the apparent level of the meniscus is different from that on the right. Since placing the black streak just under the meniscus is more repeatable than at some variable distance, the close placement is recommended.
If you are assigned a buret with a white instead of a blue or red scale, a buret card other than white ought to be used. Notice in the photo at the left the white scale is rendered invisible by the white card but can be seen more clearly with the pastel blue card on the right.
Cleaning Buret Tubes
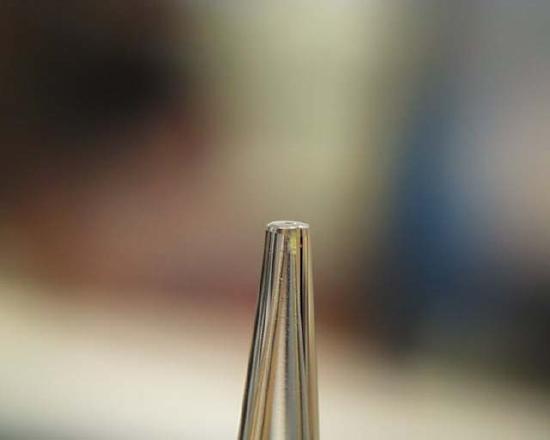
Pipettes and burettes accumulate inert solid material which must be removed from time to time. Here at the left is the nozzle of a burette which has material which will not pass through. You may have to use a wire, available on the lower ledge of the burette case, to clean out this material. It is best to do it with the petcock valve removed so that when you do a reverse wash after poking it free, the material can be washed out at the point of the valve instead of at the other end of the burette cylinder.

A bubble in the nozzle of a buret will produce an inaccurate volume reading if the bubble escapes during a titration. Bubbles may be large and visible as shown above left or so small as not to be seen, above center. During a titration such small bubbles begin to move in the direction of the nozzle but may remain in place even though there is a moderate flow of titrant (above right). Even when the buret valve is wide open some bubbles remain in place until you take your eyes off them. Then they sneak through the nozzle and ruin your titration.


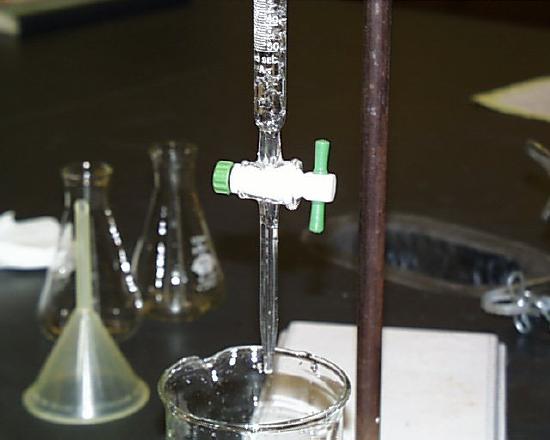
The quickest way to get rid of nozzle bubbles is to fill the buret with titrant and open the valve. The pressure of the titrant in a full buret is often enough to force all bubbles out. If that doesn't work, two other methods can be used. The first is to use some chaotic suction. The student on the left has first rinsed then filled her buret with titrant. Her attempt to force out all bubbles by the first method didn't work, so she opens the buret valve, letting the contents begin to drain into a beaker. She uses her bulb momentarily to suck air through the nozzle. The mixture of small bubbles which are produced reenter the nozzle. The chaos and production of small bubbles (right) is often capable of driving out all bubbles from the nozzle

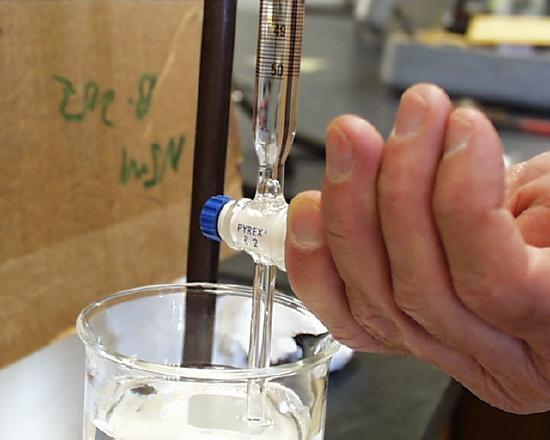
If that doesn't work, immerse the nozzle of the buret in a small beaker of titrant and while using the bulb to reverse the flow of titrant, open the valve (right). The bubble will emerge from the top of the valve and rise to the top of the column of titrant, but no air will be able to enter the mouth of the nozzle.
Finally, a brand new buret, just taken out of the box, ought to be examined carefully, as ought a buret returned to service after having been in storage a long time. Production errors are rare but they do occur. Burets in storage may be there for reasons not connected with a lack of need. The image below shows a buret found at the University of Kentucky by Professor Jim O'Reilly a number of years ago. Its particular aberration is that it has two "43" mL designations and continues on to 48 (which is really 49 mL), then it jumps to 50. It is thought to have been made in the 1950s.

Contributors
Oliver Seely (Professor of Chemistry, Emeritus; California State University Dominguez Hills). This content are in the public domain and may be copied without restriction.