
Experiment 5: Photography - Cyanotypes
- Page ID
- 221425
\( \newcommand{\vecs}[1]{\overset { \scriptstyle \rightharpoonup} {\mathbf{#1}} } \)
\( \newcommand{\vecd}[1]{\overset{-\!-\!\rightharpoonup}{\vphantom{a}\smash {#1}}} \)
\( \newcommand{\dsum}{\displaystyle\sum\limits} \)
\( \newcommand{\dint}{\displaystyle\int\limits} \)
\( \newcommand{\dlim}{\displaystyle\lim\limits} \)
\( \newcommand{\id}{\mathrm{id}}\) \( \newcommand{\Span}{\mathrm{span}}\)
( \newcommand{\kernel}{\mathrm{null}\,}\) \( \newcommand{\range}{\mathrm{range}\,}\)
\( \newcommand{\RealPart}{\mathrm{Re}}\) \( \newcommand{\ImaginaryPart}{\mathrm{Im}}\)
\( \newcommand{\Argument}{\mathrm{Arg}}\) \( \newcommand{\norm}[1]{\| #1 \|}\)
\( \newcommand{\inner}[2]{\langle #1, #2 \rangle}\)
\( \newcommand{\Span}{\mathrm{span}}\)
\( \newcommand{\id}{\mathrm{id}}\)
\( \newcommand{\Span}{\mathrm{span}}\)
\( \newcommand{\kernel}{\mathrm{null}\,}\)
\( \newcommand{\range}{\mathrm{range}\,}\)
\( \newcommand{\RealPart}{\mathrm{Re}}\)
\( \newcommand{\ImaginaryPart}{\mathrm{Im}}\)
\( \newcommand{\Argument}{\mathrm{Arg}}\)
\( \newcommand{\norm}[1]{\| #1 \|}\)
\( \newcommand{\inner}[2]{\langle #1, #2 \rangle}\)
\( \newcommand{\Span}{\mathrm{span}}\) \( \newcommand{\AA}{\unicode[.8,0]{x212B}}\)
\( \newcommand{\vectorA}[1]{\vec{#1}} % arrow\)
\( \newcommand{\vectorAt}[1]{\vec{\text{#1}}} % arrow\)
\( \newcommand{\vectorB}[1]{\overset { \scriptstyle \rightharpoonup} {\mathbf{#1}} } \)
\( \newcommand{\vectorC}[1]{\textbf{#1}} \)
\( \newcommand{\vectorD}[1]{\overrightarrow{#1}} \)
\( \newcommand{\vectorDt}[1]{\overrightarrow{\text{#1}}} \)
\( \newcommand{\vectE}[1]{\overset{-\!-\!\rightharpoonup}{\vphantom{a}\smash{\mathbf {#1}}}} \)
\( \newcommand{\vecs}[1]{\overset { \scriptstyle \rightharpoonup} {\mathbf{#1}} } \)
\(\newcommand{\longvect}{\overrightarrow}\)
\( \newcommand{\vecd}[1]{\overset{-\!-\!\rightharpoonup}{\vphantom{a}\smash {#1}}} \)
\(\newcommand{\avec}{\mathbf a}\) \(\newcommand{\bvec}{\mathbf b}\) \(\newcommand{\cvec}{\mathbf c}\) \(\newcommand{\dvec}{\mathbf d}\) \(\newcommand{\dtil}{\widetilde{\mathbf d}}\) \(\newcommand{\evec}{\mathbf e}\) \(\newcommand{\fvec}{\mathbf f}\) \(\newcommand{\nvec}{\mathbf n}\) \(\newcommand{\pvec}{\mathbf p}\) \(\newcommand{\qvec}{\mathbf q}\) \(\newcommand{\svec}{\mathbf s}\) \(\newcommand{\tvec}{\mathbf t}\) \(\newcommand{\uvec}{\mathbf u}\) \(\newcommand{\vvec}{\mathbf v}\) \(\newcommand{\wvec}{\mathbf w}\) \(\newcommand{\xvec}{\mathbf x}\) \(\newcommand{\yvec}{\mathbf y}\) \(\newcommand{\zvec}{\mathbf z}\) \(\newcommand{\rvec}{\mathbf r}\) \(\newcommand{\mvec}{\mathbf m}\) \(\newcommand{\zerovec}{\mathbf 0}\) \(\newcommand{\onevec}{\mathbf 1}\) \(\newcommand{\real}{\mathbb R}\) \(\newcommand{\twovec}[2]{\left[\begin{array}{r}#1 \\ #2 \end{array}\right]}\) \(\newcommand{\ctwovec}[2]{\left[\begin{array}{c}#1 \\ #2 \end{array}\right]}\) \(\newcommand{\threevec}[3]{\left[\begin{array}{r}#1 \\ #2 \\ #3 \end{array}\right]}\) \(\newcommand{\cthreevec}[3]{\left[\begin{array}{c}#1 \\ #2 \\ #3 \end{array}\right]}\) \(\newcommand{\fourvec}[4]{\left[\begin{array}{r}#1 \\ #2 \\ #3 \\ #4 \end{array}\right]}\) \(\newcommand{\cfourvec}[4]{\left[\begin{array}{c}#1 \\ #2 \\ #3 \\ #4 \end{array}\right]}\) \(\newcommand{\fivevec}[5]{\left[\begin{array}{r}#1 \\ #2 \\ #3 \\ #4 \\ #5 \\ \end{array}\right]}\) \(\newcommand{\cfivevec}[5]{\left[\begin{array}{c}#1 \\ #2 \\ #3 \\ #4 \\ #5 \\ \end{array}\right]}\) \(\newcommand{\mattwo}[4]{\left[\begin{array}{rr}#1 \amp #2 \\ #3 \amp #4 \\ \end{array}\right]}\) \(\newcommand{\laspan}[1]{\text{Span}\{#1\}}\) \(\newcommand{\bcal}{\cal B}\) \(\newcommand{\ccal}{\cal C}\) \(\newcommand{\scal}{\cal S}\) \(\newcommand{\wcal}{\cal W}\) \(\newcommand{\ecal}{\cal E}\) \(\newcommand{\coords}[2]{\left\{#1\right\}_{#2}}\) \(\newcommand{\gray}[1]{\color{gray}{#1}}\) \(\newcommand{\lgray}[1]{\color{lightgray}{#1}}\) \(\newcommand{\rank}{\operatorname{rank}}\) \(\newcommand{\row}{\text{Row}}\) \(\newcommand{\col}{\text{Col}}\) \(\renewcommand{\row}{\text{Row}}\) \(\newcommand{\nul}{\text{Nul}}\) \(\newcommand{\var}{\text{Var}}\) \(\newcommand{\corr}{\text{corr}}\) \(\newcommand{\len}[1]{\left|#1\right|}\) \(\newcommand{\bbar}{\overline{\bvec}}\) \(\newcommand{\bhat}{\widehat{\bvec}}\) \(\newcommand{\bperp}{\bvec^\perp}\) \(\newcommand{\xhat}{\widehat{\xvec}}\) \(\newcommand{\vhat}{\widehat{\vvec}}\) \(\newcommand{\uhat}{\widehat{\uvec}}\) \(\newcommand{\what}{\widehat{\wvec}}\) \(\newcommand{\Sighat}{\widehat{\Sigma}}\) \(\newcommand{\lt}{<}\) \(\newcommand{\gt}{>}\) \(\newcommand{\amp}{&}\) \(\definecolor{fillinmathshade}{gray}{0.9}\)Background - Black and White Photography
The earliest photographic (1830's) processes relied on printed out silver which requires long exposure times:
\[2 AgX_{(s)} \stackrel{h \nu}{\longrightarrow}2 Ag_{(s)} + X_{2(g)} \quad X=C 1, B r, I \nonumber\]
In the 1840's the "latent" image was discovered. \(AgI\) was used as the silver halide and the "invisible" latent image was chemically developed. This greatly shortened exposure times and became the basis for modern black and white photography:
\[AgNO_{3(aq)} + KX_{(aq)} \stackrel{in \quad gelatin}{\longrightarrow} AgX_{(s)} + K^+ + NO_{3(aq)} ^- \nonumber\]
This reaction produces a colloidal suspension of \(AgX\) in a gelatin solution.
It is ripened (heated) to increase particle size of silver halide.
A hardener is added to stiffen the gelatin.
The gelatin is then coated onto a support such as:
- glass plate (1800's).
- cellulose nitrate (fire hazard!!!) or acetate (safety film) for negatives.
- paper coated with baryta (\(BaSO_4\)) for prints.
The gelatin is allowed to harden.
NOTE: the crystal structure and size of the silver halide crystals greatly affects light sensitivity of the film, and the sharpness of the image
\[2 AgX_{(s)} \stackrel{h \nu}{\longrightarrow}2 Ag_{(s)} + X_{2(g)} \nonumber\]
To make the latent image viewable, use a metal reducing agent such as \(V^{2+}\) or \(Fe^{2+}\).
\[M^{2+} + Ag^+ \longrightarrow M^{3+} + Ag \nonumber\]
Or, more typically, use an organic reducing agent such as hydroquinone.
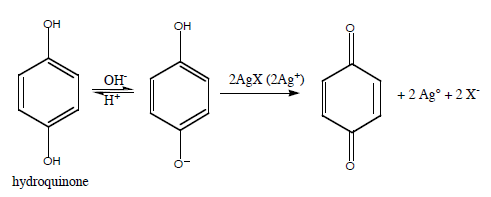
Note: the reaction requires base to proceed.
To stop the reaction, take advantage of the acid-base equilibrium by adding "stop bath" (acetic acid) to shift to the acid form of hydroquinone which is not readily oxidized.
The print or negative is "fixed" as discussed in solubility equilibria by using "hypo" \(Na_2S_2O_3\) to remove unreacted \(AgX\).
Background - Cyanotypes
In 1842, after the discovery of the photosensitivity of ferric (\(Fe^{3+}\)) salts, Sir John Herschel invented the cyanotype process. This process involves coating a sheet of paper with a yellow light-sensitive solution of ferric ammonium citrate and potassium ferricyanide. Exposure to UV light reduces ferric (\(Fe^{3+}\)) salt to the ferrous (\(Fe^{2+}\)) state and ferricyanide (the \(Fe^{3+}\) in [\(Fe(CN)_6]^{3-}\)) to ferrocyanide (\(Fe^{2+}\) in \([Fe(CN)_6]^{4-}\)). The result is formation of a yellow blue image consisting of ferrous ferrocyanide. Washing removes the yellow soluble, unreduced (unexposed) salts, leaving behind an insoluble blue and white image. The image intensifies with time as ferrous ferrocyanide is oxidized to the deep blue color of ferric ferrocyanide, also known as the artist's pigment Prussian blue. The rate of oxidation can be increased by treating the image with an oxidizing solution.
Procedure
I. Stock Solutions: Prepare solutions at least 24 hours before coating paper and store in airtight brown bottles.
Solution A: 50 mL distilled water at ~21 °C
10.0 g Ferric ammonium citrate (green is preferable to brown)
Solution B: 50 mL distilled water at ~21 °C
4.0 g Potassium ferricyanide
II. Sensitize the paper
A. Choice of paper: To get good image resolution choose a paper that has
1) A smooth ‘hot pressed’ (HP) surface.
2) A high cotton or alpha-cellulose content.
3) An internal sizing agent, ideally with a pH of 7-7.5.
4) No alkaline buffering agents. Paper pH<7.
5) Good wet strength (i.e. heavier weights of paper i.e., 160-200 g/m2).
6) No other additives such as fillers, brighteners, retention aids, dyes, bleaches, wet-
strengthening agents...
Note: All papers have a ‘felt’ or ‘blanket’ side and a ‘wire side. The felt side generally has a more random texture and a less intrusive texture. Paper is a chemical entity in its own right and each type of paper (and sometimes each batch of a paper) will behave in its own way with the chemicals.
B. Choice of room light conditions: Work with the solutions and sensitized paper under tungsten light. Daylight and fluorescent light will expose/fog the paper.
C. Paper preparation:
1. Cut the paper to leave a margin of at least an inch around the area to be coated to permit
handling.
2. Lightly pencil guide marks to indicate the area to be coated on the sheet of paper. A cardboard
template the size of the negative may be used.
Note: Avoid watermark area of paper. Handle only by the edges to avoid transfer of moisture or
dirt from fingers to image area (including on the reverse).
D. Sensitization solution preparation:
Note: The total volume of sensitizer needed depends on the negative size, the type of paper, and absolute humidity. There should be enough sensitizer to make 3-5 passes with the coating rod.
1) Prepare a 1:1 mixture of solution A (Ferric ammonium citrate) and solution B (Potassium ferricyanide) in a 10 ml beaker. Use a separate syringe (no needle) for each solution (label them).
Use the following as a starting point:
solution A (Ferric ammonium citrate) 0.2 ml
solution B (Potassium ferricyanide) 0.2 ml
2) Use a third syringe to mix the solution thoroughly bypassing the liquid in and out of a syringe two or three times. Use this syringe to transfer the sensitizer solution to the paper.
E. Transfer of the sensitizer solution to the paper:
Note: Coating should be done at a room temperature of between 18 and 22 °C and a relative humidity of around 75%. (If conditions are too cold or dry, surface crystallization will occur, and too high an ambient temperature or relative humidity may cause the solutions to penetrate too deeply into the paper).
1) Tape the marked paper onto a sheet of glass and clean the paper surface with a blower.
2) Arrange glass coating rod (it must be free of dust and grease), blotting paper, and loaded syringe nearby.
3) Gently eject solution from the syringe along the top of the coating area. Place the glass rod spreader on the paper just above the liquid line. Draw the rod into the solution, pause briefly (about a second), allowing the fluid to distribute itself evenly along the length of the rod. Then smoothly pull the spreader down the length of the area to be coated. Coat 1-2 cm beyond the image area.
The surface may look blotchy at this stage, but it will even out in the next few moments. One ‘pass’ for a 10x15 cm area will take about 3 to 5 seconds. Apply only a slight pressure, otherwise, the paper surface will be abraded. At the bottom of the first pass, ‘hop’ the spreader over the line of solution and smoothly push it back up to the top of the sheet, thus repeating the process, but in the opposite direction.
Make 3 to 5 passes over the paper in this way. It is best to stop before all the solution has been absorbed into the paper. Soak up the excess solution with a strip of blotting paper. (Alternatively, a brush may be used to apply the solution).
4) Remove the paper from the sheet of glass. Place the coated paper in the oven for 5-10 minutes. Ideally, the temperature should be between 35-40 °C (95-105 F). Allowing the dried paper to "rest" for half an hour or more may improve image quality. Unlike other \(Fe\), \(Pt\), and \(Pd\) processes cyanotypes are relatively unaffected by relative humidity.
III. Image formation:
1) Place the dried paper in contact with the negative (sensitized surface to emulsion) in a contact printing frame. This can be made from a clipboard, piece of art foam, piece of glass and rubber bands. Alternatively, a purchased contact printing frame which permits opening halfway to check the image without disturbing the registration of the print and negative may be used.
2) Expose to UV light source. Printing times will vary according to negative density. The image is partially formed during the exposure. A commercial contact printing frame permits examination the print by opening one half without disturbing the registration of the negative to the print. This ‘inspection’ must be carried out in an area shielded from the UV source, otherwise the print will be fogged.
Caution: To prevent eye damage, do not look into UV sources.
Note: the UV light source may be the sun, a sunlamp or a specially designed UV source (or even a tanning bed if you wish to do large images).
3) Clear print in a water bath for about 1 minute. Wash in running water for 5-10 minutes, or until highlight (white) areas in print have cleared.
4) Hang to dry.
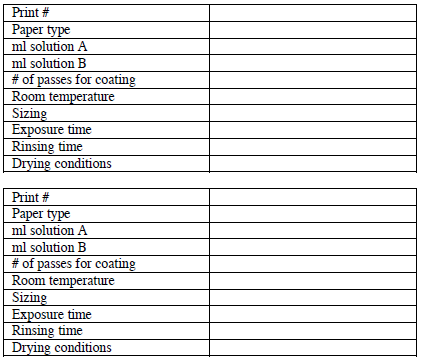
IV. Data summary - a useful practice to maximize image quality
References
- Crawford, William. The Keepers of Light. p.163-165, 177-180
- Reeve, Catharine and Sward, Marilyn . The New Photography. p 55-63.
- Ware, Mike. Cyanotype: The History, Science and Art of Photographic Printing in Prussian Blue.
- Science Museum and National Museum of Photography, Film and Television. England: Cromwell Press. 1999.