
12.2: Ionic Solids
- Page ID
- 43269

Introduction
Ionic compounds form many types of crystal structures, and they tend to be more complicated than those of the closest packing schemes introduced in the last section. There are several reasons for this. First, the charge of the ions may not be the same, but they must be in a ratio that is neutral, and form a lattice that minimizes repulsion between like charges while maximizing the attraction between opposite charges. Second, the anion and cation are different entities, and may have completely different volumes. In this case the structure is often based on the larger ion (usually the anion) and the smaller ion fits in the "holes or void space. Finally, many ionic compounds form hydrated salts, where water is trapped within the holes or voids of the crystal lattice.
Lets look at the difference between Cesium Chloride and sodium chloride, both of which are alkyl chlorides.
Cesium chloride
In the cesium chloride both the cation and the anion of similar volumes and if you imagine a primitive cubic structure of one, with the central hole being occupied by the other (as in body centered cubic). Sort of like a primitive anionic structure offset by a primitive cationic structure.
 Figure \(\PageIndex{1}\):Structure of Cesium chloride showing how each ion forms a primitive cubic structure with respect to itself.
When the size of the ions are substantially different, more complicated geometries form.
Sodium chloride
Sodium chloride forms the halide structure, with the chloride ions forming a face centered packing, and the sodium entering the octahedral holes.
 Figure \(\PageIndex{2}\): Sodium chloride structure, note how the difference in size changes the structure compared to CsCl.
The following YouTube video explains how face centered cubic cells in a close packed structure have both octahedral and tetrahedral holes. In the case of octahedral holes, there is a 1:1 ration of hole to particles, but in the case of tetrahedral holes, there is a 2:1 ratio.
Video\(\PageIndex{1}\): YouTube Video: Ionic Lattices by Mark McClure and Sally Vallabha at UNC-Pembroke, https://youtu.be/F4Du4zI4GJ0
Calcium fluoride (CaF2)
Calcium fluoride forms the fluorite structure, where the Calcium forms a face centered cubic structure with the fluoride entering the tetrahedral holes.
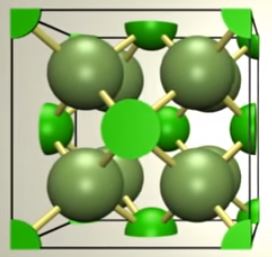 Figure \(\PageIndex{3}\): Fluorite structure of Calcium fluoride. Note how the Ca has a face centered structure with 4 atoms to the unit cell, and there are 8 fluorides inside the 8 tetrahedral holes. Please watch both videos.
Figure\(\PageIndex{3}\): .
This Youtube does a good job of showing the face centered structure of the calcium in calcium fluoride
Video\(\PageIndex{2}\):This Youtube: Fluorite, Calcium Fluoride, Calcium Difluorite crystal was posted by Manuel Moreira Baptista and is directly available at https://youtu.be/xyeHDoOxyXU .
Lattice Energy
We have looked at coulombs law and see that the energy of interaction between two charged particles separated in space can be described by the following equation,
\[ E= \dfrac{q_1q_2}{(4\pi\epsilon_0) r}\]
A closer look shows that this does not account for the high bond strength of a crystal lattice, which is because a crystal is not two isolated ions, but the result of multiple charges at multiple distances interacting at the same time. None the less, we can see some initial trends come out of understanding coulombs law, and these are observable in Table 12.3.1. The first is that the smaller the ion, the greater the lattice energy. The second is the greater the charge, the greater the lattice energy. So from that level, Coulomb's law is very useful in predicting trends.
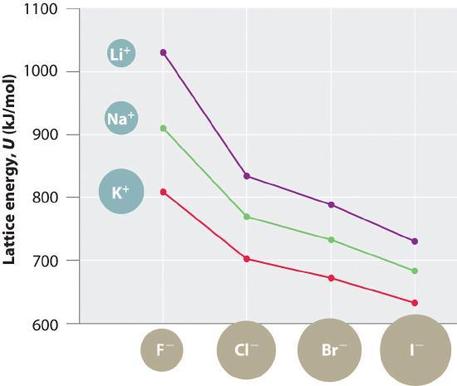 Figure \(\PageIndex{4}\): Trends of lattice energies as function of ion charges. In this chart the energy is being shown as a dissociation energy, the energy required to break a mol of the crystal lattice into its separated ions.
General trends in Lattice Energy can be predicted by Coulombs Law for the attractive forces between the cation and anion, but the actual energy is much more complicated as each ion interacts with multiple neigboring ions, with some of those being the repulsive forces between like charges. As we will see below, we can calculate the Lattice Energy through an energy cycle (Born Haber cycle). So the actual Lattice energy is not predicted by Coulombs law, although general trends can be predicted by coulombs law.
What is the Definition of Lattice Enthalpy
- Some textbooks state it is the energy change when a mole of an ionic compound is dissociated into its gaseous ions (an endothermic process with a positive value).\[M_mX_{n(s)} \rightarrow M^{n+}_{(g)} + X^{m-}_{(g)} \tag{12.3.2}\] Within this definition, the lattice enthalpy will always correspond to an Endothermic Process, i.e., \(\Delta H>0\)
- Other textbooks state it is the energy change when a mole of an ionic compound is formed from its gaseous ions (an exothermic process with a negative value) \[M^{n+}_{(g)} +X^{m-}_{(g)} \rightarrow M_mX_{n(s)} \tag{12.3.3}\] Within this definition, the lattice enthalpy will always correspond to an Exothermic Process, i.e., \(\Delta H<0\)
Do not be fooled, the |value| is the same, and you may need to interpret whether it is a formation or dissociation energy. Familiarize yourself with Table 12.3.1 and be able to predict the periodic trends represented in the table.
| Representative Calculated Lattice Energies as Dissociation Energies | Representative Calculated Lattice Energies as Formation Energies | |||
| Substance | E (kJ/mol) | Substance | E (kJ/mol) | |
| NaF | 910 | NaF | -910 | |
| NaCl | 788 | NaCl | -788 | |
| NaBr | 732 | NaBr | -732 | |
| NaI | 682 | NaI | -682 | |
| MgCl2 | 2326 | MgCl2 | -2326 | |
| SrCl2 | 2127 | SrCl2 | -2127 | |
| AlF3 | 5,492 | AlF3 | -5,492 | |
| Al2O3 | 15,300 | Al2O3 | -15,300 | |
Table \(\PageIndex{1}\): Lattice Energies expresses as dissociation energies (right) and formation energies (left).
Note: You should not be confused by the difference in signs. If a crystal forms, it is more stable than the isolated ions, otherwise it will not form. So a negative value implies a formation enthalpy, and a positive value implies a dissociation enthalpy. Since energy is conserved, they are of equal magnitude, it is just that one direction is endothermic (breaking the bonds), and the other is exothermic (making the bonds).
Exercise \(\PageIndex{1}\)
Rank the following in order of increasing lattice energy (stronger energies, so more negative for formation, and more positive for dissociation). Justify your answers
LiF, LiCl, LiBr, LiI, MgF2, MgBr2, CdS, Al2O3:
- Answer
-
LiI < LiBr < LiCl < LiF because they are all +1/-1 and so size of ions matter, with the smaller ions resulting in stronger forces.
LiF < MgBr2 because the charges increase (+2/-1) interaction, and that effect is typically more important than radii
MgBr2 < MgF2 because fluoride is smaller than bromide (they have the same charges)
MgF2 < CdS because CdS has higher charges (+2/-2) vs (+2/-1)
Al2O3 has the largest crystal lattice energy because it has huges charges (+2/-3) and the ions are very small.
So the trend is
LiI < LiBr < LiCl < LiF < MgBr2 < MgF2 < CdS < Al2O3
Energy Cycles and the Born Haber Equation
The first law states that energy is conserved, and internal energy and enthalpy are state functions, which means their value is path independent. That is, the energy difference between two states is independent of the energy used to transition between the states. (You could pick a pencil off the floor and put in on your desk, or pick it up, run around the building, and put in on the desk. At the end, the energy difference of the pencil on the desk and the floor is the same, but the work done depends on the path you took).
This principle allows you to calculate the energy of a path you can not directly measure, and this is effectively an application of Hess's Law, although to more complex processes. In the figure below, you can calculate the lattice energy for the formation of Sodium chloride from the following known values
- Bond dissociation energy of chlorine (section. 8.9)
- Enthalpy of sublimation of sodium (section 5.7.4-calculate from enthalpies of formation)
- ionization energy of sodium (section 7.3.3)
- electron affinity of chlorine (section 7.3.4)
- enthalpy of formation of sodium chloride (s) (section 5.7.3)
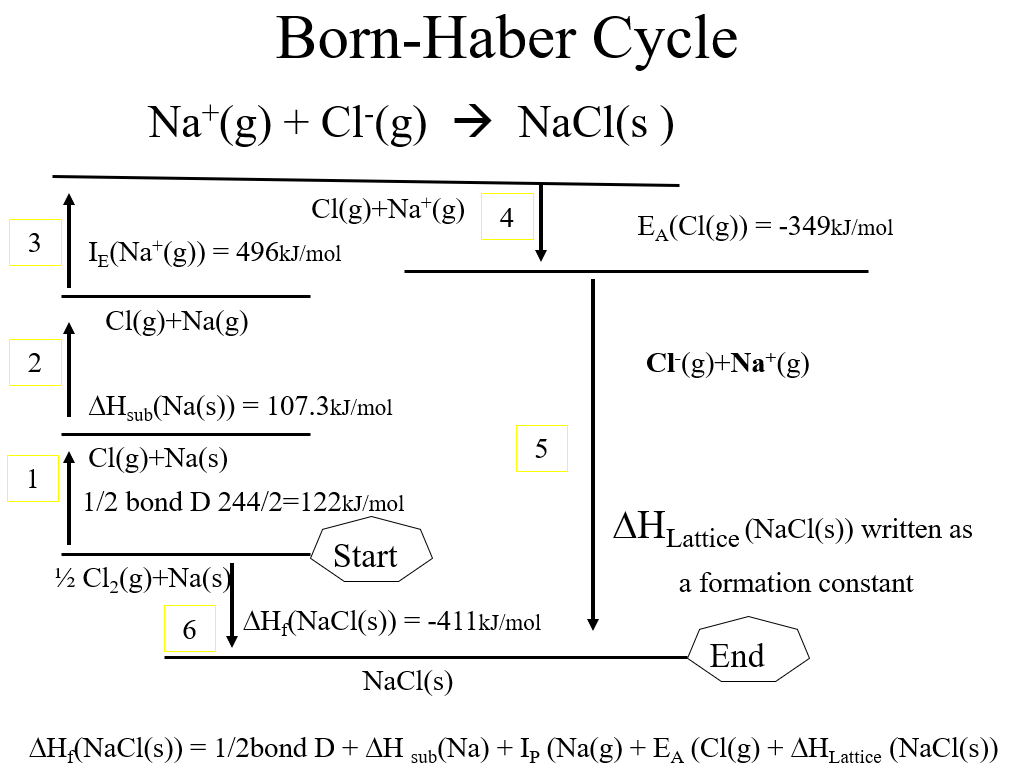 Figure \(\PageIndex{5}\): Born Haber cycle showing two paths for making NaCl(s) from its elements in their standard states, with one path involving the lattice energy. Since all the other steps (CC0 Bob Belford)
The molar enthalpy of formation of table salt [NaCl(s)] is the energy change associated with making one mole of the crystal sodium chloride from its elements in their standard state (1/2 mole of Cl2(g) and 1 mole Na(s)).
As energy is conserved, the energy change from the Start to the End is the same no matter the path. So
step 6 = step1 + step2 + step3 + step4 + step 5
so
Step5 = step6 - step1 - step2 - step3 - step4
If you know 5 of the steps, you can calculate the 6th. In this case, you are calculating step 5. Note: steps going up are endothermic (+ values) and those going down are exothermic (-) values. If two paths go to the same state, the final difference in energy must be the same, or energy is not conserved.
Step 1: 1/2 bond dissociation energy of Cl2(g) -Known (122 kJ/mol)
Step 2: Enthalpy of sublimation of Na(s) - Known (107.3 kJ/mol)
Step 3: Ionization energy of Na(g) - Known (496 kJ/mol)
Step 4: Electron affinity of Cl(g) - Known (-349 kJ/mol)
Step 5: Lattice formation energy of NaCl - Unkown
Step 6: Enthalpy of formation of NaCl - Known (-411 kJ/mol)
Step5 = step6 - step1 - step2 - step3 - step4
Step 5 = (-411 -122 -107.3 - 496 -(-349) kJ/mol = -7,873 kJ/mol (as a formation energy)
Exercise \(\PageIndex{2}\)
Calculate the Lattice Energy (Enthalpy of formation) for Rubidium Chloride, given:
- \(\Delta H_{f}^{o}[Rb(g)] = 80.9kJ/mol\)
- \(\Delta H_{f}^{o}[RbCl(s)] = -435.4kJ/mol\)
- IE(Rb)=403kJ/mol
- EA(Cl) = -349kJ/mol
- Bond Dissociation Energy (Cl-Cl) = 244kJ/mol
Video\(\PageIndex{1}\): Description of Born Harbor energy cycle and its use to calculate the lattice enthalpy of formation for RbCl.
Video\(\PageIndex{2}\): Using Hess's Law to solve for an unknown enthalpy, the lattice enthalpy of formation for barium chloride
- Answer
-
-692.3 kJ/mol (as an formation energy).
In Class Activities
ADAPT \(\PageIndex{1}\)
Contributors and Attributions
Robert E. Belford (University of Arkansas Little Rock; Department of Chemistry). The breadth, depth and veracity of this work is the responsibility of Robert E. Belford, rebelford@ualr.edu. You should contact him if you have any concerns. This material has both original contributions, and content built upon prior contributions of the LibreTexts Community and other resources, including but not limited to: