9.6: Grading Open-Ended Assessments
- Page ID
- 322397
\( \newcommand{\vecs}[1]{\overset { \scriptstyle \rightharpoonup} {\mathbf{#1}} } \) \( \newcommand{\vecd}[1]{\overset{-\!-\!\rightharpoonup}{\vphantom{a}\smash {#1}}} \)\(\newcommand{\id}{\mathrm{id}}\) \( \newcommand{\Span}{\mathrm{span}}\) \( \newcommand{\kernel}{\mathrm{null}\,}\) \( \newcommand{\range}{\mathrm{range}\,}\) \( \newcommand{\RealPart}{\mathrm{Re}}\) \( \newcommand{\ImaginaryPart}{\mathrm{Im}}\) \( \newcommand{\Argument}{\mathrm{Arg}}\) \( \newcommand{\norm}[1]{\| #1 \|}\) \( \newcommand{\inner}[2]{\langle #1, #2 \rangle}\) \( \newcommand{\Span}{\mathrm{span}}\) \(\newcommand{\id}{\mathrm{id}}\) \( \newcommand{\Span}{\mathrm{span}}\) \( \newcommand{\kernel}{\mathrm{null}\,}\) \( \newcommand{\range}{\mathrm{range}\,}\) \( \newcommand{\RealPart}{\mathrm{Re}}\) \( \newcommand{\ImaginaryPart}{\mathrm{Im}}\) \( \newcommand{\Argument}{\mathrm{Arg}}\) \( \newcommand{\norm}[1]{\| #1 \|}\) \( \newcommand{\inner}[2]{\langle #1, #2 \rangle}\) \( \newcommand{\Span}{\mathrm{span}}\)\(\newcommand{\AA}{\unicode[.8,0]{x212B}}\)
The ADAPT system facilitates streamlined open-ended grading via a dedicated grading portal for each assignment.
How to grade open-ended Questions (aka Human grading)
- To grade an assignment click the checkmark under Actions
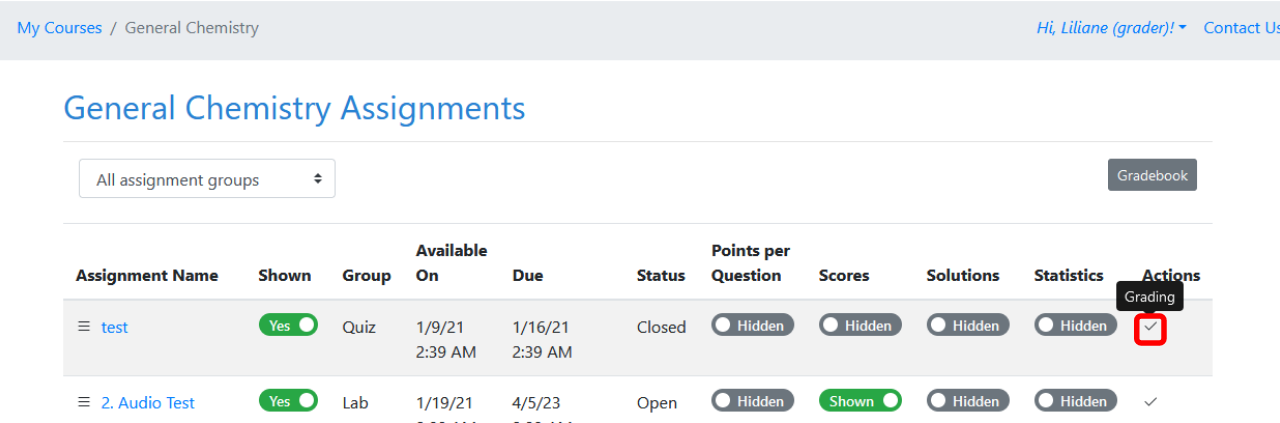
Figure \(\PageIndex{3}\): Click the checkmark to the right of assignment to grade to start grading - Figure \(\PageIndex{4}\) shows the first part of the grading interface
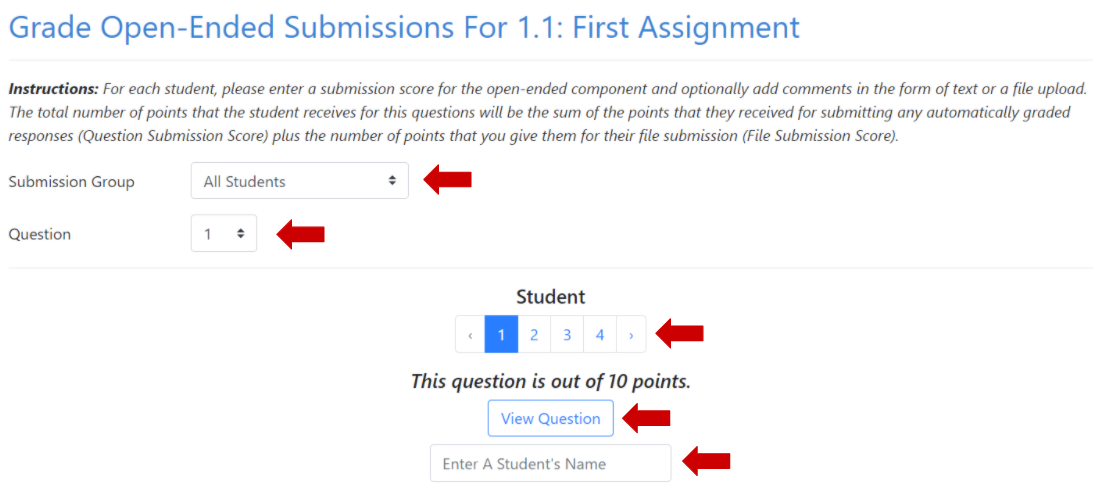
Figure \(\PageIndex{4}\): Grading controls - Submission Group - lets you choose if you want to see submissions from all students, only graded submissions or only ungraded submissions
- Question - You can select what question you'd like to grade and see student's submissions for that question only
- Student - Switch from student to student using numbers
- View Question - question text opens in a new window for you to review
- Enter Student's Name - allows you to quickly find a specific student by first or last name
- Figure \(\PageIndex{5}\) shows the second part of the grading interface
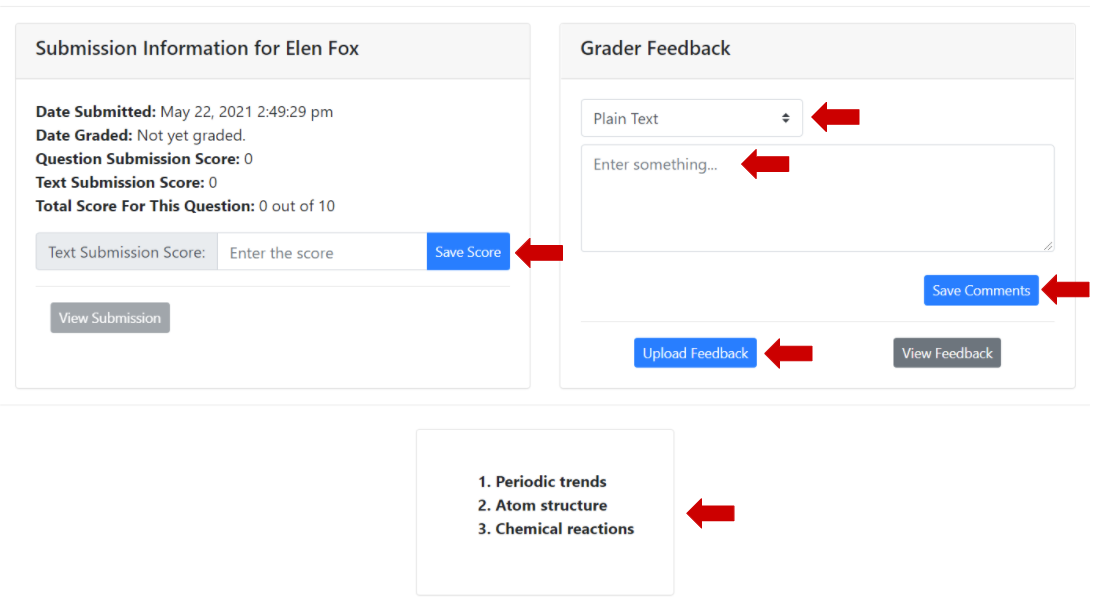
Figure \(\PageIndex{5}\): Grades and Feedback - Text Submission Score - provide your score for this question. You have to click "Save Score" to save the score
- Feedback Type - choose Plain Text, Rich Text or Canned Response. See Graders Feedback to learn more
- Comments section - provide your feedback to the student. Students will see it when you release the scores. You have to click "Save Comments", otherwise your feedback won't be saved
- Upload Feedback - you can choose to upload your feedback as an image/pdf file or record an audio feedback. See Grader Feedback to learn more
- Student's submission - this can be text, a file or an audio submission (see Figure \(\PageIndex{6}\) below)
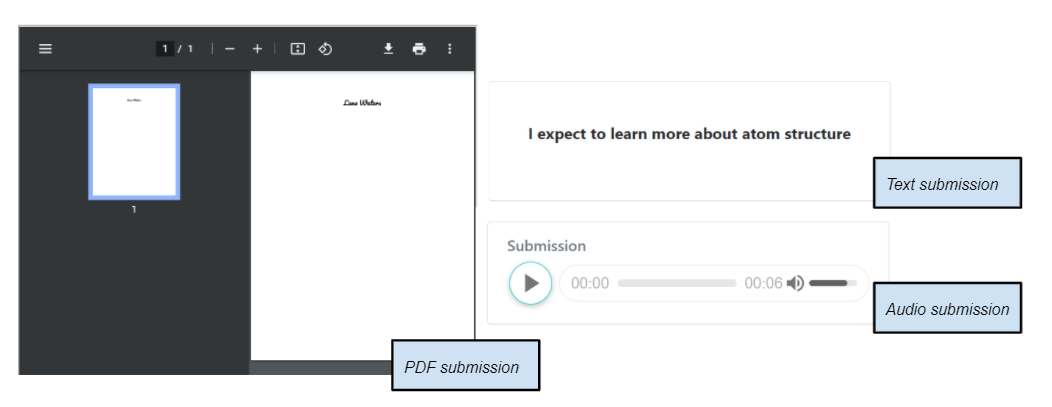
Figure \(\PageIndex{6}\): Different submission types
Grader Feedback
There are a few options to send Grader's feedback to students:
- Plain Text - as the name states this feedback is just text, without any special formatting options
- Rich Text - gives Graders some formatting options, like cut, copy, undo, redo, bold, italic, underline, subscript and superscript
- Canned Response - allows Graders to save their feedbacks and apply them when grading other students. Very useful in situations when you need to give the same feedback to several students. To use Canned Responses:
- Select "Canned Response" as Grader feedback type
- Click "Edit Responses"
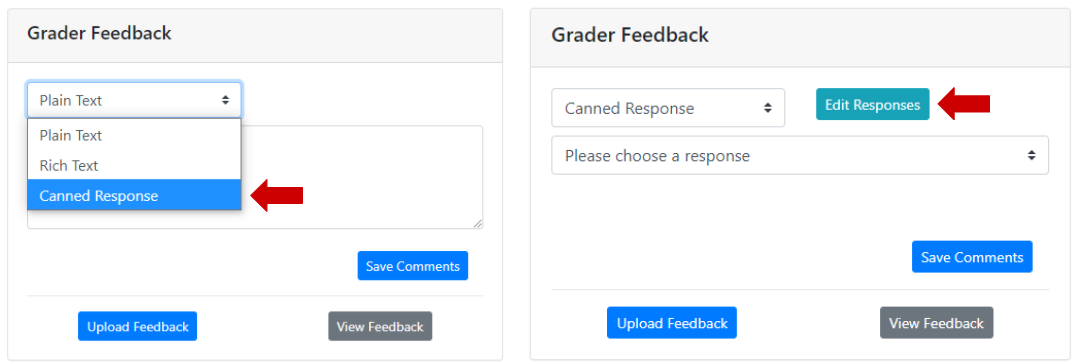
Figure \(\PageIndex{7}\): Select "Canned Response" and click "Edit Responses" to add a new canned response - Add your comment and click "Save Response"
- You can add as many as you need. Click "Ok" when you're done
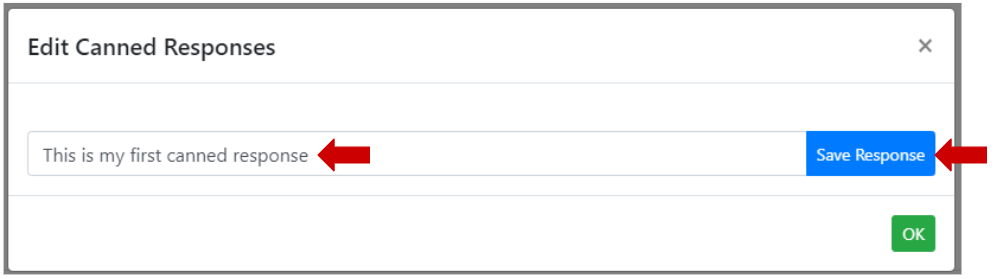
Figure \(\PageIndex{8}\): Type your Canned Response and click "Save Response". Repeat to add more Canned Responses. - To delete caned responses use Recycle Bin icon next to it
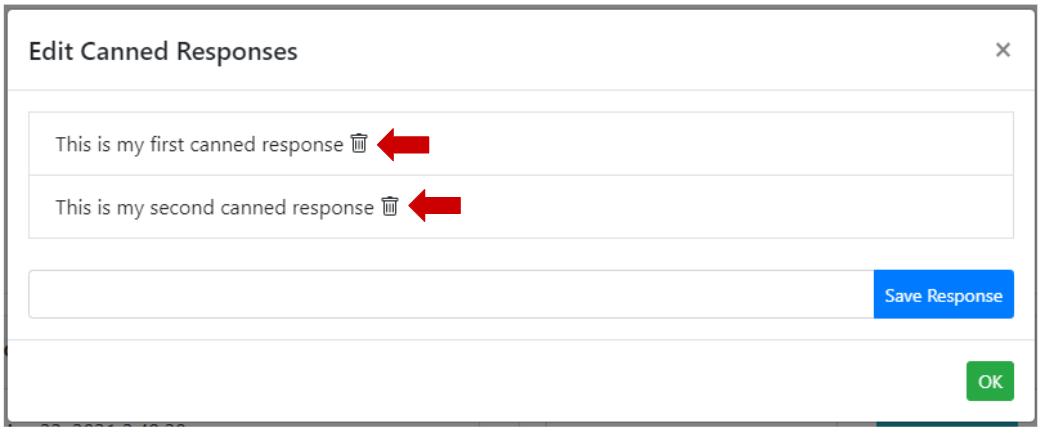
Figure \(\PageIndex{9}\): Click the Recycle Bin icon next to the Canned Response to delete it - To use one of your Canned Responses, select it from the drop-down menu and click "Save comments"
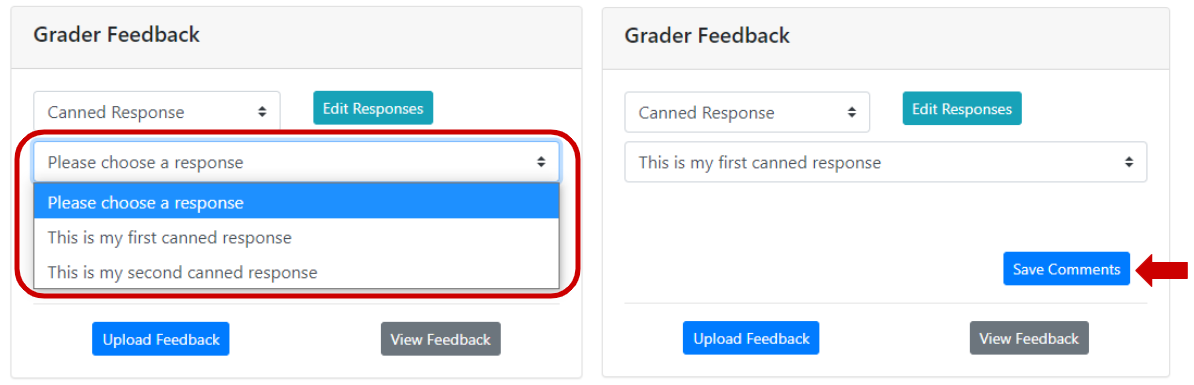
Figure \(\PageIndex{10}\): To add one of the Canned Responses as your feedback select the response and click "Save Comments"
- PDF/Image Feedback - Graders can upload a file as their feedback. To do that:
- Click "Upload Feedback"
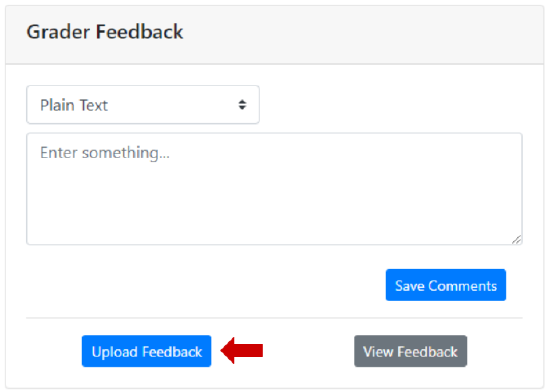
Figure \(\PageIndex{11}\): Click "Upload Feedback" to add a PDF or Image to your Feedback - Click "Browse" and choose a file from your device or simply drag and drop the file. Click "Submit"
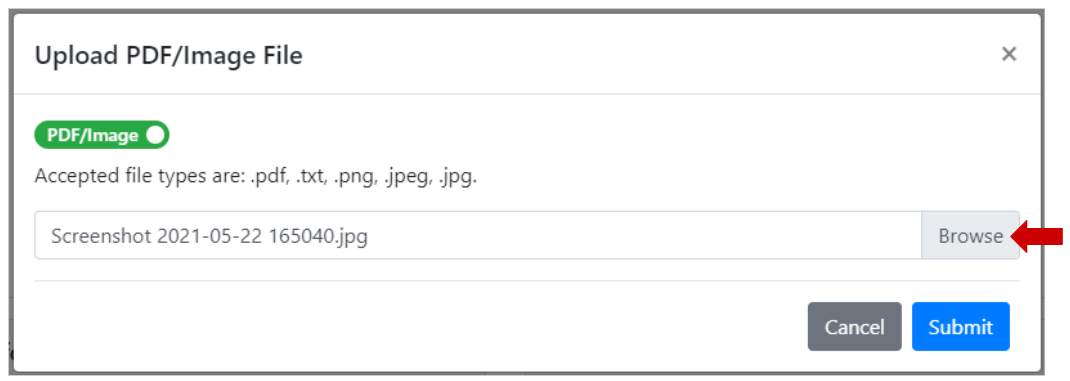
Figure \(\PageIndex{12}\): Click "Browse" to select the file or just drag and drop it in this area - To preview your file upload, click "View Feedback". Your file will be displayed below

Figure \(\PageIndex{13}\): To see the file you've uploaded, click "View Feedback" - To return to student's submission click "View Submission" under Submission Information
- Click "Upload Feedback"
- Audio Feedback - you can record an audio feedback up to 1 minute long. To do that:
- Click "Upload Feedback"
Figure \(\PageIndex{14}\): Click "Upload Feedback" to add an audio feedback - Switch the toggle from "PDF/Image" to "Audio" by clicking on it
- Click the Microphone icon to start recording. Click the Stop icon when you're done. Use Pause icon (will be available once you start recording) to pause your recording. Optional: You might see a message from your browser asking if you want to allow this website access to your microphone. You must select "Allow" to use the audio feedback feature.
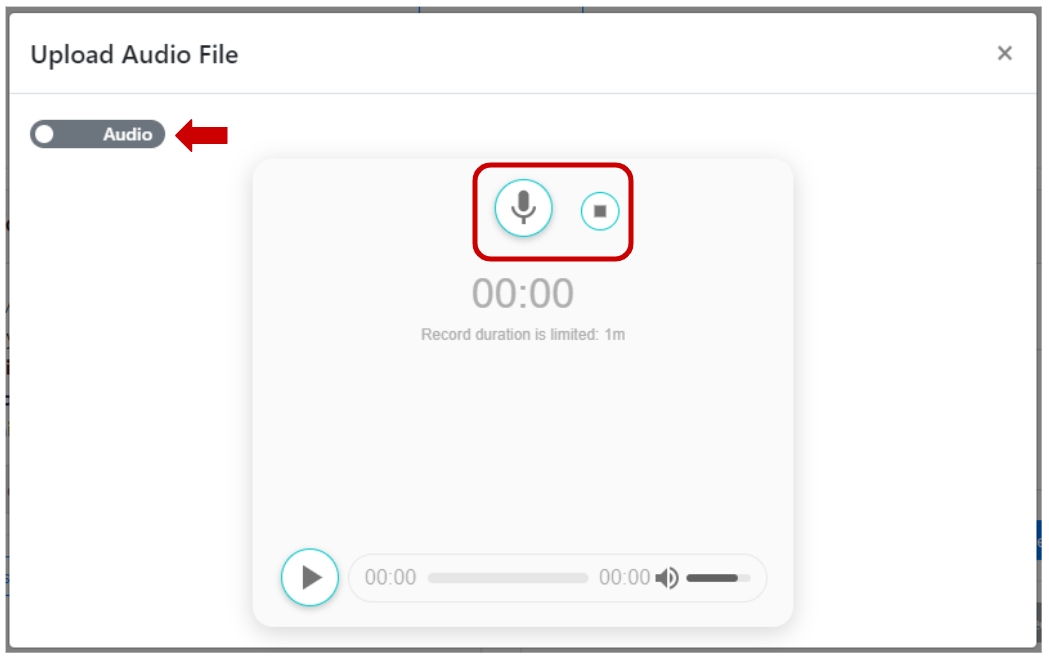
Figure \(\PageIndex{15}\): Make sure the toggle is switched to "Audio" - You can create several recordings. Click on the name of the recording to access controls.
To listen to the recording click Play button below
To delete the recording click the "X" to the left from the name
To save the recording to your device use the save icon with an arrow
To save it as your feedback use the floppy disk icon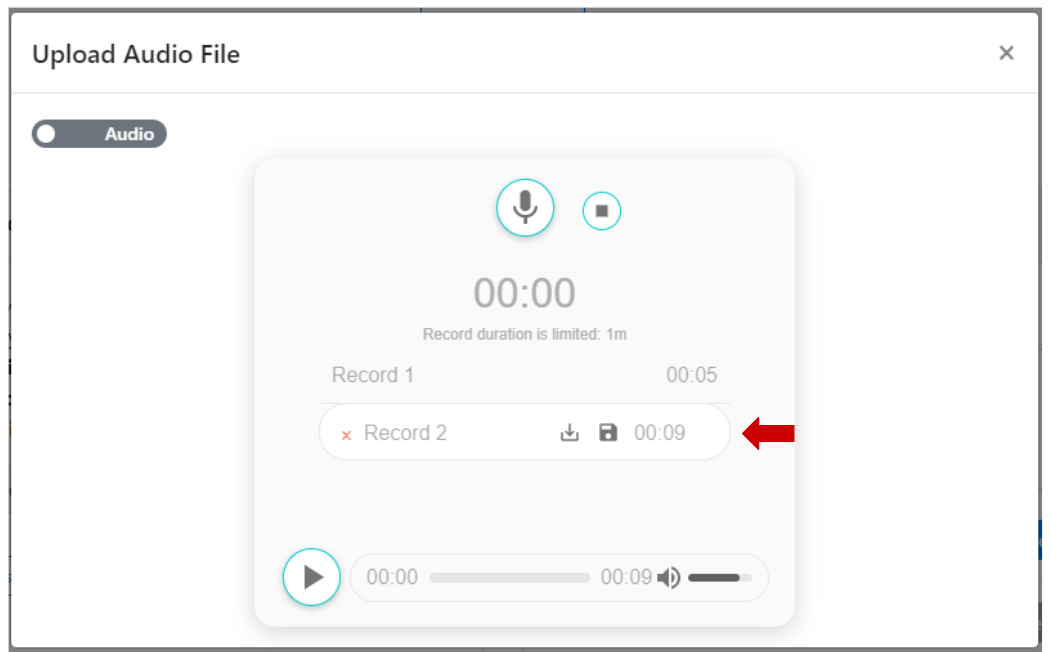
Figure \(\PageIndex{16}\): Click the floppy disk icon to save your feedback - You will see your audio feedback added below. To return to student's submission click "View Submission" under Submission Information
- Click "Upload Feedback"
Communicating with Students
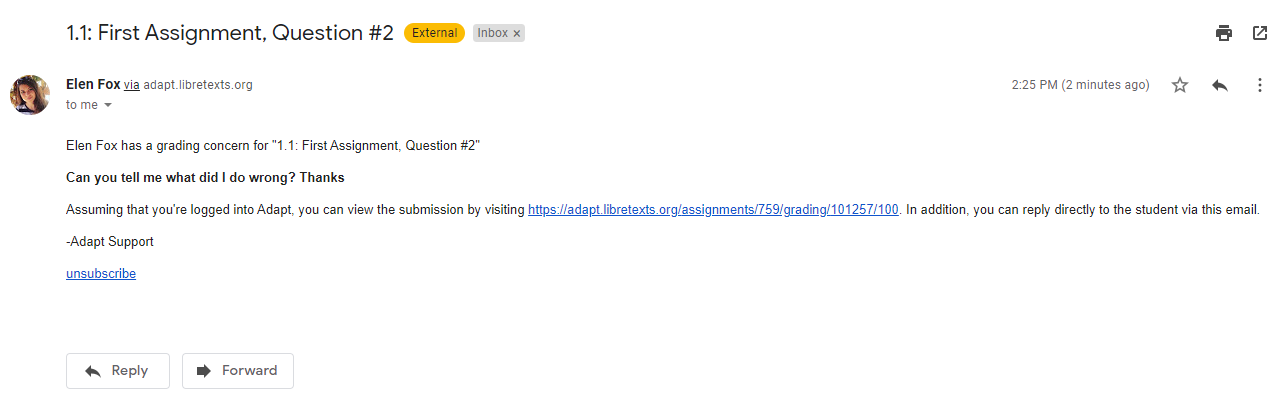
Students can send questions about their grades or submissions to the Grader. Grader will receive an email similar to the one shown in Figure \(\PageIndex{17}\). Grader can reply to the email directly or use the provided link that will take them to the grading section. The question that the message was about will be brought up. From here the process is the same as during the first time grading. Score can be updated or left the same, new feedback can also be added if needed