
Technique I Use of Spectrophotometer_1_1_1
- Page ID
- 305636
Technique I: Use of Spectrophotometer
Section 1: Purpose of Technique
This technique describes how to use a laboratory spectrophotometer.
Section 2: Operations of Spectronic 200E
There are several types of spectrophotometers that are used to determine the amount of light absorbed within a given sample solution. The spectrophotometers used in the lab are the Spectronic 20, Spectronic 20+ and Spectronic 200. Before using the Spectronic 200, follow these steps to make sure that no damage or injury will occur due to faulty or careless behavior.
NOTE: Several terms are used for the container used to hold a sample in a spectrometer. This procedure will use the term ‘optical cell’ but other terms like ‘cuvette’ may be used in reference texts and instrument manuals.
-
Make sure the spectrophotometer is on a stable, flat surface free from vibrations.
-
Plug in the spectrophotometer and turn it on by flipping the power switch at the back of the machine. The following image will appear on the screen when it is on. (Figure 1)

Figure 1. On screen
-
Make sure that the sample compartment is empty. Then, press ENTER. The following image will appear on the screen. (Figure 2)

Figure 2
-
Look at the image below. Once at this point, wait for approximately 1 minute.
-
The screen will then display the Home Menu. Use the arrows to select the SPEC 200E MODERN INTERFACE option, then press ENTER. (Figure 3)

Figure 3. SPEC 200E MODERN INTERFACE
-
The screen will then show APPLICATION LIVE DISPLAY. Press the right arrow. (Figure 4)

Figure 4. APPLICATION LIVE DISPLAY
-
The screen will then show APPLICATION MULTI λ, press the right arrow again. (Figure 5)

Figure 5. APPLICATION MULTI λ
-
Then the screen will show APPLICATION QUANT, press the right arrow again. Refer to figure 6.

Figure 6. APPLICATION QUANT
-
Then the screen will show APPLICATION ANALYZER, press the right arrow again. Refer to figure 7.

Figure 7. APPLICATION ANALYZER
-
Then the screen will show APPLICATION SCAN, press ENTER. Refer to figure 8.

Figure 8. APPLICATION SCAN
-
Fill an optical cell half-way with laboratory water. Use Light-Duty Tissue Wipers, to wipe off any fingerprints on the outside of the cell.
-
Place the optical cell into the sample compartment, then press the AUTOZERO KEY.
-
After the spectrophotometer is done zeroing, replace the optical cell filled with water with an optical cell filled with your chemical sample.
-
Wipe the optical cell with the Light-Duty Tissue Wipers and place it into the sample compartment. Press ENTER.
-
After the spectrophotometer is done analyzing the sample, a graph will appear to the right of the screen.
-
Use the right arrow to move cursor to the peak of the curve. This will show the peak absorption.
-
Press the HOME KEY when you are done. To turn the spectrophotometer off, flip the power switch on the back of the machine.
-
DO NOT move the spectrophotometer if it is plugged in, as it may cause damage to it. DO NOT yank the cord out of the wall, but gently pull from the base of the plug on the cord.
-
If there are any issues with the use of Spectronic 200, refer to the link below:
https://archive-resources.coleparmer.com/Manual_pdfs/02652-55.pdf
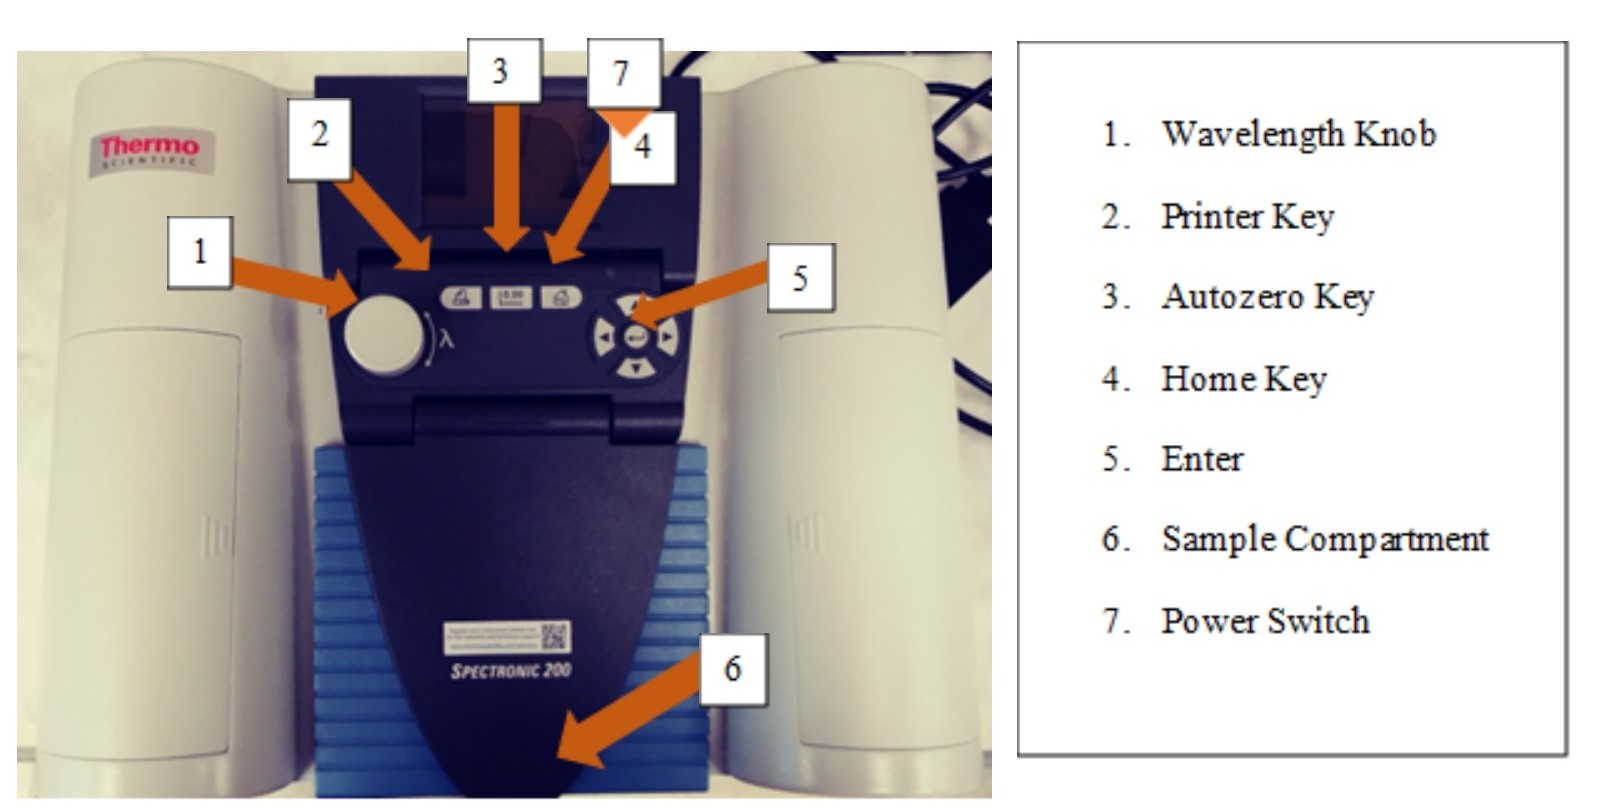
Figure 9. Spectronic 200
Section 3: How to Use the Spectronic 20 and 20+
To minimize any potential problems, follow these steps:
-
Turn on the spectrophotometer by turning the power switch located on the left side of the instrument. Allow for the instrument to warm up for 15 minutes.
-
After warming the machine up, use the Wavelength Control Knob to set to the wavelength that you want.
-
Adjust the filter lever to the needed position for the wavelength being used.
-
Set the mode to 100% T (Transmittance) or 0 A (Absorbance) by turning the knob under the wavelength knob. This may take several turns.
-
Fill a clean Spectronic 20 tube with laboratory water as a blank solution and wipe it with a KIMwipe™ to remove liquid droplets, dust, and fingerprint residue.
-
Place the Spectronic 20 tube in the sample compartment and align it with the guide mark within the compartment. Ensure that the optical cell is firmly placed in the compartment before closing the compartment cover.
-
Make sure that the absorbance of the water sample is at 0 by using the 100% T or 0A knob to adjust the absorbance accordingly.
-
Remove the tube from the sample compartment and discard the water.
-
Rinse the tube twice with whatever solution is being analyzed and then fill it half way with the solution.
-
Repeat steps 5 and 6, then read the screen to determine how much light is being absorbed by the solution (Absorbance).
-
For an accurate reading, make sure that the needle aligns with its reflection in the mirror.
-
Remove the Spectronic 20 tube from the sample compartment then close the lid of the compartment.
-
Turn off Spectronic 20 by turning the 100% T knob counterclockwise until it clicks.
-
If there are any issues with the use of Spectronic 20 and 20+, refer to the link below: http://fg.cns.utexas.edu/fg/course_notebook_appendix_ii_files/Spectronic_20_D.pdf
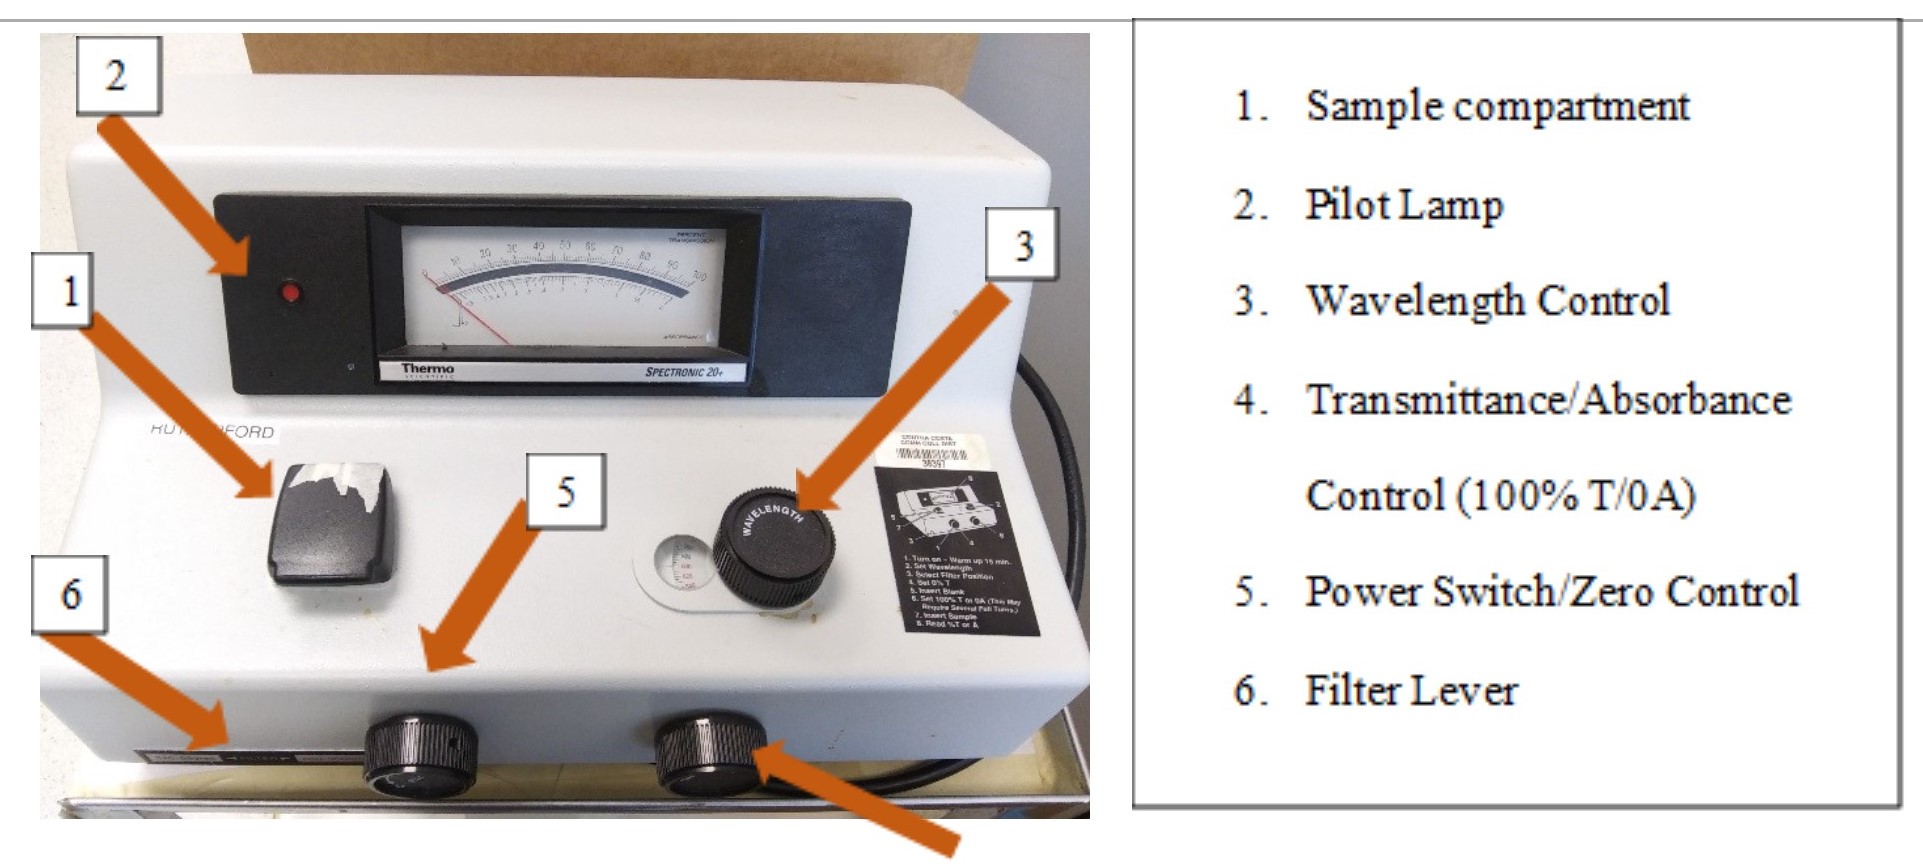
Figure 10. Spectronic 20+

Figure 11. Spectronic 20
Section 4: Tips for Using Spectrometers
To minimize any potential problems, follow these steps:
-
Do not touch the bottom of the optical cell (or tube) when placing it in the spectrophotometer. To ensure that optical cell (or tube) is clean, use a paper towel or Light-Duty Tissue wipers to wipe away fingerprints.
-
Make sure to fill the optical cell (or tube) half way with the solution to ensure that all of the light path in the spectrophotometer is used.
-
When pouring the solution into the optical cell (or tube), make sure there are no bubbles present in the solution as this could causes potential errors.
-
For Spectronic 20+ make sure to align the solution to the mark in the front of the instrument.
Section 5: References
http://fg.cns.utexas.edu/fg/course_notebook_appendix_ii_files/Spectronic_20_D.pdf
https://archive-resources.coleparmer.com/Manual_pdfs/02652-55.pdf