
5.9: Monitoring your Raspberry Pi
- Page ID
- 243941
Monitoring Clock Frequency, Voltage and Temperature
Using the vcgencmd command we can get some useful information about our Raspberry Pis.
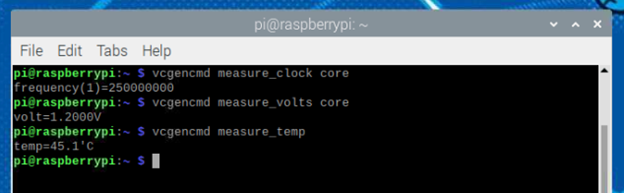
Open Terminal and type the following commands:
vcgencmd measure_clock core
vcgencmd measure_volts core
vcgencmd measure_temp
The output should look close to this one:
According to Raspberry Pi Documentation, the official operating CPU temperature limit is 85°C. When the core temperature reaches 80°C you will see a warning icon with a half-filled thermometer.

At this point various frequencies and sometimes voltages used on the chip (ARM*, GPU**) are reduced. It is necessary to reduce the amount of heat generated and keep the CPU temperature down.
If the CPU temperature reaches 85°C the ARM cores and the GPU will be throttled back. You will see another warning icon - a fully filled thermometer.

Using get_throttled Command
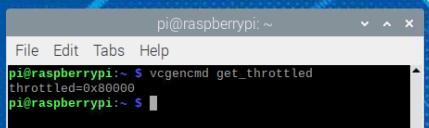
Now let’s look at another parameter we need. In your terminal type the following command and hit enter
vcgencmd get_throttled
You should see something like this (the numbers you get might be different)
But what does this mean? Let's check Raspberry Pi Documentation where we can find this information.
| Bit | Meaning |
|---|---|
| 0 | Under-voltage detected |
| 1 | Arm frequency capped |
| 2 | Currently throttled |
| 3 | Soft temperature limit active |
| 16 | Under-voltage has occurred |
| 17 | Arm frequency capping has occurred |
| 18 | Throttling has occurred |
| 19 | Soft temperature limit has occurred |
It helped some, but it is still not clear what those numbers mean and how to use this table. We need to look deeper. We are going to use Python to convert this value to an integer (it is a string by default) and then to a binary number.
1. Open Thonny
2. Convert the string you have to an integer
In this code 16 is a base we need to use to let Python know that it is a hexadecimal. You can also set the base to 0 and let Python figure it out based on the 0x in the number.
Both numbers will be the same, so you can choose which way is more convenient for you. We will use the first example.
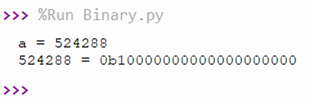
3. Now it’s time to convert the number we have to a binary number. Here is the full code:
4. The output will differ depending on the original value, but here is the output for our example:
To interpret this value we need to number the bits. Remember that numbering starts with zero and goes right to left (ignore 0b):

It is clear now that bit 19 is set (1 means on, 0 means off), which according to Table 1 indicates that Soft Temperature Limit has occurred at some point. The bits chart below was found in one of the Raspberry Pi firmware commit comment on GitHub. It illustrates the meaning of each bit and might be easier to use.
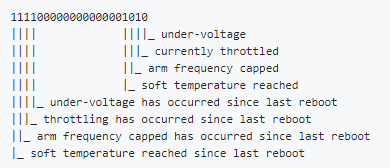
Soft Temperature Limit was introduced for the Raspberry Pi 3B+ Model. When the temperature reaches 60°C (default Soft Temperature Limit) the clock speed goes from 1.4GHz to 1.2GHz and the operating voltage is also reduced slightly. It is necessary to reduce the rate at which the temperature is increasing. Basically, you are trading a shorter period at 1.4GHz for a longer period at 1.2GHz. This gives you more time before the Raspberry Pi reaches the hard limit of 85°C.
______
*ARM - Advanced RISC Machine.
**GPU - Graphics Processing Unit.
Contributors and Attributions
- Elena Lisitsyna