
Send Email from NodeMCU
- Page ID
- 290610
You will need
- ESP8266-NodeMCU Development Board
- USB to MicroUSB cable
Set up SMTP server
1. Go to https://www.smtp2go.com/
2. Click Try SMTP2GO Free. This plan includes up to a thousand emails per month, which should be enough for our needs.

3. Follow the steps to create a new account. You must use your work/school email since SMTP2GO does not work with public domains (like @gmail.com)
4. Check your email and activate account
5. Write down/copy your SMTP Username and SMTP Password and click “Finish”
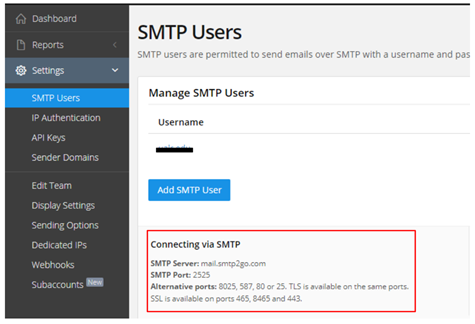
6. Navigate to Settings → SMTP Users. Where you can find SMTP Server and Port
7. Change Username and Password. We have to change Username and Password to base64 encoded format with ASCII character set. Go to https://www.base64encode.org/. Use the picture below as a reference for settings.
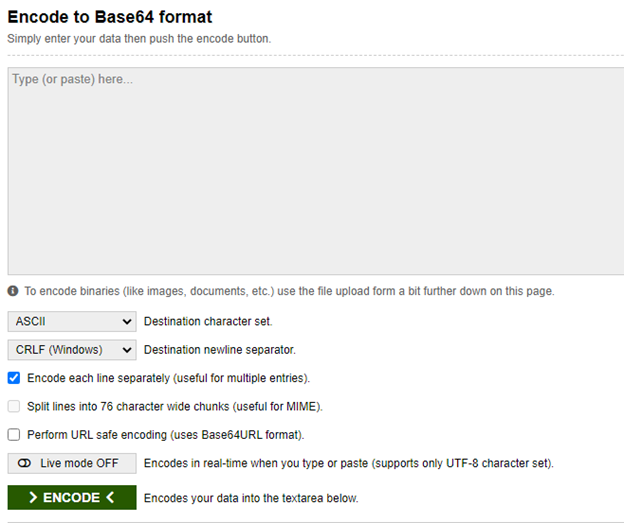
Add your Username and Password (from step 5) as two separate lines and hit >ENCODE<
Copy the encoded username and password.
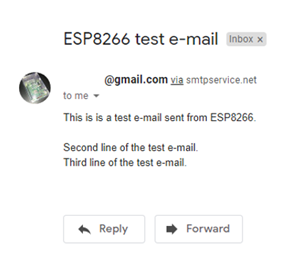
Test Email
We will start by sending a test email that will contain three lines. Open Arduino and paste the code below. You will need to read the comments and change the code accordingly.
#include <ESP8266WiFi.h>
const char* ssid = "WiFi Name";   // Enter the name of your WiFi Network.
const char* password = "WiFi Password";  // Enter WiFi Password.
char server[] = "mail.smtp2go.com";   // The SMTP Server the we setup earlier

WiFiClient espClient;


void setup() {
  Serial.begin(115200);
  delay(10);
  Serial.println("");
  Serial.println("");
  Serial.print("Connecting To: ");
  Serial.println(ssid);
  WiFi.begin(ssid, password);

  while (WiFi.status() != WL_CONNECTED) {
       delay(500);
       Serial.print("*");
  }
  Serial.println("");
  Serial.println("WiFi Connected.");
  byte ret = sendEmail();
 }


void loop(){
}

byte sendEmail() {
  if (espClient.connect(server, 2525) == 1)  {
       Serial.println(F("connected"));
  } else {
       Serial.println(F("connection failed"));
       return 0;
  }
  if (!emailResp())
    return 0;

  Serial.println(F("Sending EHLO"));
  espClient.println("EHLO www.example.com");
  if (!emailResp())
       return 0;

  Serial.println(F("Sending auth login"));
  espClient.println("AUTH LOGIN");
  if (!emailResp())
       return 0;

  Serial.println(F("Sending User"));


  espClient.println("Enter Encoded Username Here"); // Paste your encoded Username here
  if (!emailResp())
       return 0;

  Serial.println(F("Sending Password"));

  espClient.println("Your Encoded Password Here"); // Paste your encoded Password here

  if (!emailResp())
       return 0;

  Serial.println(F("Sending From"));

  espClient.println(F("MAIL From: xyz@gmail.com")); // Replace with sender email address
  if (!emailResp())
       return 0;

  Serial.println(F("Sending To"));
  espClient.println(F("RCPT To: xyz@ualr.edu")); // Replace with receiver email address
  if (!emailResp())
       return 0;

  Serial.println(F("Sending DATA"));
  espClient.println(F("DATA"));
  if (!emailResp())
       return 0;
  Serial.println(F("Sending email"));

  espClient.println(F("To:  xyz@ualr.edu ")); // Replace with receiver email address

  espClient.println(F("From: xyz@gmail.com")); // Replace with sender email address
  espClient.println(F("Subject: ESP8266 test e-mail\r\n")); // Edit subject as needed
  espClient.println(F("This is is a test e-mail sent from ESP8266.\n"));
  espClient.println(F("Second line of the test e-mail."));
  espClient.println(F("Third line of the test e-mail."));
  //
  espClient.println(F("."));
  if (!emailResp())
       return 0;
  //
  Serial.println(F("Sending QUIT"));
  espClient.println(F("QUIT"));
  if (!emailResp())
       return 0;
  //
  espClient.stop();
  Serial.println(F("disconnected"));
  return 1;
}

byte emailResp() {
  byte responseCode;
  byte readByte;
  int loopCount = 0;

  while (!espClient.available()) {
       delay(1);
       loopCount++;

       if (loopCount > 20000)
       {
       espClient.stop();
       Serial.println(F("\r\nTimeout"));
       return 0;
       }
  }

  responseCode = espClient.peek();
  while (espClient.available()) {
       readByte = espClient.read();
       Serial.write(readByte);
  }

  if (responseCode >= '4') {

       return 0;
  }
  return 1;
}
Check your email and adjust the code as needed.
Email IP Address
Sometimes it is helpful to know the IP address of your microcontroller. There is a code that allows you to print the IP address to Serial Monitor, but it is not always convenient as to do that you have to connect your NodeMCU to your computer and also erase whatever code you had there before, upload the IP code, then replace it with the old code again. It is easier to set your microcontroller to send an email with its IP address at reboot.
Make a copy of the Sketch we used to send a test email and replace the body of the email with the following line:
espClient.println(WiFi.localIP());
You can alter the subject to reflect the contents of the email.