

6.1.8: A Different Perspective on Drawing Lewis Structures
- Page ID
- 517022
\( \newcommand{\vecs}[1]{\overset { \scriptstyle \rightharpoonup} {\mathbf{#1}} } \)
\( \newcommand{\vecd}[1]{\overset{-\!-\!\rightharpoonup}{\vphantom{a}\smash {#1}}} \)
\( \newcommand{\dsum}{\displaystyle\sum\limits} \)
\( \newcommand{\dint}{\displaystyle\int\limits} \)
\( \newcommand{\dlim}{\displaystyle\lim\limits} \)
\( \newcommand{\id}{\mathrm{id}}\) \( \newcommand{\Span}{\mathrm{span}}\)
( \newcommand{\kernel}{\mathrm{null}\,}\) \( \newcommand{\range}{\mathrm{range}\,}\)
\( \newcommand{\RealPart}{\mathrm{Re}}\) \( \newcommand{\ImaginaryPart}{\mathrm{Im}}\)
\( \newcommand{\Argument}{\mathrm{Arg}}\) \( \newcommand{\norm}[1]{\| #1 \|}\)
\( \newcommand{\inner}[2]{\langle #1, #2 \rangle}\)
\( \newcommand{\Span}{\mathrm{span}}\)
\( \newcommand{\id}{\mathrm{id}}\)
\( \newcommand{\Span}{\mathrm{span}}\)
\( \newcommand{\kernel}{\mathrm{null}\,}\)
\( \newcommand{\range}{\mathrm{range}\,}\)
\( \newcommand{\RealPart}{\mathrm{Re}}\)
\( \newcommand{\ImaginaryPart}{\mathrm{Im}}\)
\( \newcommand{\Argument}{\mathrm{Arg}}\)
\( \newcommand{\norm}[1]{\| #1 \|}\)
\( \newcommand{\inner}[2]{\langle #1, #2 \rangle}\)
\( \newcommand{\Span}{\mathrm{span}}\) \( \newcommand{\AA}{\unicode[.8,0]{x212B}}\)
\( \newcommand{\vectorA}[1]{\vec{#1}} % arrow\)
\( \newcommand{\vectorAt}[1]{\vec{\text{#1}}} % arrow\)
\( \newcommand{\vectorB}[1]{\overset { \scriptstyle \rightharpoonup} {\mathbf{#1}} } \)
\( \newcommand{\vectorC}[1]{\textbf{#1}} \)
\( \newcommand{\vectorD}[1]{\overrightarrow{#1}} \)
\( \newcommand{\vectorDt}[1]{\overrightarrow{\text{#1}}} \)
\( \newcommand{\vectE}[1]{\overset{-\!-\!\rightharpoonup}{\vphantom{a}\smash{\mathbf {#1}}}} \)
\( \newcommand{\vecs}[1]{\overset { \scriptstyle \rightharpoonup} {\mathbf{#1}} } \)
\(\newcommand{\longvect}{\overrightarrow}\)
\( \newcommand{\vecd}[1]{\overset{-\!-\!\rightharpoonup}{\vphantom{a}\smash {#1}}} \)
\(\newcommand{\ket}[1]{\left| #1 \right>}\)
\(\newcommand{\bra}[1]{\left< #1 \right|}\)
\(\newcommand{\braket}[2]{\left< #1 \vphantom{#2} \right| \left. #2 \vphantom{#1} \right>}\)
\(\newcommand{\braopket}[3]{\left< #1 \vphantom{#2}\vphantom{#3} \right| #2 \vphantom{#1}\vphantom{#3} \left| #3 \vphantom{#1}\vphantom{#2} \right>}\)
\(\newcommand{\qmvec}[1]{\mathbf{\vec{#1}}}\)
\(\newcommand{\op}[1]{\hat{\mathbf{#1}}}\)
\(\newcommand{\expect}[1]{\langle #1 \rangle}\)
\(\newcommand{\dfn}[1]{\emph{\textbf{#1}}}\)
Learning Objectives
- Recognize that using formal charges to determine how many bonds to make, is different perspective on drawing Lewis Structures.
Using formal charges to determine how many bonds to make, a different perspective...
If we draw the Lewis structure for PO43– ion using the rules you’ve seen earlier, we come up with the structure below. It has the correct number of electrons (32), and every atom satisfies the octet rule.

However, many textbooks (and websites) insist that the structure below is a better one, even though the phosphorus atom has ten electrons around it:

The first structure follows the rules for drawing structures. So why do chemists add a double bond? To understand, we need the formal charges on the atoms in each structure…

Many chemists prefer the second structure because it gives us a couple of zeroes. However, the phosphorus atom in the second structure violates the octet rule. So which structure is best?? The answer is that either structure is legitimate. Both structures give us all of the information we need about phosphate ion; they allow us to predict the shape of the molecule, the angles between the bonds, and whether the molecule is polar.
So which structure should YOU draw on a test? Be sure to check with your instructor, but most will accept either one. However, the first structure is easier to figure out, because it’s the structure you produce when you follow the provided rules. The second structure requires more work. Therefore, we recommend that when you draw a structure that satisfies the octet rule, you stop there without adding more bonds.
WARNING: Some students come to Chem 101A having been taught to draw Lewis structures with extra double bonds.
If you’re familiar with Lewis structures and you like the extra bonds… congratulations! You have less to learn – you already know all of this stuff.
BUT…
If you draw structures with extra bonds, they have to be correct. For example, a structure for phosphate that has two double bonds is not acceptable.

Also, a structure for nitrate ion (NO3–) that has two double bonds is not acceptable, even though it gives you more zeroes. The structure with one double bond is the only acceptable one.
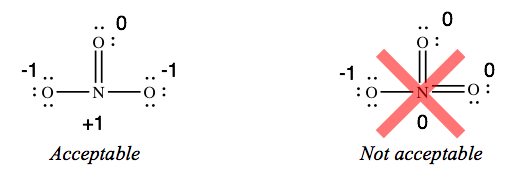
If you don’t know why the structures I’ve labeled “unacceptable” are not allowed, don’t risk losing points by adding extra bonds when the central atom already has eight electrons.
Using formal charges to evaluate which is the best central atom...
Generally, you are told which atom is the central bonding atom in the molecule. However, if it is unclear, or if you are asked to decide which atom is central, formal charges can be used to decide. The following is an example.
Example: calculating the formal charges in HCN and HNC
For the arrangement HCN, the Lewis structure: H–C\(\equiv\)N:
The formal charges work out as follows:

For the arrangement HNC, the Lewis structure: H–N\(\equiv\)C:
The formal charges work out as follows:

Both Lewis structures have a net formal charge of zero, but note that the formal charges on the first structure are all zero! Thus the first Lewis structure is predicted to be more stable, and it is, in fact, the structure observed experimentally. In general, the closer the formal charges are to zero, the more stable the structure. Remember, though, that formal charges do not represent the actual charges on atoms in a molecule or ion. They are used simply as a book-keeping method for predicting the most stable Lewis structure for a compound.
Summary
References
Contributors and Attributions
James Armstrong, City College of San Francisco
Torrey Glenn, City College of San Francisco