3.4F: Second Crop Crystallization
- Page ID
- 95760
\( \newcommand{\vecs}[1]{\overset { \scriptstyle \rightharpoonup} {\mathbf{#1}} } \)
\( \newcommand{\vecd}[1]{\overset{-\!-\!\rightharpoonup}{\vphantom{a}\smash {#1}}} \)
\( \newcommand{\id}{\mathrm{id}}\) \( \newcommand{\Span}{\mathrm{span}}\)
( \newcommand{\kernel}{\mathrm{null}\,}\) \( \newcommand{\range}{\mathrm{range}\,}\)
\( \newcommand{\RealPart}{\mathrm{Re}}\) \( \newcommand{\ImaginaryPart}{\mathrm{Im}}\)
\( \newcommand{\Argument}{\mathrm{Arg}}\) \( \newcommand{\norm}[1]{\| #1 \|}\)
\( \newcommand{\inner}[2]{\langle #1, #2 \rangle}\)
\( \newcommand{\Span}{\mathrm{span}}\)
\( \newcommand{\id}{\mathrm{id}}\)
\( \newcommand{\Span}{\mathrm{span}}\)
\( \newcommand{\kernel}{\mathrm{null}\,}\)
\( \newcommand{\range}{\mathrm{range}\,}\)
\( \newcommand{\RealPart}{\mathrm{Re}}\)
\( \newcommand{\ImaginaryPart}{\mathrm{Im}}\)
\( \newcommand{\Argument}{\mathrm{Arg}}\)
\( \newcommand{\norm}[1]{\| #1 \|}\)
\( \newcommand{\inner}[2]{\langle #1, #2 \rangle}\)
\( \newcommand{\Span}{\mathrm{span}}\) \( \newcommand{\AA}{\unicode[.8,0]{x212B}}\)
\( \newcommand{\vectorA}[1]{\vec{#1}} % arrow\)
\( \newcommand{\vectorAt}[1]{\vec{\text{#1}}} % arrow\)
\( \newcommand{\vectorB}[1]{\overset { \scriptstyle \rightharpoonup} {\mathbf{#1}} } \)
\( \newcommand{\vectorC}[1]{\textbf{#1}} \)
\( \newcommand{\vectorD}[1]{\overrightarrow{#1}} \)
\( \newcommand{\vectorDt}[1]{\overrightarrow{\text{#1}}} \)
\( \newcommand{\vectE}[1]{\overset{-\!-\!\rightharpoonup}{\vphantom{a}\smash{\mathbf {#1}}}} \)
\( \newcommand{\vecs}[1]{\overset { \scriptstyle \rightharpoonup} {\mathbf{#1}} } \)
\( \newcommand{\vecd}[1]{\overset{-\!-\!\rightharpoonup}{\vphantom{a}\smash {#1}}} \)
\(\newcommand{\avec}{\mathbf a}\) \(\newcommand{\bvec}{\mathbf b}\) \(\newcommand{\cvec}{\mathbf c}\) \(\newcommand{\dvec}{\mathbf d}\) \(\newcommand{\dtil}{\widetilde{\mathbf d}}\) \(\newcommand{\evec}{\mathbf e}\) \(\newcommand{\fvec}{\mathbf f}\) \(\newcommand{\nvec}{\mathbf n}\) \(\newcommand{\pvec}{\mathbf p}\) \(\newcommand{\qvec}{\mathbf q}\) \(\newcommand{\svec}{\mathbf s}\) \(\newcommand{\tvec}{\mathbf t}\) \(\newcommand{\uvec}{\mathbf u}\) \(\newcommand{\vvec}{\mathbf v}\) \(\newcommand{\wvec}{\mathbf w}\) \(\newcommand{\xvec}{\mathbf x}\) \(\newcommand{\yvec}{\mathbf y}\) \(\newcommand{\zvec}{\mathbf z}\) \(\newcommand{\rvec}{\mathbf r}\) \(\newcommand{\mvec}{\mathbf m}\) \(\newcommand{\zerovec}{\mathbf 0}\) \(\newcommand{\onevec}{\mathbf 1}\) \(\newcommand{\real}{\mathbb R}\) \(\newcommand{\twovec}[2]{\left[\begin{array}{r}#1 \\ #2 \end{array}\right]}\) \(\newcommand{\ctwovec}[2]{\left[\begin{array}{c}#1 \\ #2 \end{array}\right]}\) \(\newcommand{\threevec}[3]{\left[\begin{array}{r}#1 \\ #2 \\ #3 \end{array}\right]}\) \(\newcommand{\cthreevec}[3]{\left[\begin{array}{c}#1 \\ #2 \\ #3 \end{array}\right]}\) \(\newcommand{\fourvec}[4]{\left[\begin{array}{r}#1 \\ #2 \\ #3 \\ #4 \end{array}\right]}\) \(\newcommand{\cfourvec}[4]{\left[\begin{array}{c}#1 \\ #2 \\ #3 \\ #4 \end{array}\right]}\) \(\newcommand{\fivevec}[5]{\left[\begin{array}{r}#1 \\ #2 \\ #3 \\ #4 \\ #5 \\ \end{array}\right]}\) \(\newcommand{\cfivevec}[5]{\left[\begin{array}{c}#1 \\ #2 \\ #3 \\ #4 \\ #5 \\ \end{array}\right]}\) \(\newcommand{\mattwo}[4]{\left[\begin{array}{rr}#1 \amp #2 \\ #3 \amp #4 \\ \end{array}\right]}\) \(\newcommand{\laspan}[1]{\text{Span}\{#1\}}\) \(\newcommand{\bcal}{\cal B}\) \(\newcommand{\ccal}{\cal C}\) \(\newcommand{\scal}{\cal S}\) \(\newcommand{\wcal}{\cal W}\) \(\newcommand{\ecal}{\cal E}\) \(\newcommand{\coords}[2]{\left\{#1\right\}_{#2}}\) \(\newcommand{\gray}[1]{\color{gray}{#1}}\) \(\newcommand{\lgray}[1]{\color{lightgray}{#1}}\) \(\newcommand{\rank}{\operatorname{rank}}\) \(\newcommand{\row}{\text{Row}}\) \(\newcommand{\col}{\text{Col}}\) \(\renewcommand{\row}{\text{Row}}\) \(\newcommand{\nul}{\text{Nul}}\) \(\newcommand{\var}{\text{Var}}\) \(\newcommand{\corr}{\text{corr}}\) \(\newcommand{\len}[1]{\left|#1\right|}\) \(\newcommand{\bbar}{\overline{\bvec}}\) \(\newcommand{\bhat}{\widehat{\bvec}}\) \(\newcommand{\bperp}{\bvec^\perp}\) \(\newcommand{\xhat}{\widehat{\xvec}}\) \(\newcommand{\vhat}{\widehat{\vvec}}\) \(\newcommand{\uhat}{\widehat{\uvec}}\) \(\newcommand{\what}{\widehat{\wvec}}\) \(\newcommand{\Sighat}{\widehat{\Sigma}}\) \(\newcommand{\lt}{<}\) \(\newcommand{\gt}{>}\) \(\newcommand{\amp}{&}\) \(\definecolor{fillinmathshade}{gray}{0.9}\)As previously discussed, a portion of the compound of interest always remains dissolved in the mother liquor and is filtered away. This is not to say that this portion is lost, as it is possible to recover additional compound from the mother liquor. The solvent can be concentrated in the original vessel or on a rotary evaporator, and a second crystallization can be attempted. A second crystallization from the mother liquor of the first crystallization is called a "second crop crystallization".
To demonstrate this process, a \(1.16 \: \text{g}\) sample of trans-cinnamic acid was crystallized from a methanol/water mixed solvent system (Figure 3.31). \(0.95 \: \text{g}\) of a "first crop" of crystals was collected, representing an \(82\%\) recovery.
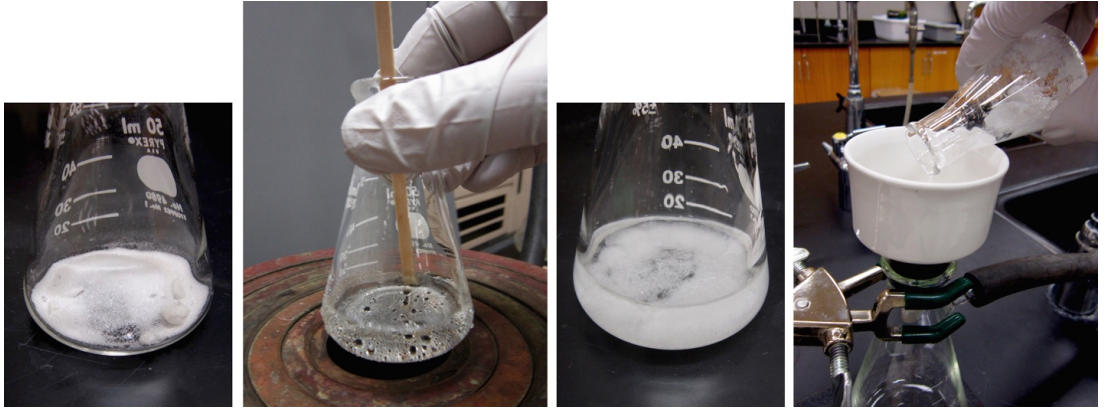
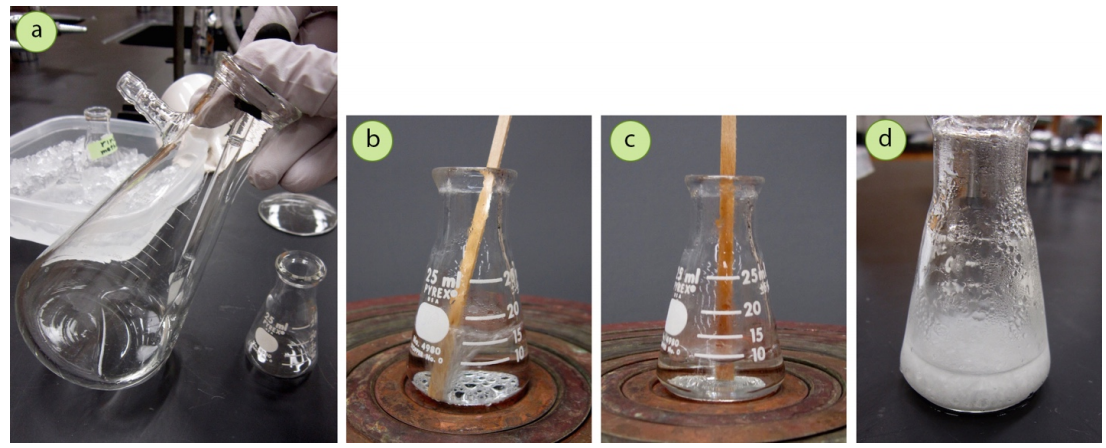
To collect a second crop of crystals, the filtrate was pipetted into an Erlenmeyer flask (Figure 3.32a) and boiled to reduce the volume by half (Figures 3.32b+c). When this solution was cooled, another \(0.08 \: \text{g}\) of compound crystallized out (Figure 3.32d), making the combined recovery of trans-cinnamic acid \(1.03 \: \text{g}\), or \(89\%\).
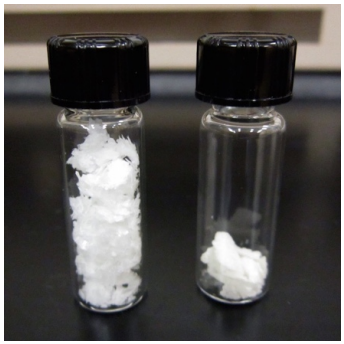
A "second crop" solid should always be kept separate from a "first crop" solid until its purity can be verified. A second crop crystal is usually more impure than a first crop crystal, as it crystallizes from a solution that contains a higher percentage of impurities (the first crop removed more compound, leaving more impurities behind).
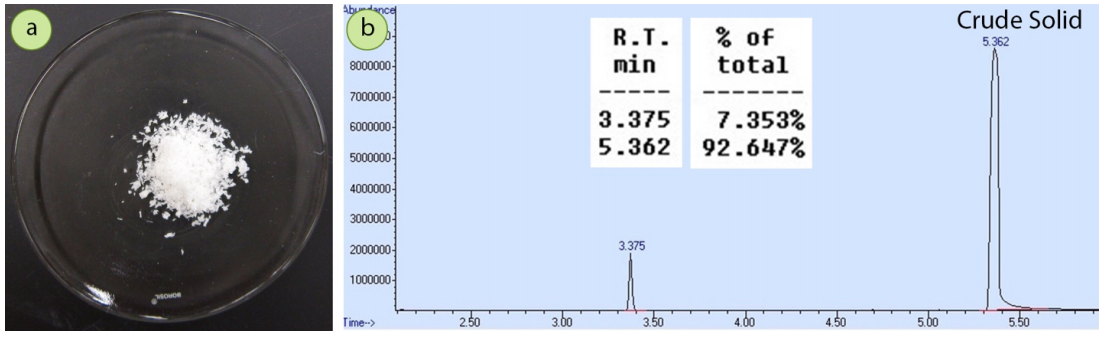
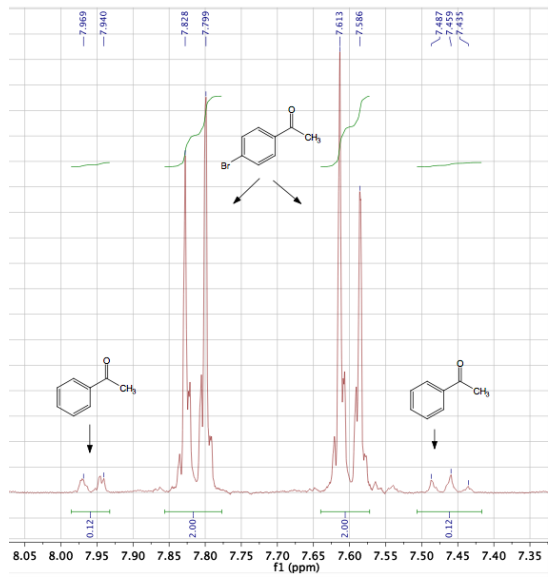
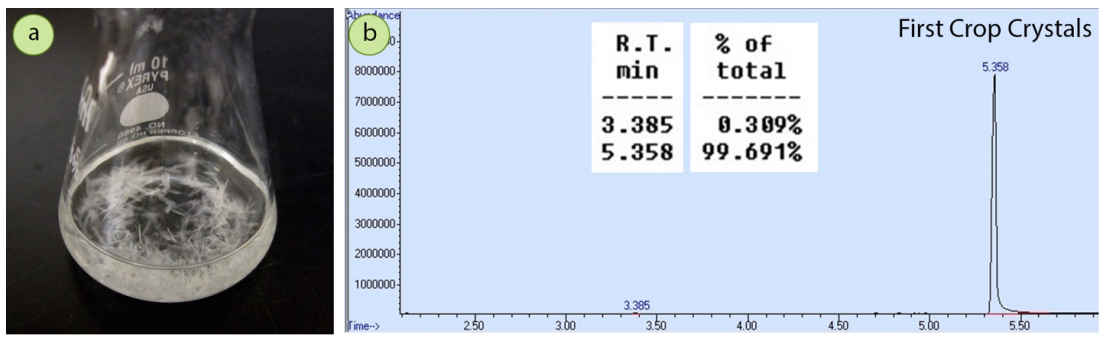
To demonstrate the relative purity of first crop and second crop crystals, a \(1.5 \: \text{g}\) mixture of 4-bromoacetophenone contaminated with a small amount of acetophenone was crystallized using ethanol. A GC spectrum of the original mixture (Figure 3.33b) shows the sample to have approximately \(7 \: \text{mol}\%\) acetophenone impurity.
Quantitation by a GC-MS instrument can sometimes be inaccurate, so the composition was also calculated through \(\ce{^1H}\) NMR integrations. The partial \(\ce{^1H}\) NMR spectrum of this sample is in Figure 3.34, and integrations indicate the sample is \(5.6 \: \text{mol}\%\) acetophenone. There is good agreement between the two quantitative methods.
After the mixture was crystallized from ethanol, a GC spectrum of the resulting solid (\(0.93 \: \text{g}\), \(63\%\) recovery) showed a dramatic reduction in the acetophenone impurity, to almost negligible amounts (Figure 3.35b). The crystallization purified the 4-bromoacetophenone very well.
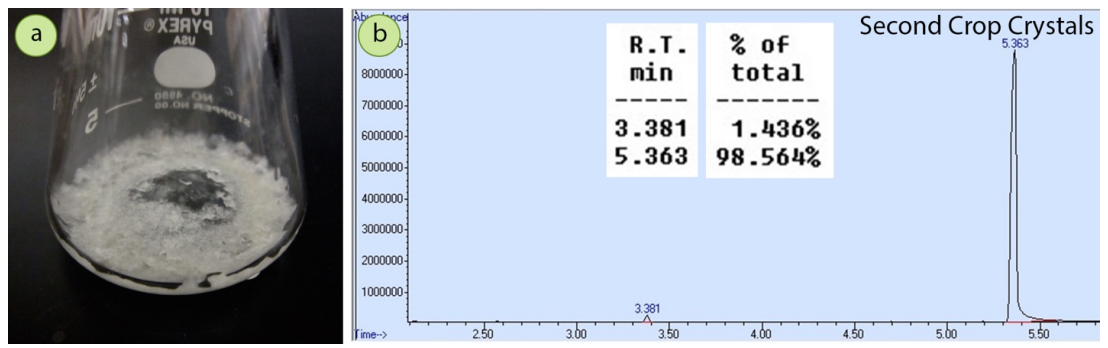
The filtrate from the first crystallization was boiled to reduce the solvent level, and a second crop of crystals was obtained (\(0.18 \: \text{g}\), combined recovery of \(77\%\)). The second crop crystals had a noticeable yellow tint while the first crop crystals were pure white. A GC spectrum of the second crop crystals (Figure 3.36b) showed the acetophenone had incorporated somewhat into the crystalline solid, demonstrating that second crop crystals are less pure than first crop crystals.
Recovery of a second crop of crystals is not commonly done in undergraduate settings as the additional recovery from a second crop is usually modest (Figure 3.37). However, the process may be done if the material is quite expensive, or if a large amount remains dissolved in the mother liquor. For the latter reason, it is a good idea to save the mother liquor until a yield can be calculated. If the recovery is quite low, a second crystallization might be attempted.
\(^{13}\)GC method: \(100^\text{o} \text{C}\) hold for 2 min, \(25^\text{o} \text{C}\) ramp per min to \(210^\text{o} \text{C}\) (6.4 min), solvent delay 2.00 min.