
6.2B: Step-by-Step Procedures for Boiling Point Determination
- Page ID
- 95736

There are a variety of methods by which a sample's boiling point can be determined, including distillation, reflux, and by using a Thiele tube. The most straightforward method uses a Thiele tube, and has the advantage of using less than \(0.5 \: \text{mL}\) of material.
Distillation Method
There are simpler methods than a distillation to measure a compound's boiling point, and it is recommended to explore other options (e.g. Thiele tube) if this is the only goal. However, if materials are limited, or if a purification is planned anyhow, a distillation can be used to determine a compound's boiling point. The distillation technique is discussed in great detail in Chapter 5.
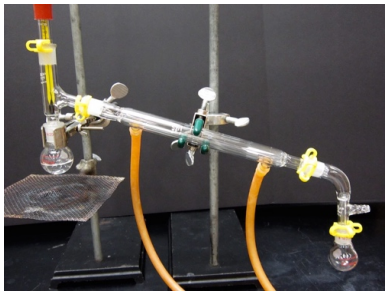
A simple distillation should suffice for most situations (Figure 6.19), and at least \(5 \: \text{mL}\) of sample should be used in the distilling flask along with a few boiling stones or stir bar. As the bulk of the material distills, the highest temperature noted on the thermometer corresponds to the boiling point. A major source of error with this method is recording too low a temperature, before hot vapors fully immerse the thermometer bulb.\(^5\) Be sure to monitor the thermometer periodically, especially when the distillation is active. Record the barometric pressure along with the boiling point.
Reflux Method
A reflux setup can also be used to determine a compound's boiling point. Reflux is when a liquid is actively boiling and condensing, with the condensed liquid returning to the original flask. It is analogous to a distillation setup, with the main difference being the vertical placement of the condenser.
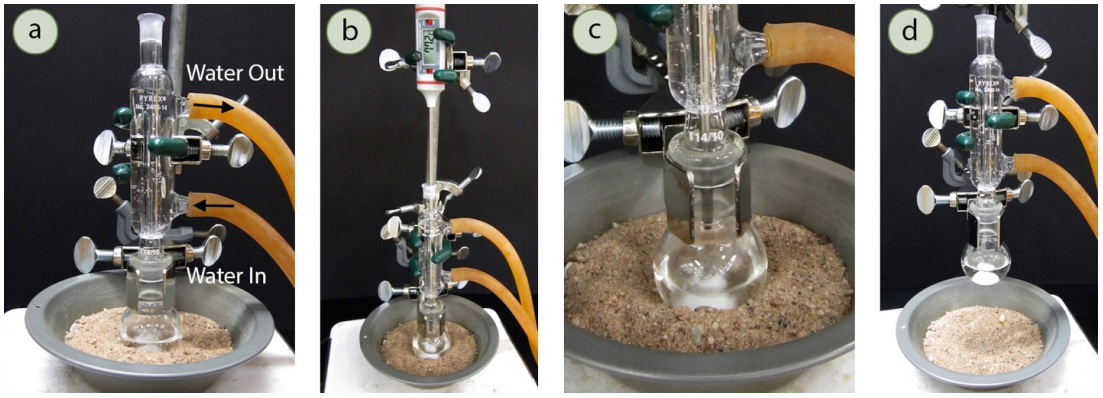
If materials are available, the best reflux setup for this application is shown in Figure 6.20b and uses a microscale condenser and digital thermometer. The setup uses \(5 \: \text{mL}\) of liquid, and a few boiling stones or stir bar. The condenser is attached to the round bottomed flask, with the lower water hose connected to the water spigot and the upper water hose draining to the sink. It is important to check that the joint connecting the flask and condenser is securely fastened. The liquid is brought to a boil on a sand bath, and the thermometer is placed low into the apparatus (Figure 6.20c) such that the bottom inch is between the boiling liquid and the bottom of the condenser. In this position, the thermometer can accurately measure the hot vapors and the temperature will stabilize at the compound's boiling point.\(^6\) Record the barometric pressure along with the boiling point.
Although it might seem prudent to plunge the thermometer directly into the boiling liquid, it is possible the liquid may be superheated, or hotter than its boiling point. After determining the boiling point, the flask should be raised from the sand bath (Figure 6.20d) to cool, and condenser kept running until the flask is only warm to the touch. At this point the setup can be dismantled.
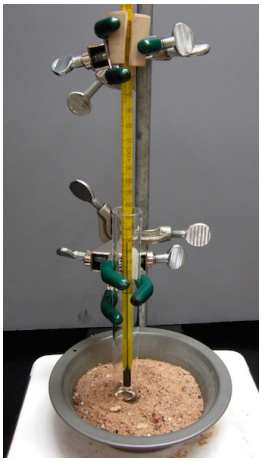
If a microscale condenser is not available, an alternative reflux method can also be used as shown in Figure 6.21. Roughly \(5 \: \text{mL}\) of sample is placed in a medium test tube (\(18\) x \(150 \: \text{mm}\)) with thermometer clamped inside so it does not touch the sides of the glass. The apparatus is carefully heated on a sand bath such that reflux happens controllably and vapors do not escape from the tube. The temperature during reflux will eventually stabilize (this takes some time), and the highest temperature noted corresponds to the compound's boiling point.\(^6\) The boiling points measured with this method may have significant error if the boiling point is very low or high (\(< 70^\text{o} \text{C}\) or \(> 150^\text{o} \text{C}\)) as low boiling compounds boil away too easily and high boiling compounds tend to cool too easily.
Thiele Tube Method
Thiele Tube Theory
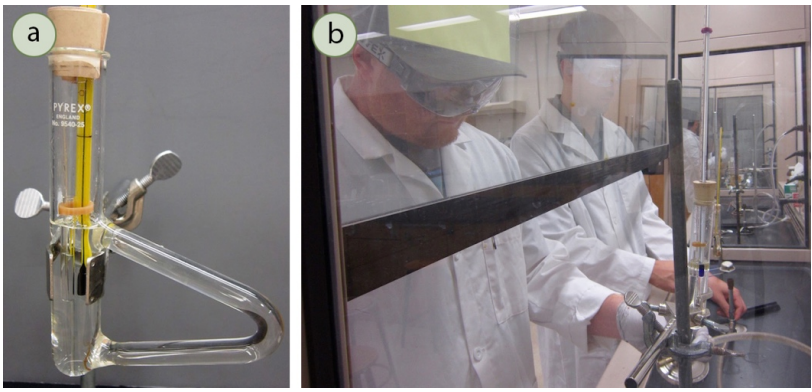
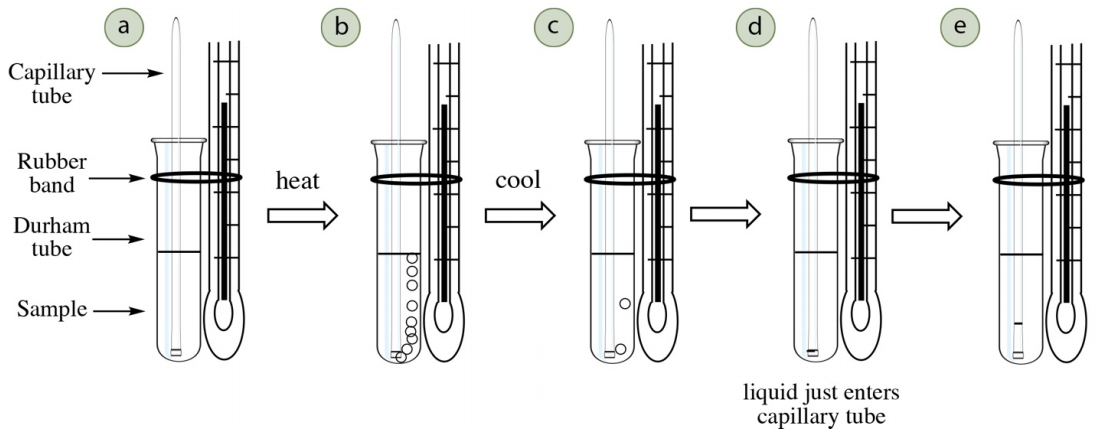
The Thiele tube method is one of the simplest methods to determine a compound's boiling point, and has the advantage of using small amounts of material (less than \(0.5 \:\text{mL}\) of sample). The sample is placed in a small tube along with an inverted capillary tube. The setup is attached to a thermometer (Figure 6.23a) and heated inside a Thiele tube (Figure 6.22a) to slightly higher than the compound's boiling point (which is evidenced by a continuous stream of bubbles emerging from the capillary tube). The tube is then allowed to cool, and the moment liquid is drawn into the capillary tube, the temperature is the compound's boiling point.
This method utilizes the definition of boiling point: the temperature where the compound's vapor pressure equals the applied (atmospheric) pressure. The inverted capillary tube acts as a reservoir to trap the compound's vapors. As the apparatus is heated, the air initially trapped in the capillary tube expands and causes bubbles to emerge from the tube (Figure 6.23b). With further heating, the compound's vapors eventually displace all of the trapped air, which is why heat is applied until there is a continuous stream of bubbles.
When the apparatus is cooled, eventually the pressure inside the capillary tube (due solely to the compound's vapors) will match the atmospheric pressure, at which point the bubbles will slow and liquid will be drawn into the tube. The temperature where this begins is the compound's boiling point (Figure 6.23d).
Thiele Tube Procedure
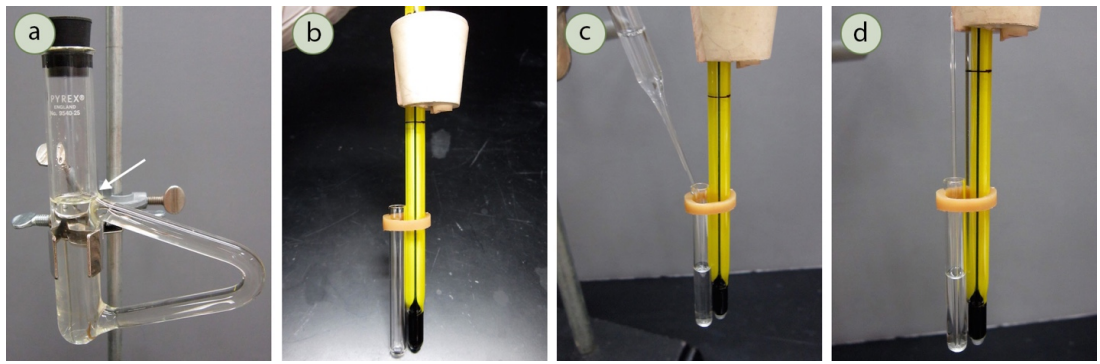
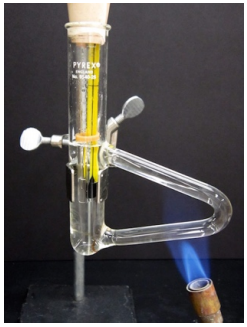
- Obtain a Thiele tube and clamp it to a ring stand in the fume hood (Figure 6.24a). The tube is normally filled with clear mineral oil, but it may have darkened from oxidation or spilled compounds. If the oil is quite dark, it should be replaced. The oil should be filled to at least \(1 \: \text{cm}\) higher than the top triangular arm (an appropriate oil level is indicated in Figure 6.24a), and if too low the oil will not circulate as needed (Figure 6.25c).
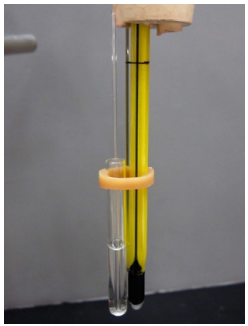
- Insert a thermometer into a one-holed rubber stopper with a slit down one side. Attach a small glass vial ("Durham tube", or \(6\) x \(50 \: \text{mm}\) culture tube) to the thermometer with a small rubber band (Figure 6.24b). The bottom of the vial should be flush with the bottom of the thermometer.
- Fill the vial about half-full with sample, which will require between \(0.25\)-\(0.5 \: \text{mL}\) of sample (Figure 6.24c).
- Insert a capillary tube into the sample (the same type that is used for melting points), open end down and sealed end up (Figure 6.24d).
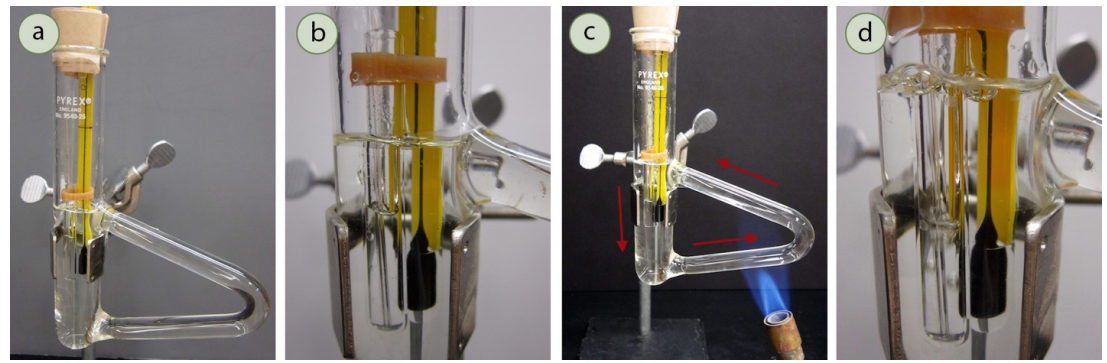
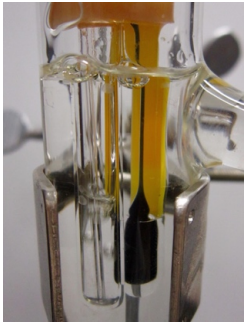
- Place the rubber stopper and thermometer assembly into the Thiele tube, adjusting the height so that the sample is midway (if possible) inside the tube (Figure 6.25a). The rubber band should be higher than the top of the mineral oil (Figure 6.25b), keeping in mind that the oil may expand somewhat during heating. The thermometer should not touch the sides of the glass, and if it does it should be clamped in such a way that it no longer touches.
- Heat the oil gently on the side arm of the Thiele tube with a microburner if available, or Bunsen burner using a back and forth motion (Figure 6.25c). As the oil warms and becomes less dense, it will rise and travel up the triangular portion of the tube. The cooler, denser oil will sink, thereby creating a current as shown in Figure 6.25c). This method is an excellent way to indirectly and slowly heat the sample.
- Although bubbles should not be seen in the Thiele tube as it warms, they commonly are seen if the tube had been used previously for boiling point determinations. In this method, the rubber band occasionally breaks causing the sample to fall into the oil and contaminate it. If the oil is not subsequently changed, the sample may boil when heated in the tube. It is okay to continue heating a Thiele tube if bubbles are seen.
- Studies of this method\(^7\) have determined that it is best to heat the oil gently and in a continual manner, as stopping and starting have caused the results to suffer.
- Continue heating until a vigorous stream of bubbles emerges from the tip of the capillary tube (Figure 6.25d), such that individual bubbles can barely be distinguished. The purpose of this step is to expunge the air originally present in the capillary tube and replace it with the sample's vapor. Do not heat so vigorously that the entire sample boils away. when bubbles are vigorously emerging from the capillary tube, the vapor pressure inside the tube is greater than the atmospheric pressure (the oil is at a higher temperature than the boiling point).
- Turn off the burner and allow the apparatus to cool. The bubbles will slow and eventually stop. At some point the vapor pressure inside the capillary tube will equal the atmospheric pressure and liquid will be drawn into the tube. The boiling point should be recorded as the temperature when liquid just begins to enter the capillary tube (Figure 6.26b).
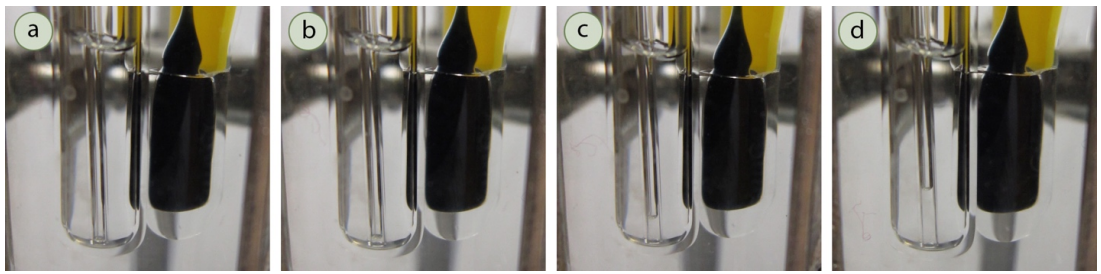
- Record the atmospheric pressure along with the boiling point.
Thiele Tube Summary
 |
 |
 |
 |
|
Fill a small tube about half-full with sample and insert a capillary tube, closed end up. Attach the tube to a thermometer with a small rubber band. |
Insert the sample into a Thiele tube, so that the sample is near the middle of the oil. Heat the arm of the Thiele tube with a burner, gently and continuously. |
Heat until a vigorous stream of bubbles emerges from the capillary tube, such that individual drops can be barely distinguished. |
Remove the heat and allow the oil to cool. The boiling point is the temperature when the oil just begins to enter the capillary tube. |
\(^5\)The author found the boiling point of ethanol to be \(76^\text{o} \text{C}\) \(\left(765 \: \text{mm} \: \ce{Hg} \right)\) with distillation (literature boiling point is \(78^\text{o} \text{C}\).
\(^6\)The author found the boiling point of ethanol (literature boiling point of \(78^\text{o} \text{C}\)) to be \(77.2^\text{o} \text{C}\) with the microscale condenser setup and \(76^\text{o} \text{C}\) with the test tube reflux setup \(\left( 765 \: \text{mm} \: \ce{Hg} \right)\). Note: Different thermometers were used with each method.
\(^7\)Blank, E. W., Ind. Eng. Chem. Anal. Ed., 1933, 5(1), p 74-75.