4. Calibrating a pH electrode
- Page ID
- 243805

\( \newcommand{\vecs}[1]{\overset { \scriptstyle \rightharpoonup} {\mathbf{#1}} } \) \( \newcommand{\vecd}[1]{\overset{-\!-\!\rightharpoonup}{\vphantom{a}\smash {#1}}} \)\(\newcommand{\id}{\mathrm{id}}\) \( \newcommand{\Span}{\mathrm{span}}\) \( \newcommand{\kernel}{\mathrm{null}\,}\) \( \newcommand{\range}{\mathrm{range}\,}\) \( \newcommand{\RealPart}{\mathrm{Re}}\) \( \newcommand{\ImaginaryPart}{\mathrm{Im}}\) \( \newcommand{\Argument}{\mathrm{Arg}}\) \( \newcommand{\norm}[1]{\| #1 \|}\) \( \newcommand{\inner}[2]{\langle #1, #2 \rangle}\) \( \newcommand{\Span}{\mathrm{span}}\) \(\newcommand{\id}{\mathrm{id}}\) \( \newcommand{\Span}{\mathrm{span}}\) \( \newcommand{\kernel}{\mathrm{null}\,}\) \( \newcommand{\range}{\mathrm{range}\,}\) \( \newcommand{\RealPart}{\mathrm{Re}}\) \( \newcommand{\ImaginaryPart}{\mathrm{Im}}\) \( \newcommand{\Argument}{\mathrm{Arg}}\) \( \newcommand{\norm}[1]{\| #1 \|}\) \( \newcommand{\inner}[2]{\langle #1, #2 \rangle}\) \( \newcommand{\Span}{\mathrm{span}}\)\(\newcommand{\AA}{\unicode[.8,0]{x212B}}\)
(Note - The following procedure was developed using the MicroLab Interface. Proceed with calibrating a pH electrode according to the manufacturer protocol).
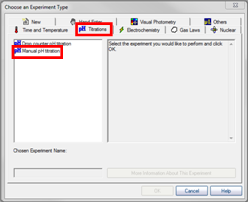
- Turn on the MicroLab interface and select the Titration tab. Choose “Hand entered titration”.
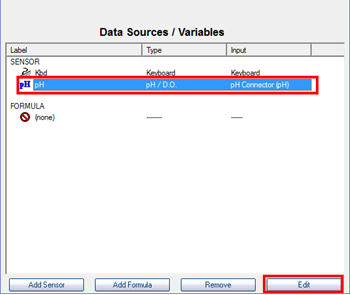
- Select the pH sensor and choose “Edit”.
- Click on “Perform New Calibration”.
- Fill three disposable plastic cups approximately 2/3rds full with pH 4, 7, and 10 buffer solutions.
- In Microlab, select “Add Calibration Point”.
- In the window which opens, enter the actual pH of the buffer in the box labelled “Actual Value”, and wait for the meter to stabilize. You will know it is stable when the red bar stays within the green region. Don’t worry about the graph that you see because it will autorange, meaning that once it is stable a very small range will be used, and it will appear to still be fluctuating significantly even though only very small changes are taking place.
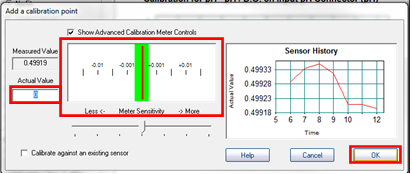
- Rinse the pH electrode with deionized water into a beaker, and then place it into one of the buffer solutions. Ensure that the tip is completely immersed in the solution. Allow the reading to stabilize, and then enter the value of the buffer and click “OK”.
- Repeat the previous step for the other two buffer solutions.
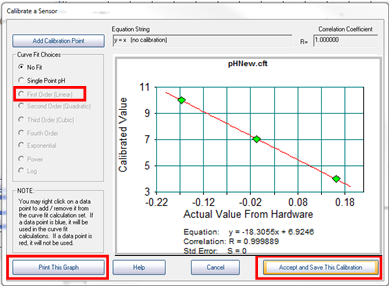
- At this point you should have three points on the graph that form a straight line. Now select “First Order” under curve fit options, and print the resulting graph. This is your only opportunity to print your calibration curve! Click “Accept and Save This Calibration”, for units enter “pH”, and assign a filename. Be sure to record the filename and directory in your lab notebook. After saving the calibration, click “Finish”.